
Written byChristinaUpdated on Oct 10, 2025
Fix External Hard Drive Not Working on macOS Tahoe
Approved byGerhard Chou
Before we start: Be careful to use the external hard drives. If an external hard drive is not working on macOS Tahoe, it's best to recover the important files from the drive with Donemax Data Recovery for Mac. Then try the methods in this guide to fix the drive.
PAGE CONTENT:
macOS Tahoe, Apple's latest operating system, comes with performance improvements, a refreshed user experience, and enhanced compatibility with modern hardware. While the update has been welcomed by many Mac users, some have encountered a frustrating issue: their external hard drive is not working or not recognized after upgrading to macOS Tahoe.
External drives are essential for storing files, backing up data, and transferring content between devices. When macOS fails to detect them, it can disrupt productivity, lead to concerns about data safety, and even result in potential data loss. Fortunately, in most cases, the issue can be resolved without professional repair.
This guide will walk you through the most common reasons why an external hard drive not working on macOS Tahoe and provide step-by-step solutions, along with preventive tips and data recovery options if the drive becomes inaccessible.
Common Reasons for External Hard Drive Not Working on macOS Tahoe
Before applying fixes, it's helpful to understand what might be causing the issue. Here are the most common reasons:
- Faulty USB or Thunderbolt Cable/Port – A defective cable or port can prevent the Mac from recognizing the drive.
- Drive Not Mounted – The system may detect the drive but fail to mount it automatically in Finder.
- File System Incompatibility – Drives formatted in NTFS or other unsupported formats may not be writable or readable on macOS Tahoe.
- Disk Errors or Corruption – Improper ejection, power failures, or malware can corrupt the external drive.
- macOS Tahoe Bugs or Outdated Drivers – Newly released operating systems often have compatibility issues that are patched in later updates.
- Hardware Failure – In rare cases, the external drive itself may be failing.
By identifying the root cause, you can apply the correct fix more efficiently.
Preliminary Checks Before Troubleshooting
Before diving into advanced fixes, perform these basic checks:
- Check the Cable and Port: Try connecting the external drive with another cable or to a different USB/Thunderbolt port.
- Test on Another Device: Plug the drive into another Mac or PC to verify if it works there.
- Check for Power: Some external drives require external power. Ensure the power adapter (if any) is working.
- Open Disk Utility: Go to Applications > Utilities > Disk Utility and see if the drive appears there, even if it's not in Finder.
If your external hard drive shows up in Disk Utility but not Finder, it's often a mounting or format issue rather than hardware failure.
Fixes for External Hard Drive Not Working on macOS Tahoe
Fix 1. Check Finder Preferences
Sometimes, external drives are connected but hidden in Finder. To enable visibility:
- Open Finder. Go to the Finder menu > Settings.
![fix external hard drive not working on macOS Tahoe]()
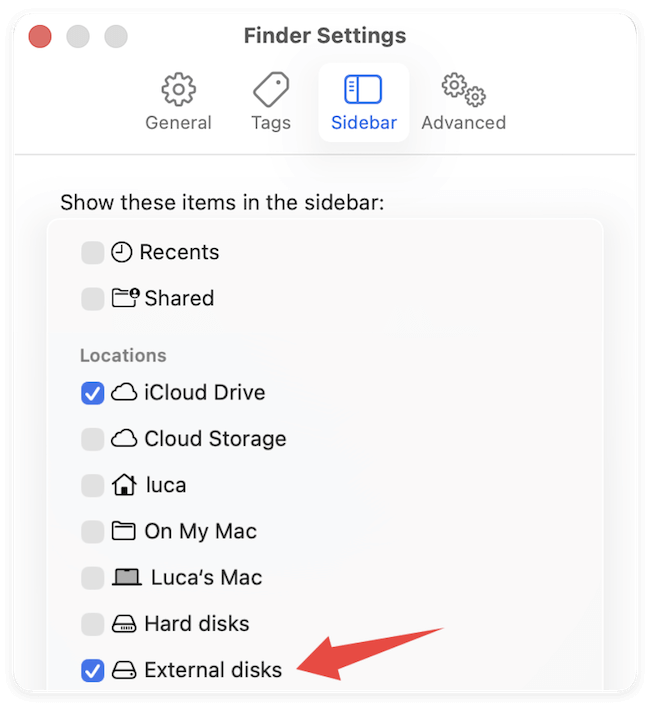
- Under the Sidebar tab, check External disks.
![fix external hard drive not working on macOS Tahoe]()
- Under the General tab, ensure External disks is selected under "Show these items on the desktop."
![fix external hard drive not working on macOS Tahoe]()


Now, your drive should appear on the Finder sidebar or desktop when connected.
Fix 2. Use Disk Utility to Mount or Repair the Drive
When your external hard drive is connected to macOS Tahoe but does not show up in Finder, it's often still visible in Disk Utility. Disk Utility is Apple's built-in disk management tool, allowing users to mount, erase, and repair drives. If your drive is detected but unmounted or corrupted, this is the first place to attempt a fix.
Step 1: Open Disk Utility
- Click on the Apple menu in the top-left corner.
- Select System Settings > General > Storage, then click Disk Utility (or search for "Disk Utility" in Spotlight).
- The left sidebar displays all available storage devices, including internal drives, external drives, and disk images.
Step 2: Check If the Drive Appears
- If your external drive appears but is grayed out, this means macOS recognizes it but hasn't mounted it for use.
- If the drive does not appear at all, the issue may be with the cable, port, or the drive's hardware itself.
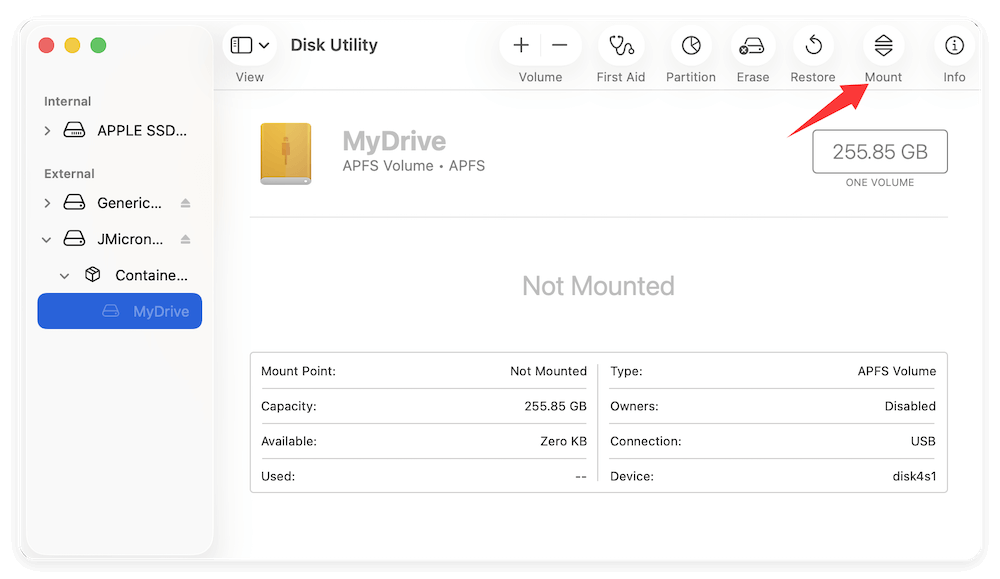
Step 3: Manually Mount the Drive
- Select your external hard drive from the left sidebar.
- Click the Mount button at the top.
- If successful, the drive will appear in Finder, and you'll be able to access your files.
If mounting fails, move to repairing the disk.
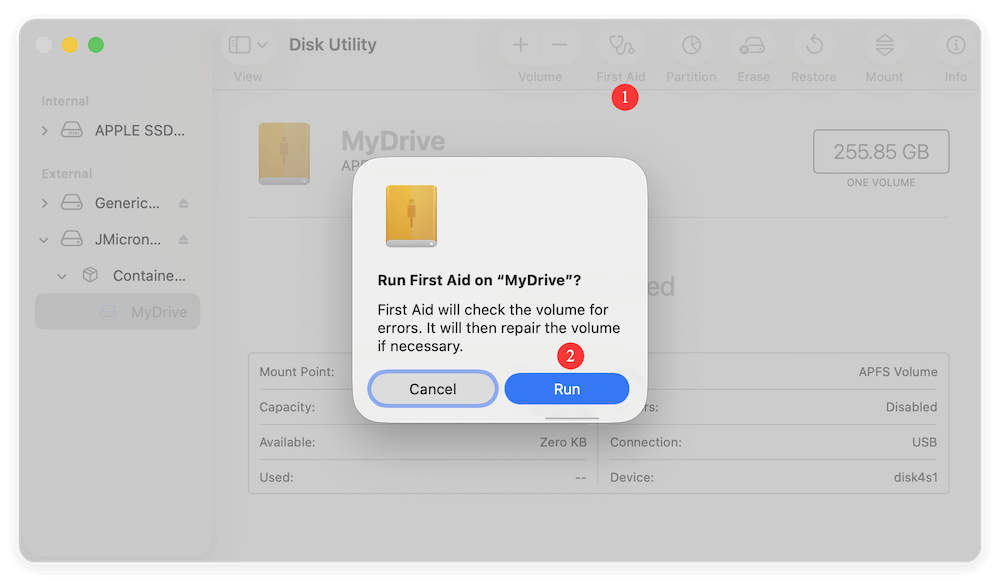
Step 4: Run First Aid to Repair Disk Errors
The First Aid function checks the drive for file system errors and attempts to repair them.
- Select the problematic drive in Disk Utility.
- Click First Aid from the top menu.
- When prompted, click Run.
- Disk Utility will scan the drive and attempt to fix directory issues, permission errors, and minor corruptions.
- When the process completes, restart your Mac and reconnect the drive.
Step 5: Advanced Repair with Terminal (if First Aid Fails)
If Disk Utility fails to repair the drive, you can attempt manual repairs using Terminal:
- Open Terminal from Utilities via Applications.
- Type:
diskutil list
This command lists all drives connected to your Mac. Note your external drive's identifier (e.g., disk2).
- To repair the drive, type:
diskutil repairDisk /dev/disk2
(Replace disk2 with your drive's identifier.)
- Once the process completes, try mounting the drive again.
Step 6: Consider Reformatting (Last Resort)
If the drive remains inaccessible even after repairs, reformatting may be necessary. Remember, reformatting erases all data. If your data is valuable, attempt data recovery software before proceeding.
To reformat:
- Select your external hard drive in Disk Utility.
- Click Erase at the top.
- Choose a new format: APFS – Best for SSDs and modern Macs; Mac OS Extended (HFS+) – For compatibility with older Macs; exFAT – For cross-platform use with Windows and macOS.
- Name the drive and click Erase.
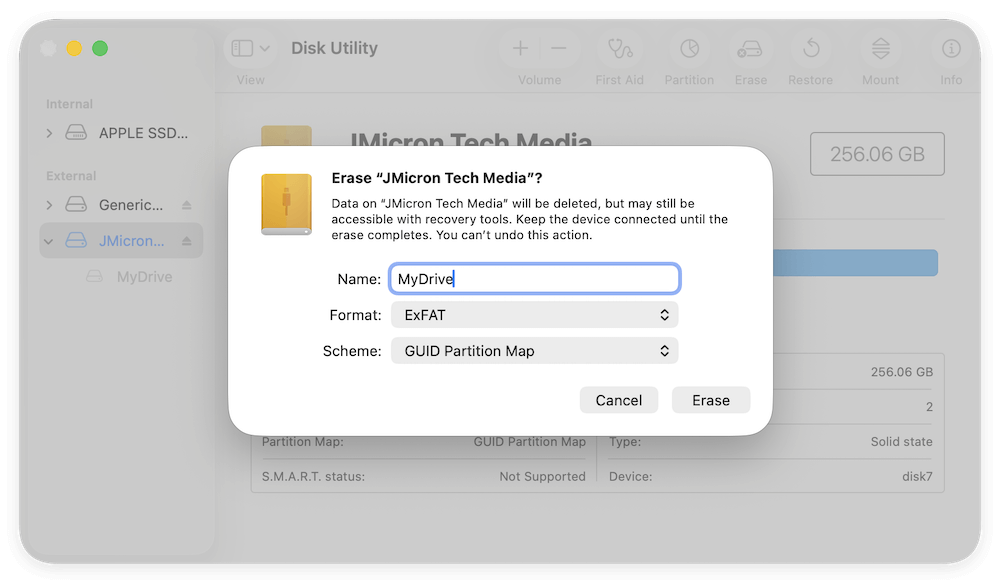
After formatting, the drive should mount and function normally.
Fix 3. Check File System Compatibility
macOS Tahoe supports APFS, HFS+ (Mac OS Extended), exFAT, and FAT32. However:
- NTFS drives (commonly used on Windows PCs) are read-only on Mac. You can open files but cannot modify or add new ones.
- If the external drive is formatted in NTFS and you need full read/write access, you have two options:
- Install third-party NTFS drivers for Mac, like Donemax NTFS for Mac.
- Reformat the drive to exFAT (compatible with both macOS and Windows) or APFS (Mac only).
Fix 4. Reset NVRAM/PRAM and SMC
Resetting system settings can resolve external drive detection problems:
To reset NVRAM/PRAM:
- Turn Off your Mac.
- Turn it on and immediately press and hold Option + Command + P + R for about 20 seconds.
To reset the SMC (for Intel Macs):
- Turn Off your Mac.
- On laptops: Hold Shift + Control + Option and press the power button. Release all keys, then restart.
- On desktops: Disconnect power for 15 seconds, reconnect, then restart.
(For Apple Silicon Macs, simply restart the system since SMC/NVRAM resets are automatic.)
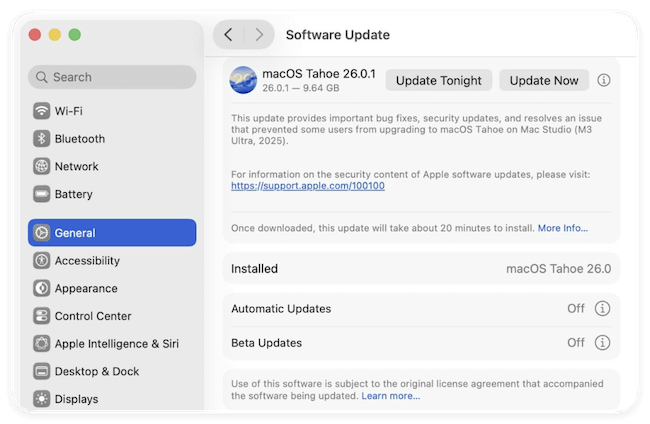
Fix 5. Update macOS Tahoe
Apple frequently releases bug fixes in minor updates. To ensure your Mac is up to date:
- Go to System Settings > General > Software Update.
- Install any available updates.
- Restart your Mac and reconnect the external drive.
Fix 6. Use Terminal to Mount the Drive
For advanced users, Terminal can be used to manually mount a drive:
- Open Terminal.
- Type:
diskutil list
This shows all connected drives. Find your external drive's identifier (e.g., disk2s1).
- Then type:
diskutil mount /dev/disk2s1
(Replace disk2s1 with your actual drive identifier.)
If successful, the drive should appear in Finder.
Data Recovery Options if the Drive Still Doesn't Work
If none of the above fixes work and your data is important, you may need to use data recovery software or consult professional services.
Donemax Data Recovery for Mac is the best data recovery tool recommended for macOS Tahoe. The software supports data recovery for APFS, HFS+, exFAT, NTFS, and more. It's beginner-friendly with deep scan options. Also, this recovery tool is effective for corrupted or RAW drives.
Here are the simple 3-step guide to recover data with Donemax Data Recovery for mac:
Step 1. Download and install the software. Connect the not working external hard drive to the Mac. Run the software and select the external drive from the device list.

Step 2. Click the Scan button and the software will deeply scan the drive to search for lost files automatically.

Step 3. Wait until the scan process is finished. Check and locate the wanted files first. Preview the files to confirm if they are recoverable. At last, select the desired files and click Recover button to save the files on another drive.

Best Practices for Data Recovery:
- Stop using the drive immediately to prevent overwriting files.
- Avoid formatting before attempting recovery.
- Always recover files to a separate storage device.
If software fails, consider a professional recovery service, especially for physically damaged drives.
Preventive Measures to Avoid Future Issues
Once you've fixed the problem, adopt these preventive habits:
- Always Eject Safely: Right-click the external drive and choose Eject before unplugging.
- Keep macOS Updated: Install regular system updates for stability and compatibility.
- Use Mac-Compatible File Systems: For smooth performance, format drives to APFS or exFAT.
- Regular Backups: Use Time Machine or cloud backups to avoid losing important files.
- Check Cables and Ports Periodically: Replace faulty accessories early to prevent data corruption.
Conclusion
An external hard drive not working on macOS Tahoe can be alarming, but in most cases, the issue is minor and easily fixable. By checking Finder preferences, repairing disks with Disk Utility, ensuring file system compatibility, resetting NVRAM/PRAM, and updating macOS, you can usually restore normal functionality.
If the drive still doesn't respond, data recovery software or professional help may be necessary. To avoid future problems, always eject drives properly, back up your files, and keep macOS updated.
With the right troubleshooting approach, you can quickly get your external hard drive working again and ensure your data remains safe and accessible on macOS Tahoe.
Donemax Data Recovery for Mac
Donemax Data Recovery for Mac is one of the best Mac data recovery software. It is easy-to-use and can help in recovering deleted, formatted, inaccessible or lost data from Mac HDD/SSD, external disk, USB drive, SD card, camera or other storage devices.
Related Articles
- Jan 14, 2025Convert GPM (GUID Partition Map, GPT) Disk to MBR (Master Boot Record) on Mac
- Jan 12, 20258 Fixes for Fixing WD Drive Utilities Not Recognizing My WD Drive
- Aug 21, 2023How to Convert RAW to NTFS Without Losing Data?
- Feb 19, 2025Fix The Parameter is Incorrect Without Losing Data
- Feb 22, 2024External Hard Drive Shows Wrong Storage Size, How to Fix It
- Mar 27, 2026Format an External Hard Drive Using CMD (2026 New)?

Contributing Writer
Christina
Christina is the senior editor of Donemax software who has worked in the company for 4+ years. She mainly writes the guides and solutions about data erasure, data transferring, data recovery and disk cloning to help users get the most out of their Windows and Mac. She likes to travel, enjoy country music and play games in her spare time.

Editor in chief
Gerhard Chou
In order to effectively solve the problems for our customers, every article and troubleshooting solution published on our website has been strictly tested and practiced. Our editors love researching and using computers and testing software, and are willing to help computer users with their problems