PAGE CONTENT:
When dealing with digital storage, the need for compatibility across multiple platforms often arises. Whether you're moving files between different operating systems such as Windows, macOS, and Linux, or you simply want to maximize the storage capacity of your external drives, formatting to the right file system is essential. Among the available file systems, exFAT (Extended File Allocation Table) is a versatile and widely supported option, making it an excellent choice for external drives like SD cards, USB flash drives or external hard drives. In this article guide, we will dive into the intricacies of formatting a drive to exFAT, exploring why it's useful, the steps for different operating systems, and some best practices to ensure a smooth process.
Understanding File Systems: Why Choose exFAT?
Before formatting a drive to exFAT, it's important to understand what file systems are and why exFAT is often the preferred choice for external drives. File systems define how data is stored and retrieved on a storage device. Each operating system has its own native file system. For example, Windows primarily uses NTFS (New Technology File System), while macOS relies on HFS+ or the more modern APFS (Apple File System). While these systems are optimized for their respective platforms, they aren't universally compatible.
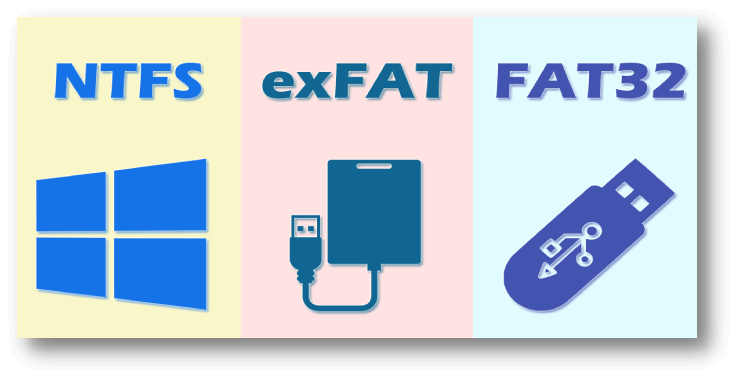
ExFAT vs. NTFS vs. FAT32
Find out the differences among exFAT, NTFS and FAT32, then choose the right file system for external hard drive, USB drive, SD card, etc.
Here's where exFAT comes into play. exFAT, developed by Microsoft in 2006, is designed to be lightweight and universally compatible across various operating systems. Unlike older file systems like FAT32, which has a file size limit of 4GB, exFAT supports much larger file sizes, making it ideal for video editing, large backups, and multimedia storage. Additionally, exFAT works seamlessly on both Windows and macOS without requiring additional drivers or software. Linux users can also use exFAT with the right drivers installed.
Key Advantages of exFAT:
- Cross-Platform Compatibility: Works on Windows, macOS, and Linux.
- No File Size Limits: Unlike FAT32, exFAT supports files larger than 4GB.
- Efficient with Large Storage Devices: Ideal for flash drives, SD cards, and external hard drives.
- Low Overhead: It's a lightweight file system, meaning it uses minimal resources and performs well on slower storage devices.
Preparing to Format Your Drive to exFAT
Before you format any drive, it's critical to back up all your data. Formatting will erase everything on the drive, and recovery can be difficult or impossible in many cases. Ensure that any important files are stored in a safe location.
Once you've backed up your data, decide which operating system you'll be using to format the drive. We'll cover the process for Windows, macOS, and Linux. Keep in mind that while the basic steps are similar, each operating system has its own nuances.
Steps for Backup:
- Identify Important Files: Go through your drive and identify the files you need to keep.
- Copy to a Backup Location: Use an external hard drive, cloud storage, or another safe location for your backup.
- Verify the Backup: Ensure all files are successfully copied and accessible from the backup.
Considerations Before Formatting:
- Usage Scenario: Think about where and how the drive will be used. If you plan to share files between Windows and macOS, exFAT is ideal. If you’ll only be using Windows, you might consider NTFS.
- Drive Health: Check the drive's health to ensure it's functioning properly before formatting.
How to Format a Drive to exFAT?
#1 Formatting a Drive to exFAT on Windows
The process of formatting a drive to exFAT on Windows is relatively straightforward, and you can use either the built-in File Explorer or the Disk Management tool. Both methods are easy to follow, but Disk Management gives you a bit more control if you're dealing with complex setups.
Method 1: Using File Explorer
- Connect the Drive: Plug the drive you want to format into your Windows PC.
- Open File Explorer: Navigate to This PC (or My Computer on older versions).
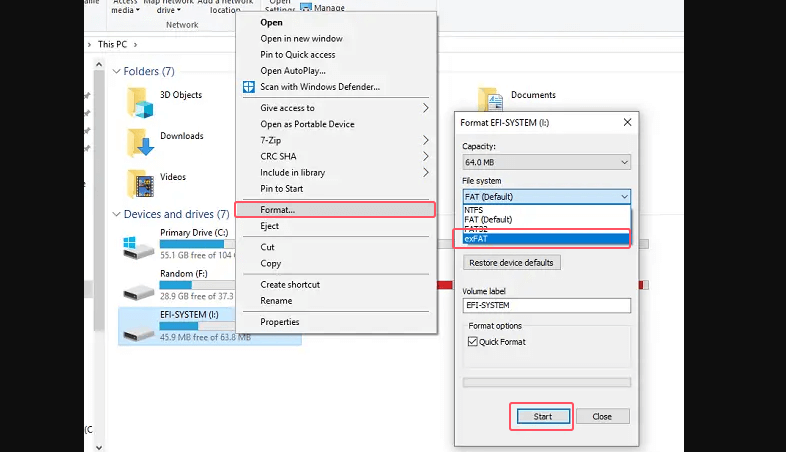
- Right-Click on the Drive: Select the drive you want to format, then right-click and choose Format from the dropdown menu.
- Choose exFAT: In the File System dropdown, select exFAT. Leave the Allocation Unit Size as the default unless you have specific requirements.
- Quick Format: If you're formatting a new or lightly used drive, leave the Quick Format option checked. For older drives or if you suspect issues with the drive, uncheck this option for a more thorough format.
![Quick Format]()
- Start the Format: Click Start to begin the formatting process. A warning will appear notifying you that all data on the drive will be erased. Confirm this to proceed.
- Completion: Once the process is complete, a notification will appear. You can now safely use the drive.
Method 2: Using Disk Management
- Open Disk Management: Press Windows + X and select Disk Management from the menu.
- Locate Your Drive: Find the drive you want to format in the list of available drives.
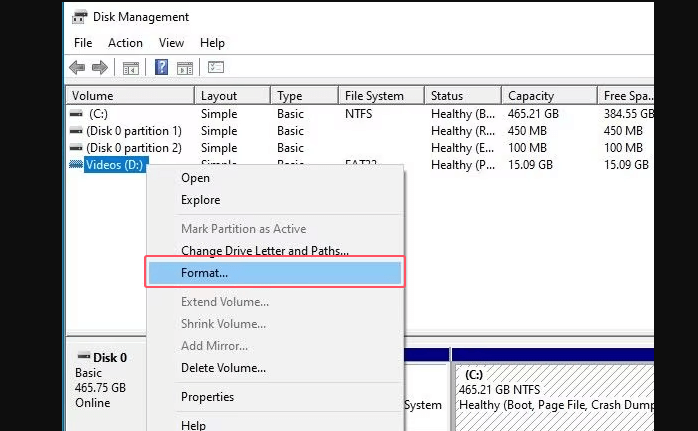
- Right-Click and Choose Format: Right-click on the volume you want to format and select Format.
![Right-Click and Choose Format]()
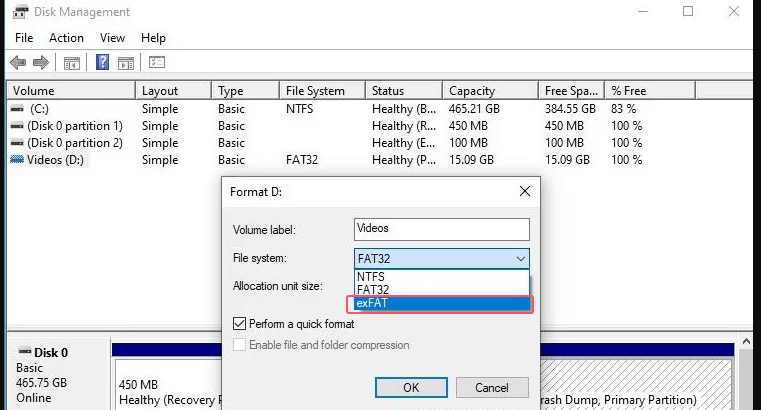
- Choose exFAT: Select exFAT as the file system and proceed with the format.
![Choose exFAT]()
- Finalize: Confirm the process, and once it's finished, your drive will be formatted to exFAT.
#2 Formatting a Drive to ExFAT on macOS
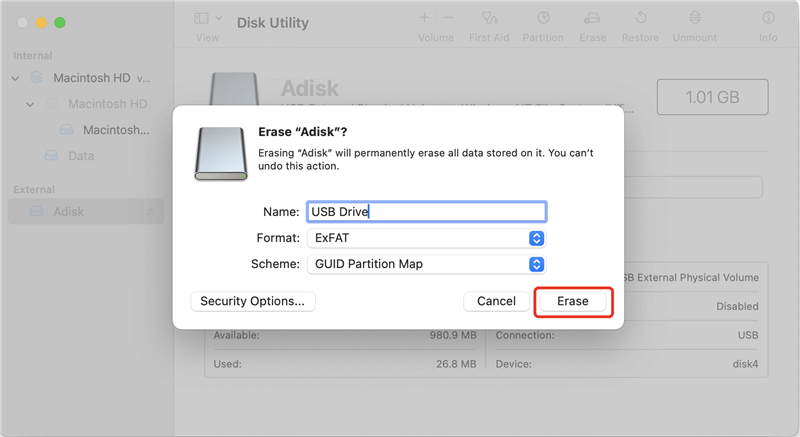
macOS users can easily format drives to ExFAT using the Disk Utility tool. This built-in utility offers an intuitive interface for managing storage devices and supports several file systems, including ExFAT.
Steps to Format on macOS:
- Connect the Drive: Plug your external drive into the Mac.
- Open Disk Utility: Launch Disk Utility by going to Utilities from Applications.
- Choose the Drive: Locate and pick the drive you wish to format from the list on the left.
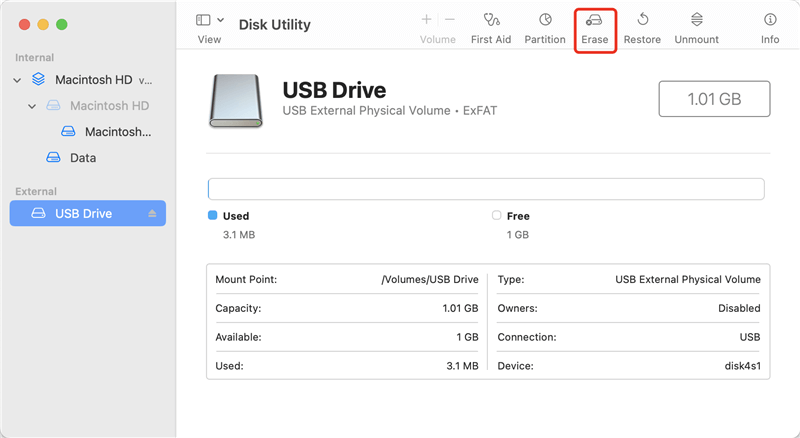
- To erase the drive, click the Erase button at the window's top.
![click the Erase button at the window's top]()
- Choose ExFAT: In the Format dropdown, select ExFAT. You can leave the Scheme as GUID Partition Map for most drives, though Master Boot Record (MBR) can be used if you're dealing with older systems.
- Name the Drive: Assign a name to the drive.
![Assign a name to the drive]()
- Erase: Click Erase to begin the formatting process.
- Completion: Once the format is complete, the drive is ready for use.
#3 Formatting a Drive to exFAT on Linux
While Windows and macOS natively support exFAT, Linux distributions may require the installation of additional packages to work with exFAT-formatted drives. Once exFAT support is installed, you can use the terminal or a graphical interface like GParted to format the drive.
Installing exFAT Support:
- Open Terminal: Press Ctrl + Alt + T to open the terminal.
- Install Required Packages:
- For Ubuntu and Debian-based distributions, run the following command:
sudo apt update
sudo apt install exfat-fuse exfat-utils
- For Fedora, use:
sudo dnf install exfat-utils fuse-exfat
- For Ubuntu and Debian-based distributions, run the following command:
Formatting via Terminal:
- List Disks: To identify your drive, run:
sudo fdisk -l
- Format the Drive: Once you've identified your drive (e.g., /dev/sdb1), use the following command to format it to exFAT:
sudo mkfs.exfat /dev/sdb1
- Completion: Once the command is executed, the drive will be formatted to exFAT.
Formatting via GParted:
- Install GParted:
sudo apt install gparted
- Launch GParted: Open GParted from the menu.
- Select the Drive: From the dropdown menu at the top right, choose the drive you want to format.
- Format to exFAT: Right-click the drive partition, select Format To, and choose exFAT.
- Apply: Click the green checkmark to apply the changes.
Common Issues and Troubleshooting
While formatting a drive is typically a smooth process, there are instances where things may go wrong. Below are common issues users face when formatting to exFAT and how to address them:
Issue 1: Drive Not Recognized
If your drive isn't recognized by your computer after plugging it in, it could be a hardware issue or a problem with the file system. Try connecting the drive to another computer to rule out hardware failure. If the drive is still not recognized, you may need to use a tool like Disk Management (on Windows) or Disk Utility (on macOS) to reinitialize the drive.
Issue 2: Formatting Error
Occasionally, an error may occur during the formatting process. This can happen if the drive is corrupted or damaged. If you're using the Quick Format option, try a full format instead. On Windows, you can use the CHKDSK command to check for errors on the drive:
chkdsk /f /r X:
Replace "X:" with your drive letter.
Issue 3: Drive Shows Wrong Capacity
If your drive shows less capacity than it should after formatting, it may have multiple partitions. Use Disk Management (Windows) or Disk Utility (macOS) to delete all partitions and create a single, unified partition.
How to Recover Lost Data after Formatting a Drive to exFAT?
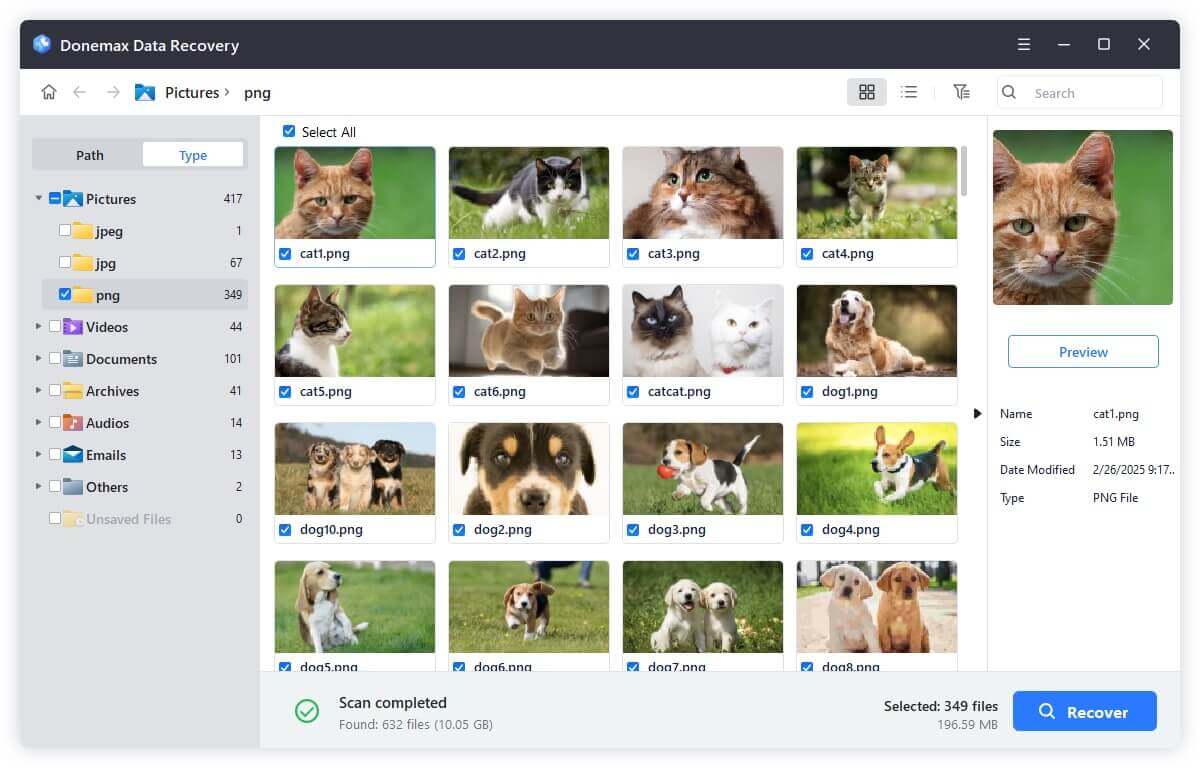
The erased or formatted data is not lost for good and can be recovered by data recovery software. If you have lost data due to formatting a drive to exFAT, you can use data recovery software - such as Donemax Data Recovery to unformat the drive & get all lost data back.
Step 1. Download and install Donemax Data Recovery on your computer. It can be installed on both Windows PC and Mac.
Step 2. Open Donemax Data Recovery, select the exFAT drive to start data recovery.
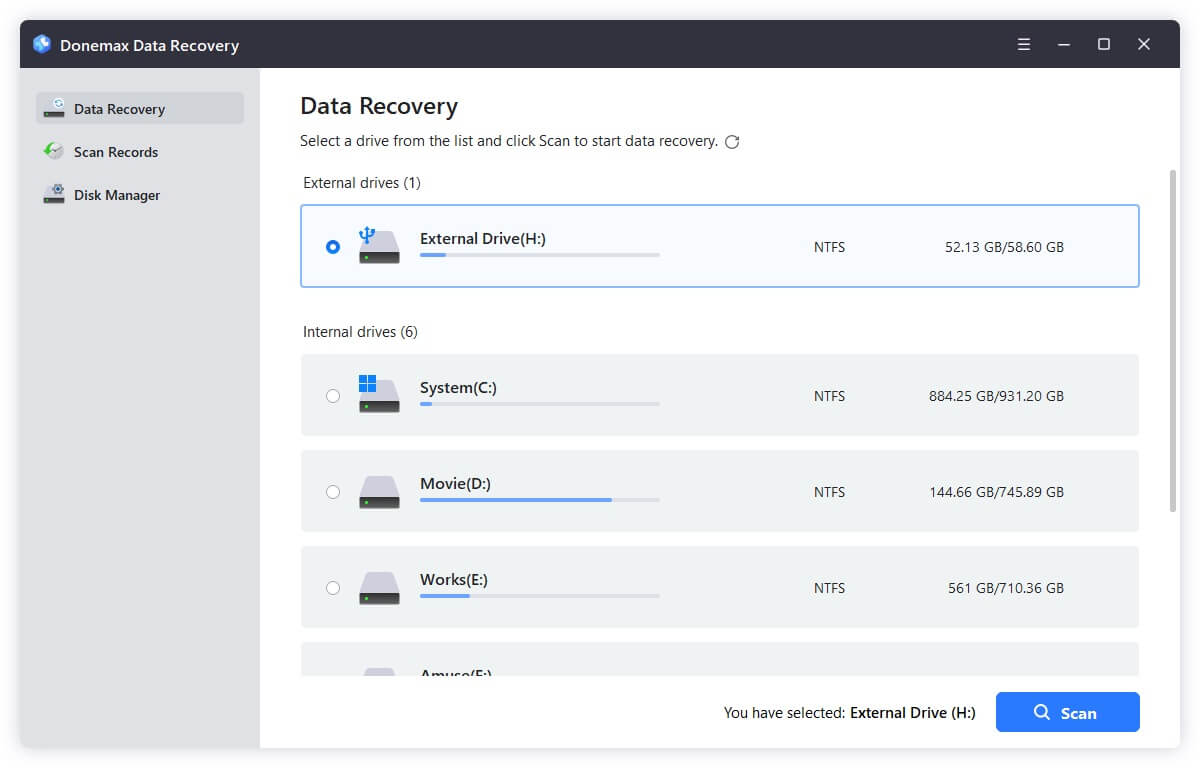
Step 3. Click on Scan button to deeply scan the exFAT drive and find all deleted/formatted/lost files.

Step 4. Once the scan is completed, you can preview all recoverable files. Then select the wanted files, click on Recover button to save them.
Best Practices for Using exFAT Drives
Once you've formatted your drive to exFAT, there are several best practices to follow to ensure optimal performance and longevity:
✦ Safely Eject the Drive: Always use the "Eject" option before unplugging your drive. This ensures that no data is being written when you remove it, which can prevent corruption.
✦ Defragment Regularly: If you use your drive for large files, consider defragmenting it regularly to maintain performance. This is particularly useful for HDDs.
✦ Scan for Errors: Periodically run error checks on your drive to ensure it's in good working order.
Conclusion
Formatting a drive to exFAT offers several advantages, especially for those who need cross-platform compatibility without the file size limitations of FAT32. Whether you're using Windows, macOS, or Linux, the process is straightforward and can be done with built-in tools or minimal additional software. By complying the process described in this article, you can ensure that your drive is properly formatted and ready for use across multiple devices. With the right care, an exFAT-formatted drive can provide reliable and efficient storage for years to come.
FAQs About Formatting a Drive to exFAT
1. How to format a drive to exFAT on Windows PC?
Just connect the drive to your computer. Open This PC find and right-click the drive, choose Format. Then select exFAT as the file system, click Start to format the drive to exFAT.
2. How to format a drive to ExFAT on Mac?
Make a backup of your data, then open Disk Utility to format the drive to ExFAT:
- Go to Launchpad > Other > Disk Utility, open Disk Utility.
- Select the drive, click Erase.
- Select ExFAT as the file system.
- Click Erase again to format the drive to ExFAT.
3. How to recover lost data from a formatted drive?
If you have lost data due to formatting a drive to exFAT, you can use data recovery software to unformat the drive:
- Download and install Donemax Data Recovery, open it.
- Select the formatted drive.
- Click on Scan button to deeply scan the formatted drive.
- Preview and recover files after scanning.
4. How to wipe an exFAT drive before selling or donating?
If you want to permanently erase all data from a drive, just use disk wipe software to wipe the drive:
- Download and install Donemax Data Eraser, open it.
- Choose Erase Hard Drive mode.
- Select the exFAT drive or other drive.
- Click on Erase Now button to erase all data from the drive.
Once the process gets finished, all data stored on the selected drive is lost for good and cannot be recovered by any method.
Related Articles
- Aug 20, 2025Windows Boot Repair Tool: Guide to Fix Startup Problems
- Oct 09, 2024Fix Error Code 43 on Windows: A Comprehensive Guide
- Oct 05, 2024How to Format an APFS Drive to ExFAT: A Comprehensive Guide
- May 09, 2025Can't Find Recycle Bin on Windows Desktop? Here's How to Fix It
- May 09, 2025System Restore on Windows: A Detailed Guide
- Jun 24, 2025How to Format Hard Drive on Window 7?

Maria
Maria is one of the senior writers & editors of Donemax who lives and works in Sydney, Australia. She loves PC, Mac and Internet Technology. She has 6 years of writing articles about data recovery on PC/Mac, disk cloning solution, data eraser and computer OS optimization, etc. She is also interested in testing various software and digital products.

Gerhard Chou
In order to effectively solve the problems for our customers, every article and troubleshooting solution published on our website has been strictly tested and practiced. Our editors love researching and using computers and testing software, and are willing to help computer users with their problems
