Written byChristinaUpdated on May 22, 2026
How to Fix SanDisk USB Drive Not Recognized?
Approved byGerhard Chou
PAGE CONTENT:
SanDisk USB drives are widely used for their reliability and ease of use. However, encountering an issue where the USB drive is not recognized can be frustrating, especially if it contains important data. This article provides a comprehensive guide to diagnosing and resolving the problem step by step.
Why SanDisk USB Drive Can't Be Recognized?
Before fixing the unrecognized SanDisk USB drive, it's important to understand why your SanDisk USB drive might not be recognized:
- Faulty USB Port or Connection: A damaged or malfunctioning USB port can prevent proper communication between the device and the computer.
- Outdated or Corrupt USB Drivers: If the drivers required for USB devices are outdated, corrupt, or missing, the drive won't function properly.
- File System Errors or Corruption: Corrupted file systems due to improper ejection or virus attacks can make the drive unreadable.
- Power Supply Issues: USB ports with insufficient power may fail to detect high-power devices like flash drives.
- Hardware Failure: A physically damaged USB drive may not respond, even if connected to a functioning port.
- Virus or Malware: Malicious software can interfere with the USB drive's functionality, causing it to remain undetected.
How to Fix Unrecognized SanDisk USB Drive?
Software-Based Troubleshooting to Fix Unrecognized SanDisk USB Drive
When your SanDisk USB drive isn't recognized, the problem often lies in the system's software configuration or file system errors. Below are detailed steps to address these issues.
Method 1. Update SanDisk USB Drivers
Drivers are essential for communication between the operating system and hardware devices. Outdated or corrupt drivers can prevent the system from detecting your USB drive.
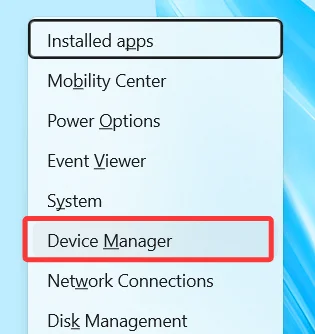
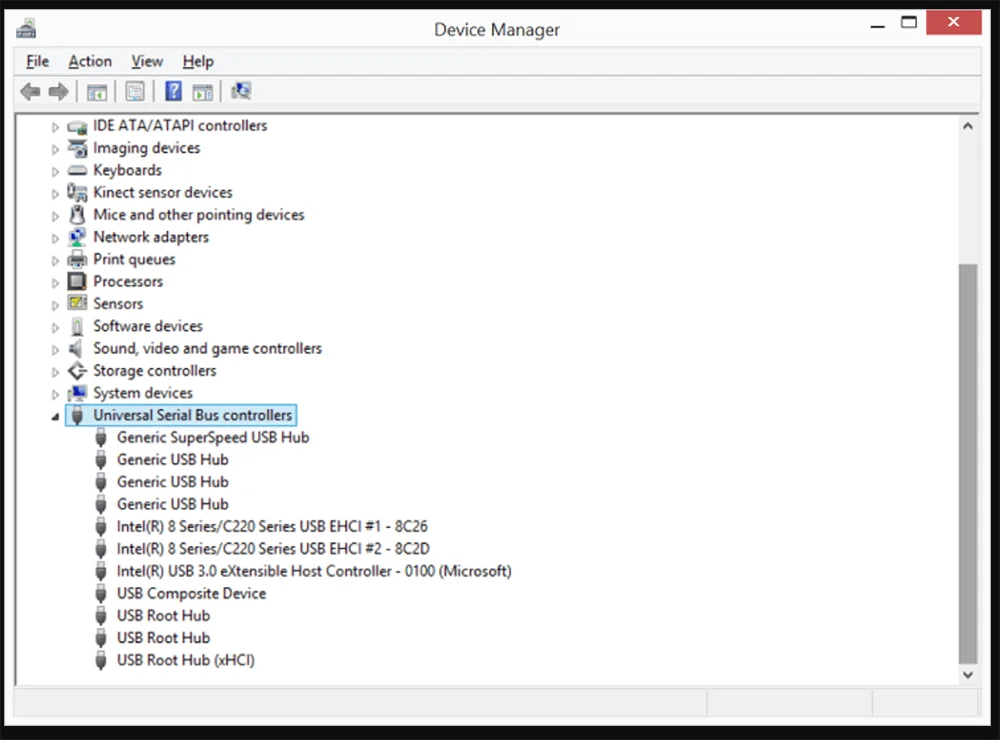
Step 1. Access Device Manager: Choose Device Manager from the menu by pressing Win + X.
Step 2. Locate USB Controllers:
- Make the section on Universal Serial Bus controllers larger.
- Search for any gadget that has a yellow triangle on it, which signifies a problem.
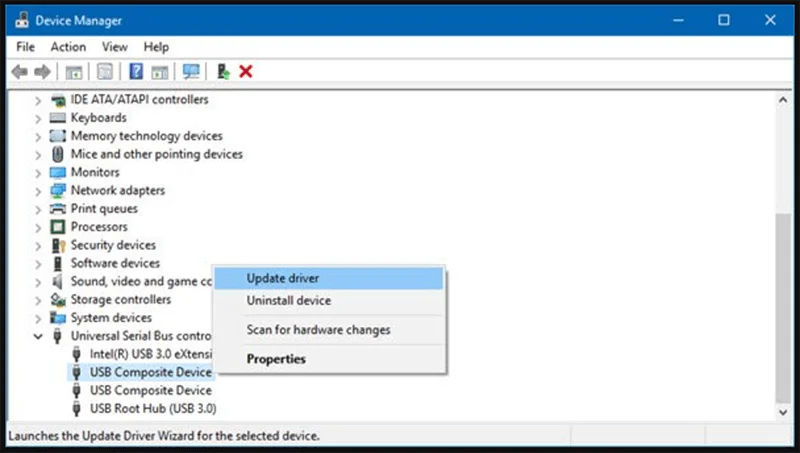
Step 3. Update Drivers:
- Right-click on the USB Root Hub or any listed USB controller.
- Choose "Update driver."
![Update Drivers]()
- Select "Automatic Driver Search" to allow Windows to locate the most recent driver.
Alternative Method:
- Visit the SanDisk website or your PC manufacturer's support page.
- Install the most recent drivers for your system after downloading them.
Updating drivers ensures compatibility and can fix USB recognition problems without requiring further steps.
Method 2. Scan for Hardware Changes
Sometimes, your system might fail to detect newly connected devices due to temporary glitches. Scanning for hardware changes forces Windows to recognize new hardware.
Step 1. Open Device Manager as explained above.
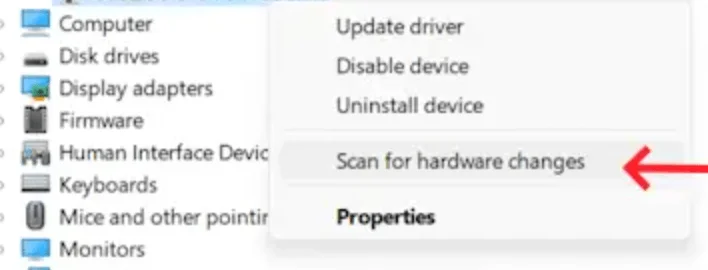
Step 2. Right-click on your computer's name (listed at the top).
Step 3. Select Scan for hardware changes from the dropdown menu.
Step 4. Wait for the system to identify and initialize any connected USB devices.
This quick method often resolves issues caused by missed hardware detection during startup or device connection.
Meethod 3. Run Disk Management Tools
If your USB drive is physically connected but still not showing up, it might not have been assigned a drive letter, or it may appear as unallocated in the Disk Management tool.
Step 1. Choose Disk Management from the menu by pressing Win + X.
Step 2. Look for your USB drive in the list of storage devices.
- If it appears but lacks a drive letter, it will need to be assigned one.
- If it appears as Unallocated, the disk needs to be initialized or formatted.
Assign a Drive Letter:
Step 1. Give the USB disk a right-click.
Step 2. Choose Change Driver Letter and Paths...
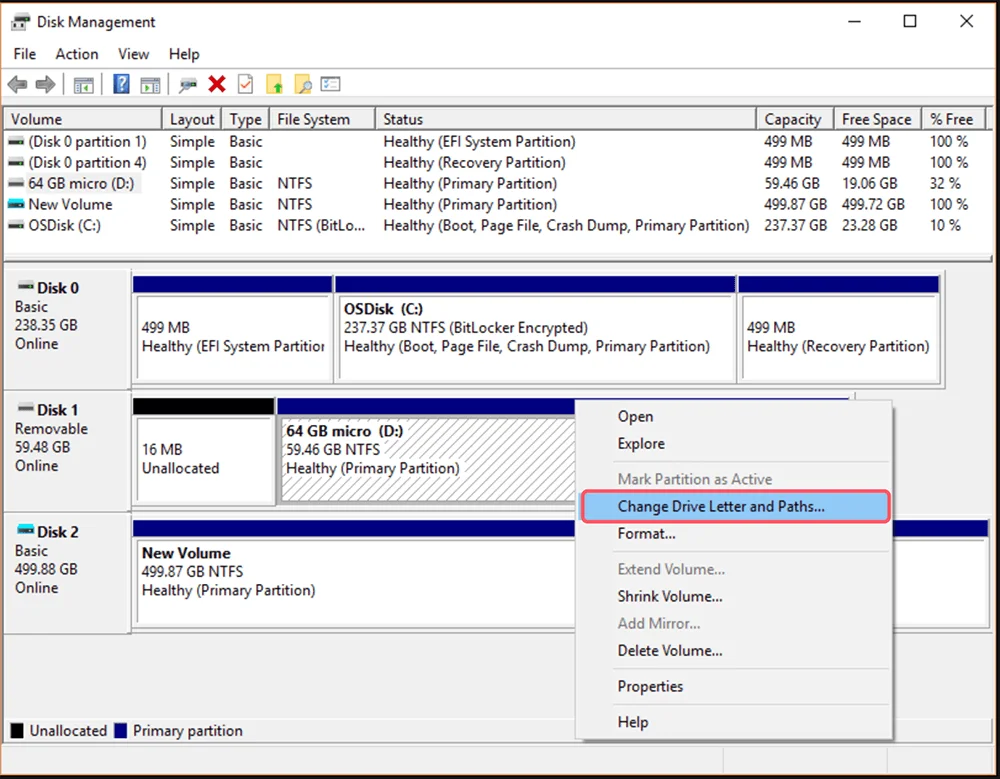
Step 3. Select a letter (such as E:), click Add, and then select OK.
Initialize or Format the Disk:
Step 1. Choose New Simple Volume from the menu when you right-click on the unallocated space.
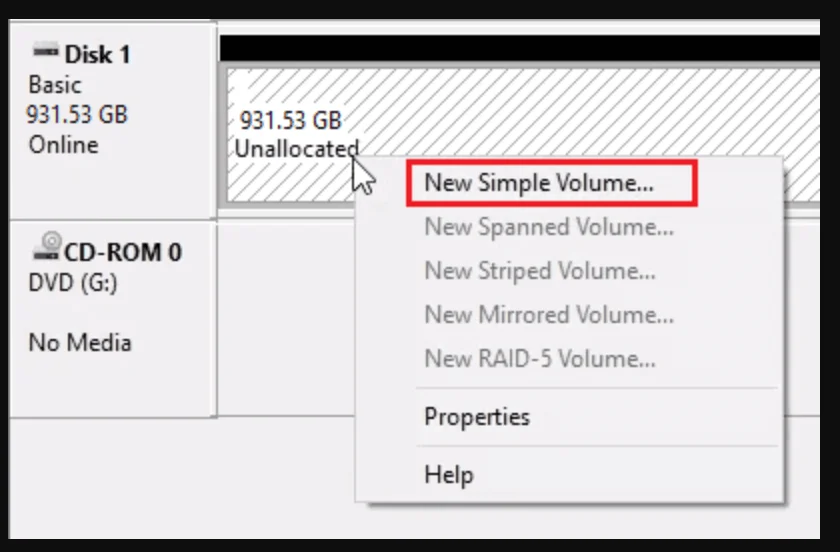
Step 2. To format the drive and designate a file system (such as NTFS or FAT32), adhere to the wizard.
This process can resolve cases where the system recognizes the drive but doesn’t allocate it properly for use.
Method 4. Check File System Integrity
File system corruption can occur due to improper ejection, power interruptions, or malware. The CHKDSK utility is a built-in Windows tool to identify and repair such issues.
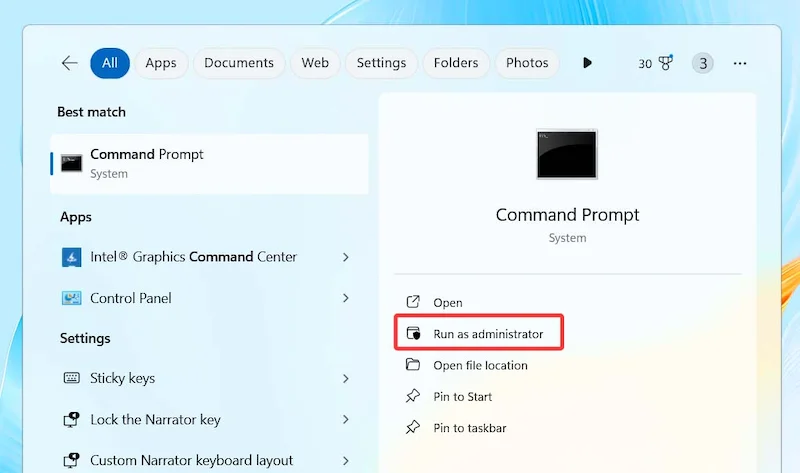
Step 1. Open Command Prompt as Administrator: Press Win + S, type cmd, and select Run as Administrator.
Step 2. Type the Command: chkdsk X: /f (replace X with the letter assigned to your USB drive).
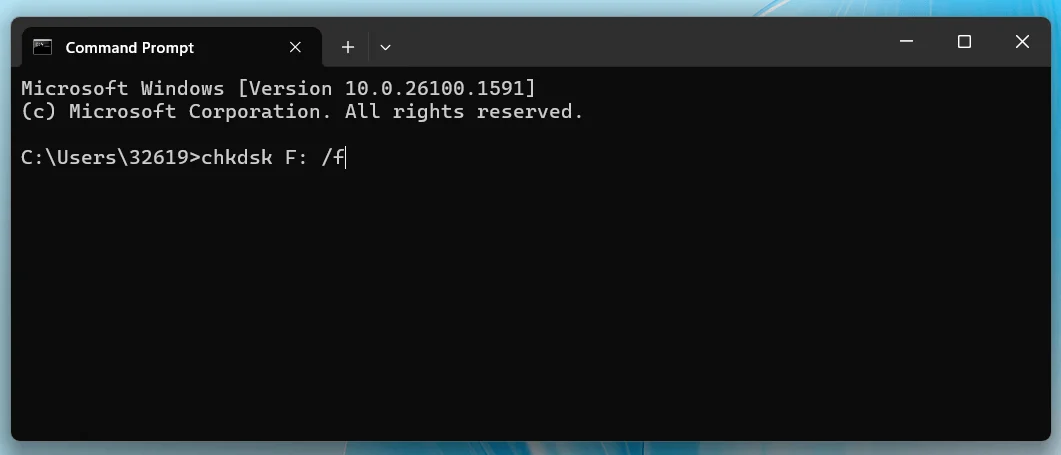
Step 3. Analyze the Output:
- If errors are detected, CHKDSK will attempt to fix them automatically.
- If the tool reports that the drive is write-protected, you may need to remove write protection using additional methods (e.g., registry editor or drive-specific utilities).
CHKDSK is effective for repairing minor to moderate file system issues without formatting the drive, preserving your data.
Method 5. Reinstall USB Controller Drivers
USB controller drivers manage all USB ports on your system. Corrupt drivers can prevent the system from detecting USB devices entirely.
Step 1. Open Device Manager.
Step 2. Make the section on Universal Serial Bus controllers larger.
Step 3. Choose Uninstall device by performing a right-click on each item with the labels USB Root Hub or Host Controller.
Step 4. Give your computer a restart.
Step 5. At startup, Windows will restore the required drivers automatically.
If automatic reinstallation doesn't occur, download and install the drivers manually from your PC manufacturer's website.
Method 6. Disable USB Selective Suspend
USB Selective Suspend is a power management feature in Windows designed to conserve energy by suspending idle USB ports. However, it can sometimes interfere with device detection.
Step 1. Open Control Panel and navigate to Power Options.
Step 2. Click on Change plan settings next to your active power plan.
Step 3. Select Change advanced power settings.
Step 4. Expand the USB settings option.
Step 5. Under USB selective suspend setting, change the setting to Disabled for both On battery and Plugged in options.
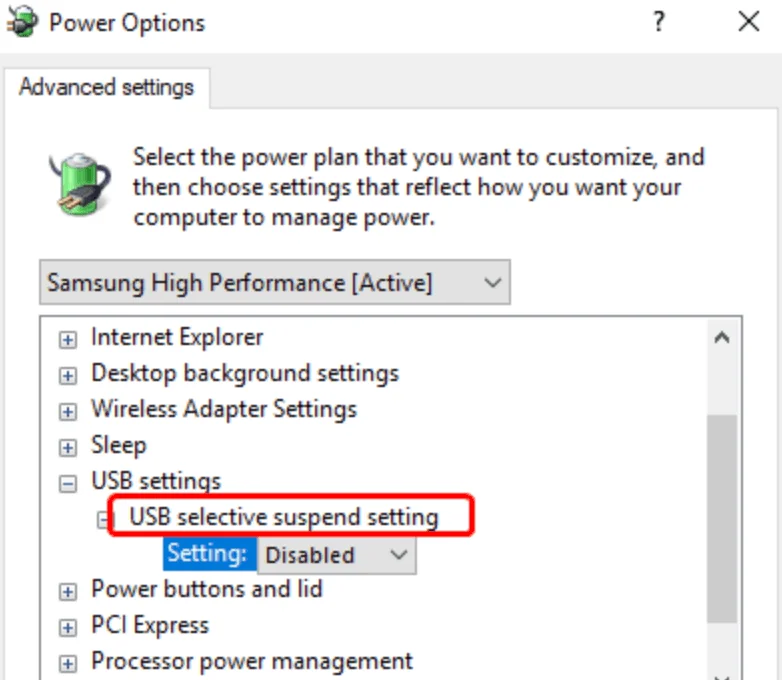
Step 6. Click Apply and restart your system.
Disabling this feature ensures that your USB ports remain active, eliminating potential interruptions in device recognition.
Method 7. Reformat the SanDisk USB Drive
Reformatting the drive can resolve severe file system errors but will erase all data.
Step 1. Open Disk Management.
Step 2. Right-click the SanDisk drive and select Format.
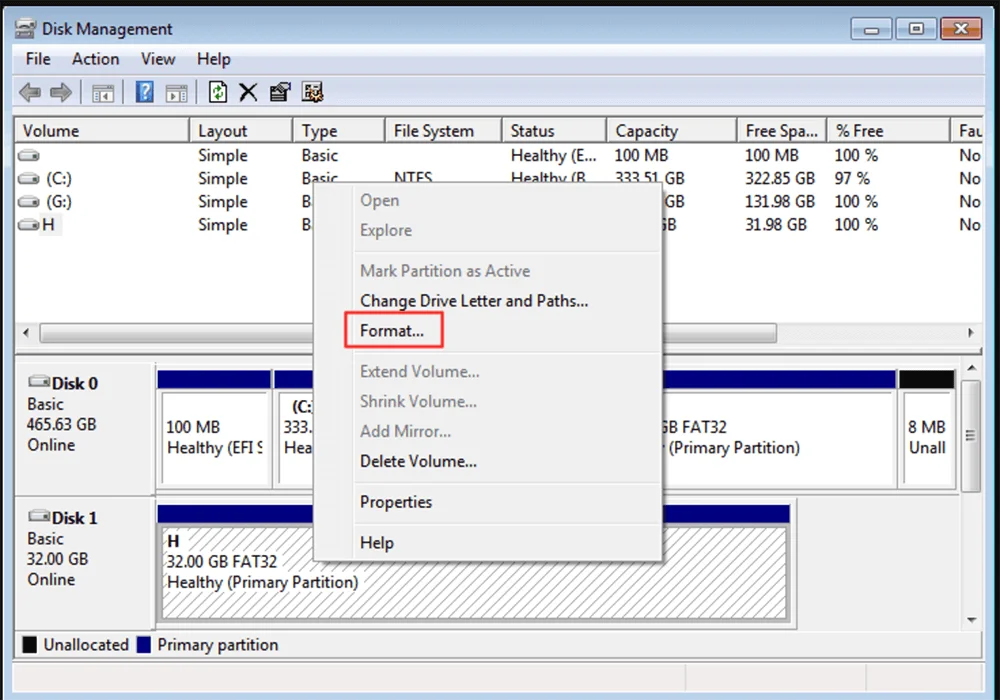
Step 3. Choose a file system (e.g., NTFS, FAT32, or exFAT).
Step 4. Click OK to proceed.
Hardware-Based Solutions to Fix Unrecognized SanDisk USB Drive
If none of the software fixes work, the issue may be hardware-related.
1. Replace USB Ports
Faulty USB ports can prevent devices from being detected. Consider testing the drive on a different USB port or using a powered USB hub.
2. Inspect the SanDisk Drive Hardware
- Physical Damage: If you find bent connectors or cracks, seek professional repair.
- Warranty Claims: Check if your SanDisk drive is still under warranty for a replacement.
Recover Data from Not Showing Up SanDisk USB Drive
If the data is important, use recovery software before formatting.
Step 1. Download and install the reliable SanDisk USB drive data recovery program - Donemax Data Recovery on your computer.
Donemax Data Recovery
- Recover data from not detected/recognized hard drive.
- Simple steps recover deleted or formatted data.
- Support data recovery for images, videos, documents, etc.
Step 2. Choose the SanDisk USB drive after you open Donemax Data Recovery.

Step 3. Click on Scan button so that Donemax Data Recovery can scan the SanDisk USB drive and find the inaccessible files or lost files.

Step 4. Once the scan gets finished, you can preview the recoverable files. Then select the wanted files, click on Recover button.

Donemax Data Recovery also can help you fix corrupted SanDisk USB drive.
Preventive Measures for Using SanDisk USB Drive:
To avoid similar issues in the future, follow these best practices:
- Safely Eject SanDisk USB Drives: Always eject the drive properly to prevent file system corruption.
- Regularly Update Drivers: Keep your operating system and SanDisk USB drivers updated.
- Avoid Using the Drive in Unstable Environments: Exposure to extreme temperatures or moisture can damage the device.
- Keep the Drive Protected: Use a protective case to minimize physical damage risks.
FAQs about SanDisk USB Drive Not Showing Up
If your SanDisk drive is inserted but doesn't appear in File Explorer or Finder, it is usually caused by outdated USB controller drivers, a missing drive letter, or file system corruption. It can also be caused by the USB Selective Suspend power setting in Windows temporarily disabling the port.
Using native diagnostic tools like CHKDSK in the Command Prompt or updating your USB drivers in Device Manager will not erase your files. However, if the drive's file system is labeled as "RAW" or "Unallocated" in Disk Management, reformatting it will wipe the data. Always recover your files using Donemax Data Recovery first if a format is required.
When a drive shows as unallocated, the system cannot read its partition map. To fix this, right-click the Start menu and open Disk Management. Right-click the unallocated space on your SanDisk drive, select "New Simple Volume," and follow the wizard to assign a new drive letter and format it to ExFAT or FAT32.
Yes, if the drive has a letter assigned to it but cannot be opened due to file system corruption, CHKDSK can fix it. Open the Command Prompt as an administrator and type "chkdsk X: /f" (replacing X with your SanDisk drive's letter) to automatically locate and repair bad sectors or directory errors.
If your USB drive fails to read on a Windows PC as well as on modern macOS Tahoe or Sequoia systems, the issue is likely physical hardware damage rather than a software conflict. Check the USB connector for bent pins or debris. If the drive is physically failing, you will need to rely on a professional data extraction tool or replacement warranty.
Conclusion
SanDisk USB drives not being recognized is a common issue that can arise due to various factors, including software glitches, hardware damage, or driver problems. By systematically diagnosing and addressing the problem using the steps outlined in this guide, you can restore functionality to your drive and regain access to your data.
If the issue persists despite these efforts, consult a professional or reach out to SanDisk support for further assistance. To prevent such problems in the future, practice safe handling, regular updates, and proper ejection of your USB drives.
If you have lost data from your SanDisk USB drive, you can use data recovery program - such as Donemax Data Recovery to get the lost data back.
Donemax Data Recovery
Donemax Data Recovery is one of the best data recovery software. It is easy-to-use and can help in recovering deleted, formatted, inaccessible or lost data from HDD/SSD, external disk, USB drive, SD card, camera or other storage devices.
Related Articles
- Oct 11, 2025External Hard Drive Not Recognized on macOS Tahoe, How to Fix It?
- Mar 13, 2025How to Format Seagate Ultra Touch External Hard Drive?
- Jan 04, 2026How to Format LaCie External Hard Drive for Mac?
- Jan 12, 2024How to Format Kingston XS1000/XS2000 External SSD on Mac?
- Nov 11, 2024How to Repair Startup Disk on Apple Silicon Mac (such as M1/M2/M3/M4 Mac)?
- Jun 06, 2025Restore USB Drive to Full Capacity: A Complete Step-by-Step Guide

Contributing Writer
Christina
Christina is the senior editor of Donemax software who has worked in the company for 4+ years. She mainly writes the guides and solutions about data erasure, data transferring, data recovery and disk cloning to help users get the most out of their Windows and Mac. She likes to travel, enjoy country music and play games in her spare time.

Editor in chief
Gerhard Chou
In order to effectively solve the problems for our customers, every article and troubleshooting solution published on our website has been strictly tested and practiced. Our editors love researching and using computers and testing software, and are willing to help computer users with their problems