
Written byStevenUpdated on Sep 28, 2025
How to Wipe Startup Disk on macOS Tahoe?
Approved byGerhard Chou
Before we start: To ensure the data will not be recovered in any way, it's essential to wipe the data permanently with the professional data erasure software. Donemax Data Eraser for Mac is professional to permanently wipe data for macOS Tahoe and other systems. It can guarantee the wiped data is gone forever without recovery possibility.
PAGE CONTENT:
Your Mac's startup disk is the heart of the system, containing the operating system, user files, and applications needed to boot macOS. With the release of macOS Tahoe, many users may find themselves needing to wipe their startup disk—whether to prepare a Mac for resale, fix persistent software issues, or perform a clean installation of the new operating system.
Wiping a startup disk is not a task to take lightly. It permanently deletes everything on the disk, including system files and personal data. That's why following the right process is essential to avoid mistakes and ensure your Mac is fully ready for reuse or a fresh installation.
This guide will walk you through how to wipe startup disk on macOS Tahoe using three primary methods: Disk Utility in Recovery Mode, Terminal commands, and the Erase All Content & Settings feature. We'll also cover essential preparations, troubleshooting, and post-wipe steps so you can complete the process smoothly and confidently.
1. Preparations Before Wiping Startup Disk on macOS Tahoe
Before erasing your Mac's startup disk, you must take a few precautions to protect your data and ensure the process goes smoothly.
1.1 Back Up Your Data
Wiping the startup disk deletes everything permanently. If you need your files, applications, or preferences later, create a backup first. You can:
- Use Time Machine with an external drive.
- Manually copy important files to an external disk or cloud storage.
- Create a bootable backup with third-party tools like Donemax Disk Clone for Mac.
1.2 Sign Out of Apple Services
To prevent issues with Activation Lock, sign out of all Apple services:
- Go to System Settings > Apple ID and sign out of iCloud.
- Disable Find My Mac.
- Sign out of iMessage and FaceTime.
1.3 Ensure Power and Internet Connection
- Plug in your MacBook to avoid interruptions.
- Connect to Wi-Fi or Ethernet if you plan to reinstall macOS Tahoe afterward.
2. Methods to Wipe the Startup Disk on macOS Tahoe
macOS Tahoe provides multiple ways to wipe your startup disk. Depending on your situation, you may choose a graphical approach via Disk Utility, a command-line method for advanced users, or the faster Erase All Content & Settings option.
2.1 Using Disk Utility in macOS Recovery
The Disk Utility method is the safest and most widely recommended way to wipe your Mac's startup disk in macOS Tahoe. Apple provides this graphical tool for managing disks, volumes, and partitions, making it beginner-friendly while still powerful enough for advanced users.
Here's the complete guide:
Step 1: Enter Recovery Mode
- Shut down your Mac completely.
- Press and hold the Power button until you see "Loading startup options" on the screen.
- Select Options, then click Continue.
- After a moment, you'll be taken into macOS Recovery.
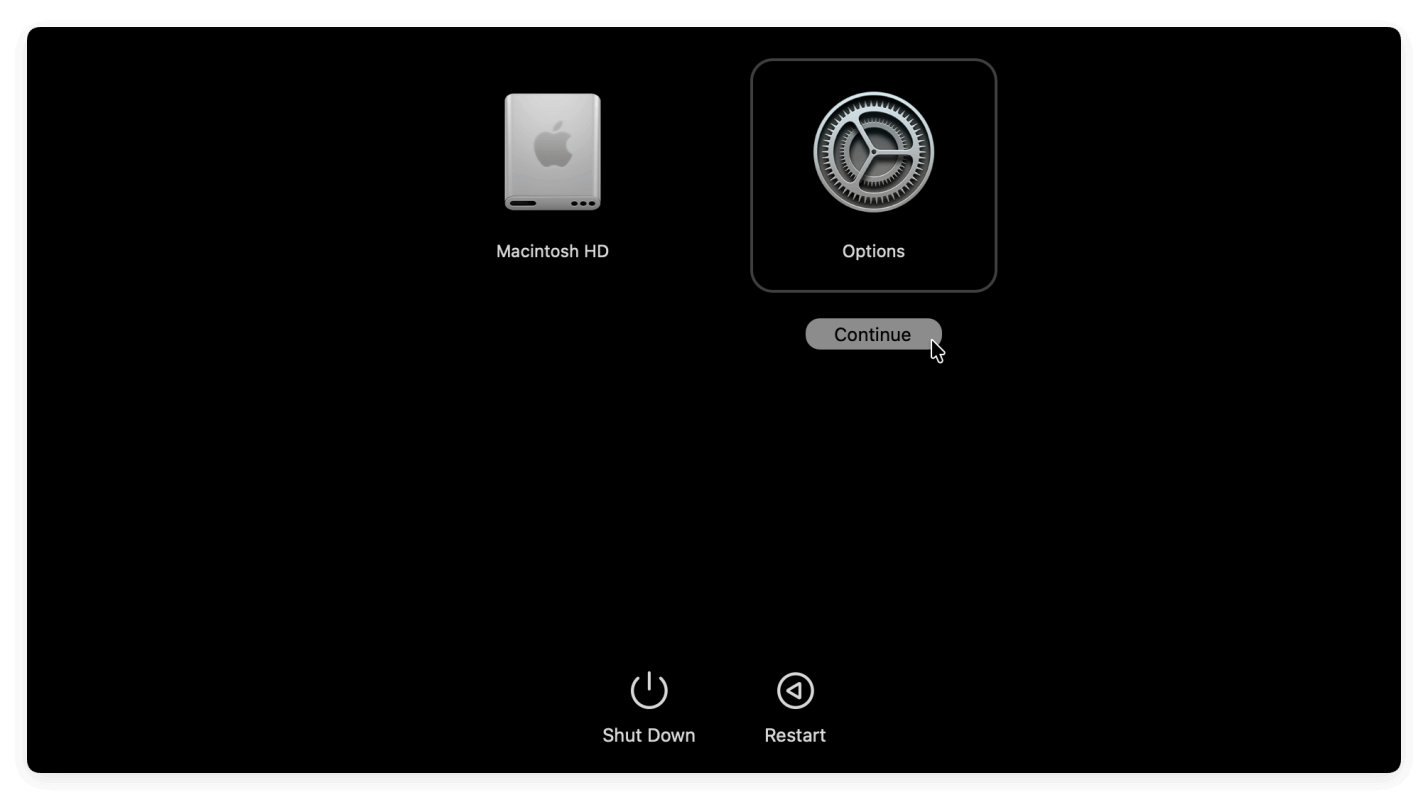
💡 Tip: On Intel-based Macs, you may need to press Command + R immediately after startup instead.
Step 2: Open Disk Utility
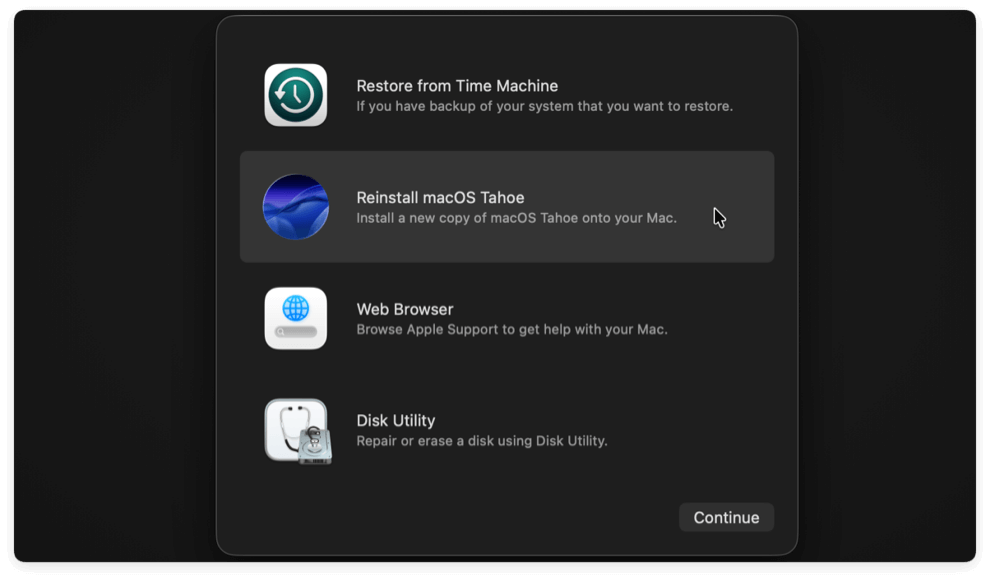
- In the macOS Recovery window, you'll see multiple options, such as Restore from Time Machine, Reinstall macOS Tahoe, and Disk Utility.
- Select Disk Utility and click Continue.
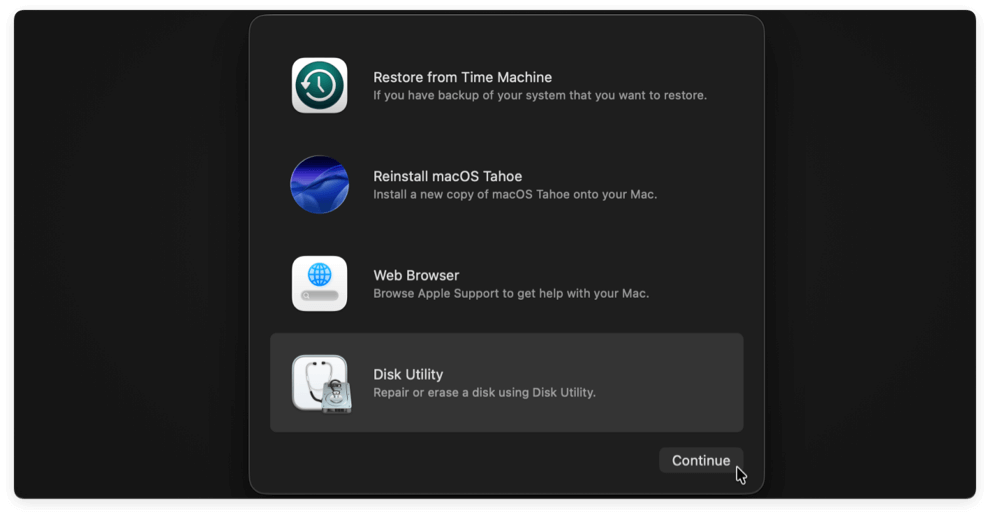
Disk Utility will now open, showing a sidebar with available drives and volumes.
Step 3: Locate the Startup Disk
Your startup disk is usually named "Macintosh HD" by default, though you might have renamed it. In modern macOS versions (including Tahoe), the startup disk often contains multiple volumes:
- Macintosh HD → System volume (read-only).
- Macintosh HD – Data → User data volume.
To fully wipe your Mac, you must erase the entire container rather than just one volume.
💡 Tip: Click the "View" button in Disk Utility and choose "Show All Devices" to ensure you're erasing the root drive, not just the volumes.
Step 4: Erase the Disk
- Select the top-level disk (e.g., APPLE SSD or Fusion Drive).
- Click the Erase button in the toolbar.
- Choose a format: APFS (default for SSDs and required for macOS Tahoe) or Mac OS Extended (Journaled) (only if you plan to install older macOS versions).
- Enter a name for the disk (you can simply call it "Macintosh HD").
- Click Erase to confirm.
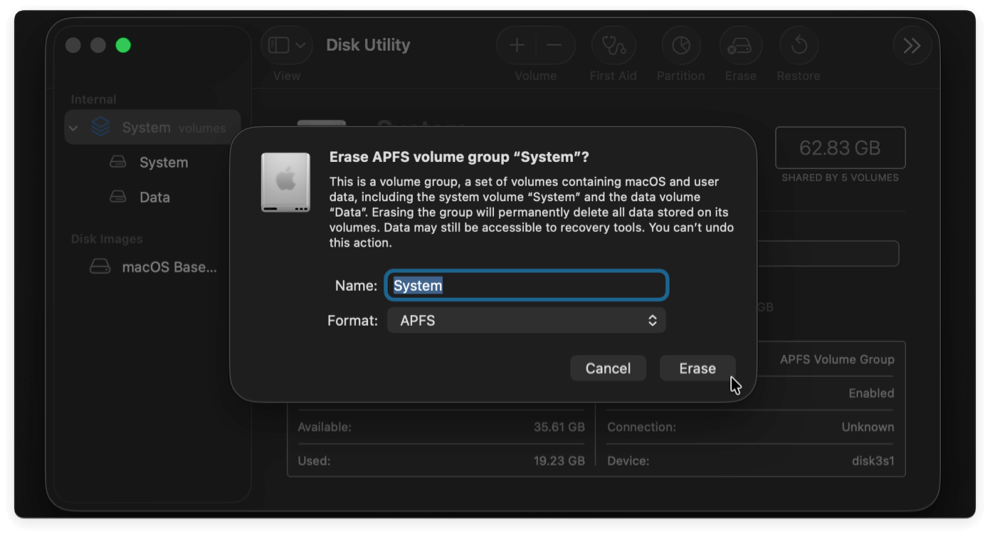
The process may take a few minutes. Disk Utility will completely erase and reformat the drive.
Step 5: Verify Erasure
Once the process completes, check the sidebar: the old system and data volumes should be gone, replaced by the newly formatted drive.
Step 6: Exit Disk Utility
- Close Disk Utility to return to the Recovery menu.
- From here, you can either shut down your Mac or reinstall macOS Tahoe immediately.
Extra Notes for Special Cases
- Fusion Drives: If your Mac has a Fusion Drive, ensure you erase the entire container (not just the SSD or HDD portion separately).
- Encrypted Disks: If your startup disk is encrypted with FileVault, you may need to enter the encryption password before erasing.
- Stuck Volumes: Sometimes the "Data" volume remains even after erasing. In such cases, erase both Macintosh HD and Macintosh HD – Data manually.
2.2 Using Terminal in Recovery Mode (Advanced Users)
For those comfortable with command-line tools, wiping the startup disk using Terminal offers more control.
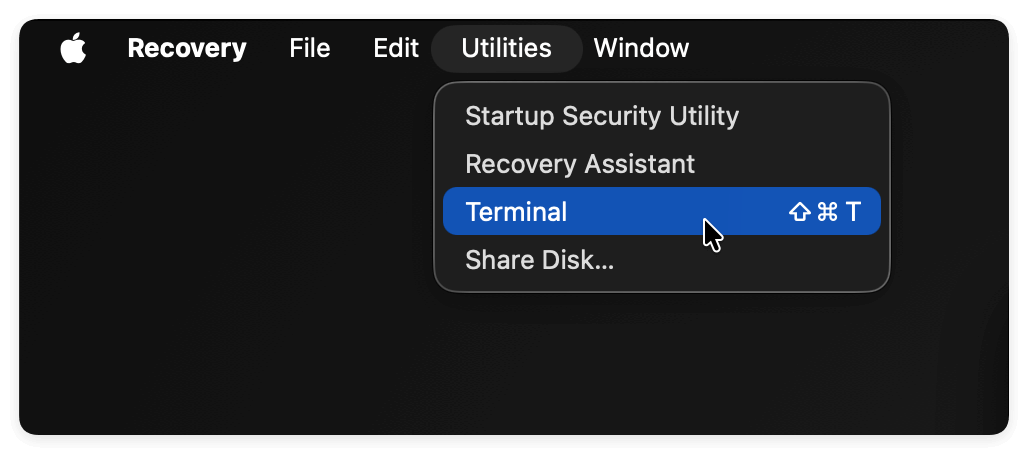
- Boot into Recovery Mode (same process as above).
- From the Utilities menu, choose Terminal.
![wipe startup disk on macOS Tahoe]()
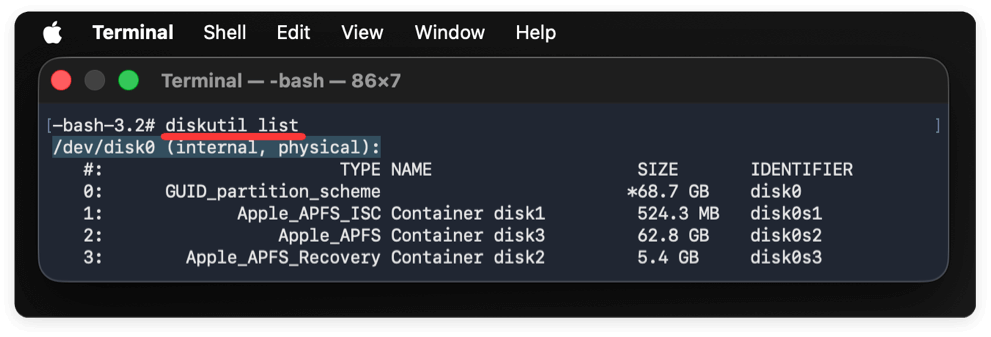
- List Available Disks:
diskutil list
This will show all disks and partitions. Identify the startup disk (usually disk0 with an APFS container).
![wipe startup disk on macOS Tahoe]()
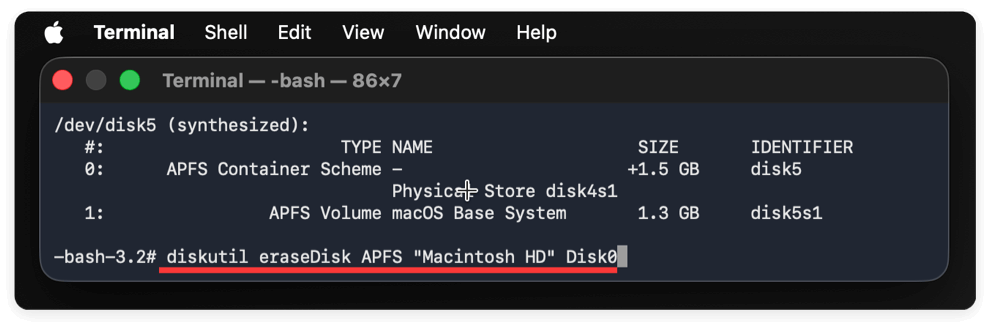
- Erase the Disk:
diskutil eraseDisk APFS "Macintosh HD" disk0
Replace "Macintosh HD" with your chosen disk name, and disk0 with the identifier of your startup disk.
![wipe startup disk on macOS Tahoe]()
- Close Terminal and proceed with reinstallation if desired.
When to use: If Disk Utility fails or you want a faster, more direct approach.
2.3 Using "Erase All Content and Settings"
Starting with macOS Monterey, Apple introduced the Erase All Content and Settings feature—similar to iOS's factory reset option. This is expected to continue in macOS Tahoe, making it the easiest way to wipe your Mac.
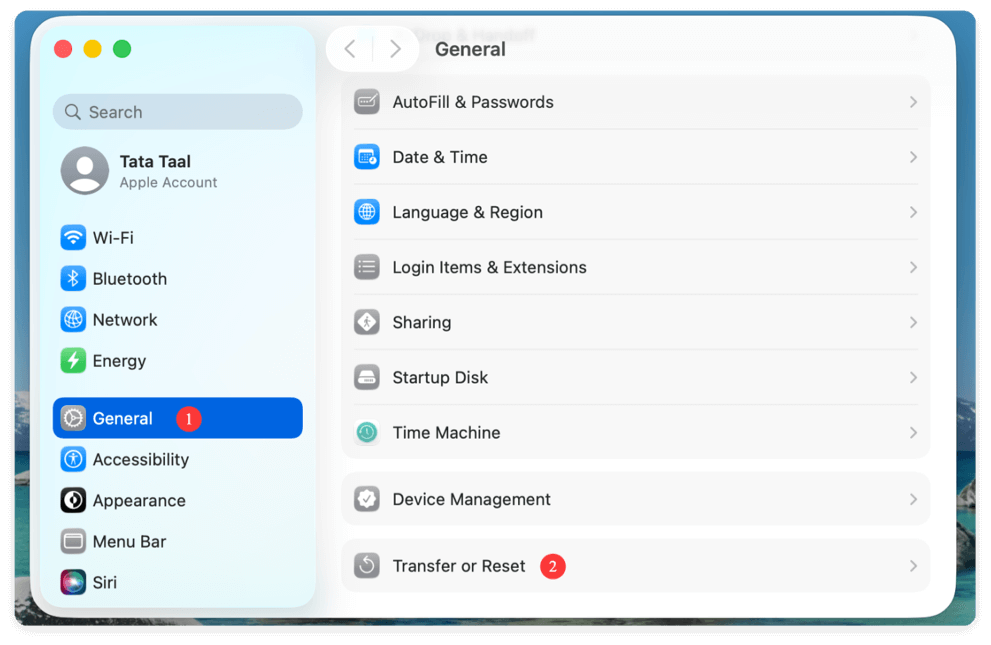
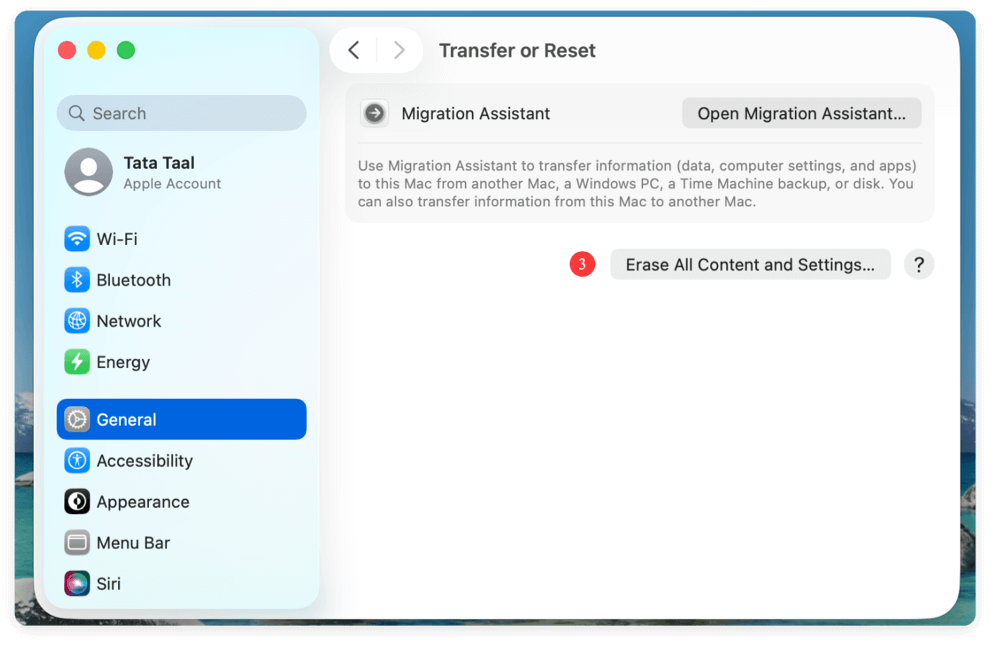
- Go to System Settings > General > Transfer or Reset.
![wipe startup disk on macOS Tahoe]()
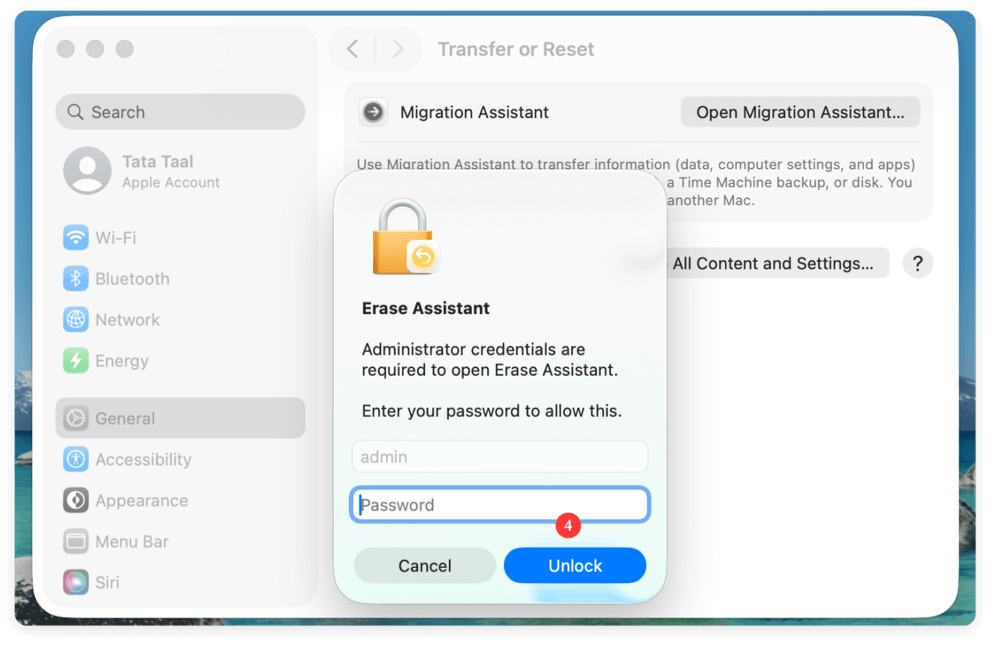
- Click Erase All Content and Settings.
![wipe startup disk on macOS Tahoe]()
- Enter your administrator password.
![wipe startup disk on macOS Tahoe]()
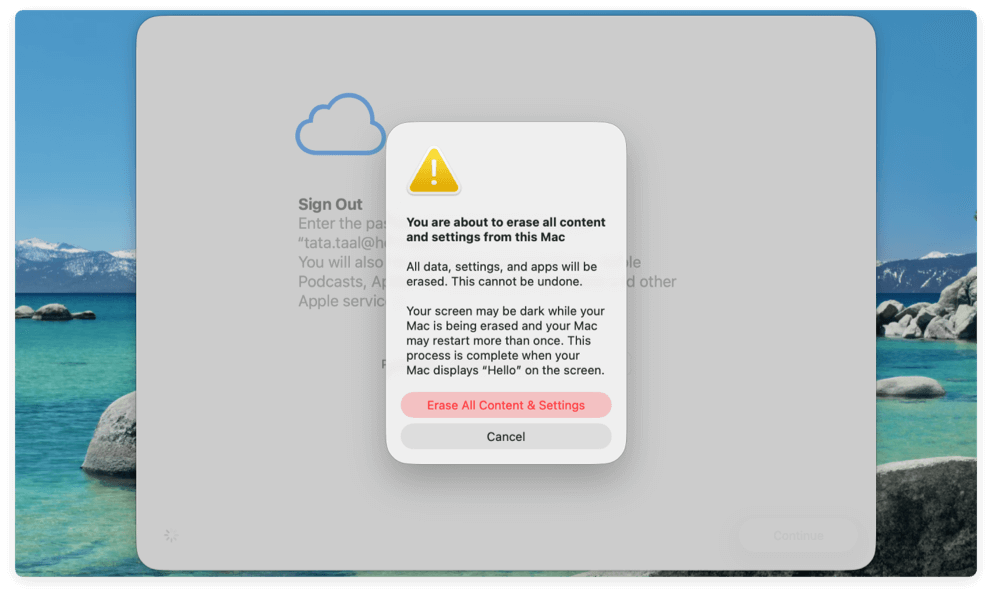
- Confirm erasure. Your Mac will restart, erase all data, and return to the Setup Assistant screen.
![wipe startup disk on macOS Tahoe]()
When to use: Perfect for selling or giving away your Mac, as it's faster and doesn't require manually erasing partitions.
3. Reinstalling macOS Tahoe After Wiping Startup Disk
After wiping the startup disk, you'll need to reinstall macOS Tahoe to use your Mac again.
3.1 Reinstall macOS Tahoe via Recovery
- Boot into Recovery Mode.
- Choose Reinstall macOS Tahoe.
- Follow on-screen prompts to install.
- Select your wiped startup disk as the installation destination.
3.2 Restore From Backup
- If you used Time Machine, you can restore your files during setup.
- Choose "From a Mac, Time Machine, or startup disk" when prompted.
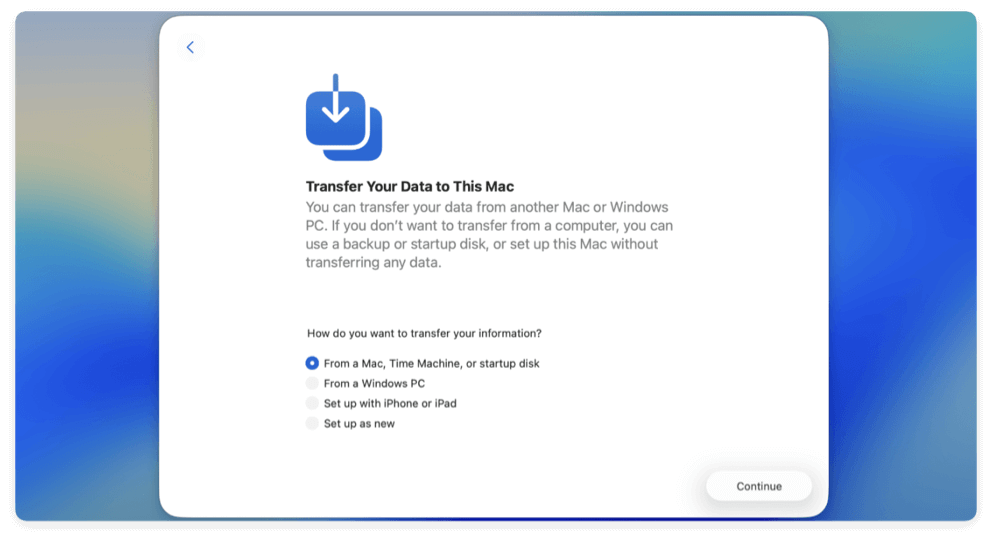
3.3 Set Up as New
If you want a clean slate, skip backup restoration and configure your Mac as new.
4. Best Practices After Wiping Startup Disk on macOS Tahoe
4.1 If You're Keeping the Mac
- Reinstall essential applications.
- Restore from backup or transfer files manually.
- Check for software updates to ensure compatibility with macOS Tahoe.
4.2 If You're Selling or Giving Away Your Mac
Leave the Mac with the default settings after reinstalling macOS. This allows the new owner to personalize setup.
Before you give the Mac to another hand, there is another important thing to do - wipe the personal data permanently. Although the personal files were removed while wiping the startup disk on macOS with all methods mentioned above, the data is still recoverable via professional data recovery software.
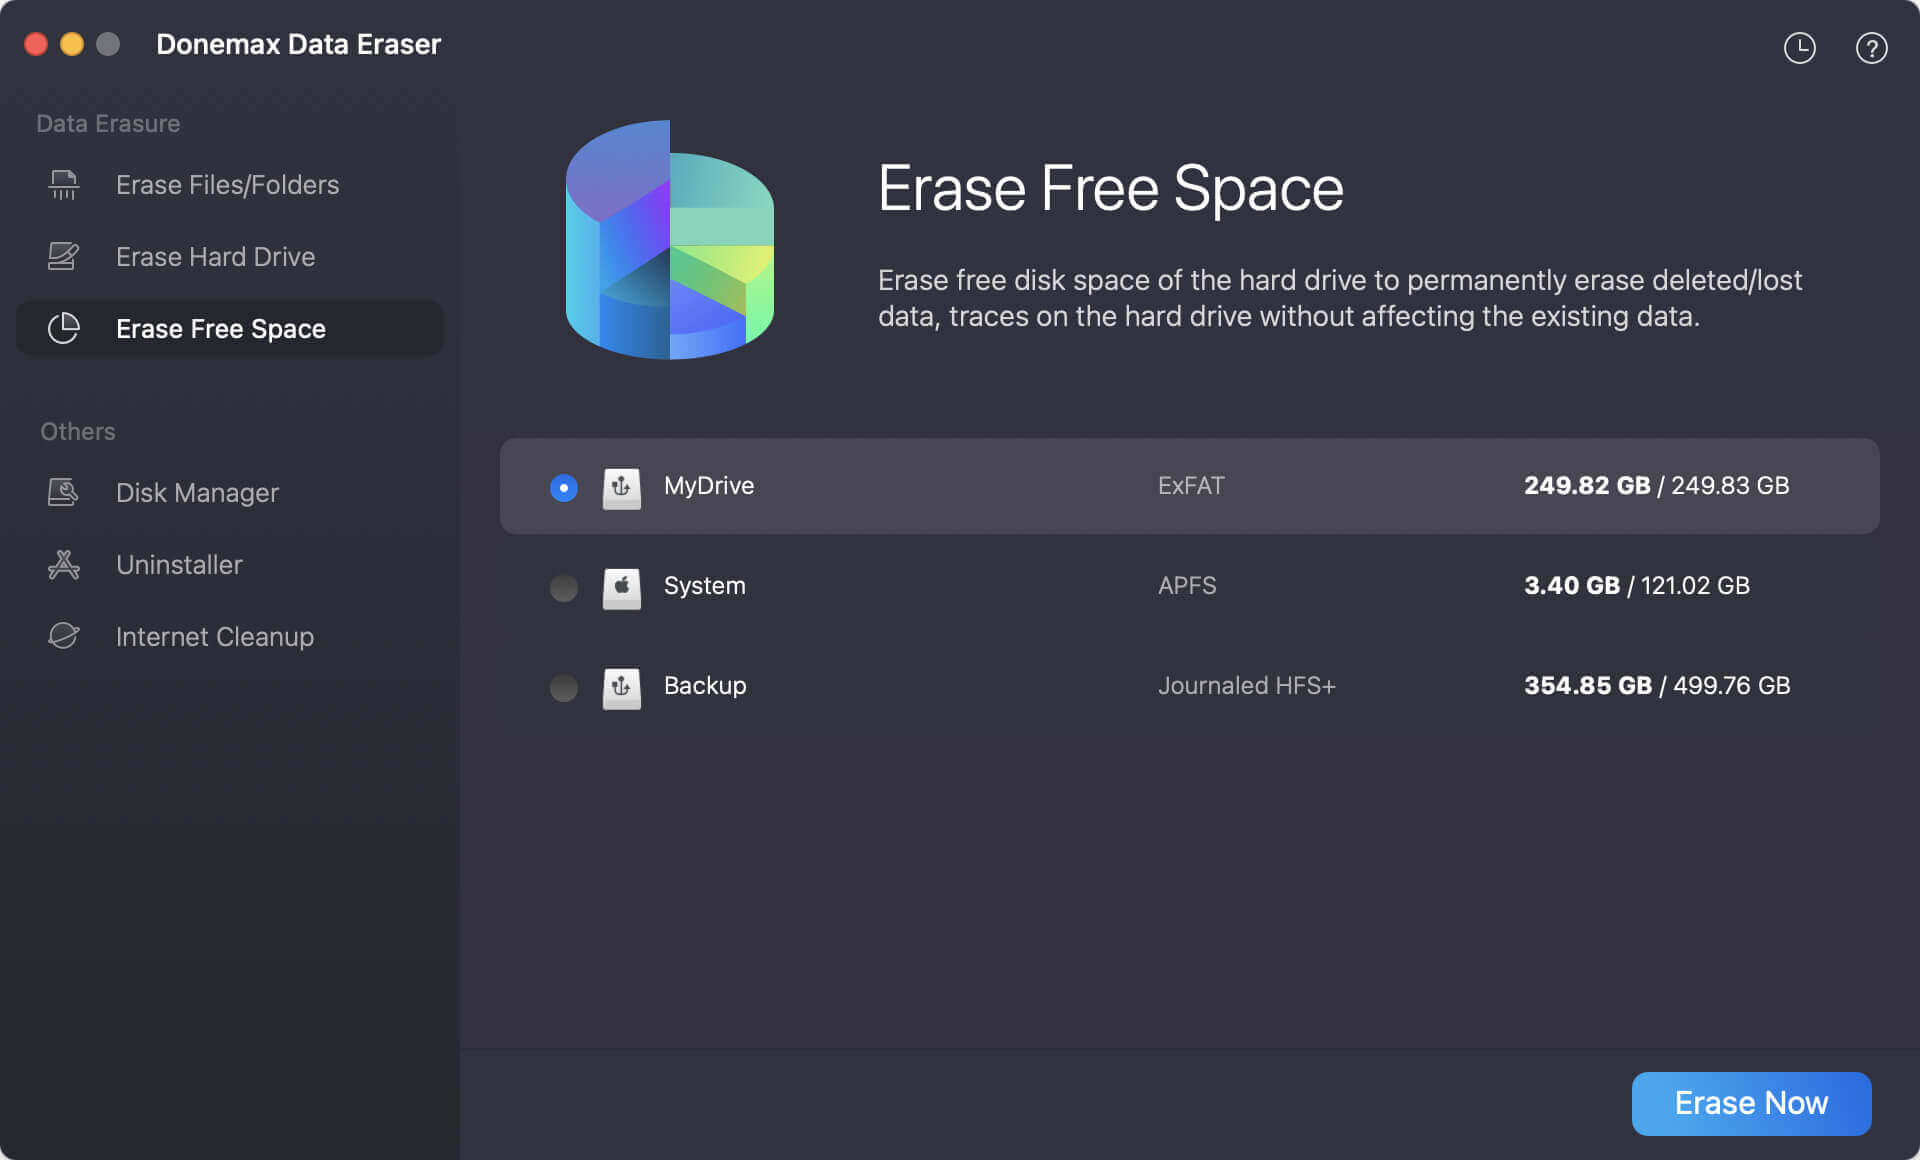
To ensure the data is no longer recoverable, use the software Donemax Data Eraser for Mac to wipe the free space of the startup disk. It can ensure the removed personal files overwritten and erased permanently.
Donemax Data Eraser for Mac
- Wipe data permanently to keep your privacy information safe.
- Three modes to shred files or wipe data flexibly.
- Easy-to-use and 100% safe to erase data.
Here are the simple steps to wipe the deleted personal files by erasing the free space with the software:
Step 1. Launch the software Donemax Data Eraser for Mac. Change to the mode Erase Free Space and choose the startup disk of Mac. Click Erase Now button.
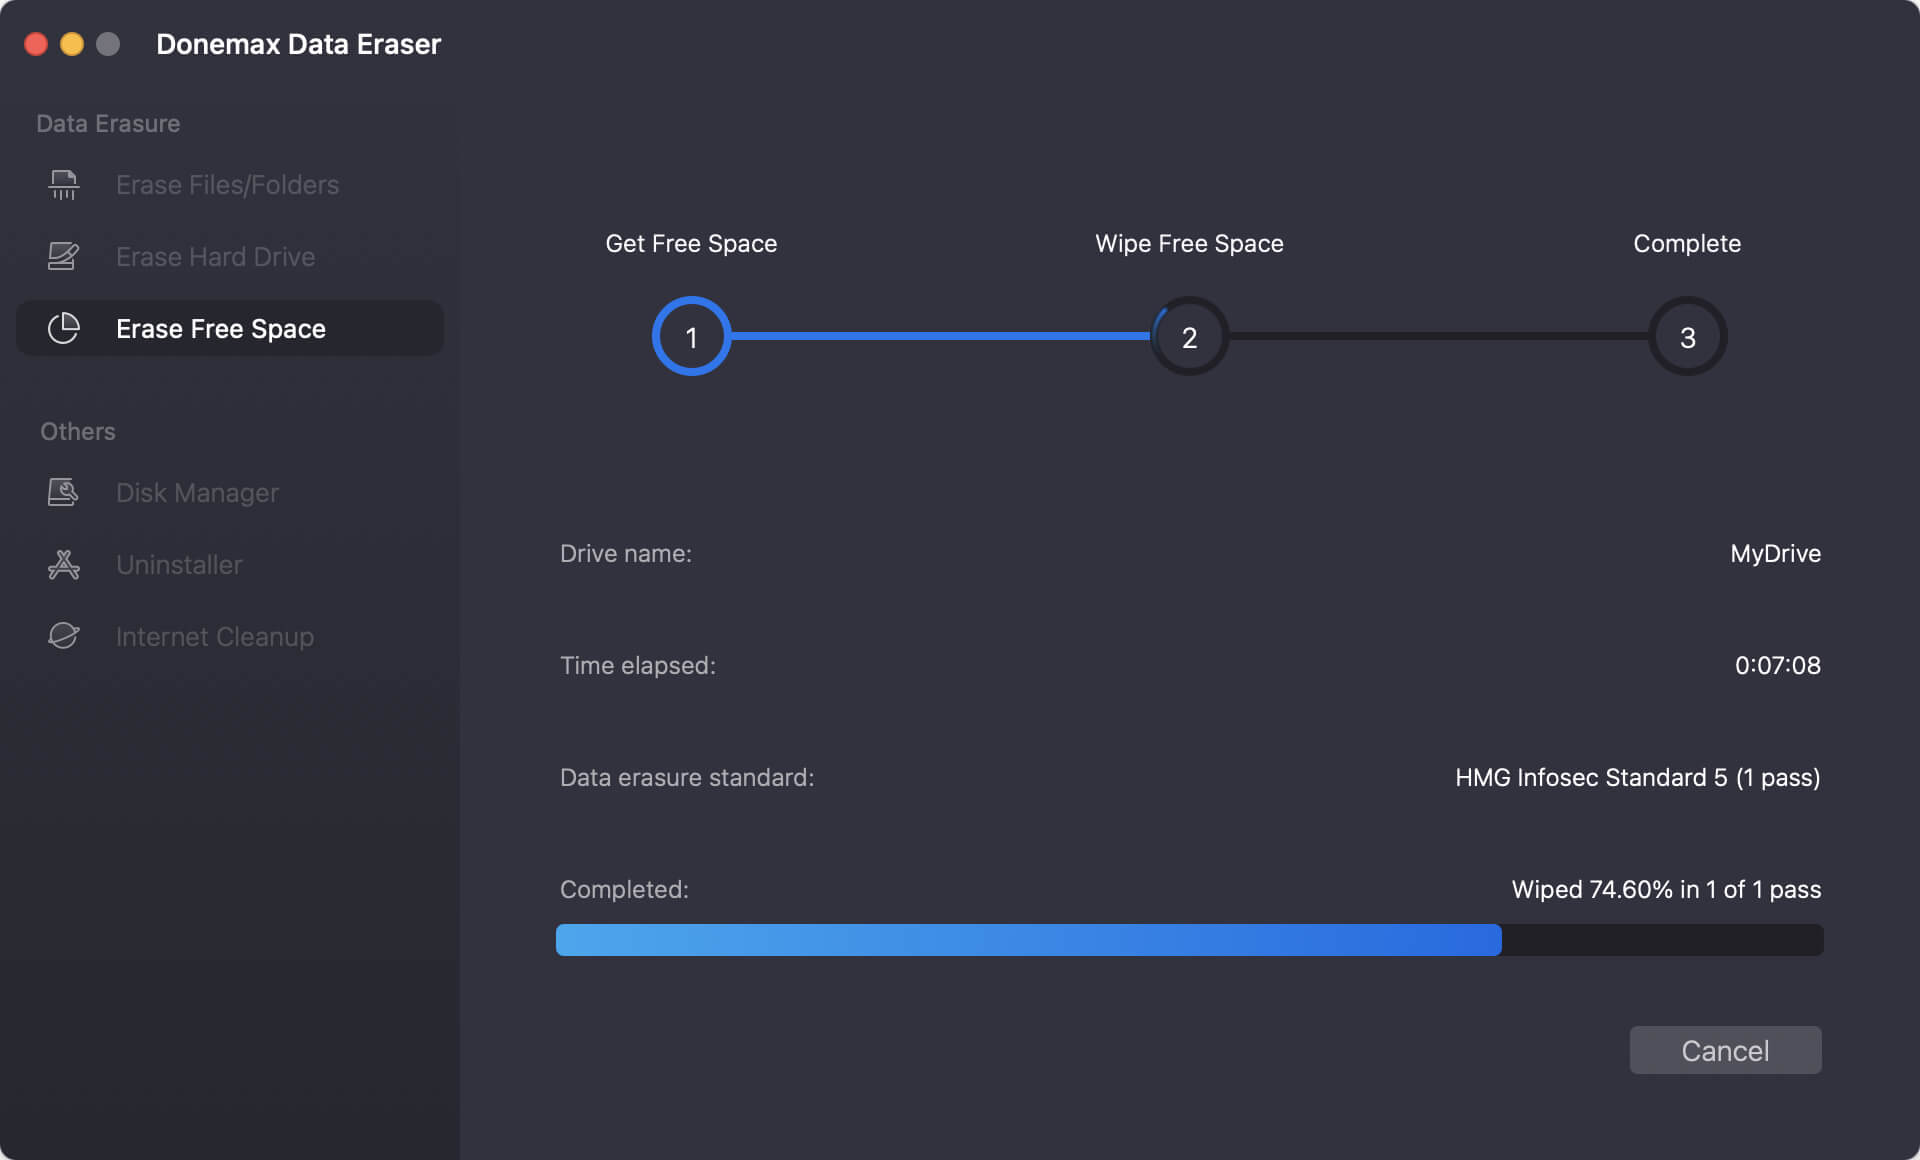
Step 2. You need to select a data erasure standard to ensure the data will be wiped permanently. Then click the Continue button.

Step 3. The software will take some time to permanently wipe the deleted data from the free space of the startup disk.
After the wiping process is finished completely, you can feel free to sell or donate the Mac without worrying about data leakages. Just remove the data wiping tool and turn off the Mac.
Conclusion
Wiping your Mac's startup disk on macOS Tahoe may sound intimidating, but with the right preparation and method, the process is straightforward. Whether you use Disk Utility, Terminal, or Erase All Content and Settings, the key is to back up your data, sign out of Apple services, and follow the correct steps carefully.
After wiping, you can easily reinstall macOS Tahoe, restore from a Time Machine backup, or set up your Mac as brand new. By following this guide, you'll ensure that your Mac is clean, secure, and ready for its next chapter—whether that's in your hands or someone else's.
Donemax Data Eraser for Mac
100% safe and powerful Mac data erasure program. It offers certified data erasure standards including U.S. Army AR380-19, DoD 5220.22-M ECE to securely and permanently erase data from Mac HDD/SSD and external storage devices, making data recovery impossible.
Related Articles
- Aug 21, 2023How to Permanently Erase Data from SD Card on Mac?
- Apr 27, 2026How to Factory Reset a MacBook Air?
- May 14, 2025How to Factory Reset a M1 Chip Mac?
- Jul 15, 2025Best 3 Methods to Wipe HFS+ Drive on Mac: A Complete Step-by-Step Guide
- Oct 17, 2025Wipe Data from Samsung Portable Hard Drive on Mac
- Apr 14, 2026How to Permanently Erase Files and Folders on Your Mac?

Contributing Writer
Steven
Steven has been a senior writer & editor of Donemax software since 2020. He's a super nerd and can't imagine the life without a computer. Over 6 years of experience of writing technical solutions and software tesing, he is passionate about providing solutions and tips for Windows and Mac users.

Editor in chief
Gerhard Chou
In order to effectively solve the problems for our customers, every article and troubleshooting solution published on our website has been strictly tested and practiced. Our editors love researching and using computers and testing software, and are willing to help computer users with their problems