Written byCharlesUpdated on Apr 18, 2025
Mac's Factory Reset Not Working, How to Fix It?
Approved byGerhard Chou
Before we start: If Mac Factory reset not working, you can Mac disk wipe software - such as Donemax Data Eraser to help securely and permanently wipe all data from your Mac's internal disk, ensure no data is recoverable.
PAGE CONTENT:
Performing a factory reset on your Mac can be a lifesaver when dealing with performance issues, system glitches, or preparing your device for resale. However, what happens when the reset process itself refuses to cooperate? If you're stuck trying to wipe your Mac clean but the factory reset isn't working, don't panic - you're not alone.
This guide provides detailed, step-by-step instructions on how to fix common problems that prevent your Mac's factory reset from completing successfully. Whether you have an Intel-based Mac or one with Apple Silicon (M chip), we've got you covered.
Common Scenarios Where Mac's Factory Reset Fails
Understanding the issue is the first step toward resolving it. Here are the most frequent factory reset failure scenarios:
- Stuck on the Apple logo or a blank screen
- macOS Utilities don't appear after using Command + R
- The Erase process fails or reports the disk can't be unmounted
- macOS reinstallation fails mid-process
- Activation Lock prevents access to reset tools
- Internet Recovery doesn't load or fails to connect
These symptoms can stem from hardware issues, firmware glitches, corrupted recovery partitions, or improper reset procedures.
Quick Fixes for Mac Factory Reset Not Working:
Before diving into advanced fixes, go through this checklist:
- Stable Internet Connection: Recovery tools often require a working internet connection to download macOS.
- Power Source: Ensure your Mac is plugged into a reliable power source to prevent unexpected shutdowns.
- Know Your Mac Model: Apple Silicon (M1 or later) Macs use different methods compared to Intel Macs.
- Back Up Your Data: Use Time Machine or clone your drive using software like Donemax Disk Clone for Mac. Once data is erased, recovery might be impossible.
Step-by-Step Fixes for Mac Factory Reset Not Working
1️⃣ Use the Correct Key Combinations for Recovery Mode
Depending on your Mac's processor type, the method to enter recovery mode varies:
For Intel Macs:
- To reinstall the most recent version of macOS on your Mac, press Command (⌘) + R.
- To update to the most recent macOS compatible with your Mac, press Option + Command + R.
- Reinstall the macOS version that came with your Mac or the most recent version by pressing Shift + Option + Command + R.
For Apple Silicon Macs (M-chip:
- Turn Off your Mac.
- Holding down the power button yields the message "Loading startup options."
- To go into Recovery Mode, choose Options > Continue.
![fix common problems that prevent your Mac's factory reset]()
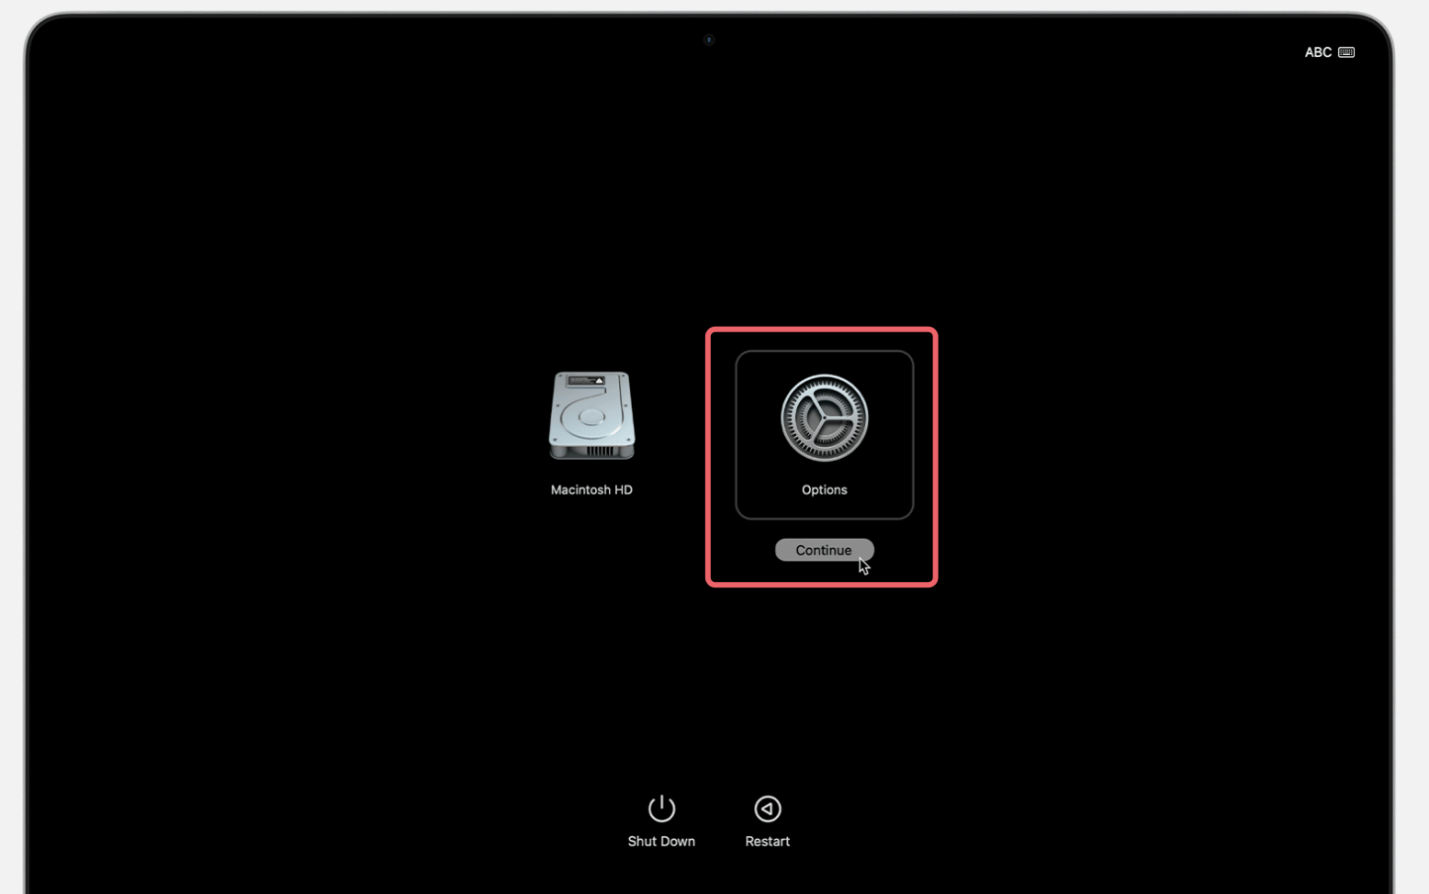
If the recovery tools don't appear, try using another combination or ensure you're holding the keys down until the Apple logo or spinning globe appears.
2️⃣ Erase Mac via macOS Recovery
Sometimes, a reset fails due to problems with the disk formatting. Here's how to manually erase your Mac:
- Boot into macOS Recovery using the above key combinations.
- Choose Disk Utility from the Utilities window.
- Choose your startup disk, which is sometimes referred to as Macintosh HD.
- Click Erase at the top.
- Format: Use APFS for newer Macs or Mac OS Extended (Journaled) for older macOS versions.
- Click Erase Volume Group if available, which removes all associated system volumes.
![fix common problems that prevent your Mac's factory reset]()
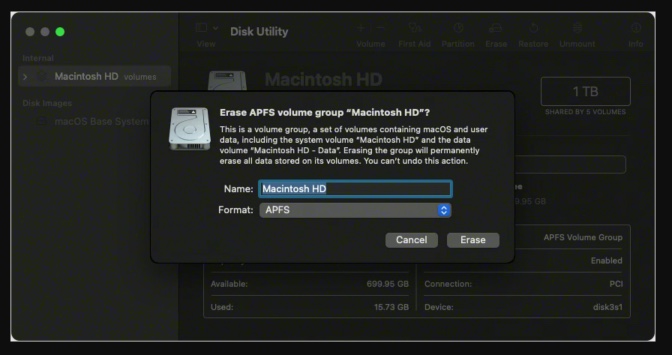
Once erased, close Disk Utility and return to the main Utilities screen.
3️⃣ Reinstall macOS Using Recovery Mode
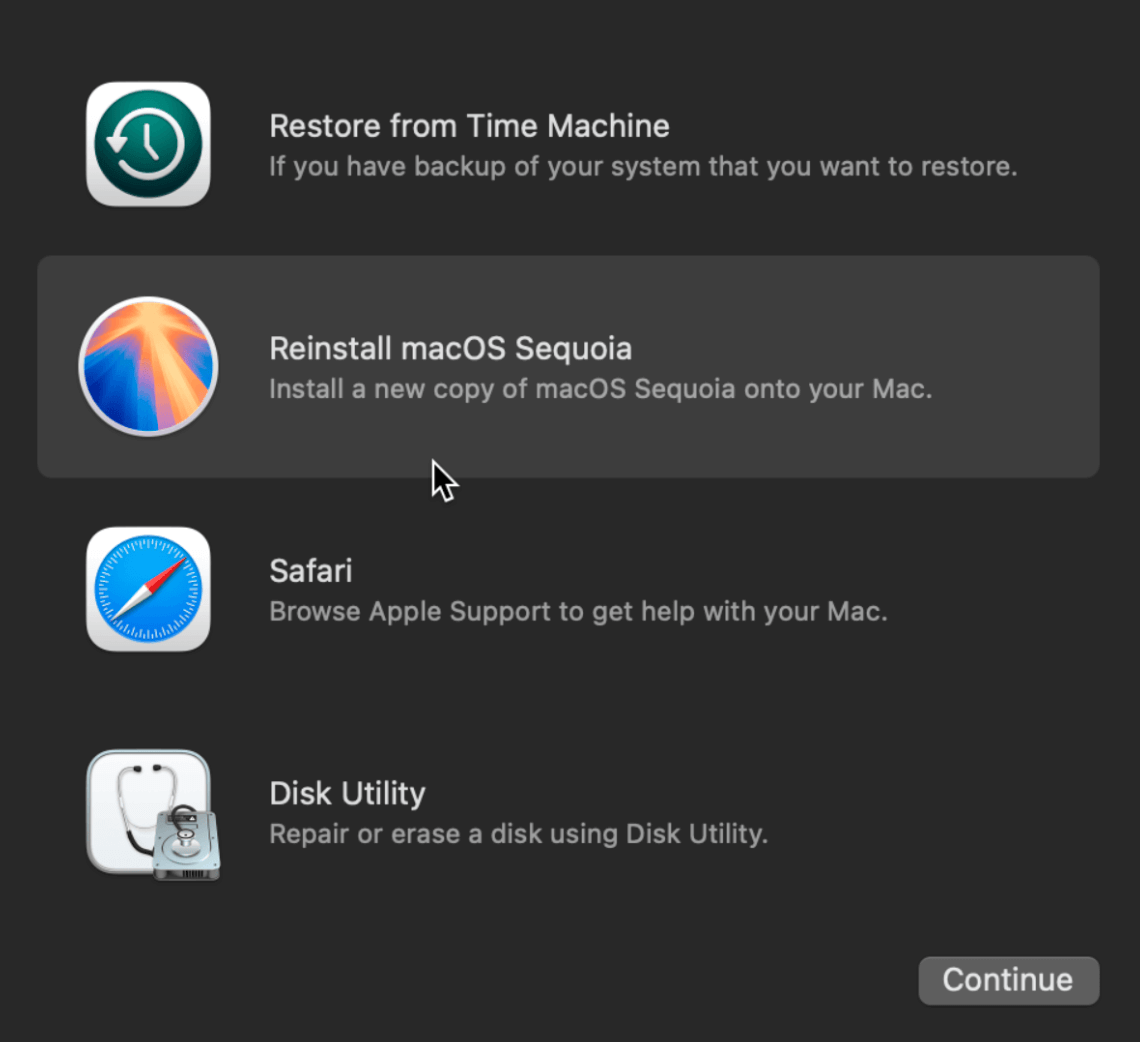
After erasing the disk, you must reinstall macOS:
- In macOS Utilities, click Reinstall macOS.
![fix common problems that prevent your Mac's factory reset]()
- To download and install macOS, comply to the on-screen directions.
💡 Tip: If macOS installation fails, it might be due to network issues, incompatible hardware, or a corrupt recovery system.
To fix this:
- Switch to a wired Ethernet connection if Wi-Fi is unreliable.
- Restart and try an alternate recovery combination (e.g., Option + Command + R).
- (For Intel-based Mac) Ensure your Mac's date and time are set correctly by launching Terminal and typing:
ntpdate -u time.apple.com
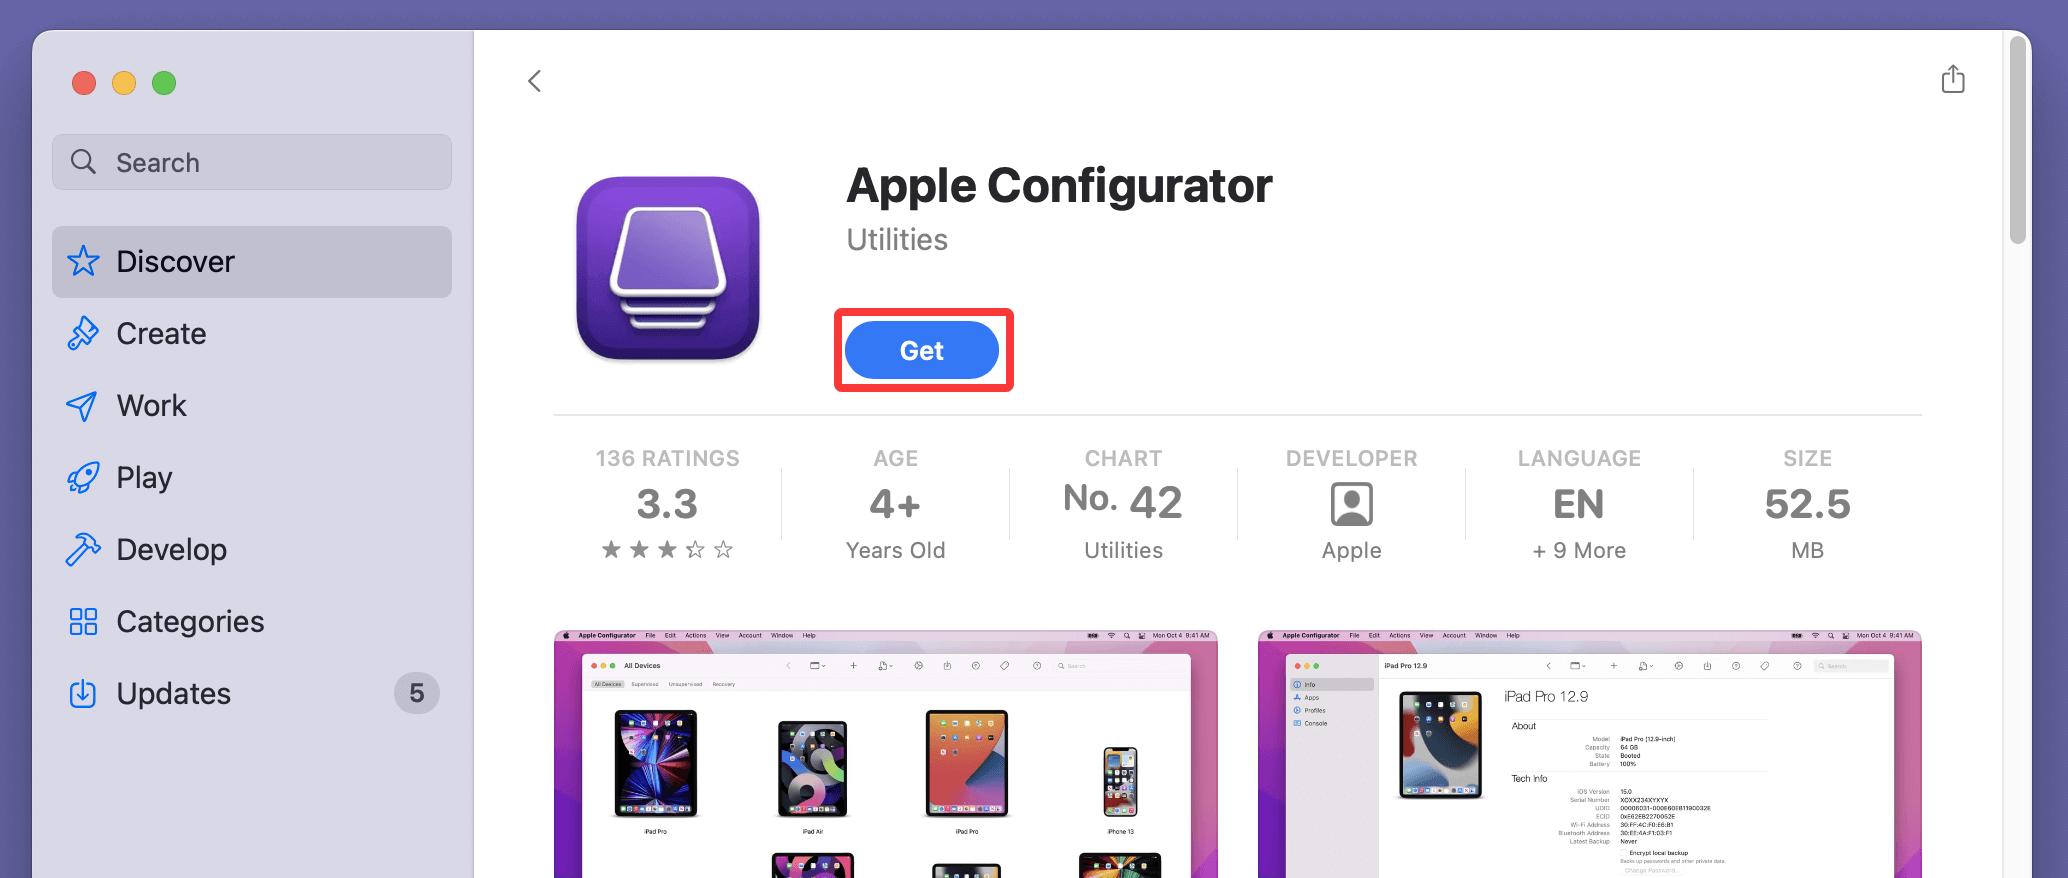
4️⃣ Use Apple Configurator for Apple Silicon Macs
If your Apple Silicon Mac refuses to enter Recovery Mode or continuously fails to reset, you may need to revive or restore its firmware using Apple Configurator 2. This method is especially useful if your Mac is bricked, stuck in a boot loop, or Recovery tools are missing or corrupted.
What Is Apple Configurator 2?
Apple Configurator 2 is a macOS app designed primarily for IT administrators to configure and restore Apple devices. It can also be a powerful tool for individuals needing to repair a malfunctioning Mac. When traditional recovery methods fail, Configurator allows you to revive the firmware (keeping your data) or restore the system to factory defaults (erasing all content and settings).
What You Need
- A second working Mac (Intel or Apple Silicon) running macOS 12 or later.
- Apple Configurator 2, available for free on the Mac App Store.
- A USB-C to USB-C cable, or a USB-A to USB-C cable if your working Mac only has USB-A ports.
- Stable internet connection for downloading macOS firmware.
Important Notes Before Proceeding
- A revive operation retains user data, but a restore will erase everything.
- This method applies only to Apple Silicon Macs like M1, M2, M3, M4, etc.
- Make sure both Macs are fully charged or connected to power.
Step-by-Step: Restore or Revive Your Apple Silicon Mac
Step 1: Prepare the Host Mac
- On the working Mac, download and install Apple Configurator 2 from the Mac App Store.
![fix common problems that prevent your Mac's factory reset]()
- Open the app and keep it running.
Step 2: Connect the Devices
- On your non-functioning Mac, insert the USB-C cable into the USB-C port nearest the screen.
- Connect the other end to the working Mac.
💡 Tip: For MacBook Air or MacBook Pro, use the left-side port closest to the lid hinge. For Mac mini, use the USB-C port farthest from the HDMI port.
Step 3: Enter DFU Mode on the Non-Working Mac
Here's how to enter DFU (Device Firmware Update) mode:
- MacBook with Apple silicon:
- For roughly ten seconds, simultaneously press and hold Power, Right Shift, Left Control, and Left Option.
- Let go of every key but the power button, then hold it down for ten more seconds.
- Mac mini with Apple silicon:
- Unplug power for 10 seconds.
- Reconnect power.
- Within 1 second of plugging in, press and hold the power button for about 10 seconds.
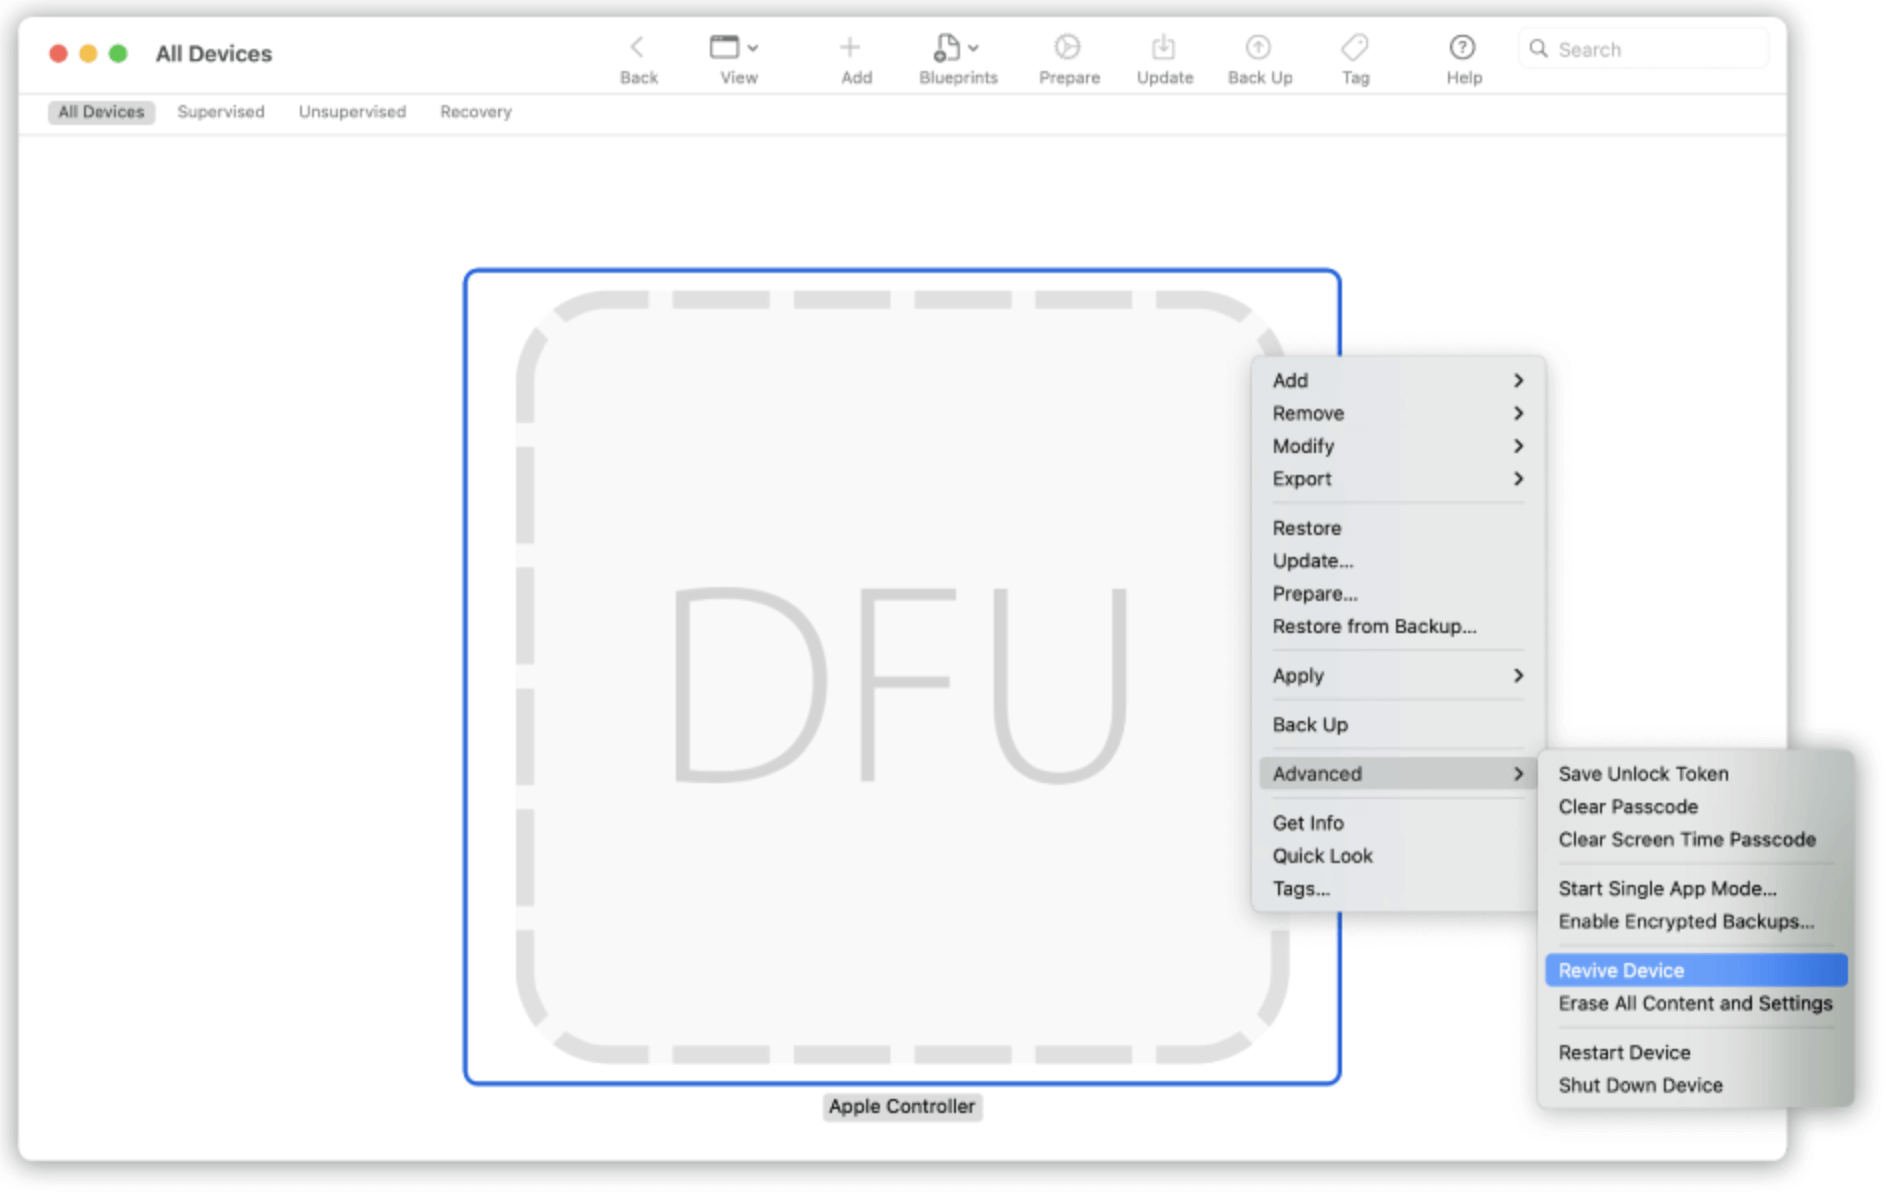
If done correctly, Apple Configurator 2 on the host Mac will show the DFU device with no icon - just a blank square and a serial number.
Step 4: Choose an Action
- To Revive the Mac:
- In Configurator, right-click the DFU icon and choose "Revive".
![fix common problems that prevent your Mac's factory reset]()
- This will reinstall the firmware and recoveryOS without deleting your files.
- In Configurator, right-click the DFU icon and choose "Revive".
- To Restore the Mac:
- Right-click > Restore.
- This option erases all data and reinstalls a fresh copy of macOS.
Step 5: Wait for the Process to Complete
- The process takes 15 - 45 minutes, depending on your internet speed.
- Do not disconnect either Mac or interrupt power during this process.
- Once complete, the Mac will reboot and show the setup assistant screen (just like a brand-new Mac).
Troubleshooting Tips
If Apple Configurator doesn't detect the device:
- Re-check the USB cable and port used.
- Try different USB ports or a different cable.
- Ensure the second Mac is running a supported version of macOS (12+).
- Quit and restart Apple Configurator 2.
- Reattempt DFU mode entry with exact timing.
If the process fails mid-way:
- Force shut down both Macs and start again.
- Check your internet connection.
- Try using "Revive" first, and if that doesn't work, try "Restore".
When to Use This Method
Use Apple Configurator if:
- Your Mac is completely unresponsive to power button presses.
- macOS Utilities are missing or broken.
- Recovery attempts fail repeatedly.
- You see a globe with an exclamation point (failed internet recovery).
Using Apple Configurator might seem like a more complex route, but for deeply stuck or corrupted Apple Silicon Macs, it’s one of the most effective ways to get your device back up and running.
5️⃣ Reset NVRAM and SMC (Intel Macs Only)
Sometimes, a simple reset of system memory settings can help.
Reset NVRAM:
- Turn Off the Mac.
- Turn it on and immediately press:
Option + Command + P + R
- Hold the keys for 20 seconds.
Reset SMC (System Management Controller):
- For Macs with a T2 chip:
- Shut down.
- Hold Right Shift + Left Option + Left Control for 7 seconds.
- After that, hold down the power button for an additional seven seconds.
- Release all keys, wait a few seconds, then turn on the Mac.
More Fixes for Mac OS Factory Reset
Fixing Internet Recovery Mode Issues
Internet Recovery can fail due to connection problems or DNS issues.
Try These Fixes:
- Switch to Ethernet for a more stable connection.
- Choose a reliable Wi-Fi network (avoid captive portals like public hotspots).
- Reset NVRAM (as shown above).
- Launch Terminal from the Recovery menu and change DNS:
networksetup -setdnsservers Wi-Fi 8.8.8.8 8.8.4.4
- Restart and try again.
If the issue persists, consider downloading a macOS installer onto a USB and using it to reinstall macOS manually.
Removing Activation Lock and iCloud Account
Activation Lock is tied to your Apple ID and is a security feature. If not disabled, it will prevent factory reset completion.
To Disable Activation Lock:
- Go to Apple Menu > System Settings > Apple ID.
- Click Sign Out.
- Enter your Apple ID password to turn off Find My Mac.
If you're selling the Mac, make sure you do this before erasing the device. If you bought a second-hand Mac and it's activation locked, contact the seller. Only Apple or the original owner can unlock it.
Using Terminal to Erase Disk (Advanced Users)
If Disk Utility fails, Terminal provides more control:
- Open Terminal from Utilities > Terminal in Recovery Mode.
- Use the following commands:
diskutil list
(Note your disk ID, e.g., disk2)
diskutil eraseDisk APFS "Macintosh HD" /dev/disk2
💡 Caution: This will permanently erase all data on the specified disk.
When to Contact Apple Support
If all methods fail, there may be a hardware or firmware-level issue. You should:
- Schedule a Genius Bar appointment
- Contact Apple Support online or via phone
- Use Apple's Remote Support app
Signs you may need expert help:
- Mac won't boot at all (no chime, no screen)
- Recovery mode is corrupt or inaccessible
- System firmware restore fails repeatedly
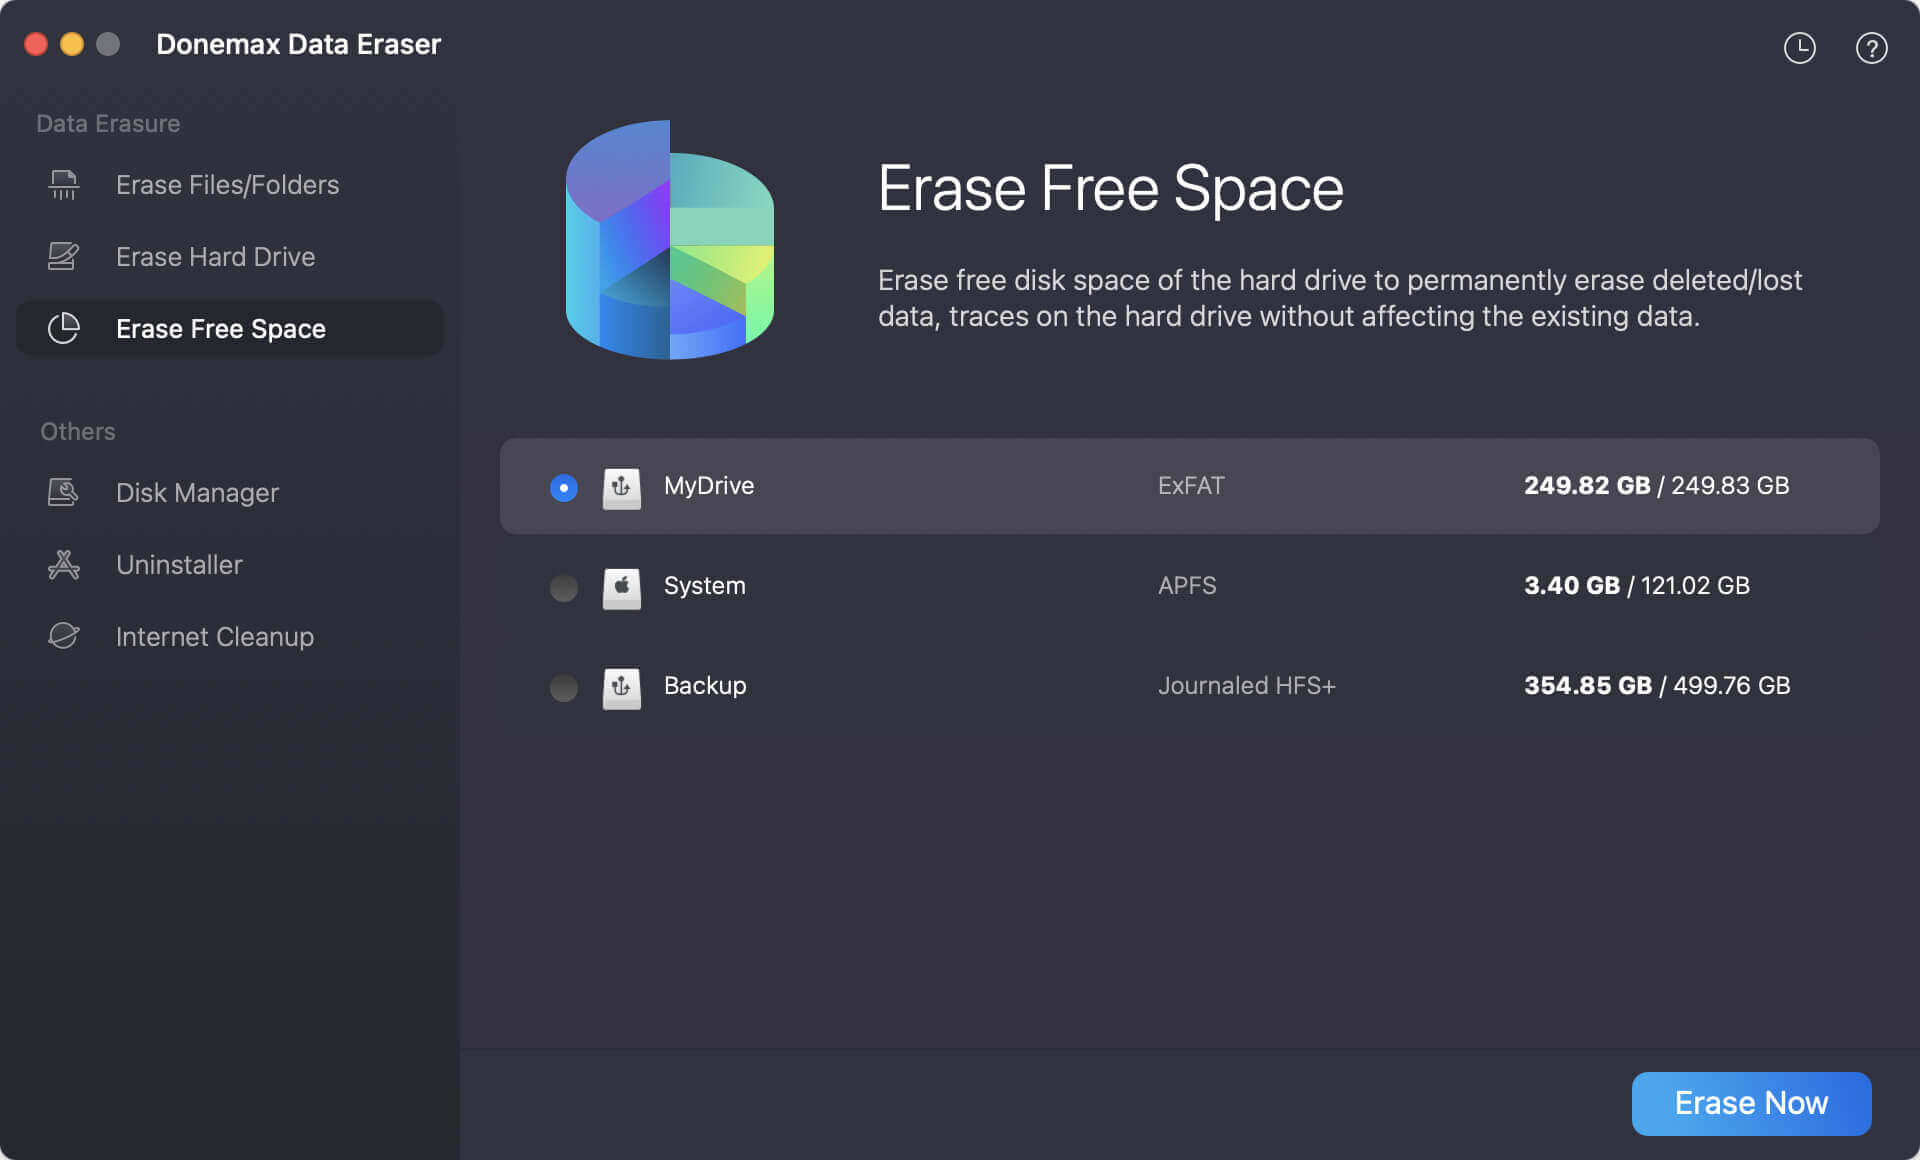
Using Mac Disk Wipe Software
To permanently erase data from a Mac, you can try Mac disk wipe software - such as Donemax Data Eraser for Mac.
Donemax Data Eraser for Mac
- Wipe a hard drive on Mac.
- Permanently shred files, wipe hard drive, wipe free disk space, etc.
- Once the data is erased, it is lost for good, can't be recovered by any method.
For example, to prevent data recovery, just choose Erase Free Space mode. Then select Macintosh HD, click on Erase Now button.
Preventive Tips for Future Mac Factory Resets
Avoid reset headaches next time by following these best practices:
- Back up regularly with Time Machine or cloud services.
- Keep your system updated to the latest macOS version.
- Unlink your Apple ID before handing off or selling your Mac.
- Create a bootable macOS USB for emergency reinstalls.
For example, you can use Donemax Disk Clone for Mac to help create a bootable clone backup for your Mac.
Step 1. Download and install Donemax Disk Clone for Mac on your Mac. Connect an external hard drive to your Mac.
Step 2. Open Donemax Disk Clone for Mac, choose OS Clone mode. Then select the external hard drive as the destination drive.

Step 3. Click on Clone Now button. It will clone everything including macOS, apps, settings, user data from Mac's internal disk to the external hard drive, creating a full bootable clone backup.

Conclusion
A factory reset should be straightforward, but sometimes technical glitches can turn it into a frustrating experience. Whether your Mac refuses to enter Recovery Mode, won't erase, or gets stuck mid-reset, the fixes above cover everything from simple key combos to advanced solutions like Apple Configurator and Terminal commands.
The most important steps are identifying your Mac type, using the correct recovery method, and ensuring all essential services like iCloud and network connections are properly configured. With a little patience and the right steps, your Mac will be back to factory condition - clean, fast, and ready for a fresh start.
Donemax Data Eraser for Mac
100% safe and powerful Mac data erasure program. It offers certified data erasure standards including U.S. Army AR380-19, DoD 5220.22-M ECE to help in securely and permanently erase data from Mac HDD/SSD and external storage device, making data recovery be impossible.
Related Articles
- Apr 20, 2026How to Factory Reset macOS Mojave: Step-by-Step Secure Guide (2026)
- Mar 03, 2025How to Wipe a USB Flash Drive on Mac: A Comprehensive Guide
- Nov 15, 2024Best Hard Drive Erasing Tool for Mac: A Comprehensive Guide
- Sep 28, 2025How to Wipe Startup Disk on macOS Tahoe?
- Apr 20, 2026How to Permanently Erase Data on macOS Ventura (100% Unrecoverable)
- Oct 13, 2025Permanently Erase Data in APFS File System

Contributing Writer
Charles
Charles, who lives in Sydney, Australia, is an editor & writer of Donemax Team. He is good at writing articles related with Apple Mac computers, Windows operating systems, data recovery, data erasure, disk clone and data backup, etc. He loves reading and playing tennis in his spare time and is interested in testing new digital devices such as mobile phones, Macs, HDDs, SSDs, digital cameras, etc.

Editor in chief
Gerhard Chou
In order to effectively solve the problems for our customers, every article and troubleshooting solution published on our website has been strictly tested and practiced. Our editors love researching and using computers and testing software, and are willing to help computer users with their problems