
Written byCharlesUpdated on Apr 18, 2025
How to Factory Reset an M3-Chip Mac?
Approved byGerhard Chou
Before we start: If you will sell, donate or dispose of an old M3-chip Mac, you can use Mac disk wipe software - Donemax Data Eraser to securely and permanently erase all data from the M3-Mac's internal disk. Once the data is erased by Donemax Data Eraser for Mac, the data is lost for good, can't be recovered by any method.
PAGE CONTENT:
Factory resetting a Mac can be a helpful and necessary step for many reasons, such as troubleshooting persistent issues, preparing a device for resale, or restoring performance. With the launch of the M3 chip, Apple has introduced significant improvements in performance, but the process of factory resetting a Mac remains relatively similar to previous Intel-based models, with some small differences to keep in mind. This guide will walk you through the process of factory resetting an M3-chip Mac, covering everything from preparing your data to troubleshooting common issues.
About Factory Reset and M3 Chip
What is Mac Factory Reset?
A factory reset refers to returning a device to its original settings, essentially erasing all data and returning it to a fresh state. This process is often necessary before selling a Mac, especially to ensure all personal data is wiped out. It can also resolve performance issues and provide a fresh start if your Mac is running slowly or experiencing persistent software glitches.
For M3-chip Macs, the reset process is very similar to previous models, but the M3 chip's advanced features may affect how certain aspects of the reset are carried out, especially when dealing with storage management and macOS versions. If you're ready to factory reset your M3-chip Mac, this guide will provide step-by-step instructions to ensure you do so safely and correctly.
About the M3-Chip Mac
Before diving into the factory reset process, let's briefly understand the M3 chip and its relevance to this procedure.
The M3 chip, as part of Apple's custom silicon line, was designed to provide better performance, energy efficiency, and faster processing compared to the Intel processors previously used in Macs. It integrates the CPU, GPU, and Neural Engine on a single chip, offering a highly optimized experience for macOS users.
While the M3 chip offers improved performance, the process of resetting it doesn't differ significantly from older Mac models. However, it's important to be aware of a few key things:
- Storage and Data: The M3-chip Macs use SSD storage (solid-state drives), which allows for faster data access and erasure.
- macOS Compatibility: M3 Macs are designed to run macOS versions optimized for Apple Silicon. The recovery tools and installation processes are tailored to this architecture.
Understanding these factors can help you better navigate the reset process and ensure your Mac is properly prepared for either resale or a fresh start.
Before Factory Resetting M3 Mac
Before you start the factory reset process, there are several preparatory steps to take. These steps ensure that your data is safely backed up and that your Mac is properly set up for the reset.
▪️ Back Up Your Data
The most important step before resetting your Mac is to back up your data. Once you factory reset your Mac, all data on the internal storage will be erased, so ensure you have a reliable backup of your important files.
There are two primary methods to back up your Mac:
- Time Machine: Apple's built-in backup solution. Connect an external drive to your Mac and use Time Machine to back up all your files, apps, and system settings.
- To use Time Machine, go to System Settings > General > Time Machine and select the backup disk. Once set up, you can manually initiate a backup or let Time Machine back up your data automatically.
- iCloud Backup: If you use iCloud to store your documents, photos, and app data, make sure iCloud is synced with your device. Go to System Settings > Apple ID > iCloud to confirm your data is being synced.
- Clone Backup: You can use disk cloning software - such as Donemax Disk Clone for Mac to clone everything of the M3 Mac to an external hard drive, making a full bootable clone backup.
It's always a good idea to back up to multiple locations (e.g., Time Machine and iCloud) for redundancy.
▪️ Sign Out of Services
Before resetting, sign out of your Apple services to ensure your data is not tied to your Apple ID after the reset:
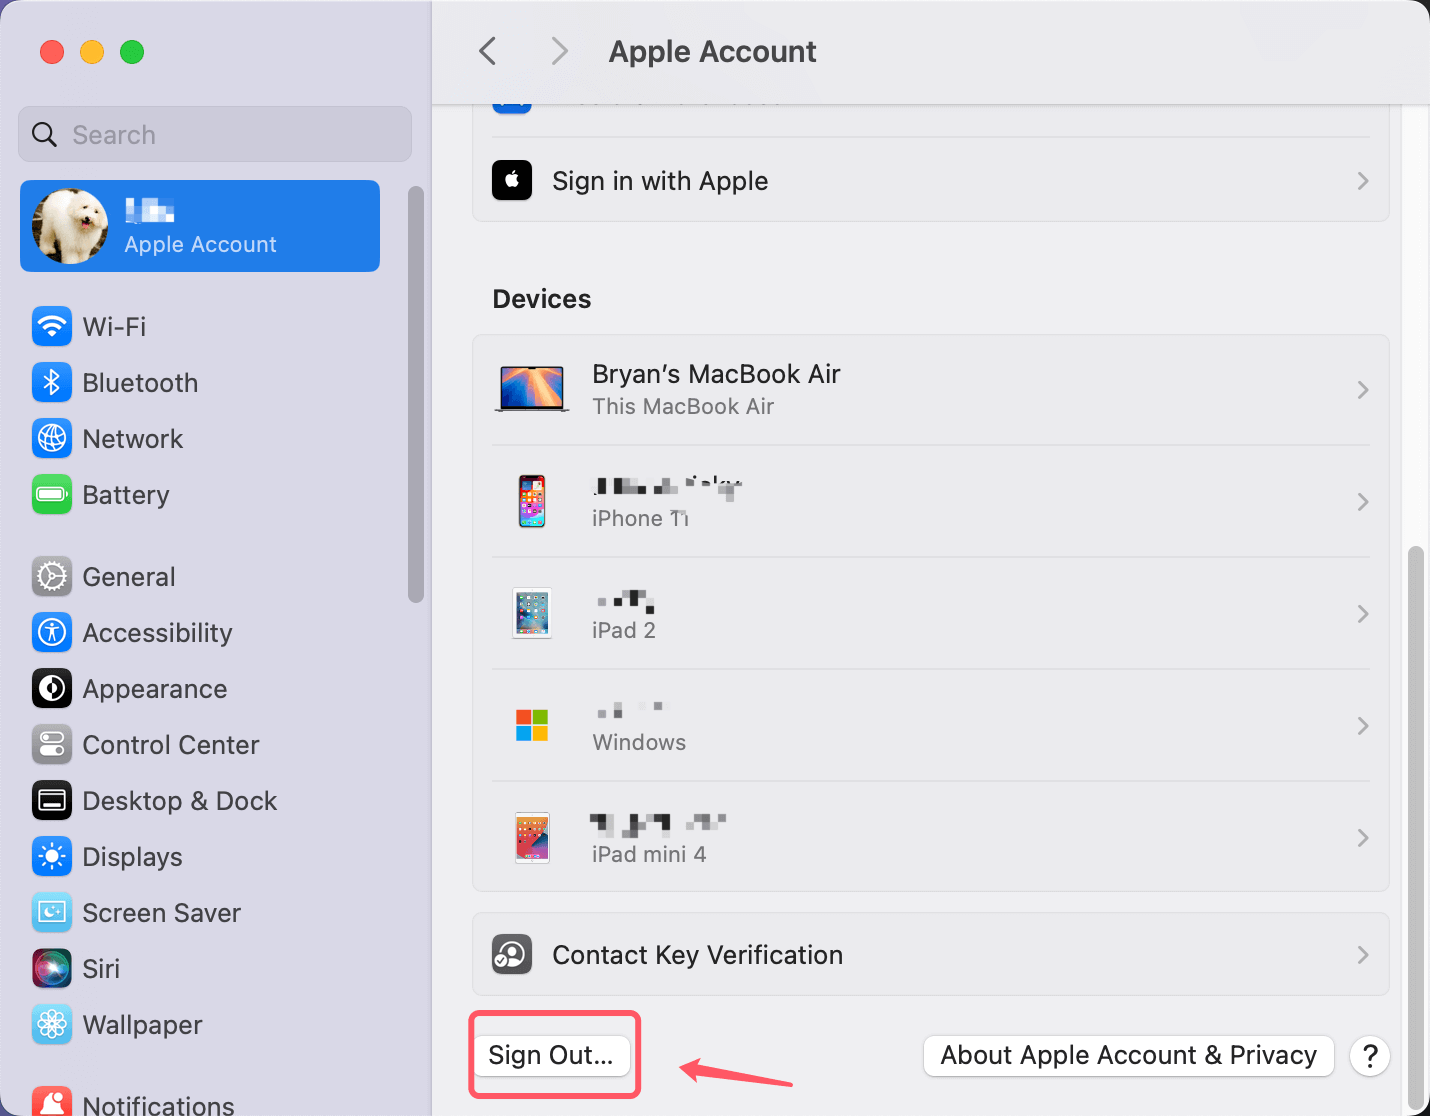
- iCloud: Go to System Settings > Apple ID > iCloud, then select Sign Out. This will ensure that iCloud data, such as contacts, calendars, and photos, is safely handled.
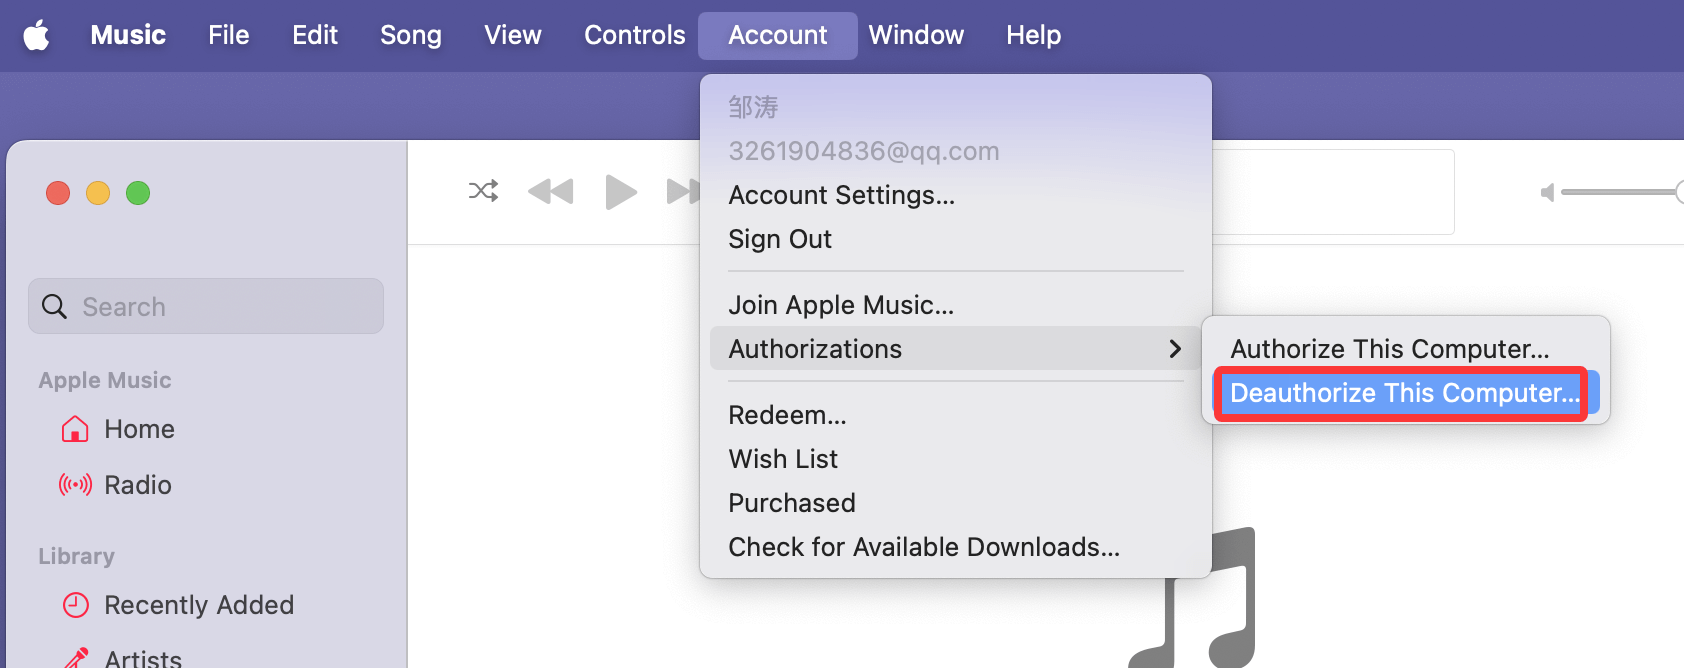
- iTunes & Apple Music: Open the Music or iTunes app, and from the Account menu, select Deauthorize This Computer to ensure the Mac is removed from your account's authorized devices list.
![factory resetting an M3-chip Mac]()
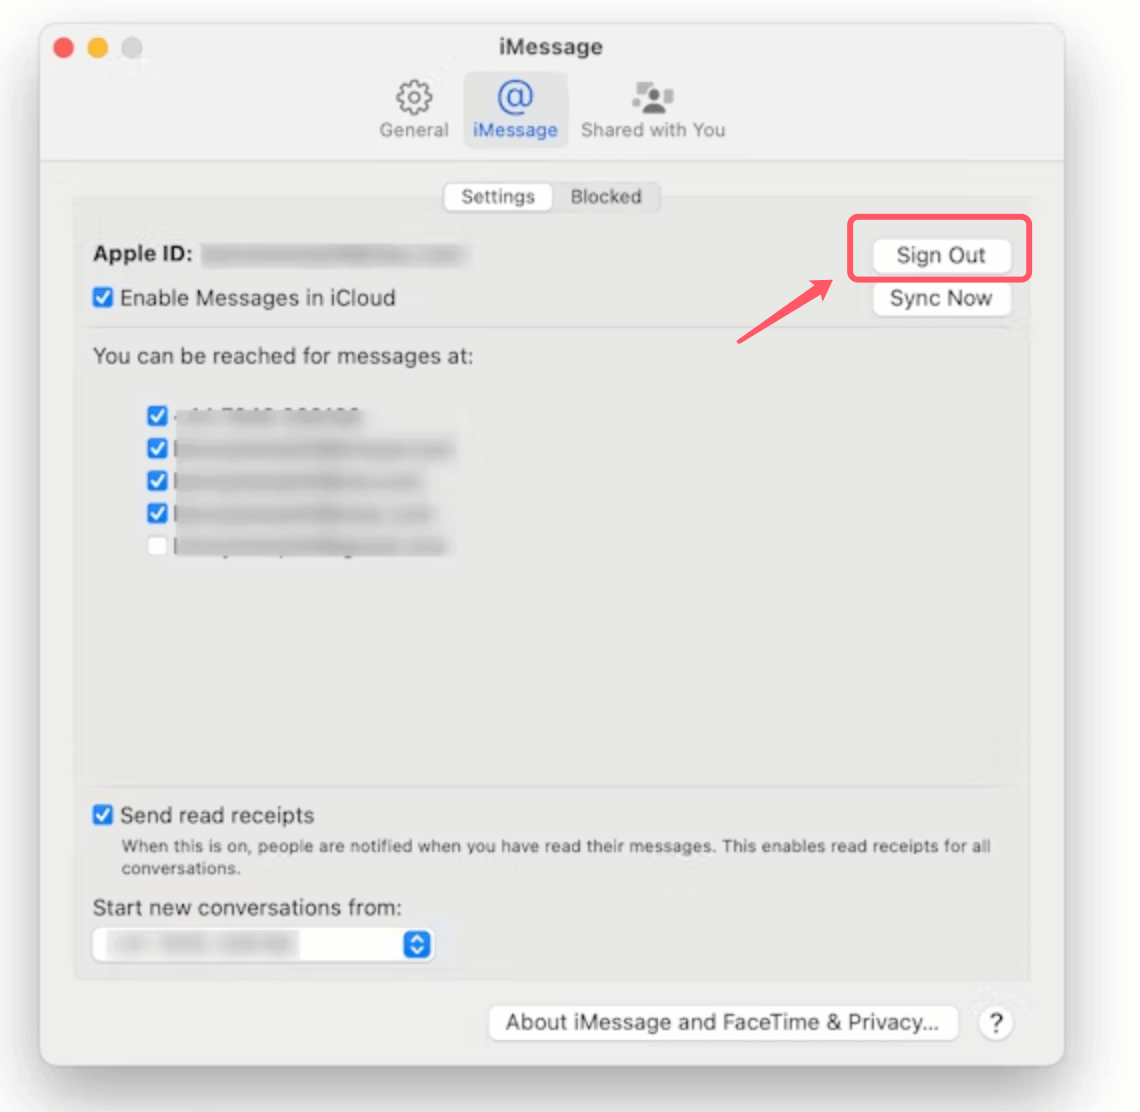
- iMessage: Open the Messages app, go to Messages > Settings, and select Sign Out from your iMessage account.
![factory resetting an M3-chip Mac]()
Signing out of these services will prevent issues related to your Apple ID and activation lock.
▪️ Deauthorize from Other Apps
If you use third-party apps that require activation, such as Adobe Creative Cloud or Microsoft Office, be sure to deauthorize those apps. This ensures you can use them again on a new device or after reinstalling macOS.
▪️ Ensure a Stable Power Supply
A factory reset requires your M3 Mac to restart multiple times. To avoid interruptions, ensure your Mac is connected to a power source during the entire process. Avoid performing a reset on battery power unless the battery is fully charged.
Steps to Factory Reset an M3-Chip Mac
Now that you've prepared your Mac, it's time to start the factory reset process. Follow the steps below carefully to ensure a smooth reset.
Step 1: Restart the M3 Mac in Recovery Mode
The first step is to boot into macOS Recovery Mode. This mode allows you to erase your hard drive and reinstall macOS.
To enter Recovery Mode on an M3-chip Mac:
- Turn Off your Mac completely.
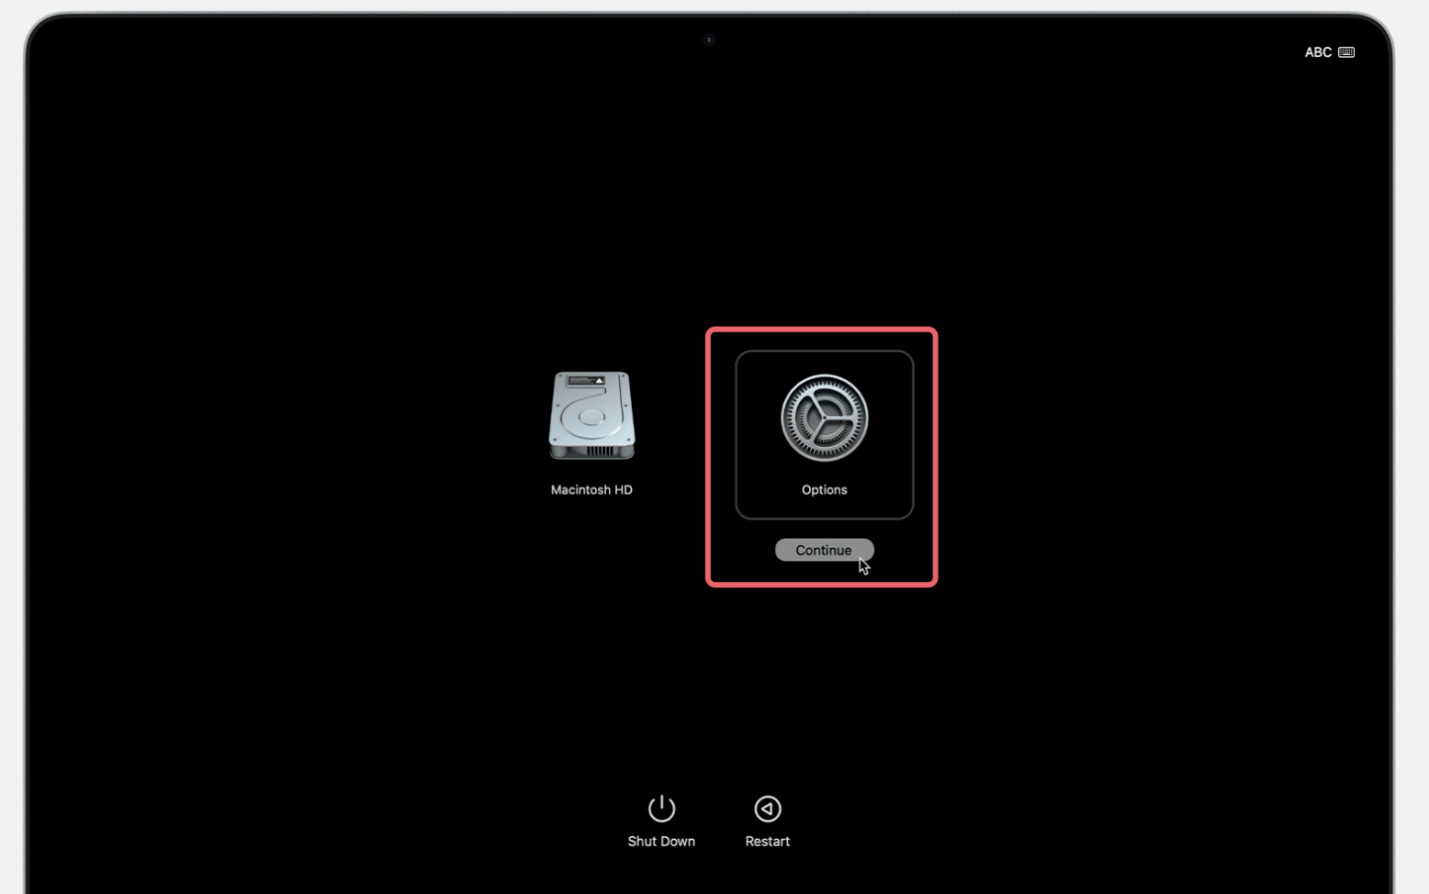
- Hold down the power button until the startup options screen appears, which will include choices such as "Macintosh HD" and "Options."
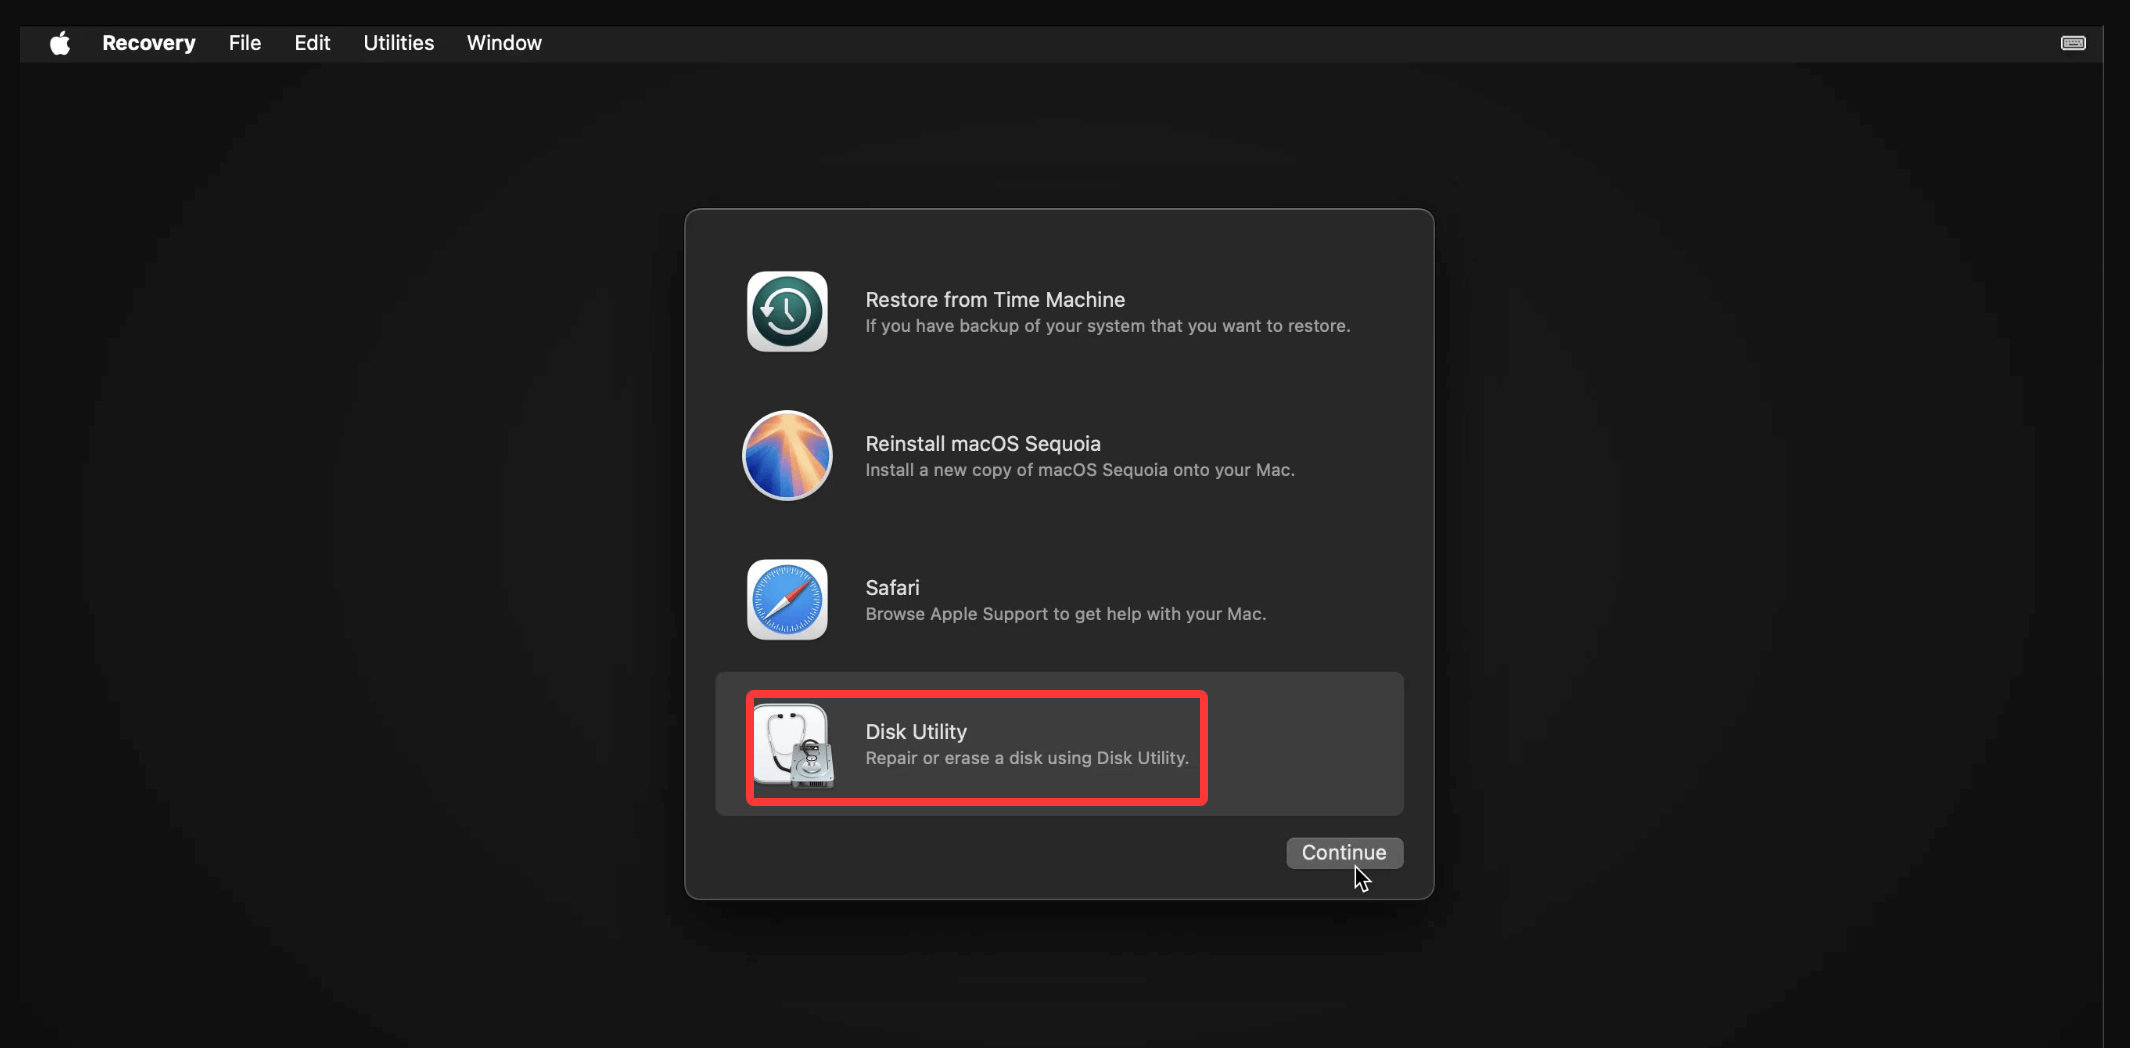
- Click on Options, then click Continue to boot into Recovery Mode.
![factory resetting an M3-chip Mac]()
In Recovery Mode, you’ll have access to Disk Utility, Reinstall macOS options, and other recovery tools.
Step 2: Erase the Mac's Hard Drive
Once you're in Recovery Mode, the next step is to erase the internal storage (hard drive or SSD). This will remove all data from your Mac.
- From the Recovery Mode screen, select Disk Utility and click Continue.
![factory resetting an M3-chip Mac]()
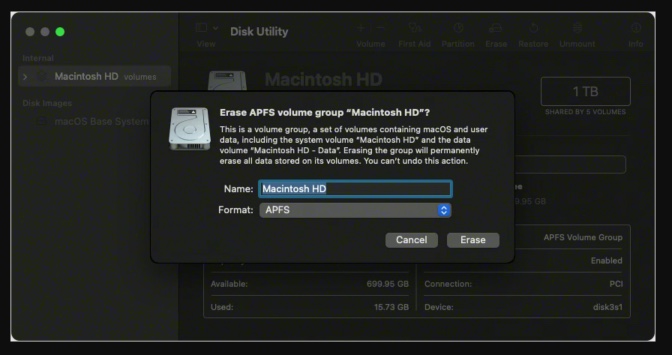
- In Disk Utility, select your internal drive from the list on the left (usually labeled "Macintosh HD" or the name of your internal drive).
- Click Erase at the top of the window. Choose a format - typically, you'll want to choose APFS (Apple File System) for modern Macs with M3 chips. If you're unsure, choose the default APFS option.
![factory resetting an M3-chip Mac]()
- Confirm the erasure process. This will delete all data on the drive.
Once the drive is erased, you can move on to reinstalling macOS.
Step 3: Reinstall macOS on M3 Mac
After erasing the drive, the next step is to reinstall macOS. This will give you a fresh copy of the operating system, ready to set up from scratch.
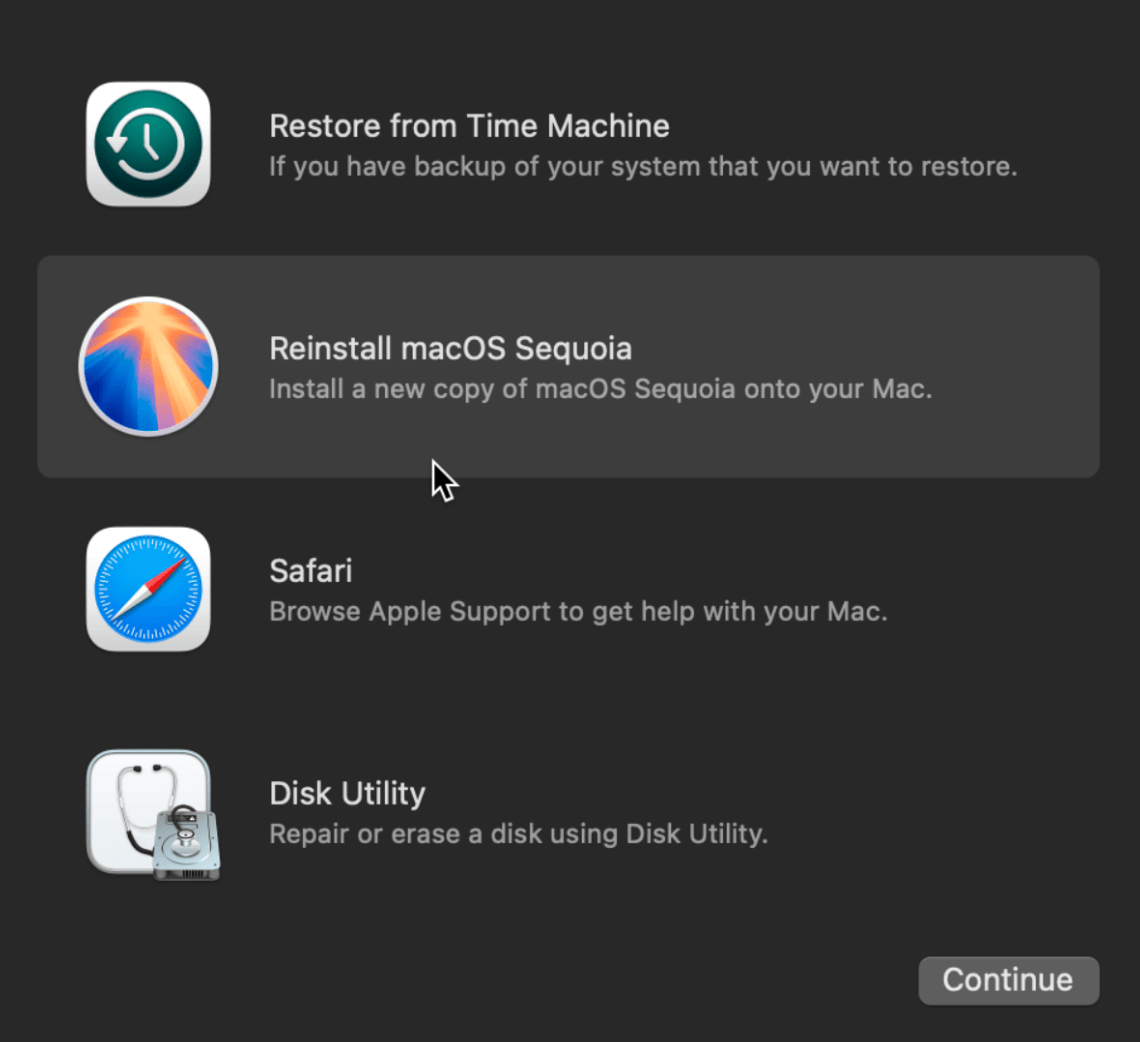
- Exit Disk Utility and return to the macOS Recovery window.
- Click Continue after selecting Reinstall macOS.
![factory resetting an M3-chip Mac]()
- To start the installation, adhere to the on-screen instructions. The most recent macOS version that is compatible with your M3 chip will be downloaded and installed on your Mac.
- Upon completion of the installation, your Mac will restart.
Step 4: Set Up as New or Restore from Backup
After macOS is installed, you'll be greeted by the initial setup screen. Here, you can either set up your Mac as a new device or restore your data from a previous backup.
- To set up as new, follow the on-screen prompts to create a new user account and configure your preferences.
- To restore from a backup, you can select the option to restore from a Time Machine or iCloud backup.
At this point, your Mac should be restored to factory settings, and you can start fresh or restore all of your data.
💡 Note: The lost data which is erased by Disk Utility or lost due to factory reset the M3 Mac is not lost for good, and can be recovered by Mac data recovery software.
🔗 Related link: how to recover lost data after factory reset a Mac
Step 5: Permanently Wipe Data on M3 Mac
If you will sell or donate your M3 Mac, you should permanently erase all data from the internal disk, ensure no information is recoverable. Mac disk wipe software - such as Donemax Data Eraser for Mac. It offers certified data erasure standards to help in securely and permanently erasing data on Mac including M3-chip Mac.
Donemax Data Eraser for Mac
- Securely and permanently erase existing data and deleted/lost data from M3 Mac.
- Certified data erasure standards including HMG Infosec Standard 5, NIST 800-88, Peter Gutmann's algorithm, DoD 5220.22-M, U.S. Army AR380-19, DoD 5220.22-M ECE.
- 100% safe disk wipe software.
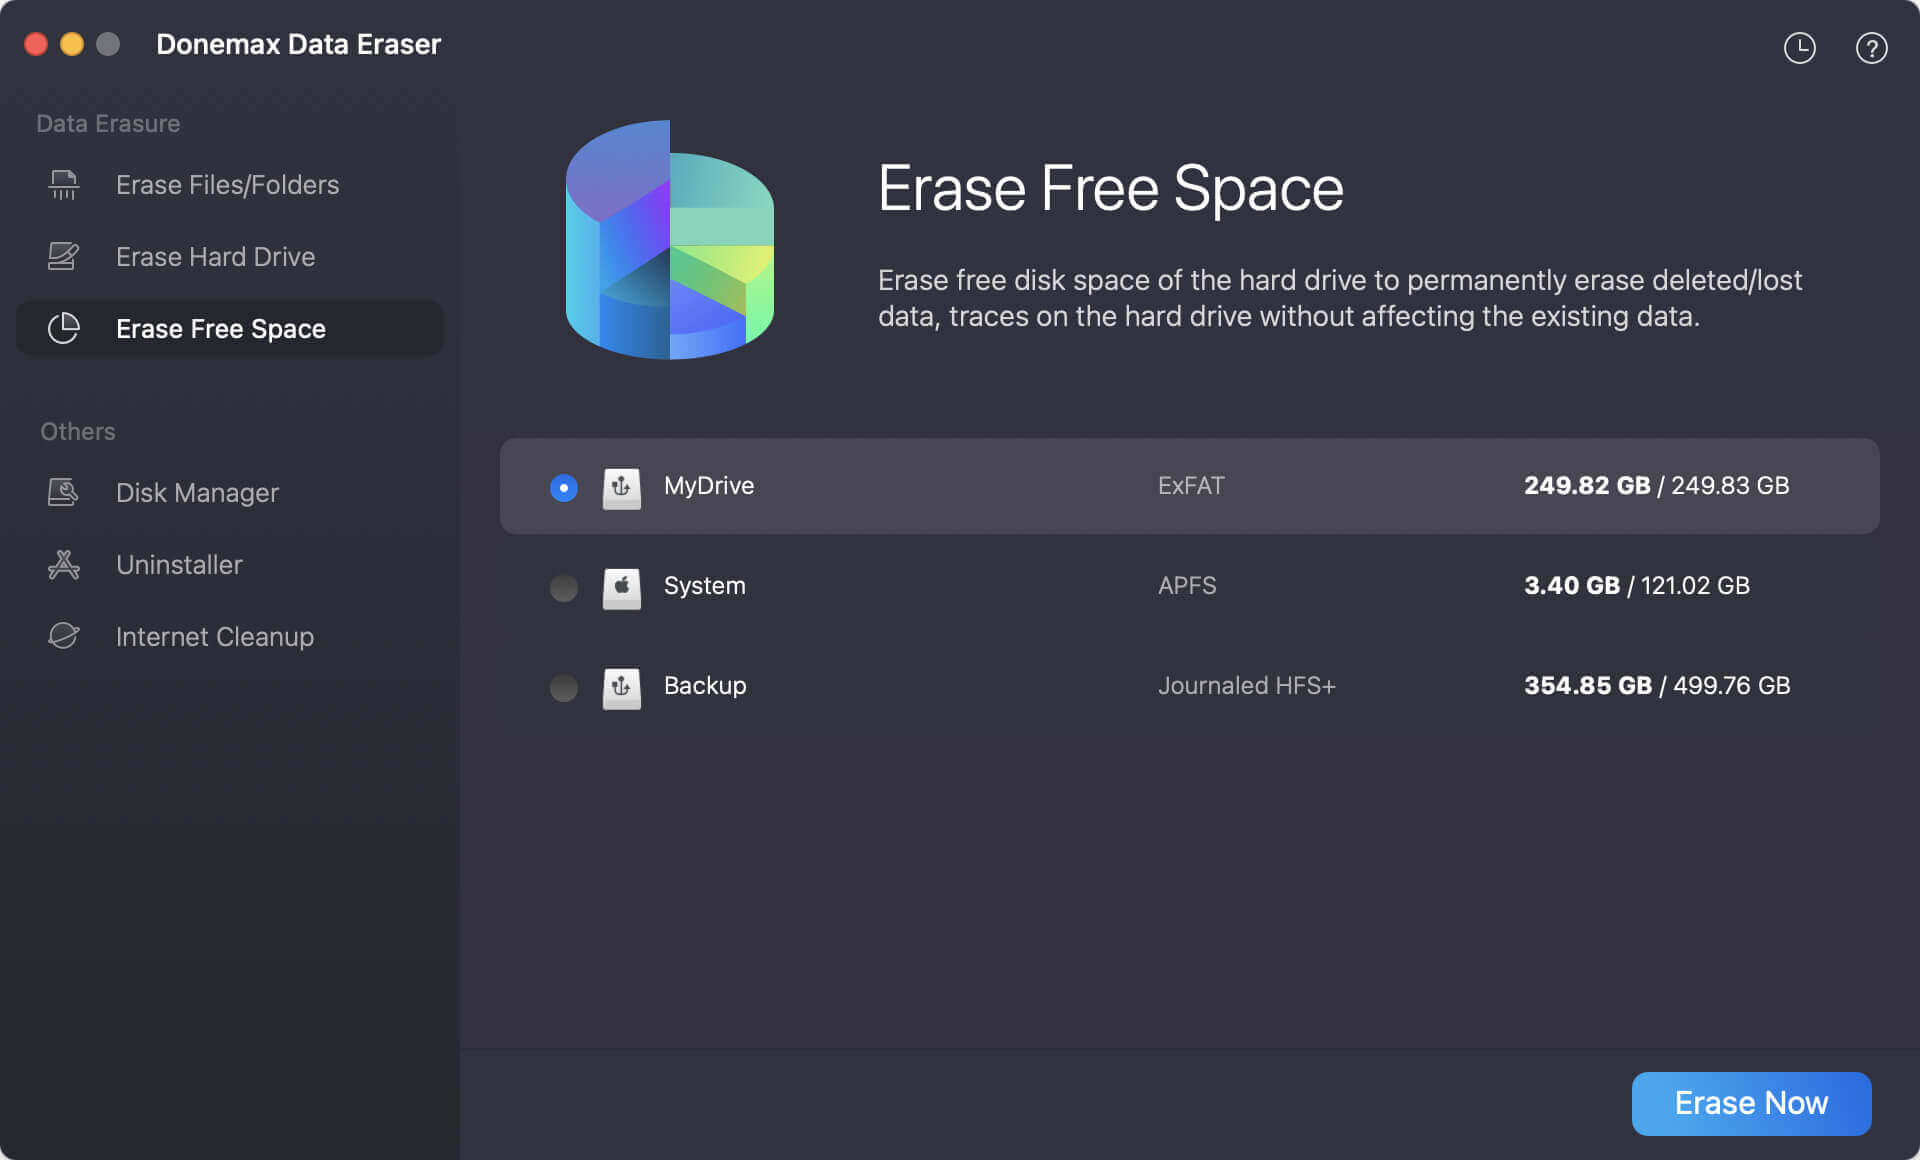
After factory resetting your M3 Mac, you can use Donemax Data Eraser for Mac to wipe free disk space of the internal disk and permanently erase all deleted/lost data from the M3 Mac.
Step 1. Download and install Donemax Data Eraser for Mac on your M3 Mac, then open it, choose Erase Free Space mode.
Step 2. Select Macintosh HD, click on Erase Now button to securely and permanently erase all deleted/formatted/lost data from the internal disk. It won't erase the existing data.
M3 Mac Factory Reset Troubleshooting Common Issues
During the reset process, you may encounter some issues. Below are solutions for common problems.
▪️ Unable to Enter Recovery Mode
If you can't enter Recovery Mode, try the following:
- Force Restart: Try again after shutting down your Mac and holding down the power button until the startup options menu appears.
- Use Internet Recovery: If the local Recovery partition is missing or corrupted, restart your Mac and hold Option + Command + R to start from Internet Recovery.
▪️ Drive Won't Erase
If Disk Utility can't erase the drive, try:
- First Aid: Run Disk Utility's First Aid tool to fix any disk issues before erasing.
- Use Terminal: In Recovery Mode, use the Terminal app to manually erase the drive via commands like diskutil eraseDisk.
▪️ What to Do After Factory Reset
Once the factory reset is complete, your Mac is now restored to its original state. Here’s what to do next:
- Reinstall any necessary apps from the App Store or other sources.
- Restore data from your backup.
- Set up any accounts or preferences that you need.
If you're selling or giving away your Mac, you can hand it over at this stage, ensuring it's in a fresh state for the next user.
Conclusion
Factory resetting your M3-chip Mac is a straightforward process that can help resolve issues, clear personal data, and provide a fresh start. By complying the steps described in this guide, you can reset your Mac safely and efficiently, ensuring that all personal information is erased and the system is restored to its factory settings. Always remember to back up your data beforehand, as once the reset is complete, all your information will be lost. With your Mac reset, you'll be ready to either set it up as new or prepare it for resale or transfer.
Donemax Data Eraser for Mac
100% safe and powerful Mac data erasure program. It offers certified data erasure standards including U.S. Army AR380-19, DoD 5220.22-M ECE to help in securely and permanently erase data from Mac HDD/SSD and external storage device, making data recovery be impossible.
Related Articles
- Nov 25, 2024How to Permanently Erase Data on macOS Monterey – A Comprehensive Guide
- Dec 19, 20255 Best File Shredder for macOS Ventura
- Aug 21, 2023How to Permanently Erase Data on MacBook Air?
- Oct 15, 2025Three Methods to Format Hard Drive on Mac
- Oct 02, 2024How to Wipe Startup Disk on macOS Sequoia?
- Oct 13, 2025Wipe MacBook Data Permanently before You Sell it

Contributing Writer
Charles
Charles, who lives in Sydney, Australia, is an editor & writer of Donemax Team. He is good at writing articles related with Apple Mac computers, Windows operating systems, data recovery, data erasure, disk clone and data backup, etc. He loves reading and playing tennis in his spare time and is interested in testing new digital devices such as mobile phones, Macs, HDDs, SSDs, digital cameras, etc.

Editor in chief
Gerhard Chou
In order to effectively solve the problems for our customers, every article and troubleshooting solution published on our website has been strictly tested and practiced. Our editors love researching and using computers and testing software, and are willing to help computer users with their problems