
Written byCoco LinUpdated on Sep 25, 2025
Photos Disappeared after macOS Tahoe Update: How to Recover?
Approved byGerhard Chou
Before we start: Some issues might cause photos disappeared after macOS Thaoe update. Fortunately, there are multiple methods to recover the missing photos. Donemax Data Recovery for Mac is an effective to recover lost photos, documents, videos and other files.
PAGE CONTENT:
Updating your Mac to the latest macOS Tahoe should ideally bring exciting new features, improved performance, and enhanced security. However, some users have reported a frustrating issue after the upgrade—their photos disappeared. Whether images have gone missing from the Photos app, albums are empty, or iCloud Photos seem out of sync, this problem can feel alarming.

The good news is that in most cases, your pictures are not permanently lost. They may just be temporarily hidden, unsynced, or stuck in a corrupted library. With the right troubleshooting steps, you can recover them.
In this guide, we'll explain the common causes of photos disappearing after macOS Tahoe update, provide step-by-step fixes, and share tips to prevent future photo loss.
Why Do Photos Disappear After macOS Tahoe Update?
Before jumping into solutions, it helps to understand the potential causes:
- iCloud Sync Issues – The update may disable or interrupt iCloud Photos sync, making your images appear missing.
- Photos Library Corruption – System upgrades can sometimes corrupt the Photos library, preventing images from showing.
- Hidden Photos or Albums – Some photos may still exist but are hidden in the Photos app.
- Spotlight Indexing Delays – After a major update, Spotlight takes time to reindex your system, which can temporarily "hide" files.
- Storage Optimization Settings – macOS might offload full-resolution photos to iCloud, leaving only thumbnails behind.
- Accidental Deletion – Photos may have been unintentionally deleted during the update process.
Now let's move on to the solutions.
Quick Checks for Disappeared Photos after macOS Tahoe Update
Before diving into deeper fixes, try these quick checks:
- Restart your Mac and Photos app – A simple restart can sometimes refresh the Photos library.
- Check your Mac's storage – Go to Apple Menu > About This Mac > Storage to confirm enough space is available.
- Verify internet connection – iCloud Photos requires a stable connection to sync your pictures.
If none of these work, proceed with the detailed fixes below.
Methods to Recover Missing Photos after macOS Tahoe Update
1. Check the Recently Deleted Album
Sometimes, photos may have been accidentally deleted during the update. Thankfully, they may still be in the Recently Deleted folder.
- Open the Photos app.
- In the sidebar, scroll down to Recently Deleted.
- Browse through the images.
- Select the ones you want to restore and click Recover.
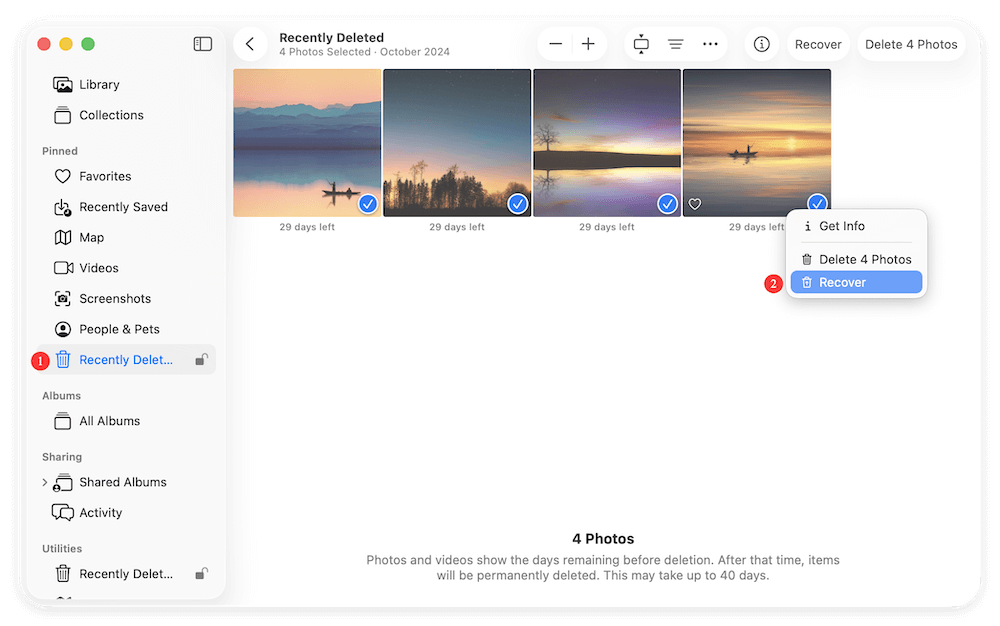
Note: Photos remain in Recently Deleted for 30 days before being permanently erased.
2. Re-enable iCloud Photos
If your images were synced with iCloud, they may have disappeared simply because iCloud Photos got turned off.
- Go to Apple Menu > System Settings.
- Click on your Apple ID > iCloud.
- Select Photos and ensure iCloud Photos is turned on.
- Give your Mac some time to resync with iCloud.
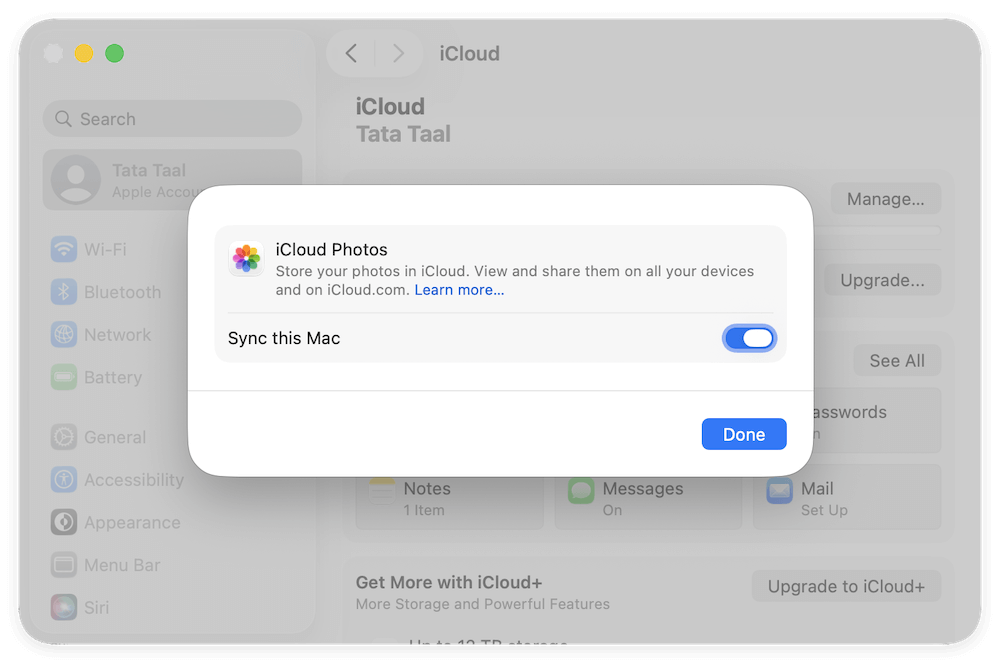
If you previously used Optimize Mac Storage, only thumbnails may appear. Turning off optimization (if space allows) will download full-resolution photos back to your device.
3. Rebuild the Photos Library
One of the most common reasons why photos disappear after updating to macOS Tahoe is a corrupted or unstable Photos Library. This library is a database that stores all of your images, albums, and metadata (like edits, tags, and organization). When macOS undergoes a major update, system changes can sometimes cause indexing errors or corrupt database files, which makes photos temporarily inaccessible.
The good news is that Apple provides a built-in tool called the Photos Repair Library feature that can scan your library for inconsistencies and fix them without deleting your images.
When to Use This Method
- If your Photos app opens but albums look empty.
- If thumbnails appear as blank or broken icons.
- If you notice missing edits, keywords, or photo metadata.
- If you've already tried iCloud re-sync and "Recently Deleted" with no luck.
Steps to Rebuild the Photos Library on macOS Tahoe
- Quit the Photos app if it's already open.
- Hold down the Option + Command keys simultaneously.
- While holding the keys, open the Photos app.
- A pop-up window will appear asking if you want to Repair the Library.
- Click Repair.
![recover photos after macOS Tahoe update]()
- Enter your macOS administrator password when prompted.
- Wait for the repair process to finish—this may take from a few minutes to several hours depending on:
- The size of your Photos library.
- Whether your library is stored locally or linked with iCloud.
- The speed of your Mac's hardware.
![recover photos after macOS Tahoe update]()
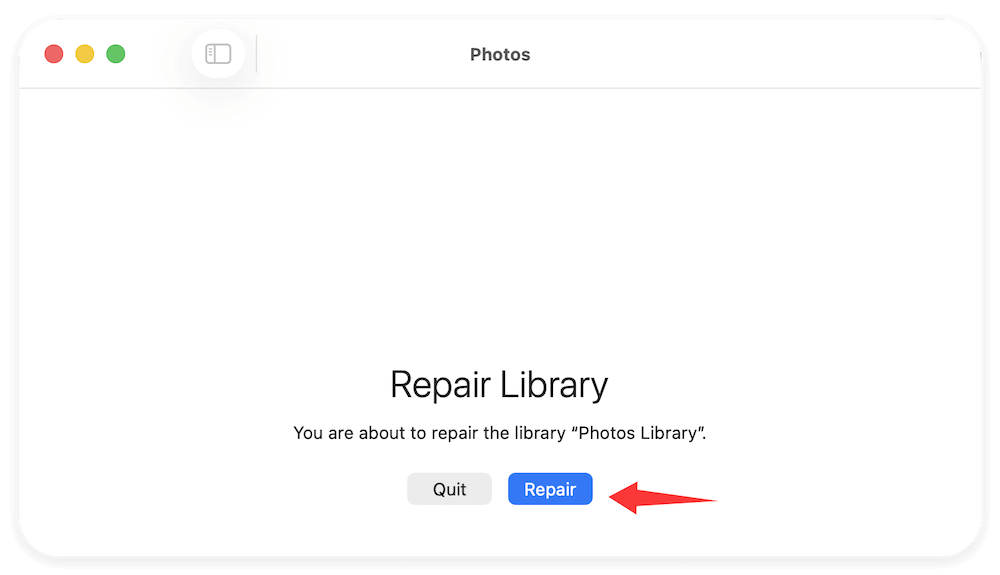

Once the repair is complete, your Photos app will reopen, and you should check if the missing images are restored.
Things to Keep in Mind
- Backup First: Although the repair tool is designed not to delete files, it's a good idea to make a Time Machine backup or copy of your Photos Library before starting.
- iCloud Users: If your Photos Library is linked with iCloud Photos, the repair process will also trigger a resync with iCloud. This means your Mac will re-download thumbnails and full-resolution photos if needed, which could take additional time.
- Multiple Libraries: If you maintain multiple photo libraries on your Mac, repeat the repair process for each one.
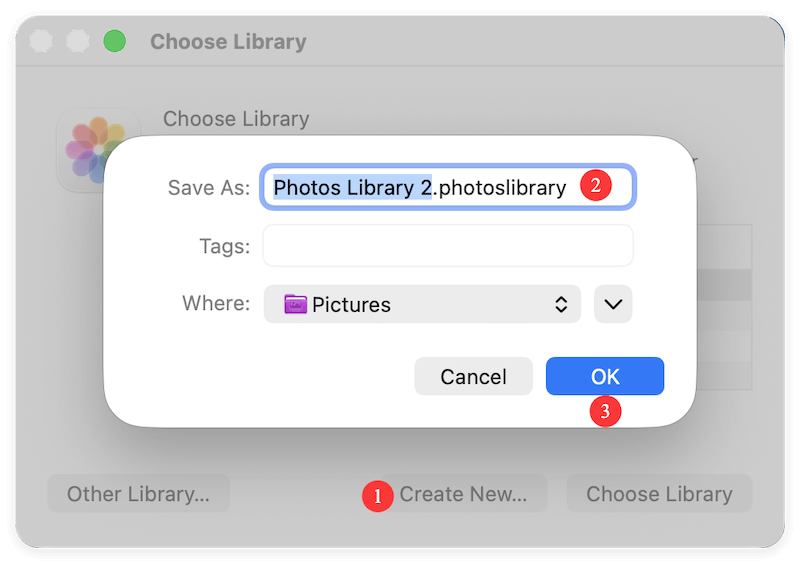
What If Repair Doesn't Work?
If the repair tool fails or your photos still don't appear:
- Try creating a new Photos Library (hold Option while opening Photos and click "Create New"). Then import older images manually if you still have them in Finder.
![recover photos after macOS Tahoe update]()
- Use Time Machine to restore a pre-update copy of the library.
![recover photos after macOS Tahoe update]()
- Consider third-party photo recovery software if the library file itself is severely corrupted.
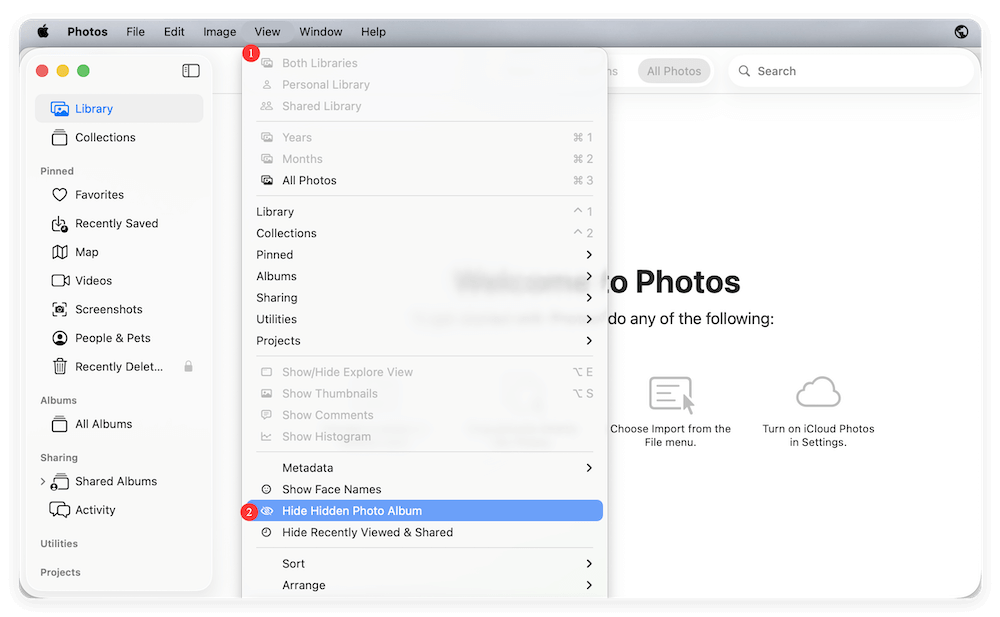
4. Look for Hidden Photos or Albums
macOS allows users to hide photos, and sometimes updates may reset settings that cause them to stay hidden.
- Open the Photos app.
- Go to View > Show Hidden Photo Album.
![recover photos after macOS Tahoe update]()
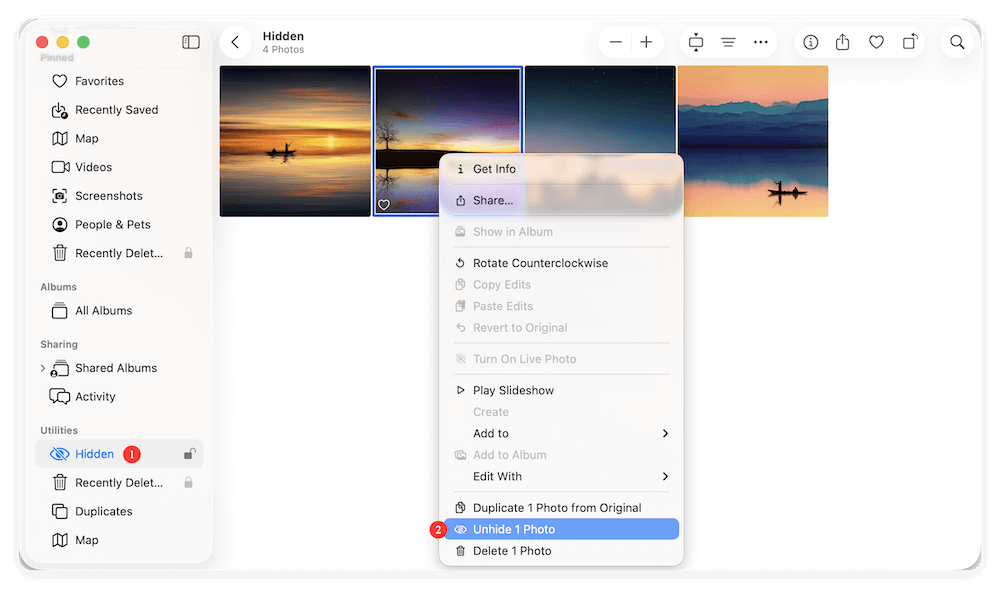
- Open the Hidden folder in the sidebar.
- Select any photos you want and click Unhide.
![recover photos after macOS Tahoe update]()
5. Use Spotlight Search to Locate Photos
Photos may not appear in the Photos app but could still exist on your Mac.
- Press Command + Spacebar to open Spotlight.
- Type common image extensions like .jpg, .png, or .heic.
- Browse through results to locate misplaced images.
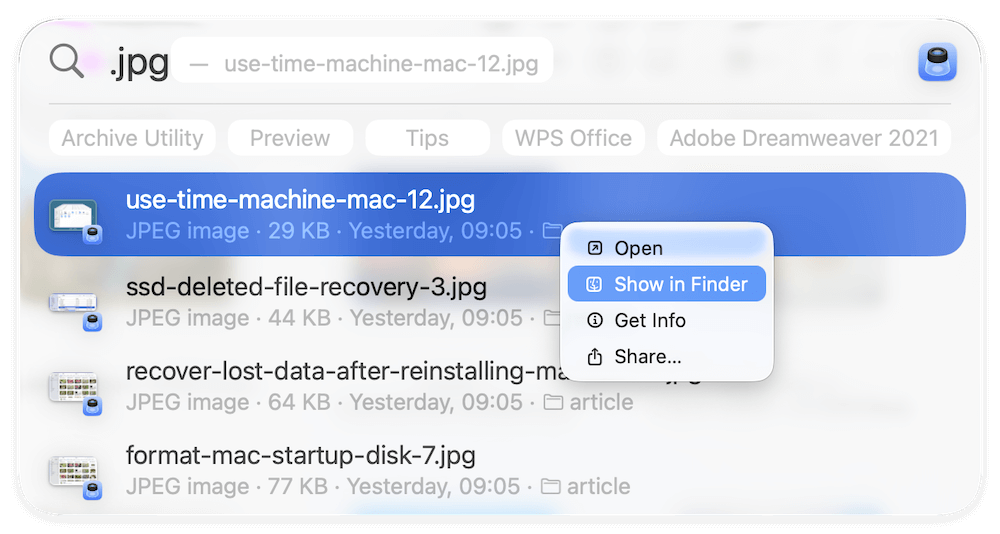
If you find them, you can re-import them into Photos.
6. Recover Photos from Time Machine Backup
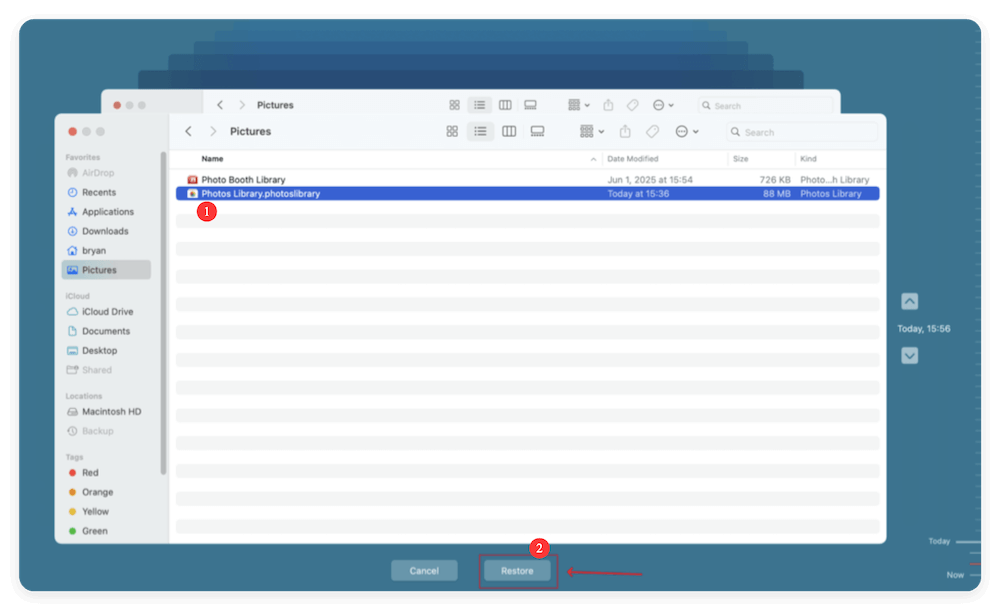
If you had Time Machine enabled before updating to macOS Tahoe, you can restore your photos from a backup.
- Connect your Time Machine backup drive.
- Open the Photos Library folder (usually in Pictures).
- Enter Time Machine from the menu bar.
- Scroll back to a date before the update.
- Select the library and click Restore.

This method can bring back lost or corrupted files easily.
7. Use Professional Photo Recovery Software
If none of the above methods work, your photos may have been permanently deleted from local storage. In that case, a reliable photo recovery tool for Mac can help.
Some popular recovery software options include:
- Donemax Data Recovery for Mac
- Disk Drill
- Stellar Photo Recovery
- Do Your Data Recovery
These tools scan your storage drive for recoverable files, including photos that are not visible in the Photos app.
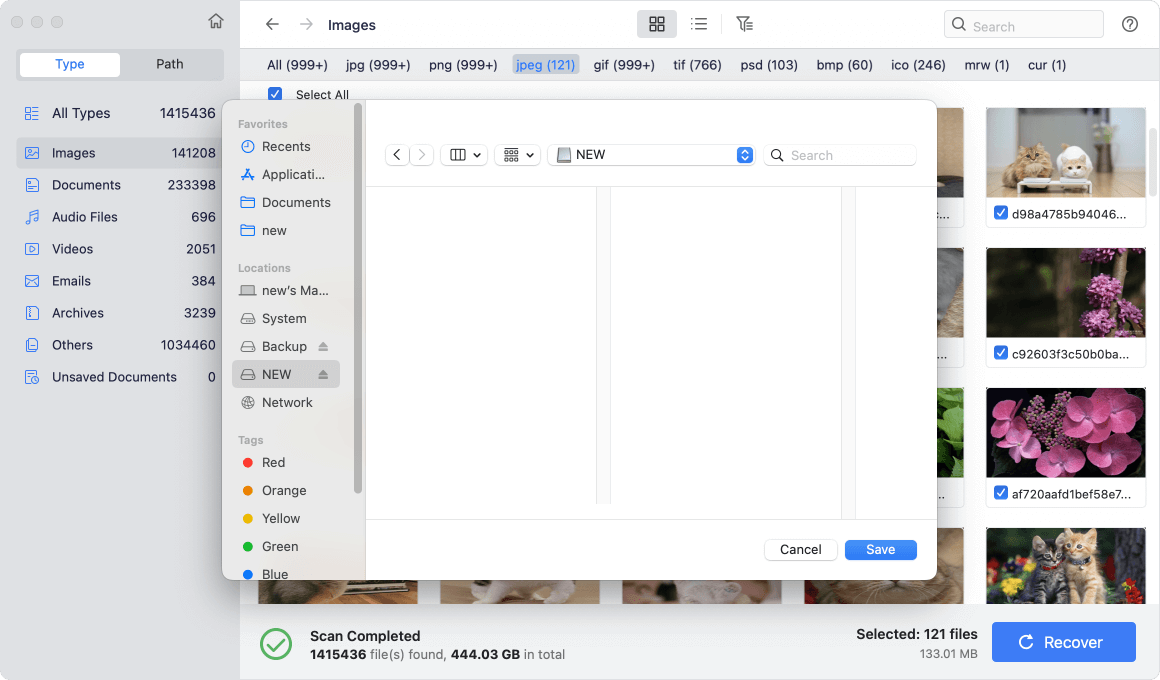
Steps to Recover Photos with Recovery Software (Using Donemax):
Step 1. Download the software Donemax Data Recovery for Mac and install it on your Mac.
Step 2. Launch the software and select the drive from which you lost the photos.

Step 3. Scan the selected drive to search for the missing photos. If the drive is large, it may take a while and just wait patiently.

Step 4. Locate the photos after the scan is done. You can search by date, name, path, type, etc. Preview the photos before recovery to confirm if they are recoverable.
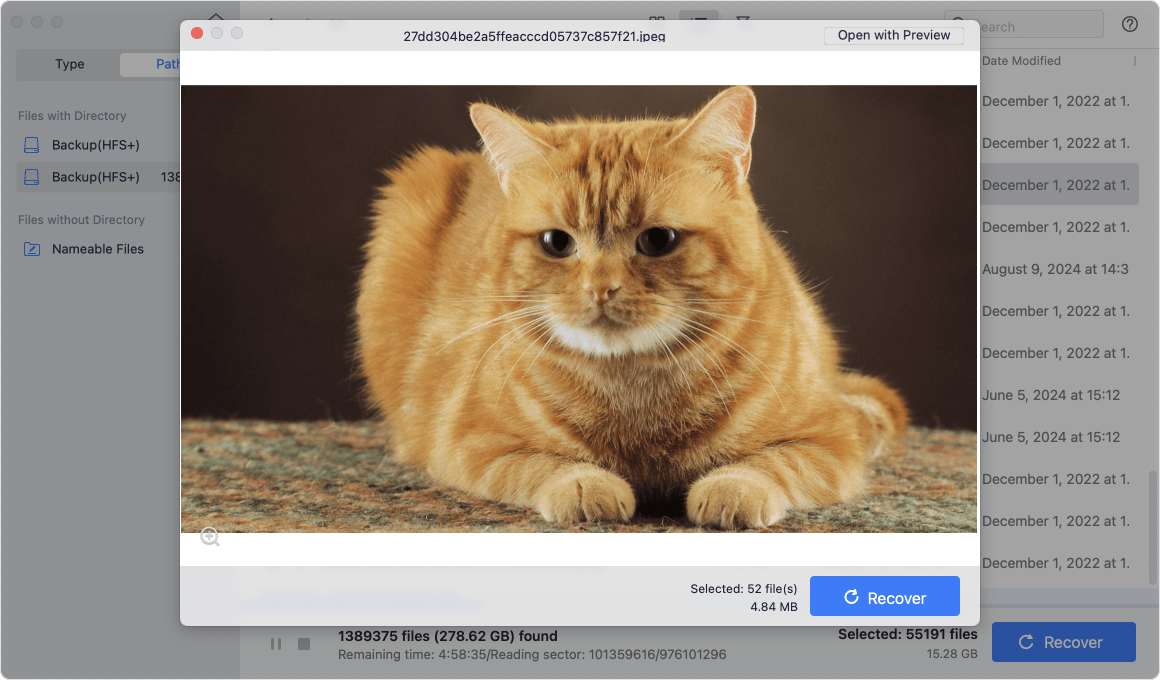
Step 5. Save the wanted photos to another hard drive. Don't recover back to the drive where you missing the photos to avoid data damage.
Preventing Photo Loss in Future macOS Updates
Once you recover your photos, it's important to ensure this doesn't happen again. Here are some preventive tips:
- 1. Back Up Before Updating Always create a Time Machine backup before installing a major macOS update. This guarantees that even if something goes wrong, you can restore your data.
- 2. Enable iCloud Photos with Full-Resolution Backup Keep your photos safely stored in iCloud by enabling Download Originals to This Mac in Photos settings.
- 3. Export Important Photos to an External Drive Periodically export critical images from Photos to an external drive for an additional backup layer.
- 4. Regularly Maintain Your Photos Library Occasionally use the Repair Library tool to keep your library healthy and avoid corruption.
FAQs about Photos Disappeared after macOS Tahoe Update
Not necessarily. In most cases, they are just hidden, unsynced, or in Recently Deleted. Permanent deletion happens only if they were removed and 30 days have passed.
It depends on the size of your library and internet speed. Syncing could take minutes to several hours.
Yes, professional recovery software can often retrieve deleted files directly from your Mac's storage.
Donemax Data Recovery for Mac is the most effective photo recovery software for macOS Tahoe. It can recover different kinds of photos and also other files.
Conclusion
If your photos disappeared after macOS Tahoe update, don't panic. In most cases, the images are still recoverable. Start with basic solutions like checking the Recently Deleted album, re-enabling iCloud Photos, and repairing your Photos library. If that doesn't help, explore Spotlight searches, Time Machine backups, or third-party recovery software.
Finally, to prevent future photo loss, always back up your Mac before updating, use iCloud Photos, and keep a copy of important files on an external drive. By taking these steps, you'll not only recover your lost photos but also safeguard your memories against future risks.
Donemax Data Recovery for Mac
Donemax Data Recovery for Mac is one of the best Mac data recovery software. It is easy-to-use and can help in recovering deleted, formatted, inaccessible or lost data from Mac HDD/SSD, external disk, USB drive, SD card, camera or other storage devices.
Related Articles
- Mar 21, 2025[7 Methods] Recover Deleted Screenshots on Mac: A Comprehensive Guide
- Mar 21, 2025How to Recover Deleted Notes on Mac? [6 Methods]
- Sep 05, 2025Accidentally Clicked Don't Save in Excel on Mac? How to Restore File?
- Jan 14, 2025How to Recover Lost Data from Fusion Drive on Mac?
- Apr 06, 20254 Methods to Recover RAW Drive on macOS: A Comprehensive Guide
- Mar 26, 2025How to Recover Deleted .dmg File on Mac? [7 Methods]

Contributing Writer
Coco Lin
Coco has been a writer and a chief programmer at Donemax software since 2018. Over 10 years of experience of writing troubleshooting articles in the software industry, she is passionate about programming and loves to providing solutions to Windows and Mac users. Also she enjoys music and palying tennis in her free time.

Editor in chief
Gerhard Chou
In order to effectively solve the problems for our customers, every article and troubleshooting solution published on our website has been strictly tested and practiced. Our editors love researching and using computers and testing software, and are willing to help computer users with their problems