
Written byCharlesUpdated on Sep 01, 2025
How to Recover Deleted Safari Histories on Mac?
Approved byGerhard Chou
Before we start: Donemax Data Recovery for Mac a great choice to recover deleted Safari histories on Mac if the other methods doesn't work. It can recover any deleted or lost files effectively and quickly on Mac.
PAGE CONTENT:
- Method 1: Check Recently Closed Tabs in Safari Browser
- Method 2: Restore Safari Histories from Time Machine Backup
- Method 3: Retrieve Deleted Safari Histories from iCloud Sync
- Method 4: Use Mac's SQLite Database to Recover Deleted Safari Histories
- Method 5: Restore Safari Histories on Mac via Recovery Software
- Method 6: Check Safari Histories in DNS Cache (Limited Use Case)
- Preventative Measures for the Future
Safari is the default web browser on macOS and is widely used due to its speed, privacy features, and seamless integration with the Apple ecosystem. Like any other browser, Safari keeps a record of your browsing history, making it easy to revisit previously accessed websites. However, there are times when Safari history may be accidentally deleted or lost due to various reasons, such as:
- 🗑️ Accidental deletion – Clearing browser history unintentionally.
- ⚙️ System updates – Some macOS updates may reset browser data.
- 📃 Corrupt Safari database – Safari's history database (History.db) might become corrupted.
- 🛠️ Use of cleaning software – Apps like CleanMyMac or DMcleaner may erase browsing history.
If you find yourself in a situation where Safari history has been deleted, don't panic. There are several methods to attempt recovery, ranging from built-in macOS features to third-party recovery tools. This guide provides a step-by-step approach to recovering deleted Safari histories on Mac.

Method 1: Check Recently Closed Tabs in Safari Browser
If you accidentally closed a tab or a set of tabs, Safari provides an easy way to reopen them:
Steps to Recover Recently Closed Tabs:
- Open Safari on your Mac.
- Use the shortcut Shift + Command + T to reopen the last closed tab.
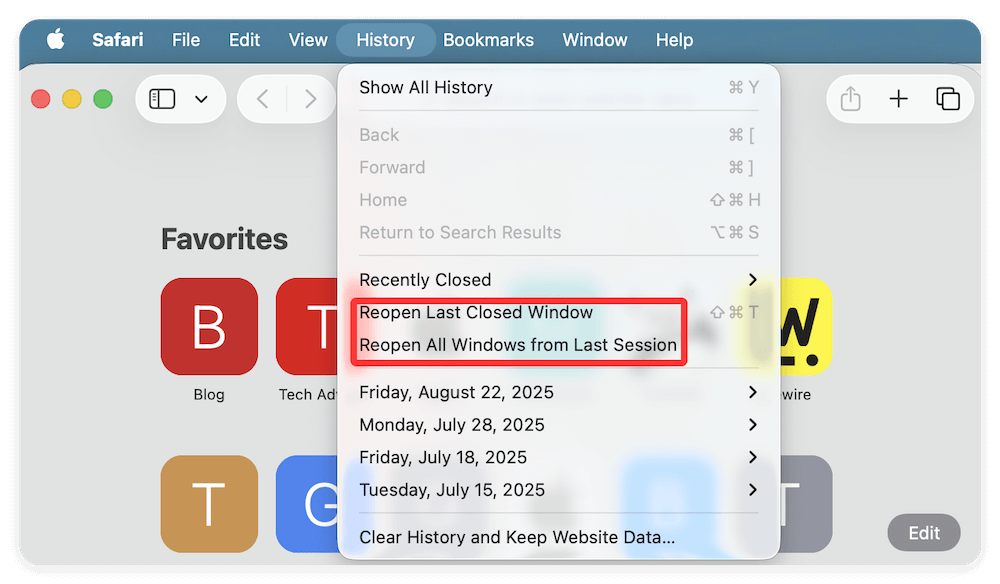
- Alternatively, go to History > Reopen Last Closed Window from the Safari menu.
- To reopen multiple tabs from the last session, select History > Reopen All Windows from Last Session.
Limitations:
- This method only works if Safari has not been completely restarted after closing the tabs.
- It does not recover browsing history that was manually deleted.
Method 2: Restore Safari Histories from Time Machine Backup
If you have Time Machine enabled, you may be able to restore your Safari history by recovering the History.db file from a backup.
Steps to Restore Safari History via Time Machine:
- Close Safari to prevent data conflicts.
- Open Finder and go to ~/Library/Safari/.
- Locate the file History.db (this file stores all Safari browsing history).
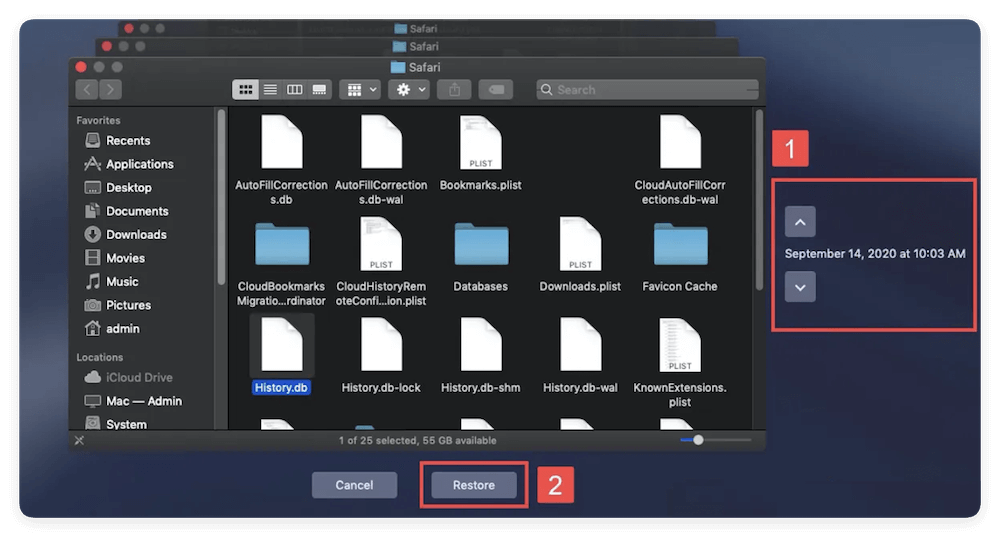
- Connect your Time Machine backup drive.
- Open Time Machine and navigate to an earlier backup date (before the history was deleted).
- Select the History.db file and click Restore.
- Relaunch Safari to check if your history has been recovered.
Limitations:
- Requires Time Machine to have been set up before the history was deleted.
- Does not work if Time Machine was not backing up the ~/Library/Safari/ directory.
Method 3: Retrieve Deleted Safari Histories from iCloud Sync
If you use iCloud to sync Safari across multiple Apple devices, you might be able to retrieve deleted history from another device.
Steps to Check iCloud Sync:
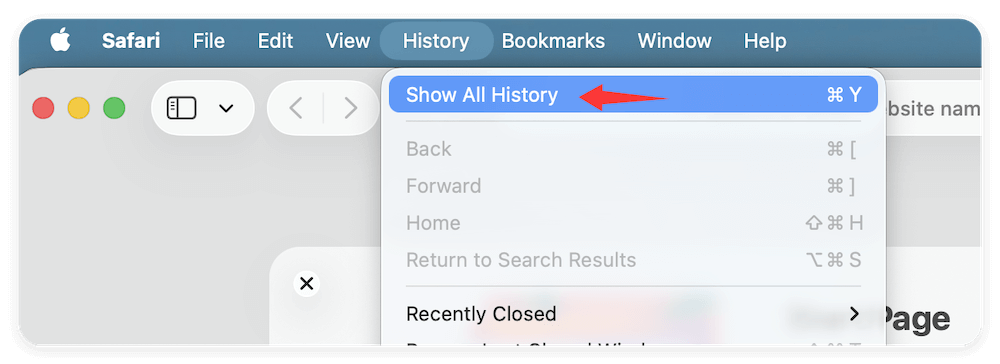
- On your another Mac device (logged into the same iCloud account), open Safari.
- Tap the History menu and select Show All History.
![recover deleted Safari histories on Mac]()
- If the history is available, manually bookmark or note down important websites.
- If needed, copy the history entries and revisit them on your Mac.
Limitations:
- Works only if iCloud syncing was enabled for Safari before deletion.
- Deleted history may sync across devices, removing it permanently.
Method 4: Use Mac's SQLite Database to Recover Deleted Safari Histories
Safari history is stored in an SQLite database file (History.db). If you haven't overwritten it, you might still be able to retrieve lost history.
Steps to Access Safari's History Database:
- Close Safari before making changes.
- Open Finder and go to:
~/Library/Safari/
- Locate History.db.
- Copy the file to a safe location.
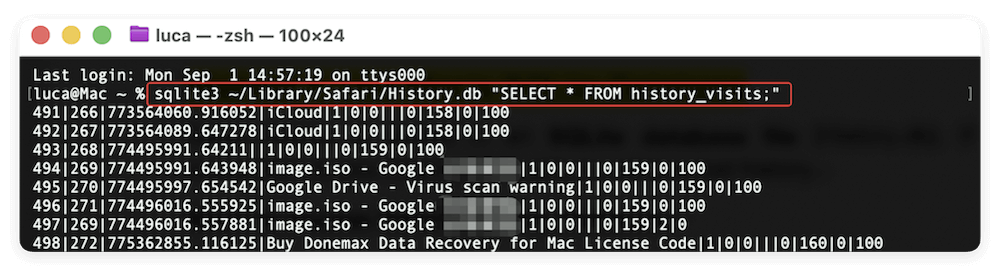
- Open Terminal and use SQLite to read the file:
sqlite3 ~/Library/Safari/History.db "SELECT * FROM history_visits;"
- Look for relevant browsing history entries.
Limitations:
- Requires some technical knowledge of SQLite.
- If the database file was corrupted or overwritten, recovery might not be possible.
Method 5: Restore Safari Histories on Mac via Recovery Software
If manual methods such as Time Machine or SQLite database recovery do not work, using a data recovery tool is your best option. These tools can scan your Mac's hard drive for deleted Safari history files and attempt to restore them. However, the success of this method depends on whether the deleted files have been overwritten.
Recommended Recovery Tools and Their Features
- Supports deep scanning to locate lost Safari history files.
- Allows previewing recoverable files before restoration.
- Offers additional disk manager and macOS bootable installer creation tools.
- The free version has a recovery limit of 200 MB.
Do Your Data Recovery for Mac
- User-friendly interface, ideal for beginners.
- Supports recovery of multiple file types, including browser history files.
- Allows selective recovery of specific files.
- The free version has a recovery limit of 1GB.
Wondershare Recoverit
- Can recover deleted browsing history from HDDs, SSDs, and external drives.
- Supports file preview before recovery.
- Works well with macOS Ventura, Monterey, and older versions.
- Free version has limited recovery capabilities.
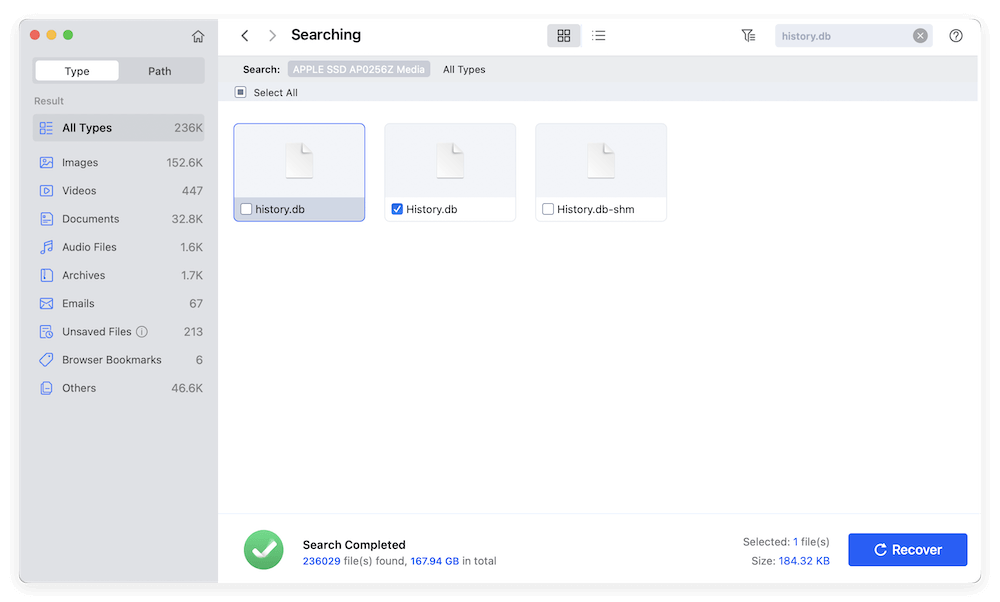
Recover Deleted Safari History Using Donemax Data Recovery for Mac
Step 1: Download and install Donemax Data Recovery for Mac.
Download the Mac version of the software. Open the .dmg file and follow the on-screen installation instructions.
Step 2: Run the software and select the drive to scan.
Open the software and choose the drive where to scan. Normally, you should select the internal system drive of Mac to search for the Safari data.

Step 3: Scan for deleted Safari history files.
Click Scan button to begin scanning. The software will deeply scan the drive to search for missing files, including the Safari history data.

Step 4: Locate and Restore Safari History
Once the scan is complete, filter results by Safari database files (.db, .plist). Click Recover, then choose a safe location to save the recovered file. Do not save it to the original Safari folder to prevent data corruption.
Step 5: Replace the Recovered File
Close Safari before replacing files. Go to ~/Library/Safari/. Backup the existing History.db file by renaming it (e.g., History_old.db). Move the recovered History.db file to this location. Reopen Safari and check if the history has been restored.
Additional Considerations for Using Recovery Software
Act quickly after deletion to increase the chances of successful recovery. The longer you wait, the more likely it is that the deleted file will be overwritten by new data.
Avoid writing new data to your Mac's hard drive. If possible, stop using Safari and install recovery software on an external drive rather than the internal drive.
If a quick scan does not find the deleted history file, try a deep scan. This method takes longer but can locate more lost files.
When Should You Use Third-Party Recovery Software?
Use it if:
- You did not have Time Machine enabled.
- Safari history was cleared manually, and other methods did not work.
- The History.db file is missing from the Safari folder.
Do not use it if:
- Safari history was lost due to an iCloud sync issue (recovery software cannot restore cloud-based deletions).
- The deleted history file has been overwritten (no software can recover completely erased data).
While third-party recovery tools like Donemax, DoYourData, and Recoverit provide a last-resort option for recovering deleted Safari history, they are not always guaranteed to work. The success of recovery depends largely on whether the deleted History.db file is still intact on the drive.
To increase the chances of a successful recovery, it is recommended to:
- Use recovery software immediately after deletion to avoid overwriting data.
- Always back up Safari history with Time Machine to prevent future data loss.
- Use iCloud Sync for Safari to maintain browsing history across Apple devices.
If none of the methods work, you may need to manually reconstruct your browsing history by checking saved bookmarks, emails, and search engine activity logs (such as Google My Activity).
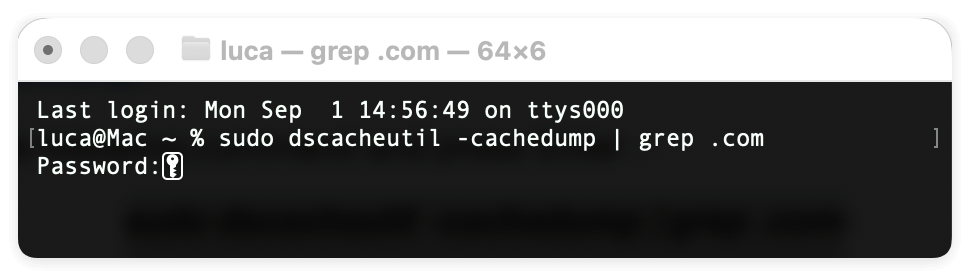
Method 6: Check Safari Histories in DNS Cache (Limited Use Case)
If you recently deleted your Safari history, your Mac's DNS cache may still contain records of visited websites.
Steps to Check DNS Cache:
- Open Terminal.
- Type the following command and press Enter:
sudo dscacheutil -cachedump | grep .com
- Enter your Mac administrator password when prompted.
![recover deleted Safari histories on Mac]()
- Review the list of domain names to see if any match your browsing history.
Limitations:
- Only shows domain names, not full URLs.
- Does not work if the Mac has been restarted or if the DNS cache has been flushed.
Preventative Measures for the Future
To avoid losing Safari history in the future, consider these preventive measures:
1. Enable Regular Time Machine Backups
- Make sure Time Machine is set up to back up ~/Library/Safari/ regularly.
- This ensures that Safari history can be restored if deleted.
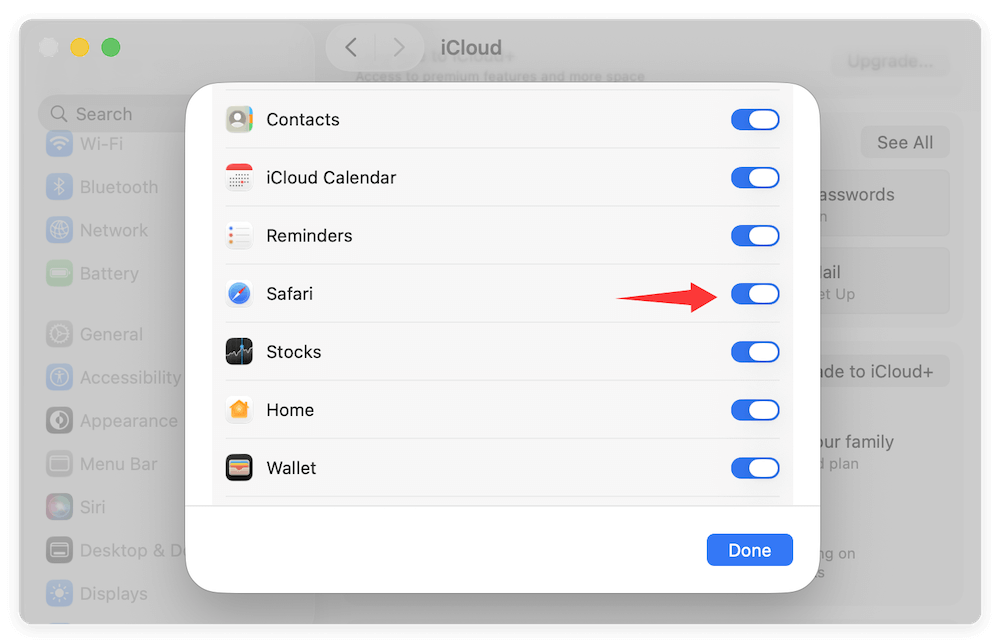
2. Use iCloud Sync for Safari
- Enable Safari sync in System Settings > Apple ID > iCloud. Click See All and then enable the option for Safari.
- This keeps history accessible across multiple Apple devices.
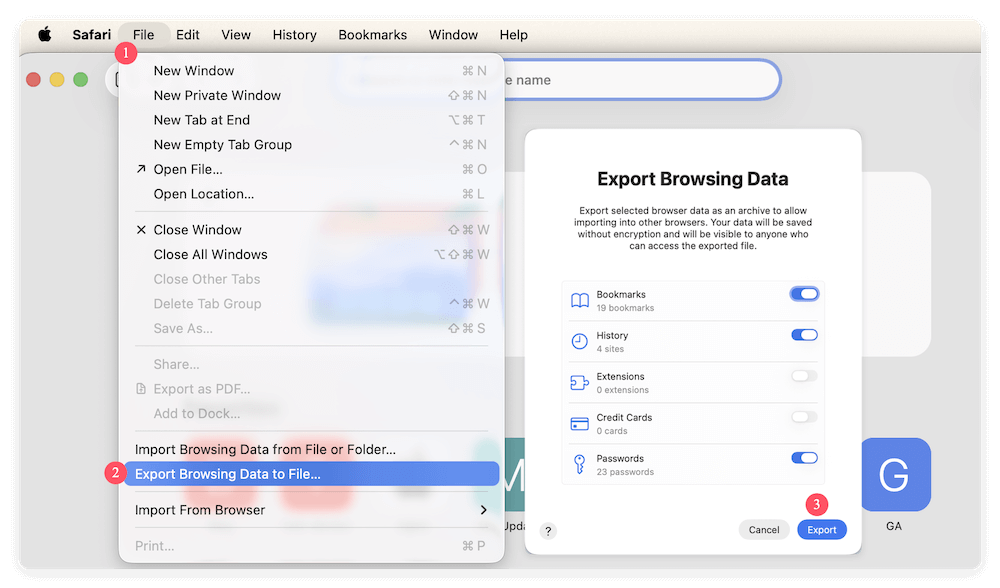
3. Export Safari History Regularly
- Open Safari and navigate to File > Export Browsing Data to File. Choose the History and other options to export.
- Save the file as a backup to retrieve past browsing data.
4. Use a Browser History Logger
- Consider using a history-logging extension or third-party app.
- Some apps can periodically store browser history even if deleted.
Conclusion
Recovering deleted Safari history on Mac can be tricky, but the chances of success depend on how the history was lost and how quickly recovery attempts are made. Here's a quick recap of the best methods:
- Check Recently Closed Tabs – Best for recovering recently closed sessions.
- Restore from Time Machine – Ideal if you had backups enabled.
- Retrieve from iCloud Sync – Works if history is still available on another Apple device.
- Use SQLite Database – Useful for tech-savvy users to extract data manually.
- Third-Party Recovery Tools – A last resort if other methods fail.
- Check DNS Cache – Limited but may show visited domains.
To prevent data loss in the future, setting up regular backups and enabling iCloud sync is highly recommended. By following these methods, you can increase your chances of recovering lost Safari history and avoid similar issues in the future.
Donemax Data Recovery for Mac
Donemax Data Recovery for Mac is one of the best Mac data recovery software. It is easy-to-use and can help in recovering deleted, formatted, inaccessible or lost data from Mac HDD/SSD, external disk, USB drive, SD card, camera or other storage devices.
Related Articles
- Jun 20, 2025How to Recover Deleted .plist Files on Mac?
- Jun 28, 2025How to Recover Deleted .pkg Files on Mac? [4 Methods]
- Sep 03, 2025Recover Unsaved or Deleted Sketch Files on Mac
- Nov 27, 2024Top 8 Methods to Recover Deleted Files on Mac
- Apr 10, 2025[4 Methods] Recover ARW Files on Mac: A Complete Guide
- Jul 05, 2024How to Recover Lost Data on macOS Sequoia? [5 Methods]

Contributing Writer
Charles
Charles, who lives in Sydney, Australia, is an editor & writer of Donemax Team. He is good at writing articles related with Apple Mac computers, Windows operating systems, data recovery, data erasure, disk clone and data backup, etc. He loves reading and playing tennis in his spare time and is interested in testing new digital devices such as mobile phones, Macs, HDDs, SSDs, digital cameras, etc.

Editor in chief
Gerhard Chou
In order to effectively solve the problems for our customers, every article and troubleshooting solution published on our website has been strictly tested and practiced. Our editors love researching and using computers and testing software, and are willing to help computer users with their problems