
Written byChristinaUpdated on Aug 10, 2025
Recover Lost Data from SanDisk G-DRIVE on Mac – Complete Guide
Approved byGerhard Chou
Before we start: Donemax Data Recovery for Mac is fully compatible with all file systems. It can help you securely and completely recover deleted, formatted or inaccessible data from SanDisk G-DRIVE on Mac. It even can repair damaged SanDisk G-DRIVE on Mac and reformat corrupted SanDisk G-DRIVE on Mac.
PAGE CONTENT:
- Common Scenarios That Lead to SanDisk G-DRIVE Data Loss
- Methods to Recover Lost Data from SanDisk G-DRIVE on Mac
- What If SanDisk G-DRIVE Is Not Recognized?
- When to Use a Professional Data Recovery Service
- Tips to Prevent Future SanDisk G-DRIVE Data Loss on Mac
- FAQs About SanDisk G-DRIVE Data Recovery on Mac
- Conclusion
SanDisk G-DRIVE is a popular choice among Mac users for its reliability, fast transfer speeds, and macOS compatibility. Whether used for Time Machine backups, media storage, or daily file transfers, it's often home to important data. But despite its robustness, data loss can still occur due to various reasons - accidental deletion, formatting, file system corruption, or even hardware issues.
If you've lost valuable files on your SanDisk G-DRIVE, don't panic. In most cases, your data can still be recovered - if you act quickly and follow the right steps. This comprehensive guide will walk you through all possible solutions to recover lost data from your SanDisk G-DRIVE on Mac.
Common Scenarios That Lead to SanDisk G-DRIVE Data Loss
Before jumping into recovery steps, it's useful to understand the typical reasons for data loss. These include:
- Accidental Deletion: You might have deleted files thinking they were backed up elsewhere.
- Drive Formatting: Sometimes drives are formatted unintentionally during macOS setup or partitioning.
- File System Corruption: A corrupted file system (HFS+, APFS, or exFAT) can prevent your Mac from accessing the drive properly.
- macOS Errors: A failed update, improper ejection, or disk unmounting can result in lost files.
- Physical Damage or Bad Sectors: Though rare, physical failure of the SanDisk G-DRIVE can lead to inaccessibility of data.
Each of these problems requires a slightly different approach to recovery, which we'll detail in the following sections.
Initial Checks Before Data Recovery
Before installing any tools or running scans, try these basic but essential checks:
1. Check the Trash
If you've deleted files from the G-DRIVE, macOS might have moved them to the Trash. Open the Trash from your Dock and search for the lost files.
2. Reconnect the Drive
Unplug the SanDisk G-DRIVE safely and reconnect it using another USB port or cable. Sometimes, faulty connections are to blame.
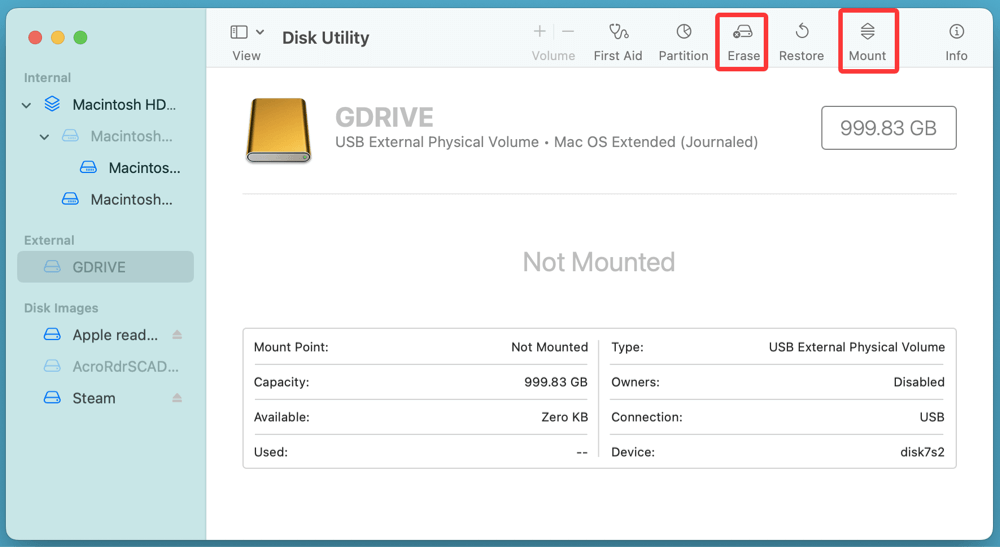
3. Verify Disk Utility
Open Disk Utility (Applications > Utilities > Disk Utility) to check if the drive appears there. If it does:
- Click on it and select "Mount".
- Run "First Aid" to repair minor errors.
![recover lost data from your SanDisk G-DRIVE on Mac]()
If the drive is still unmountable, your file system may be damaged - but don't worry, recovery software may still access it.
Methods to Recover Lost Data from SanDisk G-DRIVE on Mac
Method 1. Recover with Time Machine (If Enabled)
If your SanDisk G-DRIVE is used with Time Machine or has a backup folder from another Time Machine disk, you can restore files directly.
Steps to Restore from Time Machine:
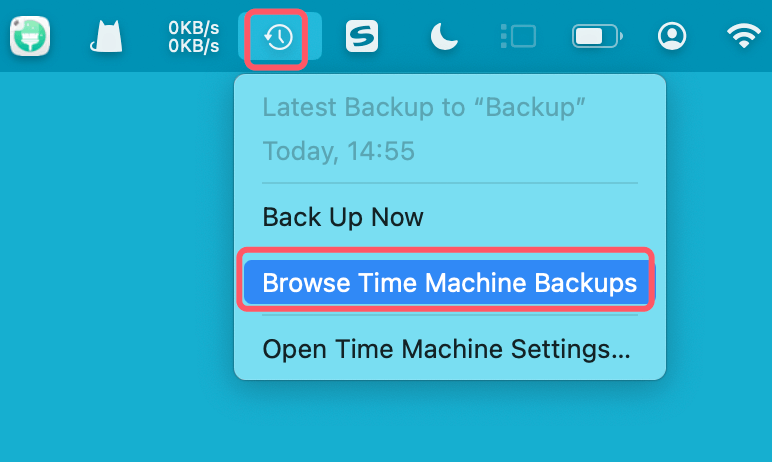
- Connect the drive.
- From the menu bar, select Time Machine, choose Browse Time Machine Backups.
![recover lost data from your SanDisk G-DRIVE on Mac]()
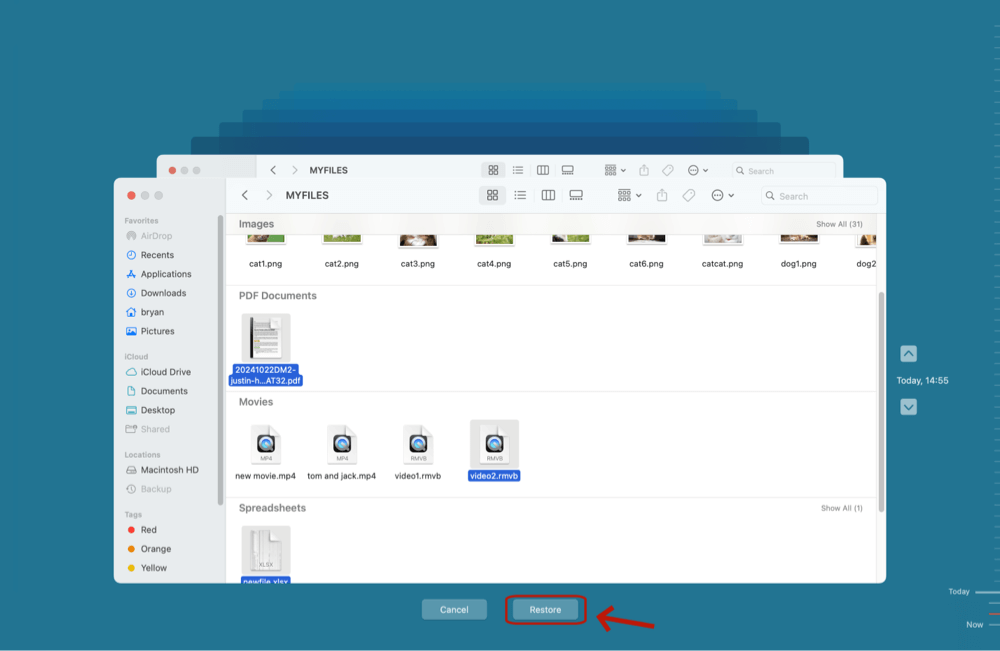
- Go to the date prior to the deletion.
- Click "Restore" after locating the deleted files.
![recover lost data from your SanDisk G-DRIVE on Mac]()
If Time Machine wasn't set up or doesn't contain the needed version of your files, proceed with data recovery software.
Method 2. Recover Lost Data Using Mac Recovery Software
This is the most effective method for retrieving deleted, formatted, or corrupted data -especially when no backup is available.
Donemax Data Recovery for Mac is a reliable Mac data recovery application. It supports to recover lost data from internal disks and external storage devices.
Step 1. Download and install Donemax Data Recovery for Mac.
Step 2. Open Donemax Data Recovery for Mac, select the SanDisk G-DRIVE to start data recovery.

Step 3. Click on Scan button. Donemax Data Recovery for Mac will deeply scan the SanDisk G-DRIVE and find all recoverable files.

Step 4. After scanning, you can preview all recoverable files. Then select the wanted files, click on Recover button to save them.

Method 3. Recover from Formatted or Corrupted G-DRIVE
If your drive was recently formatted or is showing file system errors (e.g., "The disk you inserted was not readable by this computer"), don't attempt to format it again. Instead:
For Formatted Drives:
Recovery software like Disk Drill and EaseUS can scan the entire drive and recover files based on file signatures (deep scan).
For Corrupted Drives:
- First try Disk Utility > First Aid.
- If unsuccessful, proceed with a deep scan using your chosen recovery tool.
Most Mac-compatible recovery apps support APFS, HFS+, ExFAT, and FAT32, ensuring broad compatibility with G-DRIVE formats.
What If SanDisk G-DRIVE Is Not Recognized?
In some cases, the Mac may not recognize the drive at all. Here's how to troubleshoot it:
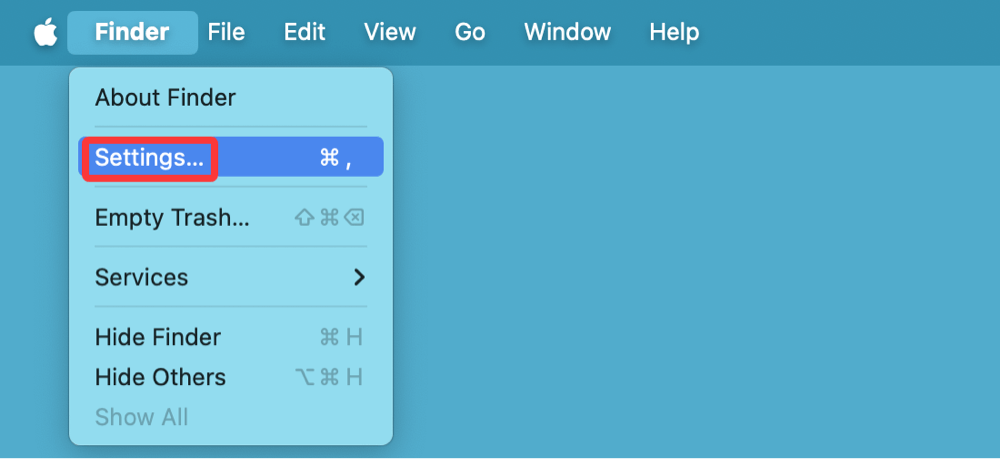
1. Check Finder Preferences
- Go to Finder > Settings.
![recover lost data from your SanDisk G-DRIVE on Mac]()
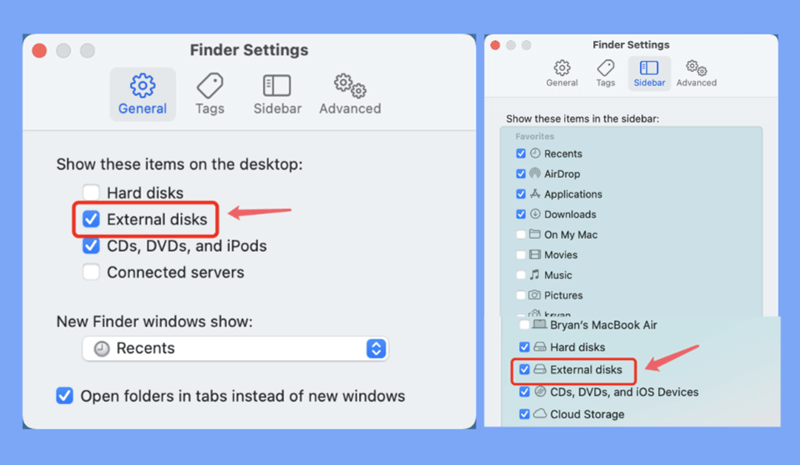
- Click Sidebar and General, ensure External disks is selected.
![recover lost data from your SanDisk G-DRIVE on Mac]()
2. Try Terminal Commands
Use Terminal to list and mount the drive manually:
diskutil list
Identify your G-DRIVE from the list, then attempt to mount it:
diskutil mount /dev/disk4

(Replace disk4 with your actual drive identifier.)
3. Test on Another Mac
Check if the drive works on a different Mac. If it does, the problem may be with your system rather than the drive.
4. Use Recovery Software Despite Mount Failure
Even if macOS can't mount the drive, most recovery apps can still access the raw sectors and recover data.
When to Use a Professional Data Recovery Service
If:
- The SanDisk G-DRIVE is physically damaged (clicking sounds, not spinning),
- The drive is not detected at all on any machine,
- Or your recovery attempts via software fail,
Then your best bet is to send it to a certified recovery lab.
Top Options:
- DriveSavers (Apple-authorized)
- Ontrack Data Recovery
- Seagate/SanDisk Recovery Services
What to Expect:
- Cost: Can range from $300 to over $1500 depending on severity.
- Time: 3 to 7 business days for diagnosis and recovery.
- Confidentiality: Reputable services offer strict data privacy policies.
Tips to Prevent Future SanDisk G-DRIVE Data Loss on Mac
Once you've recovered your data, implement these habits to prevent data loss in the future:
1. Enable Time Machine
Back up regularly using Time Machine to an external disk or NAS.
2. Eject the Drive Properly
Always eject your G-DRIVE using Finder or the right-click menu before unplugging it.
3. Avoid Full Capacity
Don't fill the drive to 100% - leave 10-15% free space to maintain performance and reduce corruption risk.
4. Use Surge Protection
Power spikes can damage external drives. Use surge protectors to safeguard your Mac and peripherals.
5. Monitor Drive Health
Apps like DriveDx or SMART Utility can track your G-DRIVE's SMART status and warn you of impending failure.
FAQs About SanDisk G-DRIVE Data Recovery on Mac
1. Can Disk Utility recover deleted files?
No. Disk Utility can repair file system issues but cannot recover deleted or lost files. You'll need recovery software for that.
2. Can I use SanDisk G-DRIVE on both Mac and Windows?
Yes, if formatted in exFAT. For macOS-only use, APFS or HFS+ is preferred.
3. Is recovery possible if I formatted the drive twice?
Yes, as long as new data hasn't overwritten the sectors. Deep scanning software is your best bet here.
4. Why does my Mac say the G-DRIVE is not readable?
This could indicate a corrupted file system or a hardware issue. Avoid reformatting and try recovery software first.
Conclusion
Losing important data from your SanDisk G-DRIVE on Mac can be frustrating, but in most cases, recovery is possible - especially if you act promptly and avoid writing new data to the drive. From built-in tools like Time Machine to professional-grade software like Donemax Data Recovery for Mac, there are several reliable methods to bring your files back.
If your drive isn't recognized or has suffered physical damage, consult a professional recovery service without delay. And once you've retrieved your data, take steps to prevent future loss with regular backups and proper drive handling.
Remember: The sooner you attempt recovery, the higher your chances of success. Don't delay - start scanning and bring your data back safely.
Donemax Data Recovery for Mac
Donemax Data Recovery for Mac is one of the best Mac data recovery software. It is easy-to-use and can help in recovering deleted, formatted, inaccessible or lost data from Mac HDD/SSD, external disk, USB drive, SD card, camera or other storage devices.
Related Articles
- Jan 05, 2025Files on Mac Desktop Disappeared: How to Recover Them? [4 Methods]
- Apr 22, 2026How to Recover Lost Photoshop Files on Mac – Guide 2026
- Mar 26, 2025How to Recover Deleted .dmg File on Mac? [7 Methods]
- May 10, 2025M3-chip Mac Data Recovery: A Complete Guide to Restoring Your Data
- Mar 06, 2025Three Methods to Recover Lost Data from WD My Passport on Mac
- Sep 25, 2025Photos Disappeared after macOS Tahoe Update: How to Recover?

Contributing Writer
Christina
Christina is the senior editor of Donemax software who has worked in the company for 4+ years. She mainly writes the guides and solutions about data erasure, data transferring, data recovery and disk cloning to help users get the most out of their Windows and Mac. She likes to travel, enjoy country music and play games in her spare time.

Editor in chief
Gerhard Chou
In order to effectively solve the problems for our customers, every article and troubleshooting solution published on our website has been strictly tested and practiced. Our editors love researching and using computers and testing software, and are willing to help computer users with their problems