Written byStevenUpdated on Jun 16, 2026
How to Create Installer for macOS 27 Golden Gate: Step-by-Step Guide
Approved byGerhard Chou
Before we start: To avoid issues and data loss during macOS 27 installing, it's better to create a full clone backup for your Mac first. Donemax Disk Clone for Mac an help you make a bootable copy for the startup disk. If issues occurred after installing macOS Golden Gate, you can just boot from the clone drive without down time.
PAGE CONTENT:
Apple has officially dropped its latest operating system upgrade: macOS 27 Golden Gate. Packed with amazing UI changes like the Liquid Glass effect and heavy performance updates, everyone is rushing to try it out. If you are looking to do a completely clean installation or want to update multiple computers without downloading the update every single time, you need a bootable drive.
In this clear guide, we will show you exactly how to create installer for macOS 27 Golden Gate using a USB drive. Don't worry if you aren't a technical wizard. We have broken everything down into very short paragraphs and easy actions so you can update your Mac with total confidence.
Why You Need a Bootable Installer for macOS 27
Getting a brand-new OS is exciting, but installing it straight through your system settings doesn't give you a backup setup file. Creating an external installation drive provides some great benefits:
- Clean System Setup: You can wipe your current system partition completely to get a fresh, super-fast start without old junk files cluttering your drive.
- Multiple Mac Updates: You only download the heavy installation package once. After that, you can update as many Macs as you want offline.
- Troubleshooting Tool: If your Mac ever encounters a system failure, a bootable USB lets you start up recovery tools quickly.
Crucial First Step: Prepare and Clone Your Mac Data
Before modifying your operating system, safety must be your top priority. System upgrades can occasionally stall, or you might find that some of your older apps aren't ready for macOS 27 Golden Gate yet.
Pro Expert Tip for a Safe Upgrade: To ensure you do not lose a single file, we strongly suggest making a bootable backup copy. We highly recommend using Donemax Disk Clone for Mac. It is a super reliable and simple tool that creates an exact clone of your startup disk. If anything goes wrong, you can boot instantly from your clone and keep working without losing your mind or your personal data.
What Things Do You Need?
Before we start building your setup drive, make sure you have the following items ready near your desk:
- Compatible Hardware: macOS 27 Golden Gate only runs natively on Apple Silicon Macs (M1, M2, M3, M4, M5, or newer chips).
- External Flash Drive: A USB 3.0 or USB-C flash memory drive with a storage capacity of at least 32GB. Note that everything on this drive will be completely erased.
- Ample Free Storage Space: Keep at least 50GB of free space available on your main internal drive to download and compile the new macOS version files.
- Stable Internet Connection: The installation program file is quite large, so a strong internet connection will save you plenty of time.
Steps to Create macOS 27 Golden Gate Installer
Step 1: Download the Full macOS 27 Golden Gate Installer
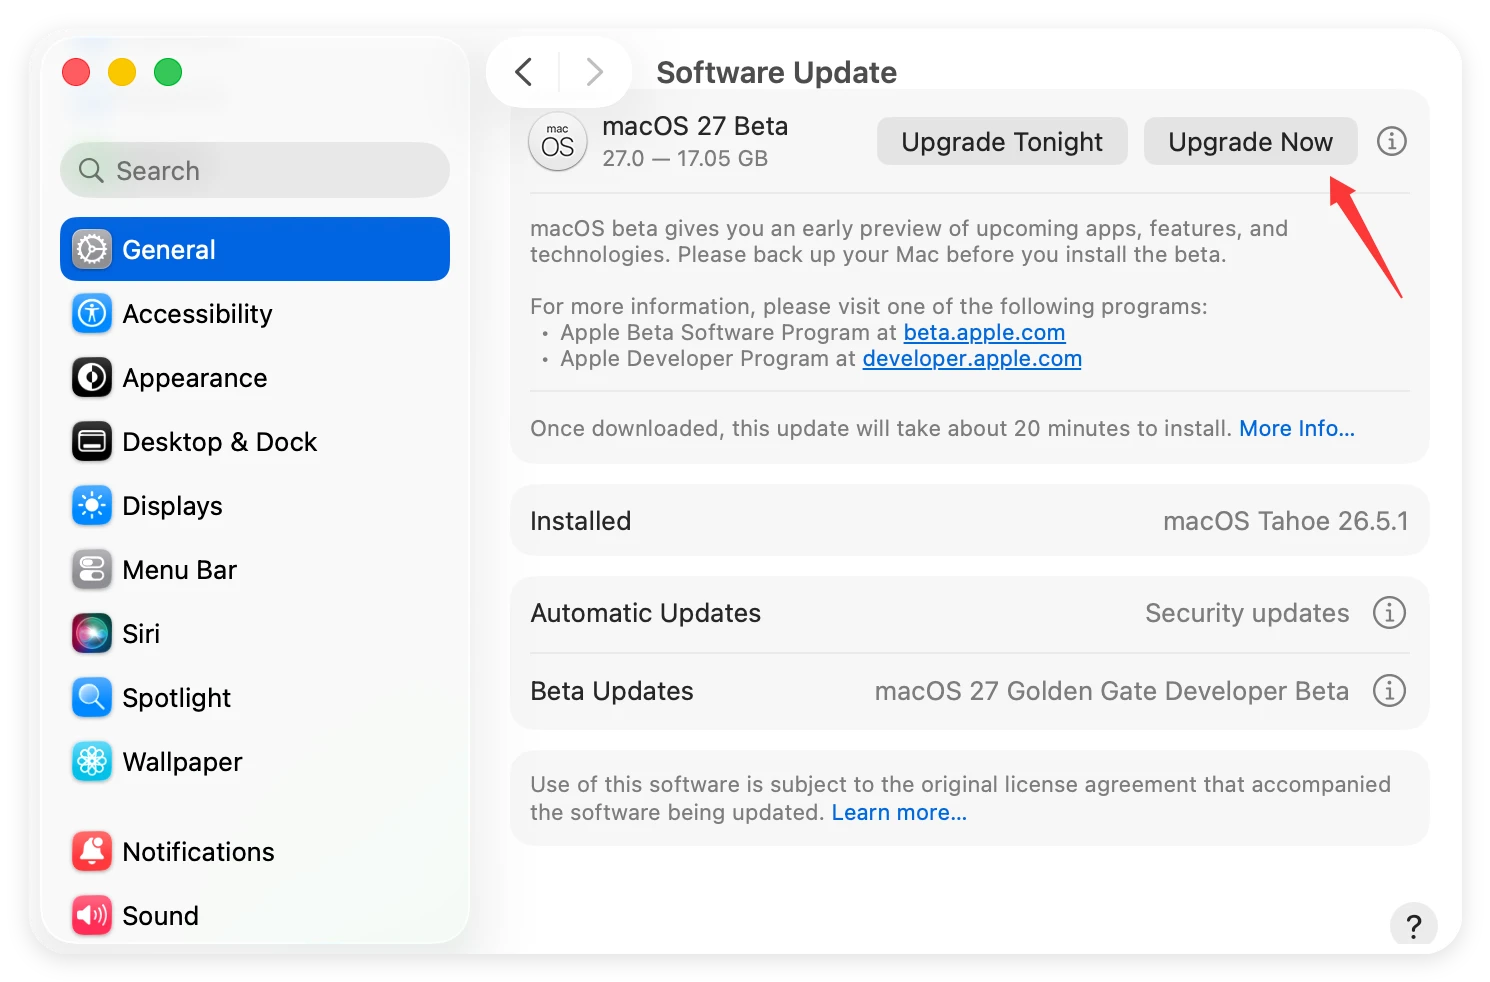
To build a copy, you must get the actual installation app file rather than doing an instant update. If you are a developer, log into developer.apple.com with your Apple ID and enable beta updates inside your system software menus.
Go to your Apple Menu > System Settings > General > Software Update. Check the options under Beta Updates and turn on the macOS 27 Developer Beta. Let the system load.
Alternatively, you can open your built-in Terminal app and force a download from Apple's update framework servers. Type the command line tool search script to extract the installation files directly to your Applications folder. When the downloaded setup software window pops open on your screen, click Quit. Do not let it start the actual installation process yet.
Step 2: Erase and Format Your USB Drive
Your external flash disk must use the correct partition map architecture to boot your Mac system. Connect your flash drive directly into your Mac's port. Avoid using USB expansion hubs as they can drop connections during deep formatting tasks.
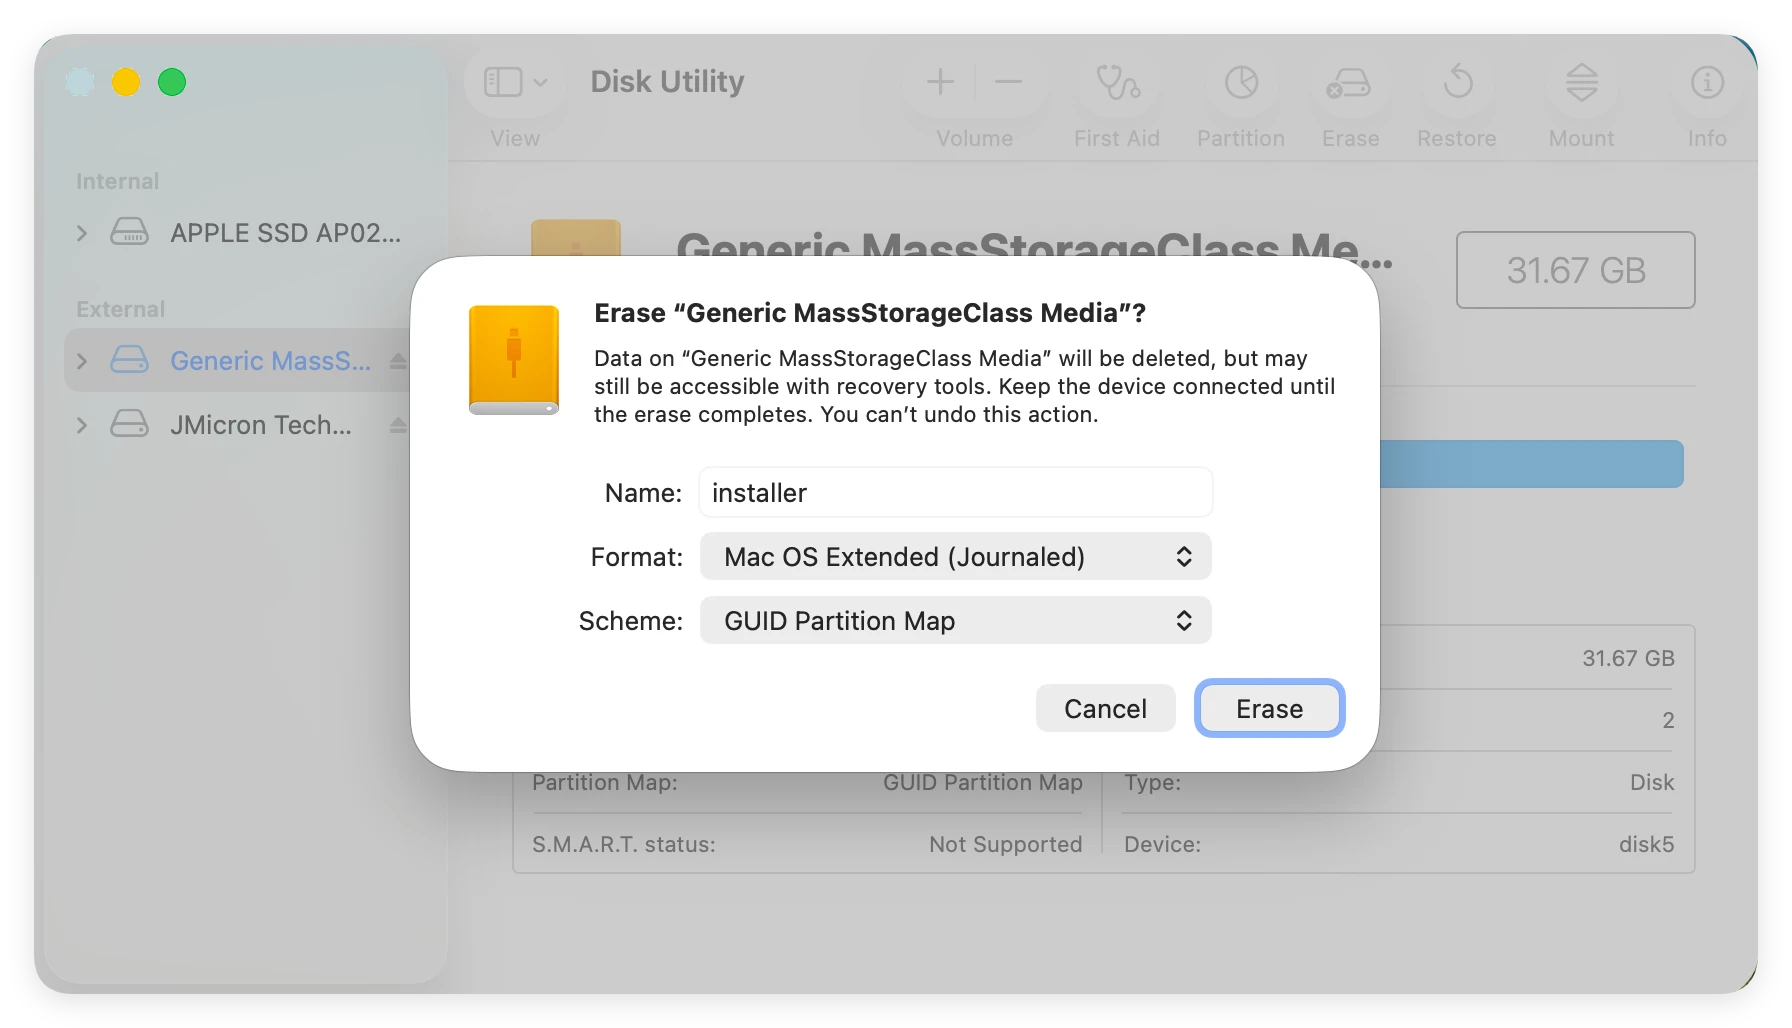
- Open your Finder, choose Go > Utilities, and launch the Disk Utility application tool. Look closely at the sidebar list and select your main external flash drive. Be careful to select the correct drive so you do not erase internal system volumes.
- Click the Erase option button at the top menu bar. In the popup window settings configuration, change the formatting name to 'MyVolume'. This exact name is very important because our command instructions expect it. Set the system format layout configuration to Mac OS Extended (Journaled), and make sure the structural Scheme is set to GUID Partition Map. Click Erase to confirm.
Step 3: Create Installer for macOS 27 Golden Gate via Terminal
Now your drive is clean and named 'MyVolume'. We will use the built-in system createinstallmedia app script inside the package contents to turn your flash drive into a live bootable media drive.
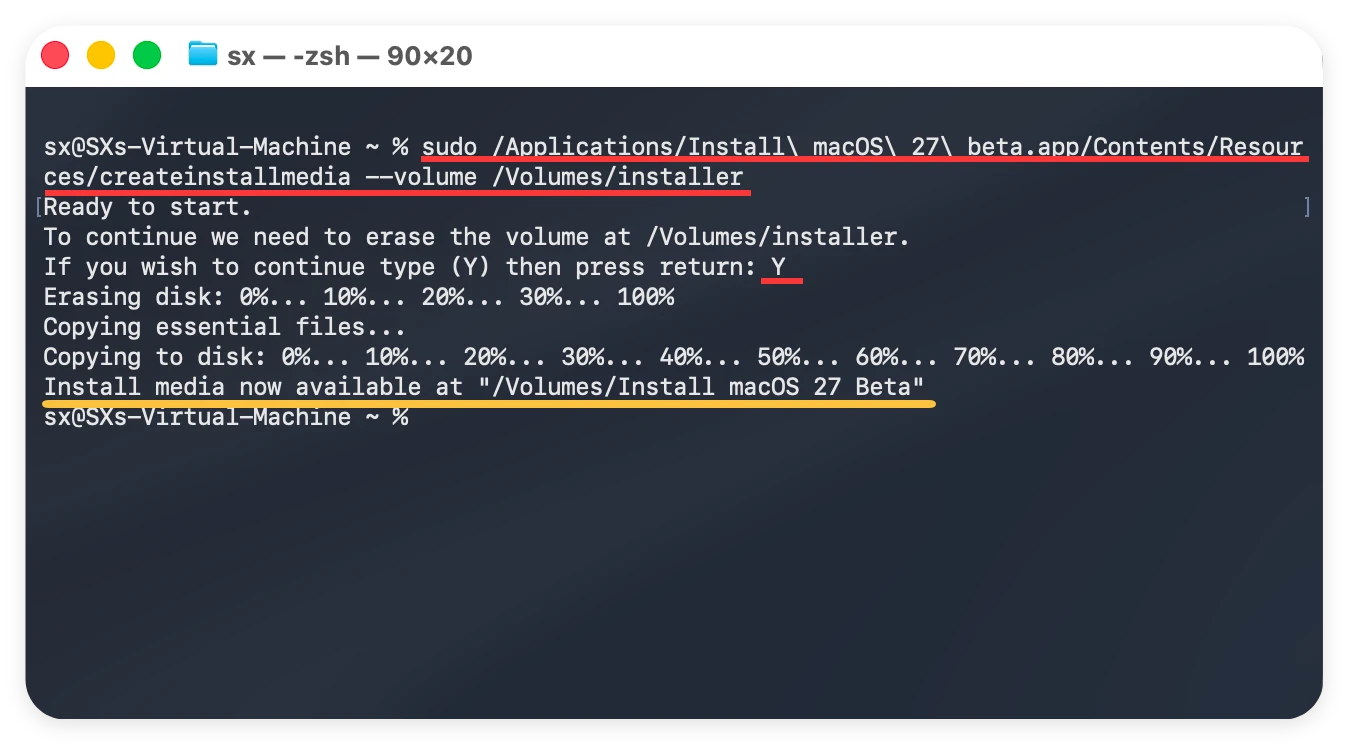
- Open Terminal from your launchpad screen. Copy and paste the standard structure path command line into the text screen window. The standard text syntax structure usually runs like this:
sudo /Applications/Install\ macOS\ 27\ Golden\ Gate.app/Contents/Resources/createinstallmedia --volume /Volumes/MyVolume
- Press the Enter key. Terminal will ask for your admin login password. Type it in and press Enter. Note that no text letters will show up as you type your security password for privacy reasons. Next, type 'Y' to confirm you want to wipe the drive, and hit Enter again.
- The utility will start cleaning the sector paths and copying the heavy software installation data files. This procedure usually takes a few minutes depending entirely on your flash disk speed. Keep your Mac plugged into power. When it says 'Install media now available', your flash tool is successfully completed.
Step 4: Boot and Install macOS 27 Using the USB Drive
Now your new storage installation drive is prepared. Turn off your Apple Silicon Mac completely. Plug your freshly created bootable USB drive right into the machine's port side.
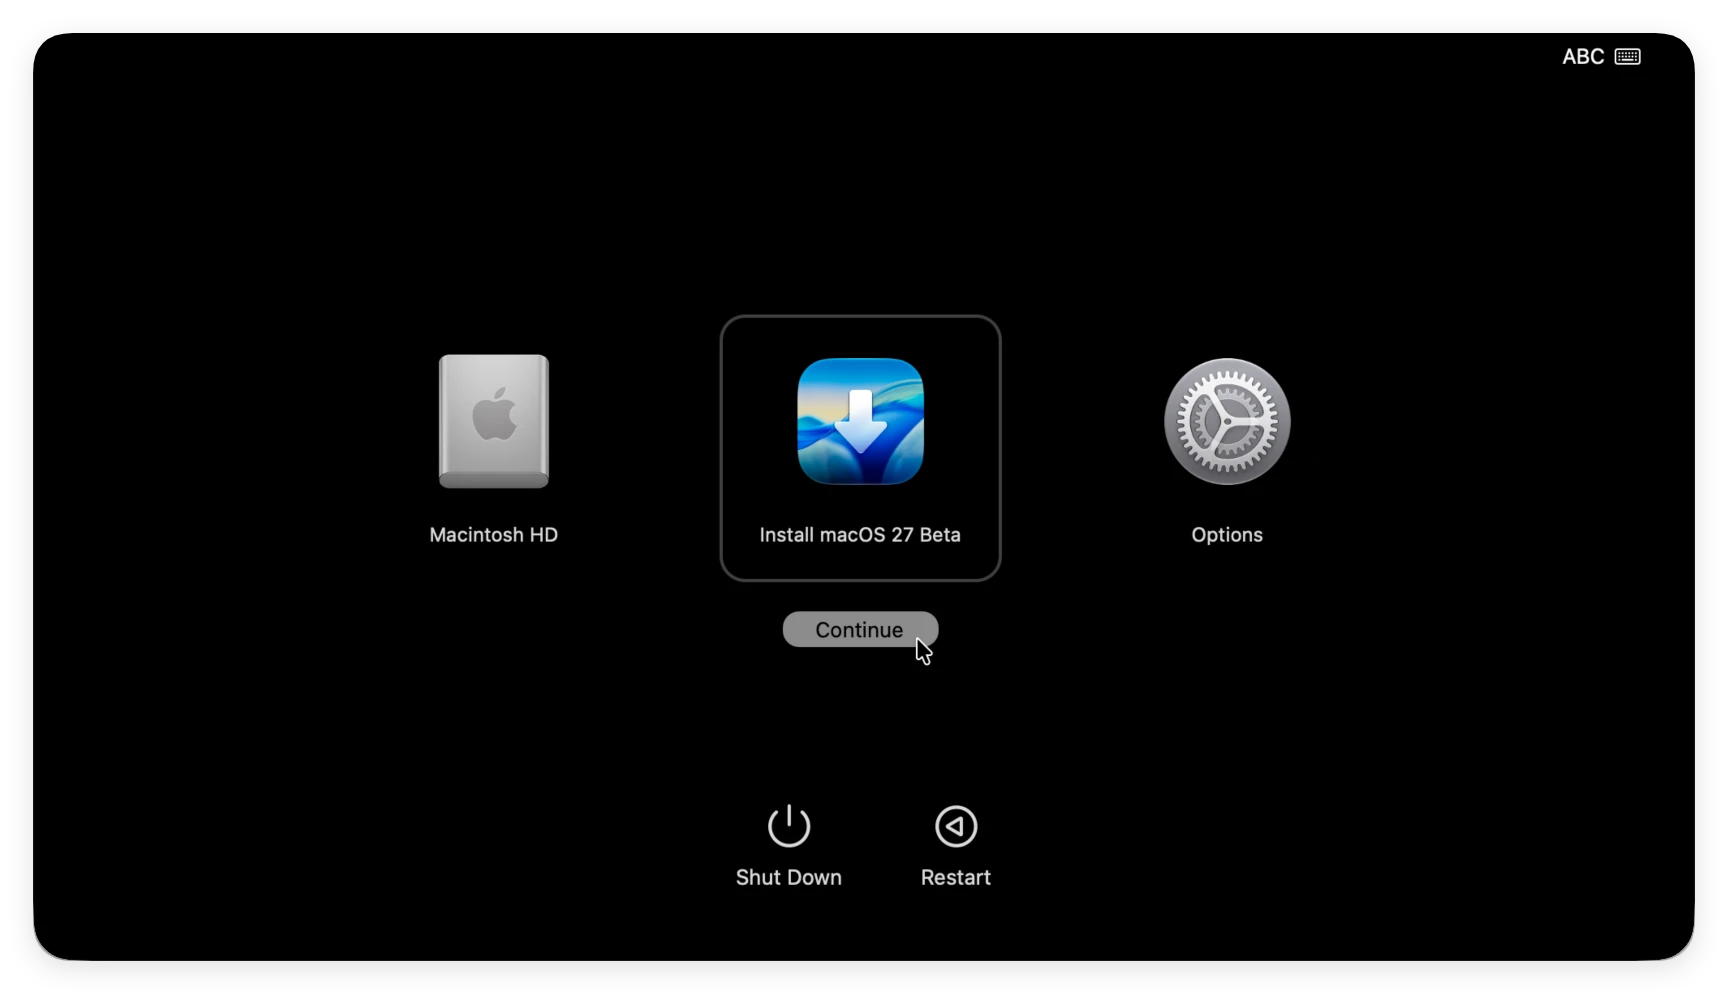
- Press and hold down the physical Power Button on your computer. Do not let go of the key. Keep holding it down until you see the message 'Loading startup options' show up on your screen.
- When the storage volume icons appear, choose the option named 'Install macOS 27' and hit Continue. Follow the basic user setup guide steps to wrap up your fresh OS setup.
Summary and Final Tips
Learning how to create installer for macOS 27 Golden Gate is a wonderful skill that keeps your hardware operating safely and lets you run clean system updates easily. Just remember to use a fast, clean 32GB flash drive, apply the exact drag-and-drop Terminal command paths, and verify your model chip compatibility.
Most importantly, protect your critical files before executing any major system tasks. Use Donemax Disk Clone for Mac to keep a complete, bootable mirror clone copy of your data on hand. It provides peace of mind so you can explore all the incredible new features in Golden Gate without any risk.
FAQs about Creating Installer for macOS Golden Gate
No. macOS 27 Golden Gate is built exclusively for Apple Silicon computers using M-series processors. Intel architecture models cannot run or build this setup media.
Yes. The structural clean process erases everything on the targeted flash media. Make sure to transfer any vital records to another drive before clicking Erase.
It usually takes between 10 to 25 minutes. The processing time depends mostly on your external drive speed interface and your Mac port setup.
This error happens if the installation app is missing from your main Applications folder, or if there is a small typo spacing error in your path syntax line. Try the drag-and-drop file trick into the window instead.
Yes, it is completely safe and very fast. It creates an exact copy of your storage drive, allowing you to quickly recover your entire system setup if an installation error happens.
Donemax Disk Clone for Mac
An award-winning disk cloning program to help Mac users clone HDD/SSD/external device. It also can create full bootable clone backup for Macs.
Related Articles
- Jan 15, 2024How to Clone Mac Hard Drive to Crucial External SSD?
- Apr 15, 2024How to Use Time Machine on Mac?
- Mar 28, 2025Clone Mac to An SD Card: A Step-by-Step Guide
- Aug 08, 2025How to Restore Mac from A Backup?
- Nov 19, 2024How to Create a Bootable Clone for macOS Monterey? [Step-by-step Guide]
- May 21, 2026How to Create a Bootable Backup Clone on MacBook Neo?

Contributing Writer
Steven
Steven has been a senior writer & editor of Donemax software since 2020. He's a super nerd and can't imagine the life without a computer. Over 6 years of experience of writing technical solutions and software tesing, he is passionate about providing solutions and tips for Windows and Mac users.

Editor in chief
Gerhard Chou
In order to effectively solve the problems for our customers, every article and troubleshooting solution published on our website has been strictly tested and practiced. Our editors love researching and using computers and testing software, and are willing to help computer users with their problems