
Written byStevenUpdated on Sep 26, 2025
Mac Becomes Slow after Installing macOS Tahoe, How to Fix It?
Approved byGerhard Chou
Before we start: If the Mac is running slower after macOS Tahoe update, you can first try to clean up junk data and optimize the settings. Donemax DMcleaner for Mac is an effective tool which can help you quickly clear junk files and improve the Mac performance.
PAGE CONTENT:
Apple's macOS updates are often exciting, bringing new features, security improvements, and design changes. With the release of macOS Tahoe, many users rushed to install the upgrade. However, a common problem emerged soon after installation: Macs that once ran smoothly now feel sluggish. Slow boot times, lagging apps, overheating, or reduced battery life are among the frequent complaints.

If your Mac becomes slow after macOS Tahoe update, you're not alone. Fortunately, most of these issues can be resolved without replacing hardware or rolling back to an older system. This article explores why performance drops occur after a major update and provides a step-by-step guide to fixing them.
Why Your Mac Becomes Slow after macOS Tahoe Update
Prior moving into solutions, it helps to understand why performance issues happen after an update. Some common reasons include:
- System Incompatibility – Older Macs may not fully support all of Tahoe's new features, leading to resource strain.
- Spotlight Reindexing – After installation, Spotlight reindexes your entire system, temporarily consuming CPU and disk resources.
- Background Processes – Services like iCloud sync, photo library updates, or mail re-indexing run in the background and slow performance.
- Software Compatibility Issues – Apps not yet updated for Tahoe may run inefficiently.
- Storage and RAM Limitations – Insufficient disk space and memory can cause freezing, crashes, or poor multitasking.
The good news is that most of these issues are temporary or fixable with proper optimization.
Quick Fixes to Improve macOS Tahoe Performance
Before exploring advanced troubleshooting, start with basic fixes that often resolve sluggishness:
- Restart Your Mac – A fresh restart clears temporary caches and frees memory.
- Check for macOS Updates – Apple frequently releases patches to address early bugs after major updates. Go to System Settings > General > Software Update.
- Close Unnecessary Apps and Tabs – Too many active apps and browser windows can drain memory and CPU.
If these quick fixes don't help, continue with deeper optimization.
Optimize macOS Tahoe to Fix Slow Mac
Method 1. Free Up Storage Space
When your Mac slows down after installing macOS Tahoe, one of the first areas to check is disk space. Modern macOS versions require a decent amount of free space to handle background tasks, cache files, system updates, and swap memory. If your disk is nearly full, performance will suffer dramatically. Experts recommend maintaining at least 15–20% free space for smooth operation.
Step 1: Check Available Storage
- Click the Apple menu () in the top-left corner.
- Select About This Mac > Storage.
- You'll see a breakdown of used and free space, categorized by Documents, Apps, System, Photos, and more.
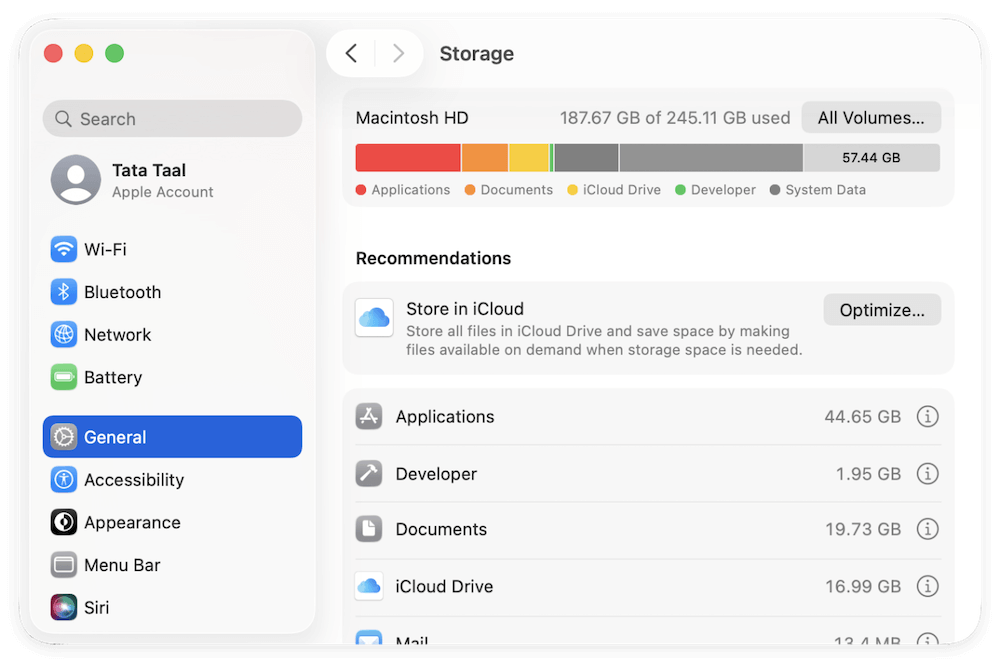
If free space is under 20GB, your Mac may run into constant slowdowns.
Step 2: Delete Unnecessary Files
- Downloads Folder Cleanup – Open the Downloads folder and remove old installers, duplicate PDFs, or unused media files.
- Large Media Files – Videos, photos, and music often take up huge amounts of space. Move them to an external hard drive or cloud storage.
- Trash Bin – Many users forget that files in the Trash still occupy disk space. Empty the Trash to free up space instantly.
Step 3: Use Built-in Storage Management
macOS Tahoe includes a Storage Management tool that helps you identify what's hogging your drive.
- Go to Apple Menu > About This Mac > Storage > Manage.
- Enable recommended optimizations such as:
- Store in iCloud – Automatically move rarely used files, photos, and messages to iCloud.
- Optimize Storage – Remove watched iTunes movies and TV shows.
- Empty Trash Automatically – Set files in Trash to be deleted after 30 days.
- Reduce Clutter – Review large files and delete what you don't need.
Step 4: Clear Cache and Temporary Files
Over time, applications build cache files that can balloon in size and slow down your Mac.
- Open Finder and select Go > Go to Folder.
- Enter ~/Library/Caches/ and press Enter.
- Delete unnecessary cache folders (don't delete system-critical ones).
💡 Tip: If unsure, use a trusted Mac cleaning tool to safely remove junk files.
Step 5: Manage Large Files and Applications
- Open Finder and press Command + F.
- In the search bar, filter by "File Size" and select files larger than 500MB or 1GB.
- Delete or move them to external storage.
- For apps, go to Applications > Sort by Size and uninstall programs you no longer use.
Step 6: Offload Data to External or Cloud Storage
If your MacBook has a smaller SSD (128GB or 256GB), consider storing large files elsewhere:
- Use iCloud Drive, Google Drive, or Dropbox for documents and media.
- Move rarely used files to an external SSD or HDD.
- Archive projects into compressed .zip files before moving them off your Mac.
Why This Works
Freeing up space doesn't just give you more room for files—it directly improves system responsiveness. macOS relies on virtual memory (swap space) stored on your drive when RAM runs out. Without adequate free storage, your system struggles to manage multitasking, leading to slowdowns, freezes, and even system crashes.
Method 2. Manage Startup Items and Background Processes
Startup items and unnecessary background tasks often cause slow boot times and reduced performance.
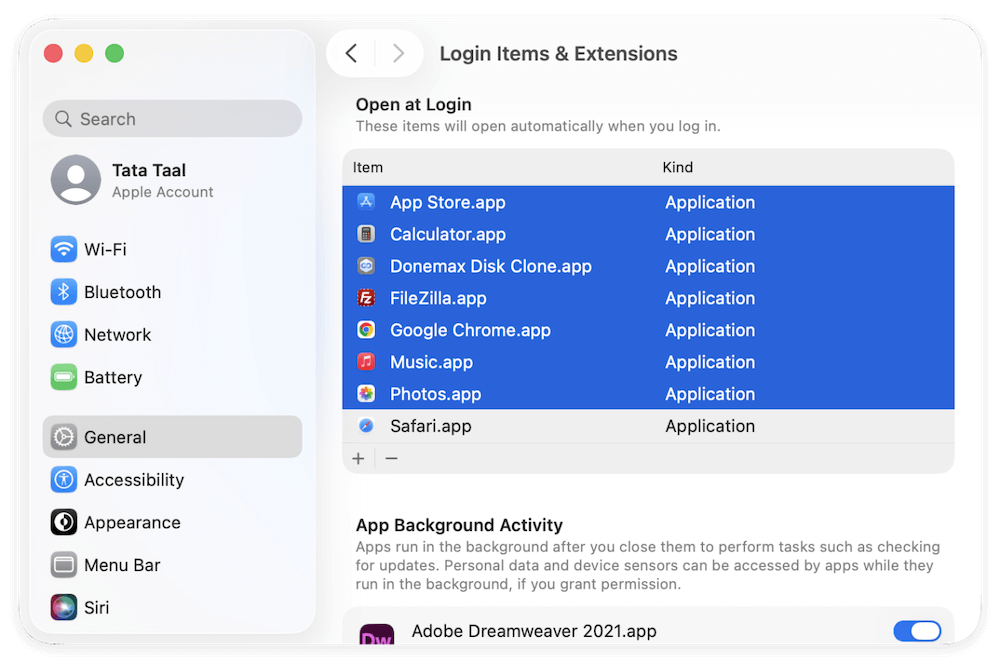
Disable Login Items:
- Go to System Settings > General > Login Items.
- Disable apps that don't need to start automatically.
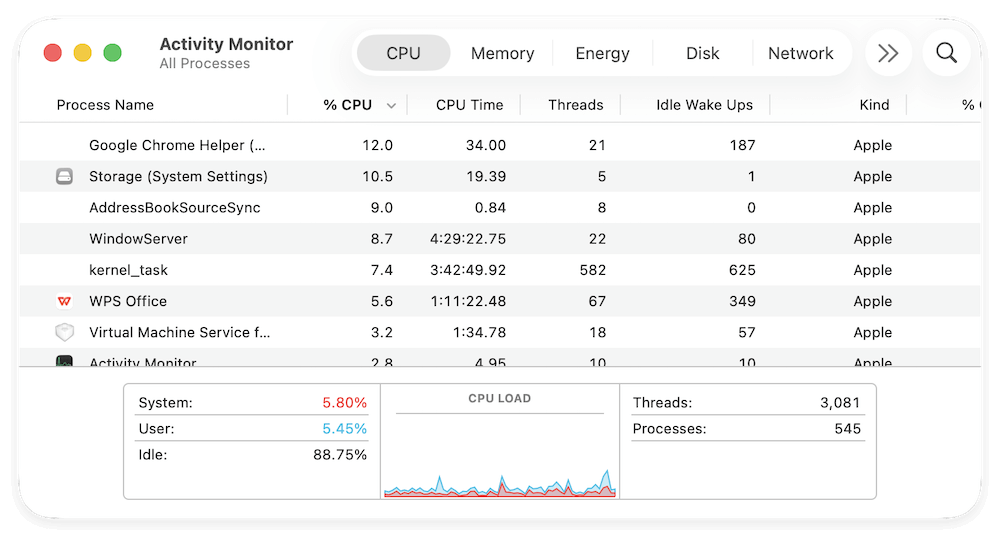
Use Activity Monitor:
- Open Activity Monitor from Utilities via Applications.
- Sort processes by CPU or Memory usage.
- Identify and quit resource-heavy apps.
Reducing startup items ensures your Mac boots faster and keeps resources available for active tasks.
Method 3. Optimize macOS Settings
Some built-in macOS features, though visually appealing, can slow performance.
Steps to Optimize Settings:
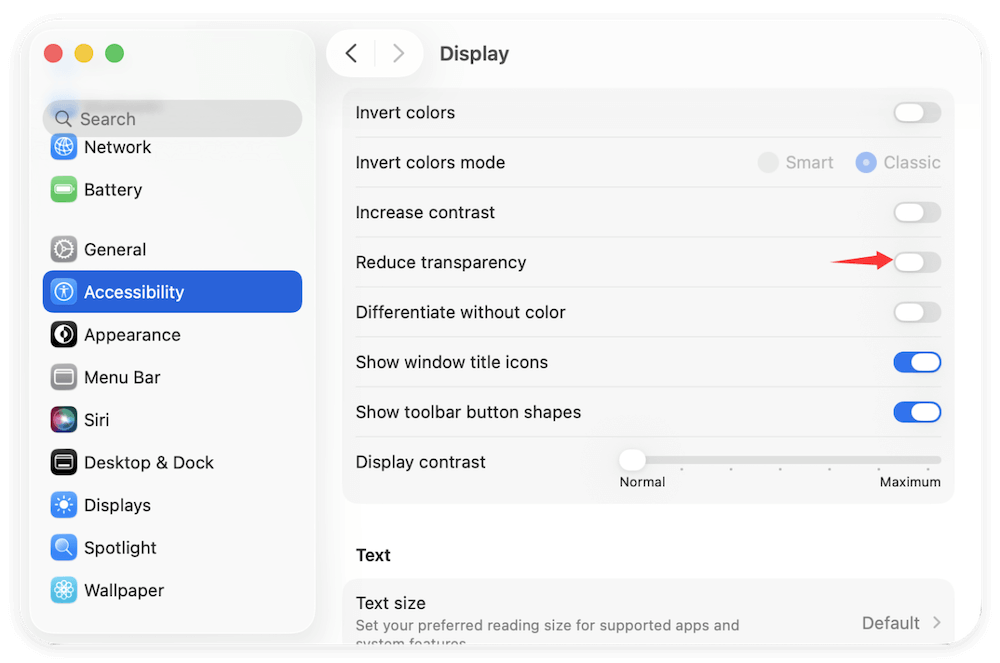
- Reduce Visual Effects
- Go to System Settings > Accessibility > Display and enable "Reduce Motion" and "Reduce Transparency."
![Mac becomes slow after macOS Tahoe update]()
- Go to System Settings > Accessibility > Display and enable "Reduce Motion" and "Reduce Transparency."
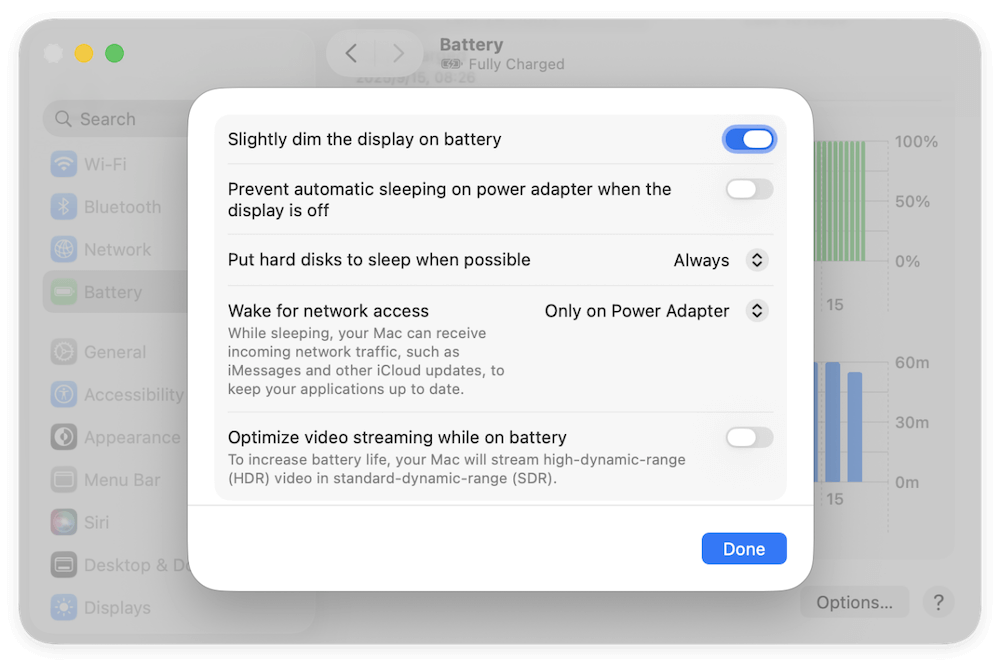
- Adjust Energy Saver Options
- On MacBooks, set display sleep and energy options to balance performance and battery life.
![Mac becomes slow after macOS Tahoe update]()
- On MacBooks, set display sleep and energy options to balance performance and battery life.
- Disable Widgets and Extensions
- Turn off unnecessary widgets in Notification Center.
- Disable Safari extensions that consume resources.
These tweaks may seem small but can significantly improve overall responsiveness.
Method 4. Check for App and Driver Updates
After a new OS release, some apps may not be fully optimized. Outdated software can cause crashes or slowdowns.
Steps to Update Apps:
- Open the App Store and update all installed apps.
- For apps downloaded outside the App Store, visit the developer's website for the latest versions.
- Ensure hardware drivers (like printers or external devices) are updated to support Tahoe.
Keeping apps updated ensures smooth compatibility with the new system.
Method 5. Reset PRAM, NVRAM, and SMC
Sometimes, system settings stored in your Mac's memory cause slowdowns after an upgrade. Resetting PRAM, NVRAM, and SMC can resolve performance issues.
Reset PRAM/NVRAM (Intel Macs):
- Turn Off your Mac.
- Turn it on and immediately press Option + Command + P + R.
- Hold for about 20 seconds, then release.
Reset SMC (Intel Macs):
- Turn Off your Mac.
- For MacBooks with non-removable batteries, press Shift + Control + Option + Power for 10 seconds, then release.
- Turn on the Mac.
(For Apple Silicon Macs, simply restart your Mac to reset these settings.)
This reset clears corrupted settings that may affect speed and responsiveness.
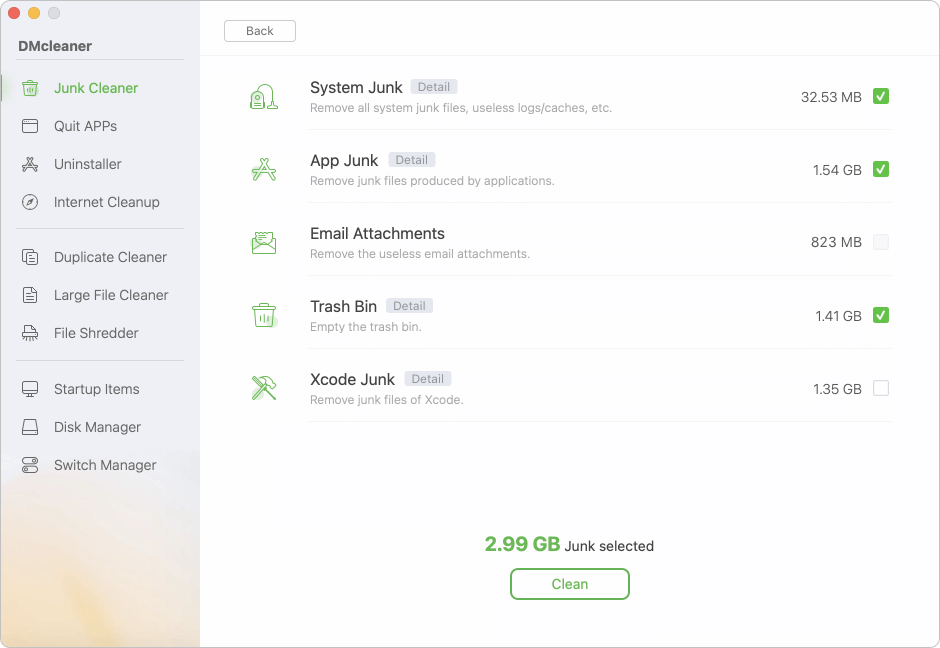
Method 6. Clean Up and Optimize with Software
You can also use the professional cleanup and optimization tool to fix the slow macOS Tahoe. With a professional tool, it will be easy and fast to clean up the junk data and speed up the Mac.
Here we suggest the comprehensive tool Donemax DMcleaner for Mac. The software offers full of options to clean up the junk data, duplicated files, large files and optimize macOS performance.
Donemax DMcleaner for Mac
- All-in-one cleanup and optimization tool for macOS Tahoe.
- Clear junk data to speed up the Mac.
- Optimize and improve the macOS performance.
After downloading and installing the software on macOS Tahoe, then run the software and clear junk, cache and other data. You can also use it to check and remove duplicated and large files. It can help you make the macOS running fast again.
Advanced Solutions to Seep Up Slow macOS Tahoe
If your Mac is still slow after applying the above fixes, try advanced troubleshooting:
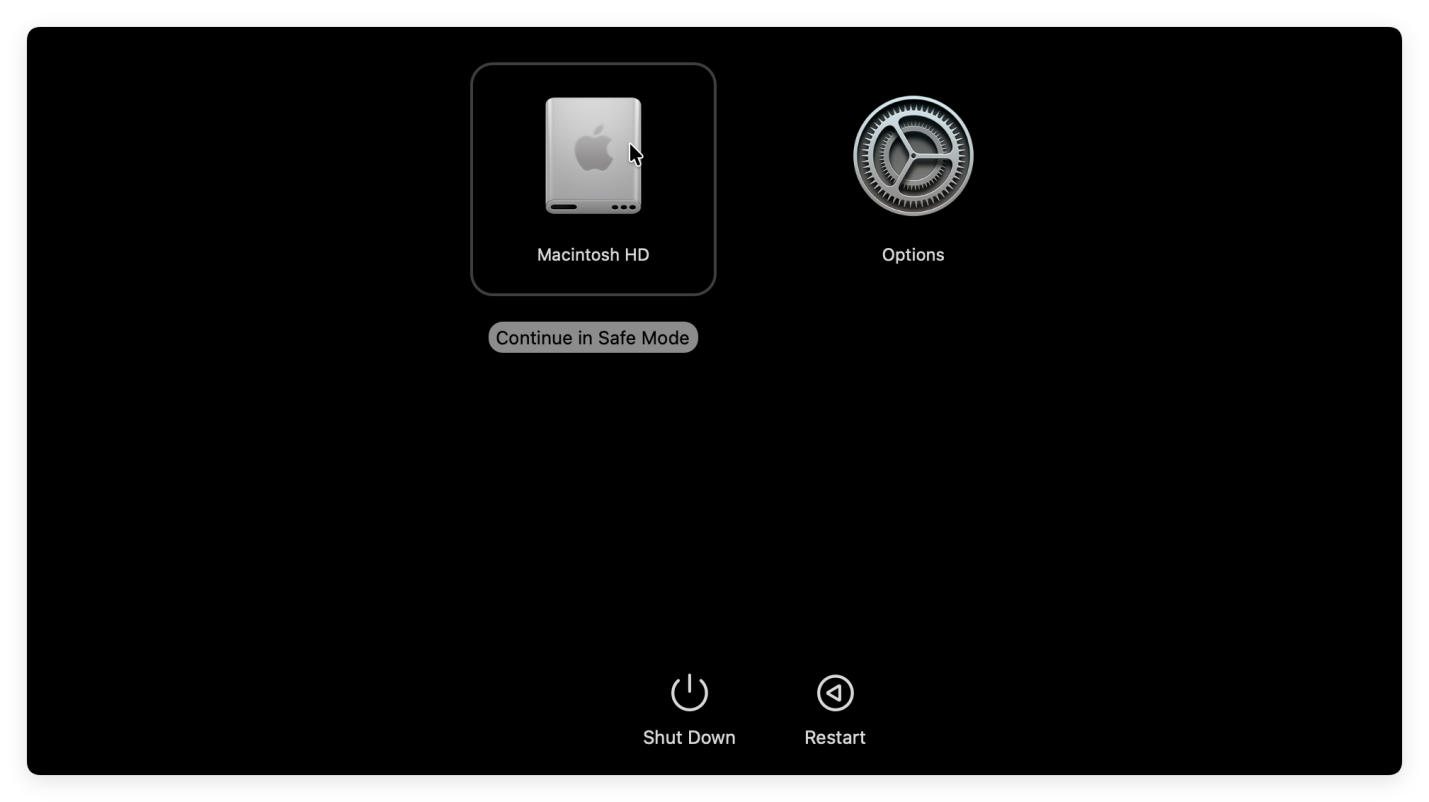
Option 1. Boot in Safe Mode
- Restart your Mac and hold power button until you see the startup options.
- Select the startup disk and press Shift key, then click Continue in Safe Mode.
- Safe Mode loads only essential files and can help identify problematic apps or extensions.
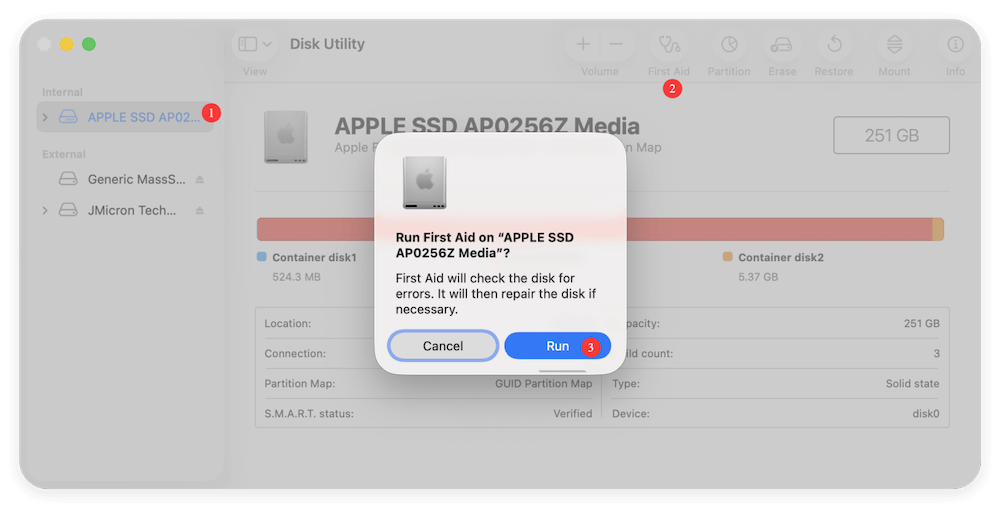
Option 2. Run Disk Utility (First Aid)
- Open Disk Utility > First Aid.
- Scan and repair disk errors that may slow performance.
Option 3. Reinstall macOS Tahoe
- If problems persist, reinstalling macOS Tahoe may resolve corrupted files.
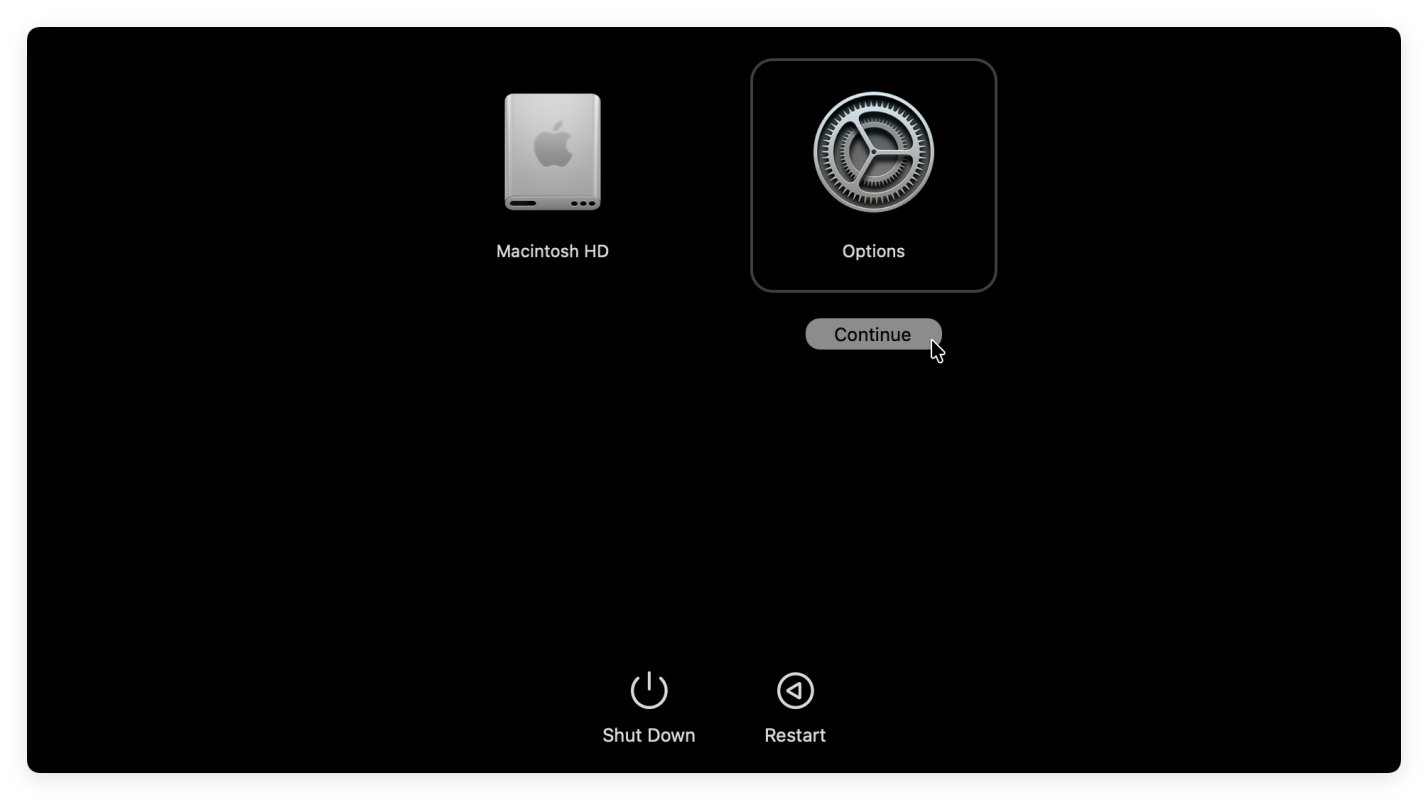
- Use macOS Recovery by holding power button during startup, choose Options and click Continue.
![Mac becomes slow after macOS Tahoe update]()
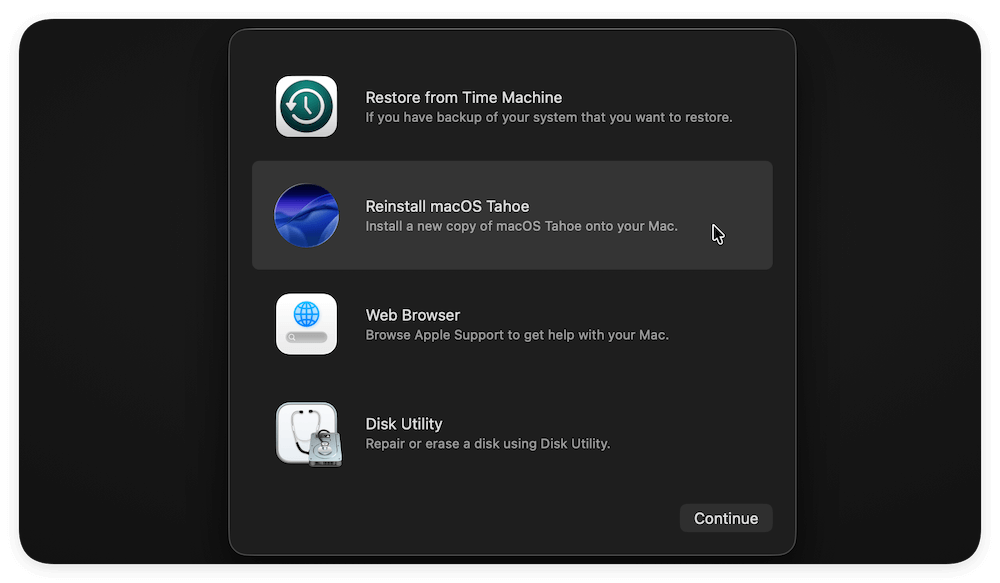
- Then select Reinstall macOS Tahoe.
![Mac becomes slow after macOS Tahoe update]()
When to Downgrade macOS Tahoe
If your Mac continues to lag despite all optimizations, downgrading may be the best option—especially for older Macs.
How to Downgrade:
- Back up your files with Time Machine.
- Create a bootable installer for the previous macOS version.
- Erase the current macOS and reinstall the older version.
Downgrading should be considered a last resort, but it restores stability on Macs that aren't fully compatible with Tahoe.
Preventive Tips for Future macOS Updates
To avoid similar slowdowns with future updates, follow these tips:
- Back Up Before Updating – Always create a Time Machine backup.
- Check Compatibility – Ensure your Mac meets system requirements before upgrading.
- Maintain Free Storage – Keep at least 20% of your disk free.
- Update Apps in Advance – Make sure essential apps are compatible with the new OS.
- Wait Before Upgrading – Let early bugs and performance issues get patched before installing new macOS versions.
These precautions help ensure smoother upgrades with fewer performance problems.
Conclusion
Installing macOS Tahoe has left many Mac users facing unexpected slowdowns. Fortunately, these performance issues are usually temporary or easily fixable.
To recap, start with simple steps like restarting your Mac, updating software, and clearing storage. If the slowdown persists, manage startup items, optimize settings, reset PRAM/SMC, or reinstall the OS. As a last resort, downgrading macOS Tahoe may be necessary, particularly for older machines.
By following these steps, your Mac can regain its speed and efficiency, allowing you to enjoy the benefits of macOS Tahoe without the frustration of lag and slow performance.
DMcleaner for Mac
Donemax DMcleaner for Mac is an award-winning Mac cleanup & maintenance tool. It offers over 10 tools to help Mac users clean junk data. It helps speed up a slow Mac. Additionally, it includes a smart switch manager and disk manager for Mac.
Related Articles
- Apr 06, 2025Perform MacBook Pro Maintenance: A Comprehensive Guide
- Apr 28, 2026How to Clear Browser Cache on Mac: Mac Maintenance Guide
- Sep 23, 2025Best 10 Mac Uninstaller to Remove Apps from Mac (macOS Tahoe Ready)
- Dec 11, 2025Delete YouTube Cookies and Cache on Mac
- Dec 10, 2025What Is The Best Mac Junk Cleaner? [macOS Tahoe Supported]
- Jan 13, 2026How to Erase/Format a Hard Drive on Mac?

Contributing Writer
Steven
Steven has been a senior writer & editor of Donemax software since 2020. He's a super nerd and can't imagine the life without a computer. Over 6 years of experience of writing technical solutions and software tesing, he is passionate about providing solutions and tips for Windows and Mac users.

Editor in chief
Gerhard Chou
In order to effectively solve the problems for our customers, every article and troubleshooting solution published on our website has been strictly tested and practiced. Our editors love researching and using computers and testing software, and are willing to help computer users with their problems