
Written byMariaUpdated on Mar 06, 2026
How to Reinstall macOS Tahoe – Complete Guide 2026
Approved byGerhard Chou
Before we start: Before reinstalling macOS Tahoe, it's necessary to back up the Mac to protect your data safe. For example, you can clone the Mac with Donemax Disk Clone for Mac. It can clone everything on the Mac and make a bootable clone backup.
PAGE CONTENT:
Reinstalling your Mac operating system can feel intimidating, but it doesn't have to be. Whether your system has become sluggish, you're encountering errors, or you're preparing your Mac for resale, reinstalling macOS Tahoe can refresh your device and bring it back to peak performance.
In this guide, we'll walk you through everything you need to know about reinstalling macOS Tahoe; from preparation, to different installation methods, to troubleshooting issues along the way.
Why You Might Need to Reinstall macOS Tahoe
Like any operating system, macOS can experience issues over time. Some common reasons for reinstalling include:
- System instability: Frequent crashes, freezes, or kernel panics.
- Performance issues: Your Mac runs unusually slow even after optimizing storage and clearing caches.
- Startup problems: Your Mac doesn't boot correctly or gets stuck on the Apple logo.
- Corruption: System files become corrupted due to failed updates, power interruptions, or malware.
- Resale or gifting: Wiping and reinstalling ensures your personal data is erased.
Unlike a simple update, reinstalling macOS provides a fresh operating environment. You can choose to preserve your data or perform a clean installation, depending on your needs.
Things to Do Before Reinstalling macOS Tahoe
Before you begin the reinstallation process, take the following precautions:
1. Backup Your Data
Reinstallation can erase data if you perform a clean install, so backing up is critical. You have several options:
- Time Machine Backup: Connect an external drive and use Time Machine to create a full backup of your system. This is the easiest way to restore apps, files, and settings after reinstalling.
- iCloud Backup: Ensure important documents, photos, and notes are synced with iCloud.
- Manual Backup: Copy critical files to an external drive or cloud storage like Google Drive, Dropbox, or OneDrive.
- Clone the Mac: You can make a full clone for the Mac before reinstalling the macOS. For example, you can use Donemax Disk Clone for Mac to create a full and bootable clone.

2. Check Internet Connection
Reinstalling macOS Tahoe requires downloading installation files from Apple servers. A stable, high-speed internet connection ensures the process goes smoothly.
3. Ensure Power Supply
If you're using a MacBook, keep it connected to a power adapter throughout the reinstallation. Losing power mid-installation can corrupt files and create bigger problems.
4. Know Your Apple ID and Password
After reinstalling, you'll need to sign in with your Apple ID to activate the Mac. If Find My Mac is enabled, Activation Lock will prevent setup unless you have your credentials.
Methods to Reinstall macOS Tahoe
There are three main ways to reinstall macOS Tahoe:
A. Reinstall Using macOS Recovery
macOS Recovery is the built-in system that allows you to reinstall macOS without additional tools.
Steps for Apple Silicon Macs:
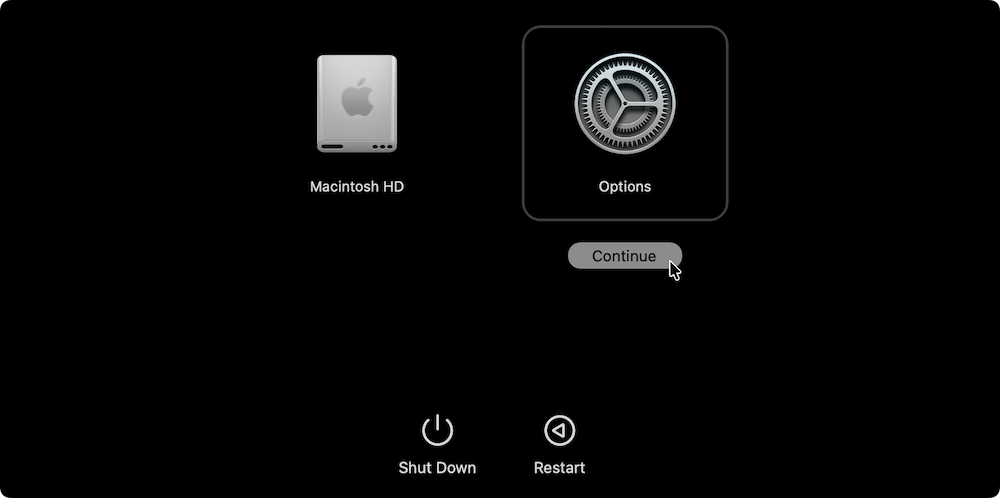
- Shut down your Mac.
- Press and hold the Power button until you see "Loading startup options."
- Select Options, then click Continue.
![reinstall macOS Tahoe]()
Steps for Intel Macs:
- Shut down your Mac.
- Turn it back on and immediately press and hold Command (⌘) + R until the Apple logo appears.
- Release the keys when you see the macOS Utilities window.
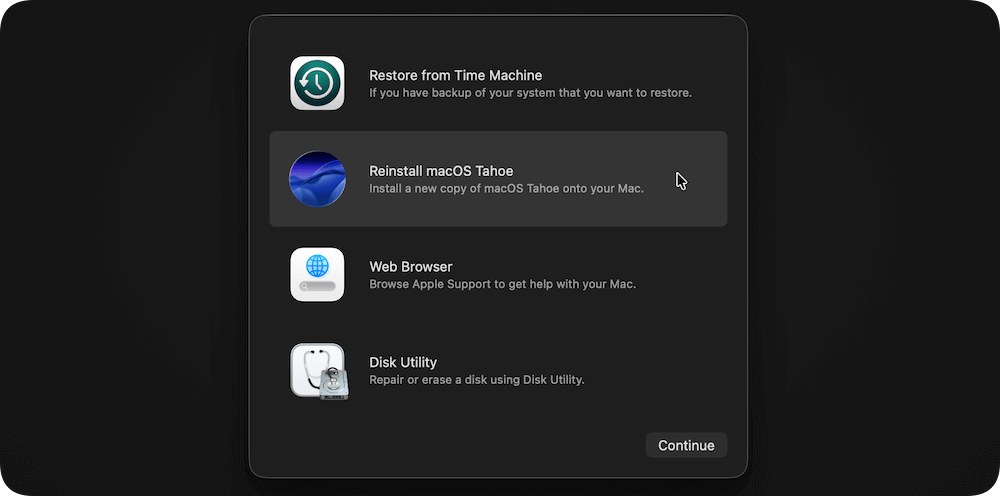
Installing macOS Tahoe:
- In macOS Utilities, select Reinstall macOS Tahoe and click Continue.
![reinstall macOS Tahoe]()
- Follow the on-screen prompts.
- Choose the disk where macOS will be installed (usually Macintosh HD).
![reinstall macOS Tahoe]()
- The installation begins — your Mac will restart several times.

This method reinstalls macOS without erasing your files, apps, or settings.
B. Reinstall Using Internet Recovery
If your local Recovery partition is damaged or unavailable, you can use Internet Recovery. This downloads the installer directly from Apple's servers.
Accessing Internet Recovery:
- On Apple Silicon: Internet Recovery is automatic if local recovery isn't available.
- On Intel Macs:
- Command + Option + R → installs the latest compatible macOS.
- Shift + Option + Command + R → reinstalls the macOS version that came with your Mac.
Steps to reinstall macOS Tahoe via Internet Recovery:
- Restart your Mac and hold the correct key combination.
- A spinning globe will appear, indicating that your Mac is connecting to Apple servers.
- Once loaded, you'll see macOS Utilities.
- Select Reinstall macOS Tahoe and follow the prompts.
This method is particularly useful if your Mac's internal recovery environment is missing or corrupted.
C. Clean Installation (Erase & Reinstall)
A clean installation of macOS Tahoe is the most thorough way to refresh your Mac. Unlike a standard reinstall, which keeps your files and applications, a clean install erases everything on the drive and starts from scratch. This is ideal if you're:
- Experiencing persistent software issues that updates or resets haven't fixed.
- Suspecting malware or deep corruption in the system.
- Preparing to sell or give away your Mac.
- Wanting to start fresh with no old clutter.
Important Warning Before You Begin
Performing a clean installation will permanently erase everything on your startup disk — apps, files, photos, and settings. Make sure you've backed up your important data to Time Machine, iCloud, or an external drive before proceeding.
Step 1: Boot into macOS Recovery
- Shut down your Mac completely.
- Boot into Recovery Mode:
- Apple Silicon Macs: Hold down the Power button until "Loading startup options" appears, then select Options > Continue.
- Intel Macs: Press and hold Command (⌘) + R immediately after powering on until you see the Apple logo.
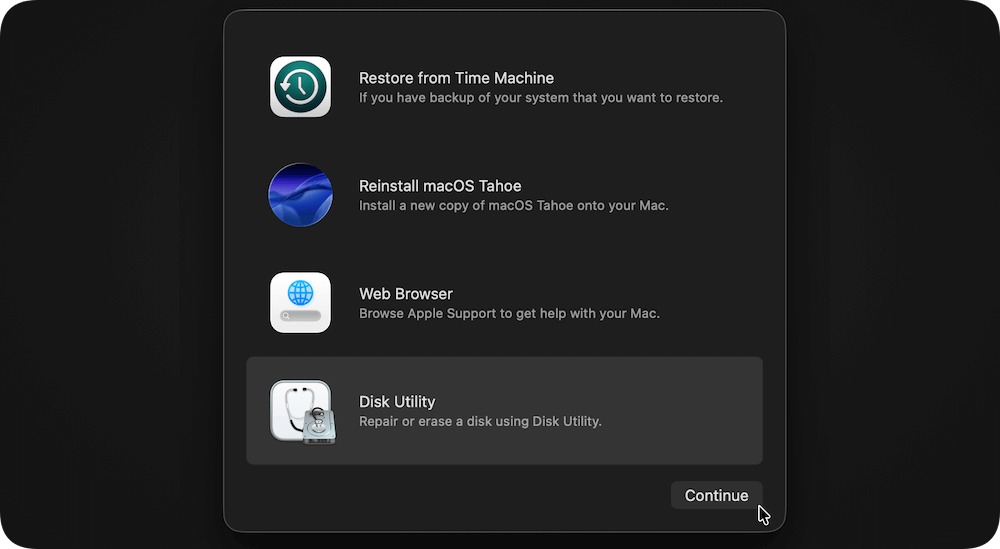
Step 2: Open Disk Utility
- From the macOS Utilities window, select Disk Utility. Click Continue.
![reinstall macOS Tahoe]()
- In Disk Utility, select your startup disk (commonly called Macintosh HD) from the left-hand sidebar.
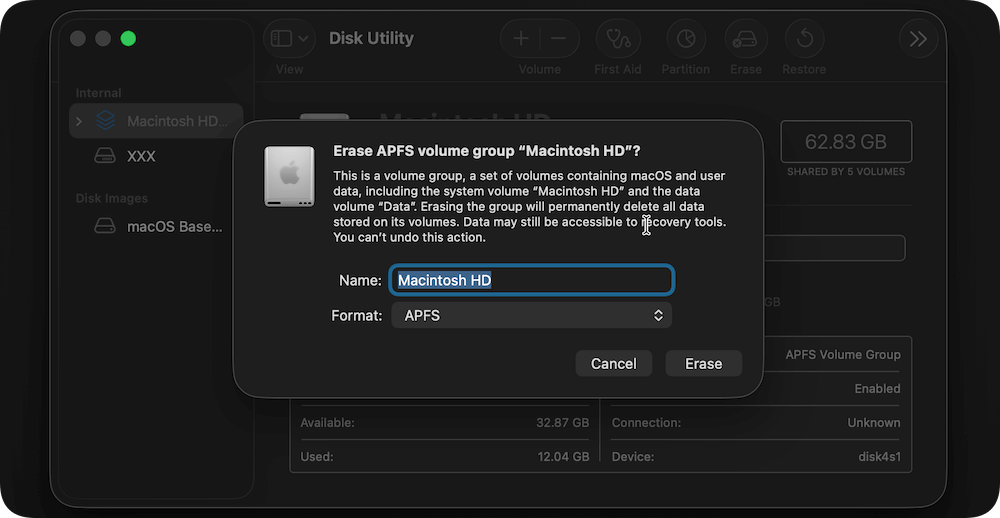
Step 3: Erase the Disk
- Click the Erase button in the toolbar.
- Choose your format and scheme:
- Format: APFS (default for Macs with SSDs and all newer macOS versions). Mac OS Extended (Journaled) (for older Macs with HDDs or Fusion drives).
- Scheme: Select GUID Partition Map.
- 3Enter a name for the disk (you can keep it as "Macintosh HD").
- Click Erase.
- Wait for the process to complete. Your disk is now wiped clean.
![reinstall macOS Tahoe]()
Step 4: Reinstall macOS Tahoe
- Close Disk Utility to return to the macOS Utilities menu.
- Select Reinstall macOS Tahoe.
- Click Continue and follow the prompts.
- Choose the disk you just erased (usually named Macintosh HD).
- Installation will begin. Your Mac may restart multiple times during the process.
Step 5: Set Up Your Mac
After installation, your Mac will boot into the Setup Assistant. You'll be prompted to:
- Select your country and keyboard layout.
- Connect to Wi-Fi.
- Sign in with your Apple ID.
- Decide whether to restore from a Time Machine backup, migrate from another Mac, or set up as a brand-new Mac.
If you're selling your Mac, you can stop at the "Welcome" screen and let the new owner complete setup.
Why Choose a Clean Install?
A clean installation has several benefits compared to a standard reinstall:
- Better Performance: Removing old cache files, leftover system junk, and unused apps makes your Mac run smoother.
- Maximum Stability: System errors caused by corrupted settings are eliminated.
- Fresh Start: You can install only the apps you really need, avoiding unnecessary clutter.
- Security: Erases all personal files, making it safe to hand your Mac over to someone else.
Troubleshooting During Reinstallation
Sometimes, problems occur during reinstallation. Here are common issues and fixes:
- Stuck on Apple Logo or Progress Bar: Restart your Mac, reset NVRAM/PRAM (Intel only), or retry installation.
- "Unable to Install macOS" Error: Ensure you have sufficient disk space and a stable internet connection. Try erasing the disk before reinstalling.
- Internet Recovery Fails:
- Check Wi-Fi or switch to Ethernet.
- Reset your router.
- Reset SMC (Intel Macs) or NVRAM.
- Insufficient Disk Space: Use Disk Utility to erase unnecessary partitions or erase the disk completely.
After Reinstalling macOS Tahoe
Once macOS Tahoe is reinstalled, your Mac will boot into the setup assistant. Here's what to do next:
- Restore from Backup:
- If you used Time Machine, choose to restore during setup.
- If you used iCloud, sign in to your Apple ID and let your files sync back.
- Reinstall Applications:
- Download apps from the App Store or re-install from installers.
- For apps outside the App Store, download the latest version from the developer's website.
- Update macOS:
- Go to System Settings > General > Software Update to ensure you're running the latest version of Tahoe.
- Adjust Settings:
- Customize preferences like Dock, Finder, and Security settings.
- Reconnect iCloud, email accounts, and other services.
Tips for Maintaining a Fresh Installation
To keep your Mac running smoothly after reinstalling:
- Keep macOS Updated: Regularly check for updates to patch security vulnerabilities and fix bugs.
- Back Up Regularly: Use Time Machine or cloud backups to prevent future data loss.
- Monitor Storage: Keep an eye on "About This Mac > Storage" and avoid clutter.
- Use Malware Protection: While macOS is secure, having additional protection is useful.
- Avoid Unnecessary Apps: Only install software you actually use to prevent slowdowns.
Conclusion
Reinstalling macOS Tahoe might sound complex, but it's a straightforward process when broken down into steps. Whether you're using Recovery Mode, Internet Recovery, or opting for a clean installation, the key is preparation — back up your Mac data, ensure you have internet access, and know your Apple ID credentials.
A fresh installation can resolve many common issues, from sluggish performance to startup failures. More importantly, it provides peace of mind that your Mac is running on a stable, clean foundation.
With macOS Tahoe reinstalled, your Mac will feel like new again — ready to perform reliably for work, study, or personal projects.
Donemax Disk Clone for Mac
An award-winning disk cloning program to help Mac users clone HDD/SSD/external device. It also can create full bootable clone backup for Macs.
Related Articles
- Aug 21, 2025How to Use GIMP Clone Tool?
- Mar 22, 2024What Is SMC? How to Reset SMC on Mac?
- Dec 26, 2024Format a WD External Hard Drive for Both Windows and macOS
- May 19, 2025Clean Install macOS Ventura: A Comprehensive Guide
- Jul 10, 2024Factory Reset Dell Laptop and Wipe All Private Data Before Selling/Donating
- Sep 09, 2025How to Delete A Partition on SSD without Losing Data?

Contributing Writer
Maria
Maria is one of the senior writers & editors of Donemax who lives and works in Sydney, Australia. She loves PC, Mac and Internet Technology. She has 6 years of writing articles about data recovery on PC/Mac, disk cloning solution, data eraser and computer OS optimization, etc. She is also interested in testing various software and digital products.

Editor in chief
Gerhard Chou
In order to effectively solve the problems for our customers, every article and troubleshooting solution published on our website has been strictly tested and practiced. Our editors love researching and using computers and testing software, and are willing to help computer users with their problems