Written byChristinaUpdated on Jul 18, 2025
Fix External Hard Drive Read-Only on macOS Tahoe 26
Approved byGerhard Chou
Before we start: Fix the drive issues, change the permissions, or turn off the write-protection switch can solve the external hard drive read-only problem on macOS Tahoe 26. However, if the drive is in NTFS format, you can use Donemax NTFS for Mac to make it writable.
PAGE CONTENT:
External hard drives are essential for backups, file transfers, and additional storage. However, many Mac users upgrading to macOS Tahoe 26 face an annoying problem: their external hard drives suddenly become read-only, meaning you can open files but can't modify, delete, or save new data on the drive.
If you're dealing with a read-only external hard drive on macOS Tahoe 26, you're not alone. This guide explains the common causes, detailed solutions, and preventive tips to help you fix the issue and regain full control over your storage device.
Why is Your External Hard Drive Read-Only on macOS Tahoe 26?
The "read-only" problem can happen for several reasons, and understanding the root cause is critical before applying a solution. Here are the most common reasons external hard drives appear read-only on macOS Tahoe 26:
1. File System Incompatibility (NTFS Drives)
The most frequent cause is the drive being formatted with a file system not natively supported by macOS for full read-write access. For example:
- NTFS (New Technology File System) is commonly used for Windows drives.
- macOS allows reading NTFS drives but restricts writing unless third-party NTFS for Mac drivers are installed.
2. Permission Restrictions
Your Mac applies security settings that control who can read or write to connected drives. Sometimes, these permissions default to read-only, especially after system updates or connecting the drive to multiple machines.
3. Drive Errors or Corruption
If your external hard drive has errors or corruption, macOS may automatically restrict it to read-only to prevent further damage or data loss.
4. Write Protection Enabled
Some external drives come with a physical write-protection switch, while others may have software-based write protection enabled, making them read-only.
5. Security Enhancements in macOS Tahoe 26
The latest macOS versions, including Tahoe 26, implement stricter security and privacy controls, affecting how external devices interact with your system. These settings can sometimes flag older drives as untrusted or restrict write permissions.
How to Confirm If Your External Hard Drive is Read-Only?
Before jumping into solutions, it's essential to verify the drive's current state:
Method 1: Using Finder
- Connect the external hard drive to your Mac.
- Open Finder and locate the drive under "Locations."
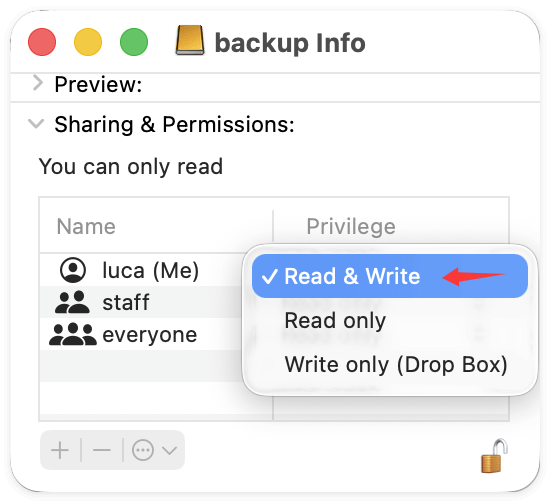
- Right click the drive and select Get Info.
![fixe read-only external drive on macOS Tahoe]()
- Check Sharing & Permissions. If you find the information like "You can only read," the issue is confirmed.
![fixe read-only external drive on macOS Tahoe]()


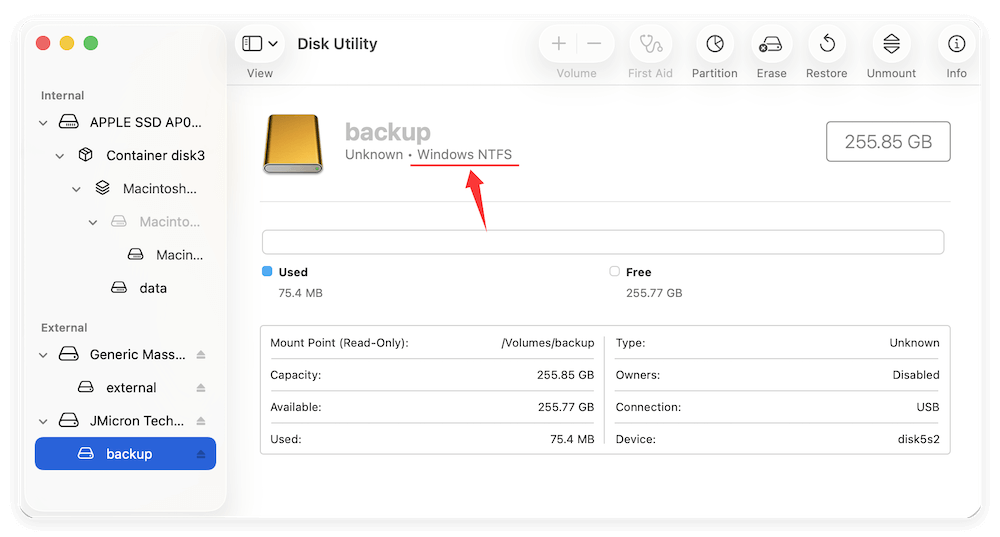
Method 2: Using Disk Utility
- Open Disk Utility via Applications from Utilities.
- Select your external drive and click Info.
- Check the "File System" and "Writable" status. If it's formatted as NTFS or shows writable status as No, that's likely the cause.

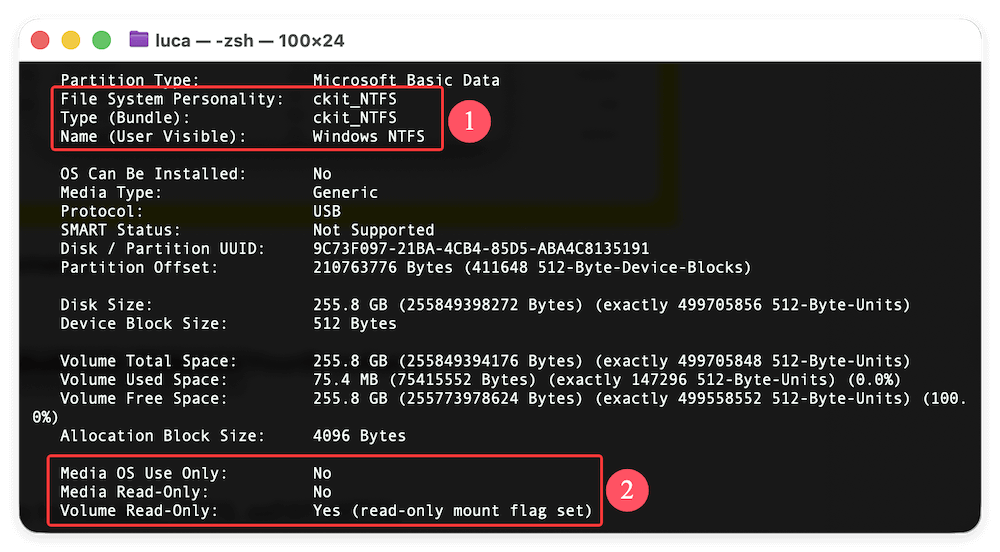
Method 3: Terminal Command
Open Terminal and type:
diskutil info /Volumes/YourDriveName

Look for:
- File System: Shows format (e.g., NTFS, exFAT, APFS)
- Media Read-Only: Indicates if hardware protection is enabled
- Volume Read-Only: Confirms if the volume is in read-only mode
Solutions to Fix External Hard Drive Read-Only on macOS Tahoe 26
Depending on the cause, here are step-by-step solutions to resolve the read-only issue:
Method 1. Check File System Compatibility
NTFS Drives
macOS Tahoe 26 only provides read-only support for NTFS-formatted drives. You can:
- Use third-party NTFS for macOS drivers for full access (details below).
- Reformat the drive to a compatible format like exFAT, APFS, or HFS+, depending on your needs.
exFAT is ideal if you need cross-platform compatibility with Windows and Mac.
How to Check File System
- Open Disk Utility.
- Select the drive and review its format.
- If it's NTFS, proceed to the next steps.
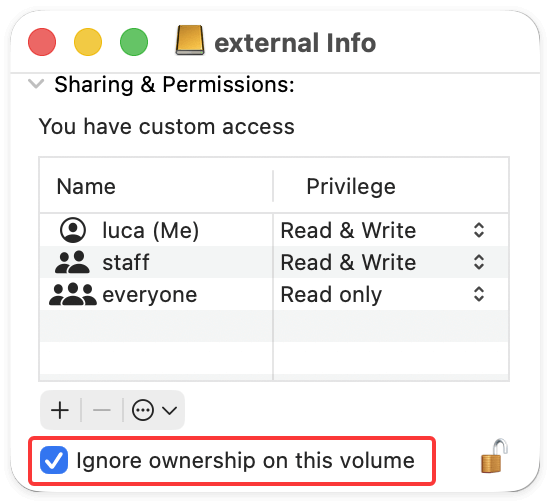
Method 2. Change Drive Permissions
If your drive is in a compatible format but still read-only::
- Right-click the drive icon in Finder.
- Select Get Info.
- Scroll to Sharing & Permissions.
- Ensure your user account has Read & Write access.
- If locked, click the lock icon, enter your admin password, and adjust permissions.
Sometimes, the Ignore ownership on this volume option is helpful for external drives.
Method 3. Disable External Drive Write Protection
Check if your drive has a physical switch. If so, toggle it to the unlocked position.
For software write protection. use the Terminal command:
sudo chmod -R u+rw /Volumes/YourDriveName
This grants read-write access to the current user.
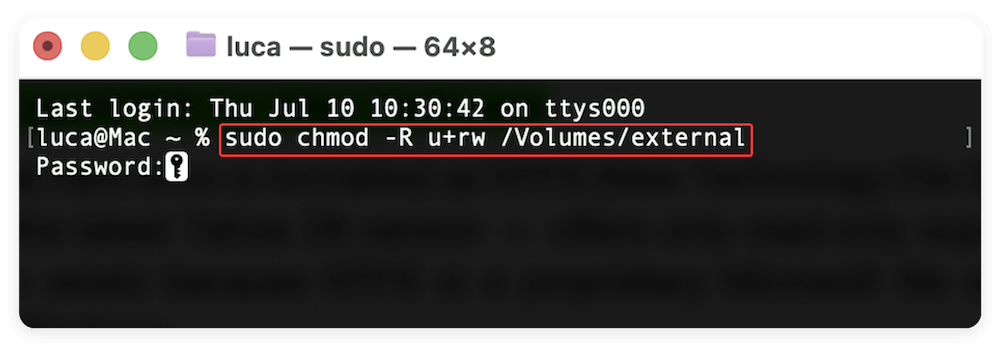
💡 Note: Be cautious with system files, and only modify known drives.
Method 4. Use NTFS for Mac Software
If your external hard drive is formatted as NTFS (New Technology File System), macOS — including the latest Tahoe 26 version — offers only read-only support by default. This limitation exists because NTFS is a proprietary Microsoft file system primarily designed for Windows.
While macOS can open and read files on NTFS drives, you won't be able to:
- Copy files to the drive
- Edit files stored on the drive directly
- Delete files from the NTFS drive
To bypass this limitation without reformatting the drive (especially when you need to maintain cross-platform compatibility or preserve existing data), you can install third-party Microsoft NTFS drivers for macOS. These drivers enable full read and write access to NTFS-formatted drives smoothly.
Popular Options:
Here are some of the most reliable, widely-used NTFS drivers for macOS, tested for compatibility with macOS Tahoe 26:
Features:
- Full read-write access to NTFS drives on Mac
- Fast data transfer speeds comparable to native Mac file systems
- Supports latest macOS Tahoe 26
- Automatic mounting of NTFS drives at startup
- User-friendly interface and easy interactions
Pros
- Stable
- Fast
- Updated frequently
Cons
- Paid license required after trial
2. Tuxera NTFS for Mac
Features:
- Read-write access to NTFS drives
- Disk checking and repair tools included
- Supports latest macOS versions
- Slightly more technical installation process than Donemax
Pros
- Solid performance
- Offers disk health tools
Cons
- Not as fast as Donemax
- UI is minimal
3. Mounty for NTFS (Free Option)
Features:
- Free, lightweight NTFS write enabler for macOS
- Uses Apple's native NTFS support with additional tweaks
- Allows basic read-write access
Pros
- No cost
- Simple interface
Cons
- Slower performance
- Limited stability
- May have compatibility issues with macOS Tahoe 26
How to Install and Use a Windows NTFS for Mac Driver
Here's how you can quickly set up Donemax NTFS for Mac as an example:
Step 1. Visit Donemax Software's official website. Download the latest version compatible with macOS Tahoe 26.
Step 2. Install the software by following on-screen instructions. Restart your Mac if prompted.
Step 3. Connect your NTFS external hard drive. Select the drive in the software and click Enable Writable button. The drive should now appear with full read-write functionality in Finder.

When to Use NTFS Drivers
Opt for NTFS drivers if:
- You frequently transfer files between Mac and Windows computers
- You need to modify existing NTFS-formatted drives without reformatting
- Reformatting would result in data loss or is not practical
💡 Note: If you use the external drive exclusively with macOS, consider reformatting to APFS or HFS+ for better performance and native compatibility.
Important Considerations with NTFS Drivers
- Compatibility: Always confirm that the driver version supports macOS Tahoe 26, especially after system updates.
- Data Safety: Use reliable drivers from reputable sources to avoid corruption or data loss.
- Performance: Paid drivers like Paragon offer optimized performance, while free tools may suffice for occasional use but with slower speeds.
Method 5. Repair Disk Using Disk Utility
Drive errors can force macOS to restrict access. Repairing the disk may solve the issue:
- Open Disk Utility.
- Select the external drive.
- Click First Aid > Run.
- Let the tool scan and repair minor errors.
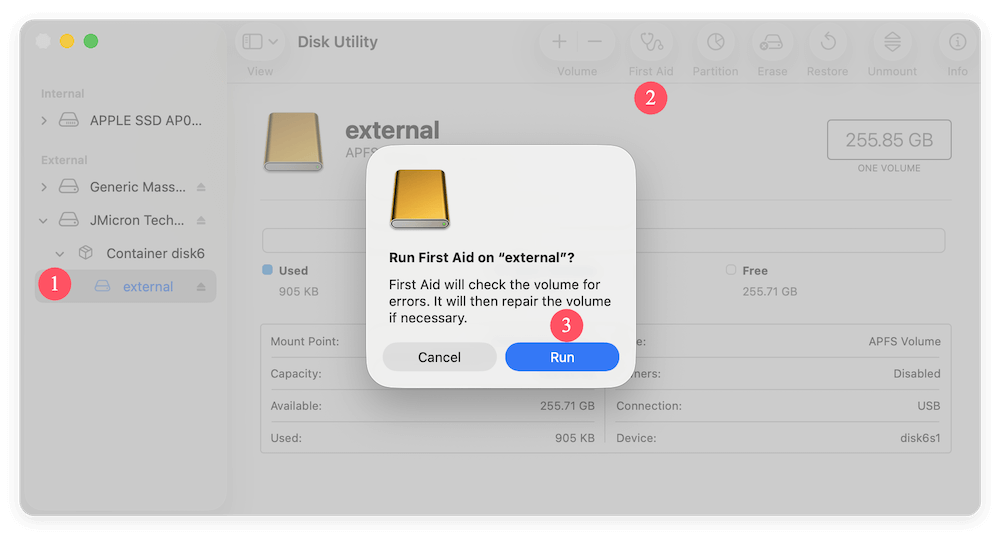
If repairs are successful, try accessing the drive again.
Method 6. Format the Drive to a Compatible File System
If you have backups or don't mind erasing the drive, formatting it resolves file system and permission issues:
Recommended Formats:
- APFS: Optimized for macOS (macOS 10.13 or later)
- HFS+: Older Mac systems, Time Machine compatible
- exFAT: For use with both Mac and Windows
Steps to Format external hard drive on macOS Tahoe 26:
- Backup important data elsewhere.
- Open Disk Utility.
- Select the external drive.
- Click Erase, choose the desired format, and click Erase.
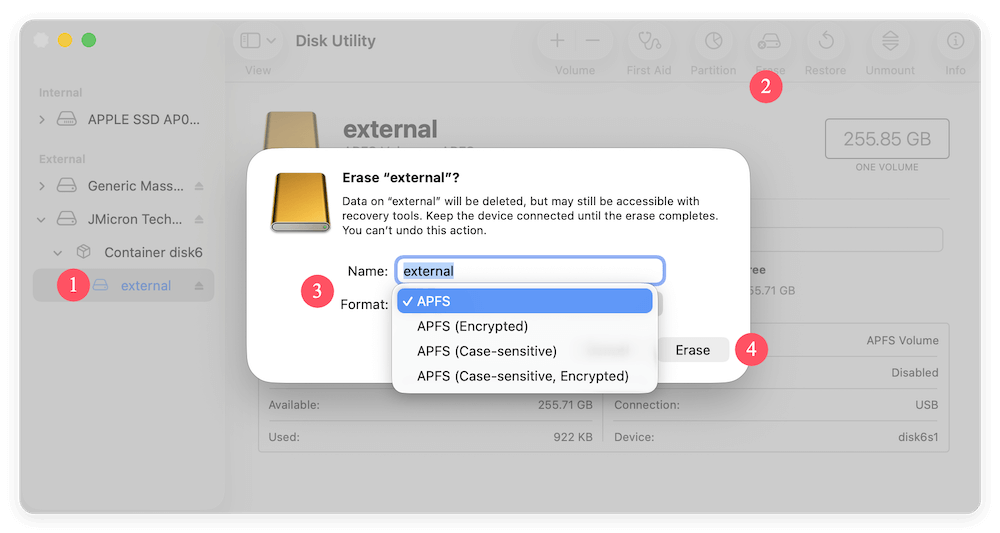
🚨 Warning: Formatting erases all existing data.
Data Recovery before Formatting
If your drive is read-only and contains critical data, recover files before reformatting (using Donemax Data Recovery for Mac):
Step 1. Install a recovery tool on your Mac.
Step 2. Connect your external hard drive. Run the software and select the drive.

Step 3. Scan the drive for recoverable files.

Step 4. Preview and recover the necessary files to a safe location.

Once data recovery is complete, you can safely reformat the drive.
Preventive Measures for Future External Drive Issues
After fixing the read-only problem, follow these practices to avoid future complications:
1. Always Eject Drives Properly
- Use Eject in Finder or Disk Utility before disconnecting to prevent corruption.
2. Maintain Regular Backups
- Keep copies of important data elsewhere to avoid loss if drive issues reoccur.
3. Keep macOS and NTFS Drivers Updated
- Install the latest macOS updates and ensure any third-party NTFS drivers support Tahoe 26.
4. Use Compatible File Systems
- For drives used between Windows and Mac, exFAT is the safest option.
- For Mac-exclusive drives, APFS provides optimal performance and security.
5. Monitor Drive Health
- Regularly run First Aid via Disk Utility.
- Use SMART monitoring tools to check for hardware failures.
Conclusion
Facing a read-only external hard drive on macOS Tahoe 26 can be frustrating, but in most cases, it's solvable. Whether it's due to NTFS formatting, permission settings, or macOS security features, the solutions above help restore full read-write access.
Here's a quick recap:
- Check the file system; use exFAT or APFS for compatibility.
- Adjust permissions through Finder.
- Disable write protection physically or via Terminal.
- Install NTFS for Mac drivers if using NTFS drives frequently.
- Repair minor drive errors with Disk Utility.
- Format the drive after recovering essential data.
By following these steps and adopting preventive practices, you can avoid similar external drive issues and ensure smooth, reliable file management on macOS Tahoe 26.
Related Articles
- Feb 06, 2025[4 Methods] Fix The Volume Macintosh HD Was Found Corrupt and Needs to Be Repaired
- Apr 20, 2026How to Create a macOS Sierra Bootable USB Installer (2026 Guide)
- Apr 06, 2025Fix support.apple.com/mac/startup 3001F Error on Mac – A Comprehensive Guide
- Jul 29, 2024How to Fix Mac Cannot Mount An ExFAT Drive?
- May 09, 2026Reset or Change Encrypted APFS Drive's Password
- Jul 27, 2025How to Connect an SD Card to Mac?

Contributing Writer
Christina
Christina is the senior editor of Donemax software who has worked in the company for 4+ years. She mainly writes the guides and solutions about data erasure, data transferring, data recovery and disk cloning to help users get the most out of their Windows and Mac. She likes to travel, enjoy country music and play games in her spare time.

Editor in chief
Gerhard Chou
In order to effectively solve the problems for our customers, every article and troubleshooting solution published on our website has been strictly tested and practiced. Our editors love researching and using computers and testing software, and are willing to help computer users with their problems