
Written byCharlesUpdated on Jan 30, 2026
How to Create a bootable USB installer for macOS?
Approved byGerhard Chou
Before we start: In this article you will find how to make a bootable USB installer for macOS. If you are looking for a disk clone software to make a bootable clone for your Mac, we recommend you try Donemax Disk Clone for Mac. With the software, you can also easily create a bootable USB installer for macOS. Besides, the software can make a fully and bootable clone backup for macOS directly.
PAGE CONTENT:
Creating a bootable USB installer for macOS is useful in some cases. For example, you can use it to bootable Mac and fix system issues when the Mac crashed. When you need to install macOS on a Mac without Internet access, a USB installer is the best choice.
This guide will introduce a the ways to create USB installer for macOS. Also, you can choose to make a full and bootable clone for Mac as alternative.
Why Create a Bootable USB Installer?
"I am a user who switched from a Windows system to a Mac. I wonder if I can make a installation USB on the Mac like Windows. In this way, after my computer crashes, I can use this installation disk to restore my system."
There are several reasons why you should create a bootable USB installer. You can create a bootable USB installers for macOS to do clean installations, install macOS to different Mac machines without re-downloading the OS installer each time, be unable to install a compatible macOS from the Finder or macOS Recovery, or to serve as a recovery boot disk, etc. No special technical skill is needed to make a bootable USB installers for macOS but command line will be used in the process.
Usually, a bootable USB installer for macOS is primarily required by the system administrators or experienced users who are familiar with entering commands in Terminal.
✎ Tip: You can use a USB external drive (more than 14GB) or a secondary volume as a startup disk from which to install the Mac operating system.
What to Do before Creating a Bootable USB Installer?
1. USB flash drive or other secondary volume with 14 GB (or more) available disk storage. USB drive with USB 3.0, or USB Type C is recommended for faster transfer speed. Meanwhile, as it is used to create a boobtable installer, a USB portable SSD will also greatly improve the efficiency.
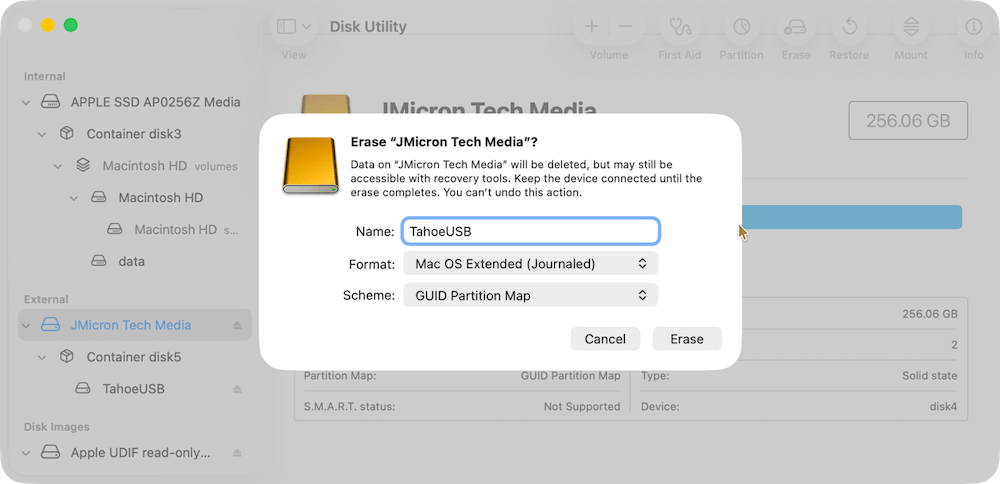
2. Format the USB drive for Mac OS Extended. If it is not, you can format it with Disk Utility as following.
- Open Disk Utility: Applications > Utilities
- Select the USB drive
- Click the Erase button in the top toolbar
- In the Format drop-down menu, select "Mac OS Extended (Journaled)"
- Give the USB drive a name and click Erase
3. Installer for OS X El Capitan or later. To get the full installer, your Mac must be using the latest version of OS X El Capitan, the latest version of macOS Sierra or any later version of macOS. Download the version of macOS compatible with your Mac from Apple.
Download macOS here: https://support.apple.com/en-gb/HT211683
How to Create a Bootable USB Installer for macOS?
It may look like it needs a lot of technical expertise, but creating the bootable installer is actually a straightforward process. However, you'd better follow the below steps to make sure you do it properly. Here's how to do the jobs.
1. Connect the bootable installation USB we are going to make to the Mac.
2. Open Terminal, which is in the Utilities folder of your Applications folder.
3. Please enter the following command line code in the open dialog box and press the Enter button. (Replace "MyVolume" in the command line below with the name of your target disk for creating a boot disk)
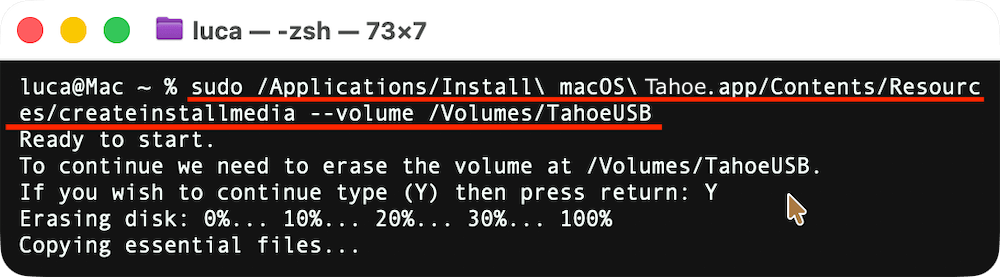
Depending on which macOS you downloaded, enter one of the following commands in Terminal as instructed above.
Tahoe:
sudo /Applications/Install\ macOS\ Tahoe.app/Contents/Resources/createinstallmedia --volume /Volumes/MyVolume
Sequoia:
sudo /Applications/Install\ macOS\ Sequoia.app/Contents/Resources/createinstallmedia --volume /Volumes/MyVolume
Sonoma:
sudo /Applications/Install\ macOS\ Sonoma.app/Contents/Resources/createinstallmedia --volume /Volumes/MyVolume
Ventura:
sudo /Applications/Install\ macOS\ Ventura.app/Contents/Resources/createinstallmedia --volume /Volumes/MyVolume
Monterey:
sudo /Applications/Install\ macOS\ Monterey.app/Contents/Resources/createinstallmedia --volume /Volumes/MyVolume
Big Sur:
sudo /Applications/Install\ macOS\ Big\ Sur.app/Contents/Resources/createinstallmedia --volume /Volumes/MyVolume
Catalina:
sudo /Applications/Install\ macOS\ Catalina.app/Contents/Resources/createinstallmedia --volume /Volumes/MyVolume
Mojave:
sudo /Applications/Install\ macOS\ Mojave.app/Contents/Resources/createinstallmedia --volume /Volumes/MyVolume
High Sierra:
sudo /Applications/Install\ macOS\ High\ Sierra.app/Contents/Resources/createinstallmedia --volume /Volumes/MyVolume
El Capitan:
sudo /Applications/Install\ OS\ X\ El\ Capitan.app/Contents/Resources/createinstallmedia --volume /Volumes/MyVolume --applicationpath /Applications/Install\ OS\ X\ El\ Capitan.app
4. When prompted, type your administrator password. Terminal doesn't show any characters as you type. Then press Return.
5. When prompted, type Y to confirm that you want to erase the volume, then press Return. Terminal displays the progress as the volume is being erased.
6. After the volume has been erased, you may see an alert stating that Terminal would like to access files on a removable volume. Click OK to allow the copy to proceed.
7. When Terminal says that it's finished, the volume will have the same name as the installer you've downloaded, such as Install macOS Monterey. You can now quit Terminal and eject the volume.
Create macOS bootable installer easily with software
If you are not faimiliar with command, you can use the software Donemax Disk Clone for Mac to make the bootable isntaller. The software offers the feature to make bootable USB installer for macOS without using the commands. Just run the software and follow the on-screen instructions to make it easily.

How to Use the Bootable Installer for macOS?
Apple silicon
- Plug the bootable installer into a Mac that is connected to the internet and compatible with the version of macOS you're installing. (A bootable installer doesn't download macOS from the internet, but it does require an internet connection to get firmware and other information specific to the Mac model.)
- Turn on the Mac and continue to hold the power button until you see the startup options window, which displays your bootable volumes.
- Select the volume containing the bootable installer, then click Continue.
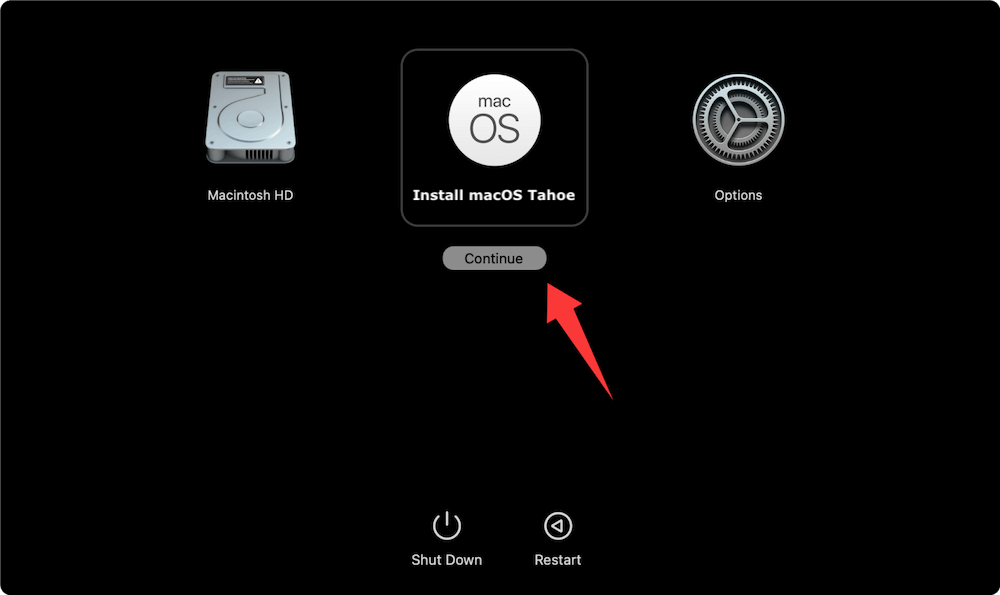
When the macOS installer opens, follow the onscreen installation instructions.
Intel processor
- Plug the bootable installer into a Mac that is connected to the internet and compatible with the version of macOS you're installing. (A bootable installer doesn't download macOS from the internet, but it does require an internet connection to get firmware and other information specific to the Mac model.)
- Turn on your Mac, then immediately press and hold the Option (Alt) key.
- Release the Option key when you see a dark screen displaying your bootable volumes.
- Select the volume containing the bootable installer. Then, click the onscreen arrow or press Return.
(If you can't start up from the bootable installer, make sure Startup Security Utility is set to allow booting from external or removable media.) - Choose your language, if prompted.
- Select Install macOS (or Install OS X) from the Utilities window, then click Continue and follow the onscreen instructions.
How to Make a Bootable Clone for Mac?
Actually, you can use a USB drive to boot macOS if you have a bootable backup of macOS. You don’t need to reinstall it and the installted applicatios. You can run this OS via an external hard drive or restore it to a new Mac so that you can run your old macOSasap without reinstalling or data transferring.
Donemax Disk Clone for Mac is a professional disk cloning software for Mac to help you securely and easily create a bootable clone for your Mac's startup disk. It can clone macOS to USB external hard drive with Clone OS, or transfer or backup all the data to another.
Donemax Disk Clone for Mac
- Most reliable disk cloning software for Mac.
- Make bootable and full clone backup for Mac.
- Easily create bootable USB installer for macOS.
Step 1. Connect the USB external hard drive to your Mac. Launch Donemax Disk Clone for Mac and switch to OS Clone.

Step 2. Select the external hard drive as the destination drive, click Clone Now to securely clone all data including macOS, files, apps, settings to the external hard drive.
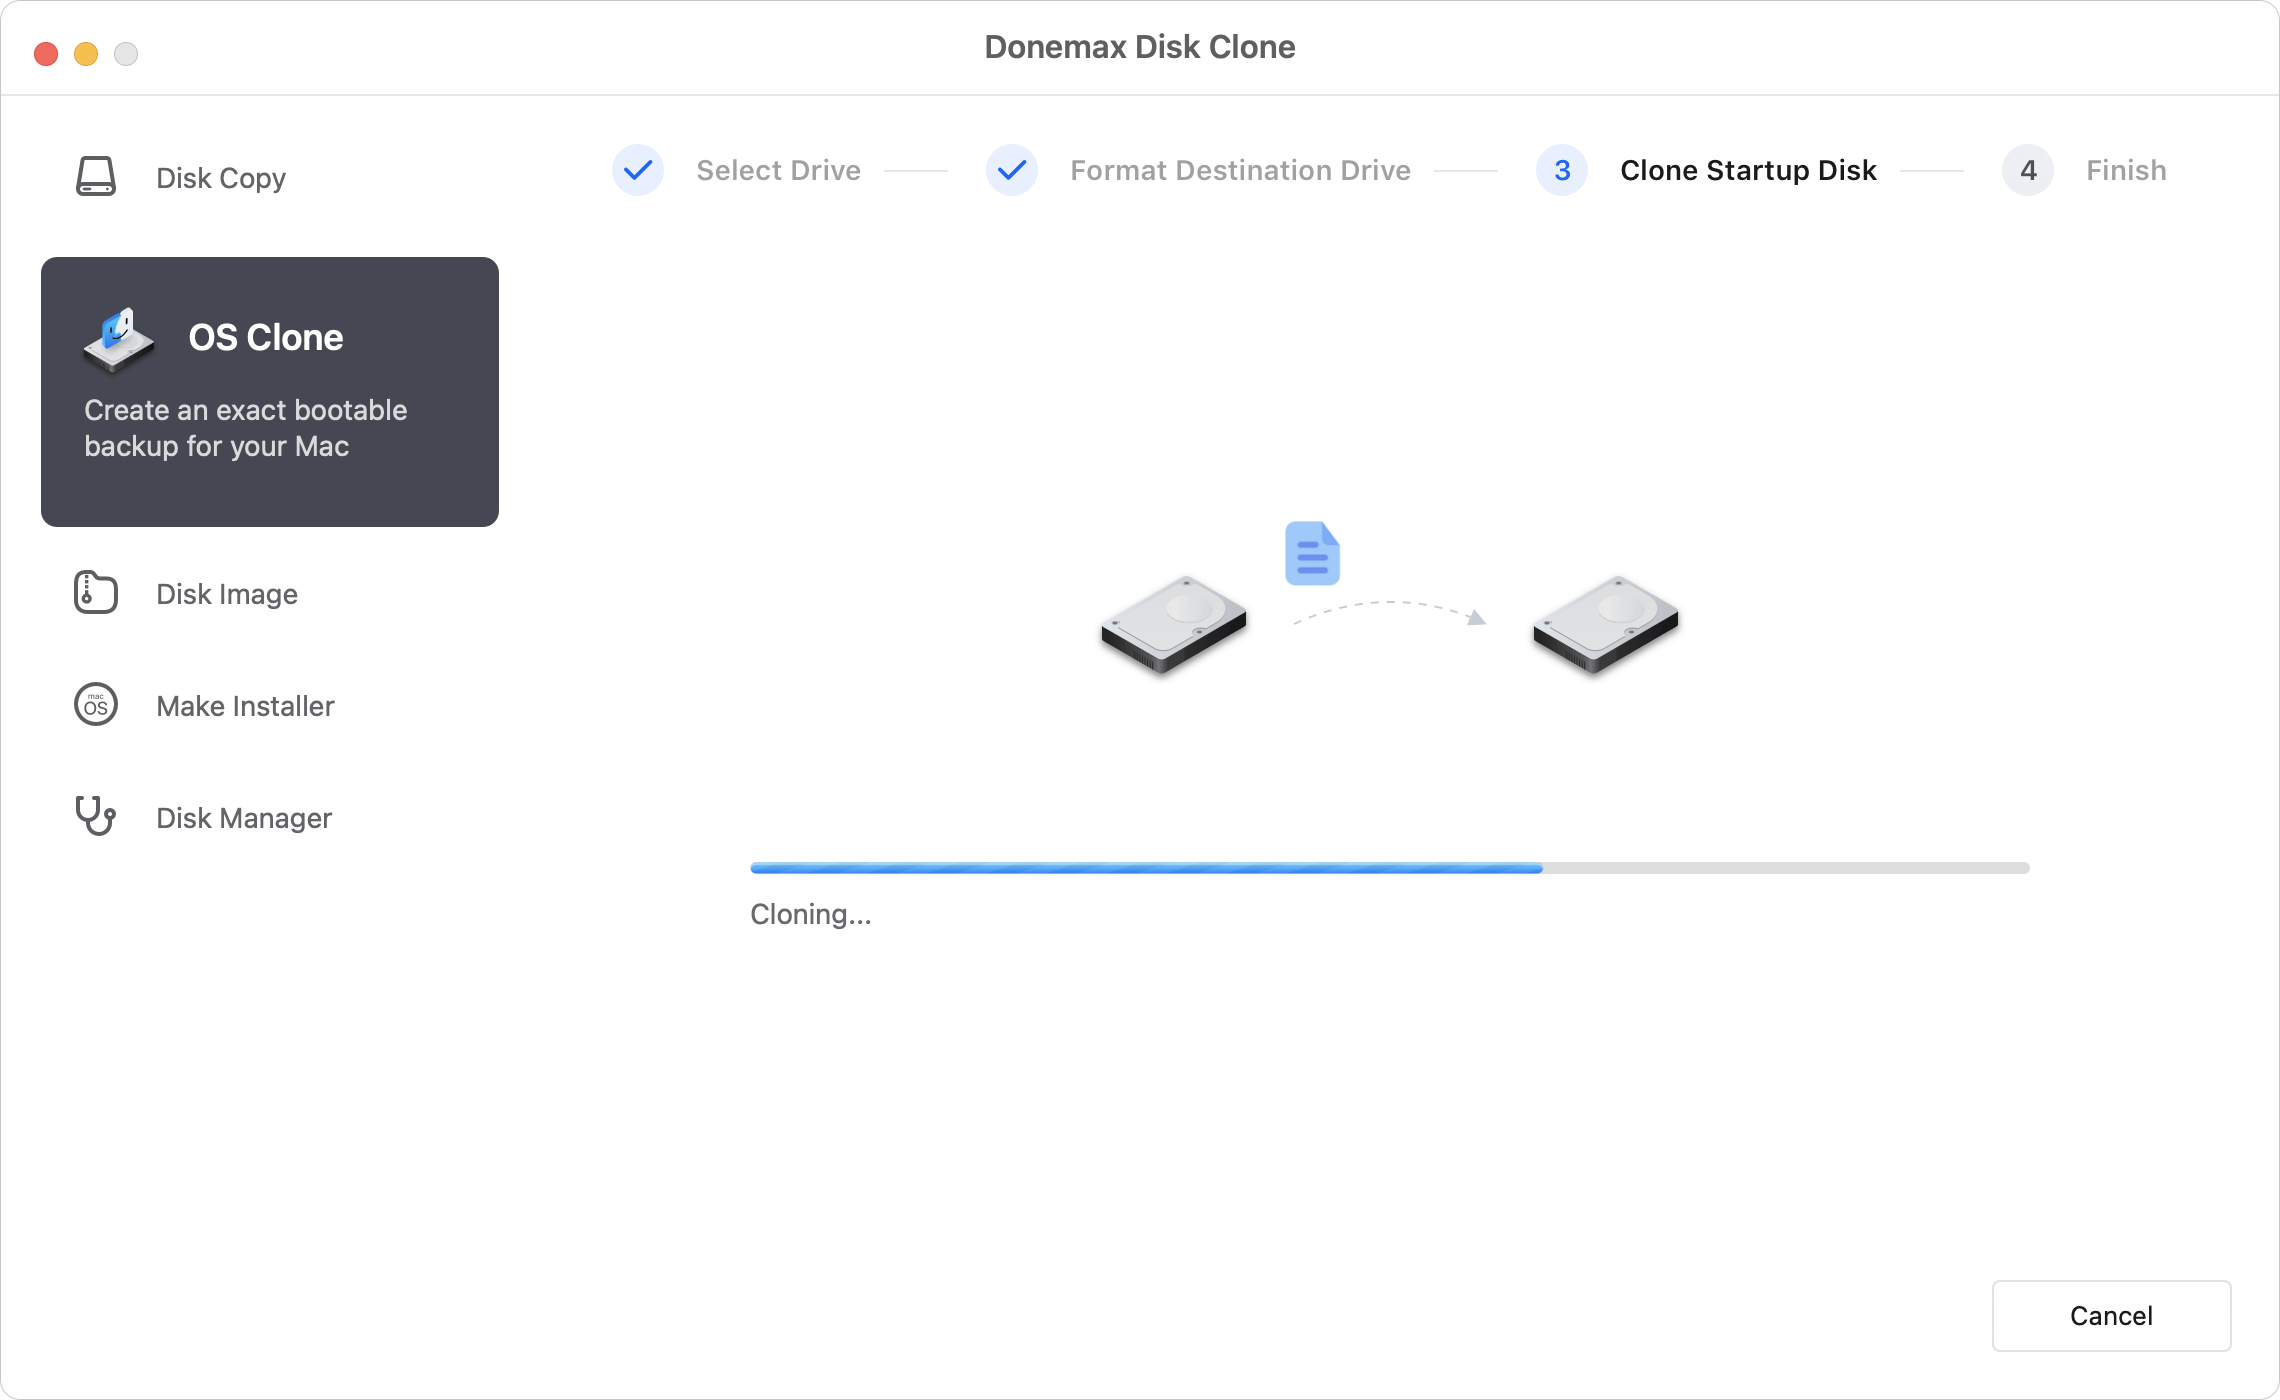
Once the process gets finished, you can use the external hard drive as a macOS boot drive on any Mac or restore this startup disk to any other Mac to run macOS.
Conclusion:
This bootable USB installer can reinstall macOS, install macOS on a second hard drive, or fix any OS-related problems your Mac may be experiencing. This guide will inform you how to make a USB drive capable of booting up and installing macOS. With a Mac disk cloning software, you also can create a bootable clone for macOS and use it on any other Mac whether it has installed macOS or not.
Donemax Disk Clone for Mac
An award-winning disk cloning program to help Mac users clone HDD/SSD/external device. It also can create full bootable clone backup for Macs.
FAQs about Creating Bootable USB Installer for macOS
- Connect the USB external hard drive to Mac.
- Download Donemax Disk Clone for Mac.
- Launch the application and choose 'OS Clone'.
- Select the external hard drive as destination
- Click 'Clone Now'.
Of course, it can be used to reinstall the Mac OS. The bootable USB backup made by the third-party startup disk cloning tool - Donemax Disk Clone for Mac can not only be used as a system restore, but also can be used as a boot disk to start the macOS.
It is true in some cases. For example, the new high-version system does not support the hardware configuration on the old computer, so the boot disk created in this article cannot be used in the such an environment. Of course, if your hardware supports the current boot system to run, there will be no problems.
You can use the professional macOS disk cloning tool such as Donemax Disk Clone for Mac to make a system bootable clone. The process is quite simple and there is no need to reinstall the system and applications. Moreover, the bootable USB made by Donemax Disk Clone for Mac can not only be used as a system startup, but when you want to restore or reinstall the system, you only need to clone the external hard drive back yo your Mac.
- Broken Mac computer running macOS.
- A trial copy of the TransMac software.
- One high-quality USB flash drive with 16GB of storage.
- Copy of macOS (DMG file).
Related Articles
- Sep 01, 2025How to Unlock Memory Card: A Complete Guide
- Jan 14, 2025Convert HFS+ (Mac OS Extended) to APFS on Mac
- Jan 17, 2025How to Format an SD Card to ExFAT or FAT32 on Mac?
- Sep 09, 2025How to Delete A Partition on SSD without Losing Data?
- Nov 20, 2023How to show & hide files/folders on Mac?
- Feb 11, 2025Fix SanDisk Memory Card Not Working Without Losing Data

Contributing Writer
Charles
Charles, who lives in Sydney, Australia, is an editor & writer of Donemax Team. He is good at writing articles related with Apple Mac computers, Windows operating systems, data recovery, data erasure, disk clone and data backup, etc. He loves reading and playing tennis in his spare time and is interested in testing new digital devices such as mobile phones, Macs, HDDs, SSDs, digital cameras, etc.

Editor in chief
Gerhard Chou
In order to effectively solve the problems for our customers, every article and troubleshooting solution published on our website has been strictly tested and practiced. Our editors love researching and using computers and testing software, and are willing to help computer users with their problems