
Written byChristinaUpdated on Aug 10, 2025
How to Fix Unable to Verify Startup Disk on Mac (Complete Guide)
Approved byGerhard Chou
PAGE CONTENT:
The Unable to Verify Startup Disk error on Mac can be a troubling issue, especially if you rely on your Mac daily for work, study, or personal use. This error usually occurs when your Mac has trouble checking the integrity or structure of your startup disk, potentially leading to performance problems, boot failures, or data loss if not addressed.
In this comprehensive guide, we'll walk you through what causes this error, how to diagnose the issue, and how to apply step-by-step solutions to fix it - from using Disk Utility and Terminal to advanced recovery options.
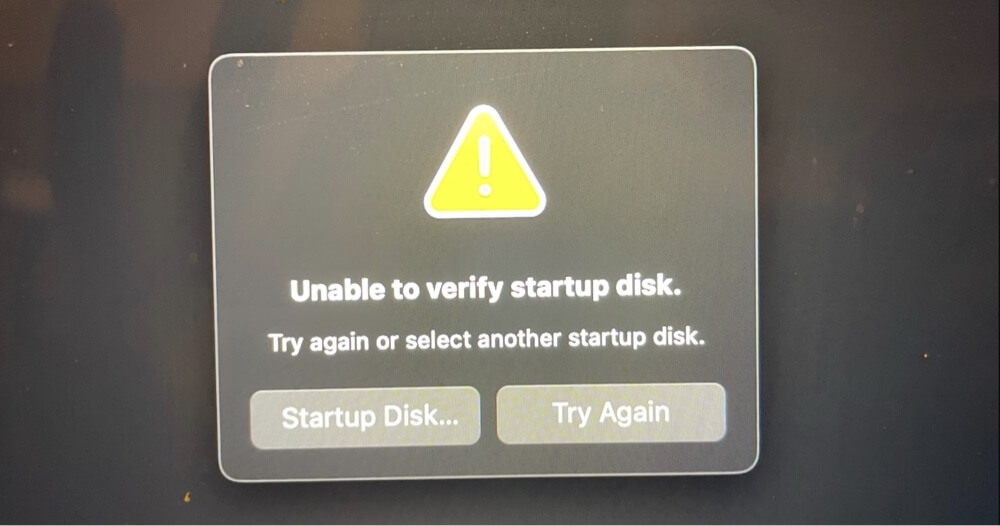
Understanding the "Unable to Verify Startup Disk" Error
This error typically appears when macOS attempts to perform a disk check and encounters issues verifying the disk structure or file system. It might pop up during:
- A system startup or reboot
- An attempt to repair the disk using Disk Utility
- A macOS update or upgrade
- Mounting an encrypted or failing APFS volume
In essence, macOS is unable to complete a basic check of your system disk, meaning either the file system is corrupt, the disk has physical issues, or something is interfering with the disk verification process.
Common Causes of the Error "Unable to Verify Startup Disk on Mac"
Before jumping into fixes, it helps to understand the root causes:
- Corrupted File System: Unexpected shutdowns, app crashes, or malware can damage file system structure.
- Bad Sectors or Failing SSD/HDD: Over time, disks may develop bad sectors, especially older drives.
- APFS Volume Issues: Errors with Apple File System (APFS) containers and volumes can cause verification failures.
- Incomplete macOS Updates: A failed update may leave the disk in a state that macOS cannot validate.
- Software Conflicts: Some third-party apps or security tools may interfere with disk access.
How to Fix Unable to Verify Startup Disk on Mac? [10 Fixes]
Fix 1. Start with Preliminary Checks
Before diving into system repairs, begin with a few simple checks:
- Update macOS: Go to System Settings > General > Software Update and install any pending updates.
![Unable to Verify Startup Disk error on Mac]()
- Restart Your Mac: Sometimes, a temporary cache issue is to blame.
- Disconnect External Drives and Peripherals: Faulty external devices can conflict with startup disk detection.
- Free Up Disk Space: If your startup disk is nearly full, it may affect system functions. Ensure you have at least 10 ~15% free space. You can use junk cleaning software - such as DMcleaner for Mac to clean up GBs of data on your Mac.

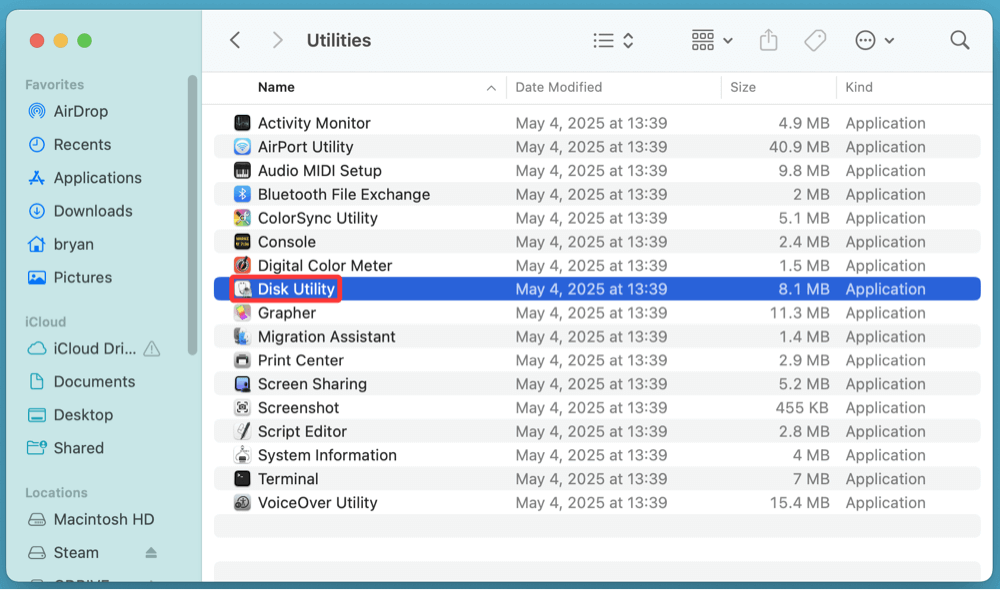
Fix 2. Run First Aid in Disk Utility
Disk Utility's First Aid tool can fix many minor errors related to file system structure.
Steps:
- Open Disk Utility from Utilities via Applications.
![Unable to Verify Startup Disk error on Mac]()
- In the sidebar, select your startup disk (usually named Macintosh HD).
- Click First Aid in the toolbar and confirm.
![Unable to Verify Startup Disk error on Mac]()
- Let the scan and repair process complete.
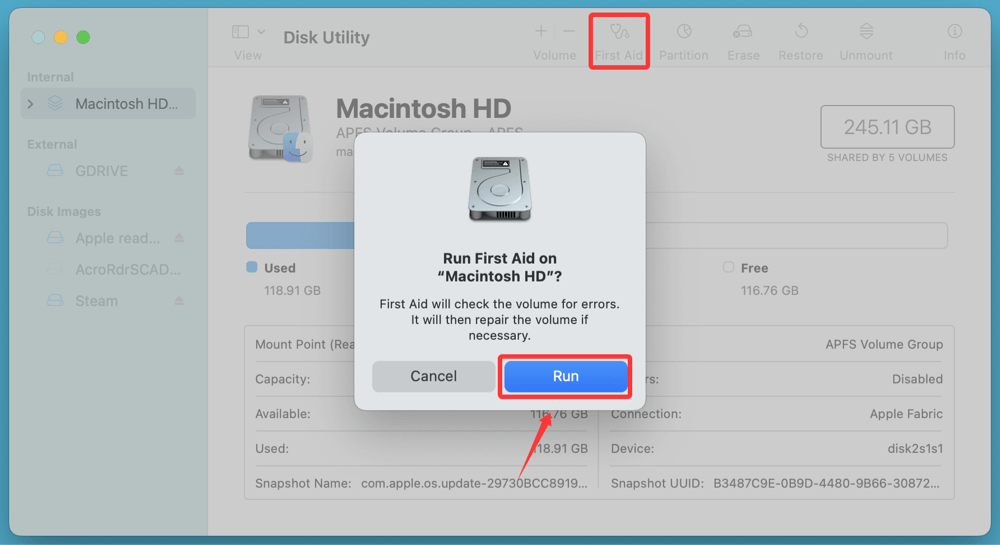
If First Aid fails to verify the disk or reports errors it cannot fix, continue with more advanced steps.
Fix 3. Boot into macOS Recovery Mode
When you're unable to verify your startup disk from within normal macOS, the best next step is to boot into macOS Recovery Mode. This mode runs a separate recovery environment located on a hidden partition, allowing you to safely run diagnostics and repairs without interference from macOS system processes or third-party apps.
Why Use Recovery Mode?
Recovery Mode operates independently of the main macOS boot volume, so it can:
- Access Disk Utility without relying on the possibly-corrupted startup volume.
- Use built-in tools to run First Aid or reinstall macOS.
- Let you access Terminal and other utilities without normal system restrictions.
- Repair APFS containers, which might be locked or in use during a regular boot.
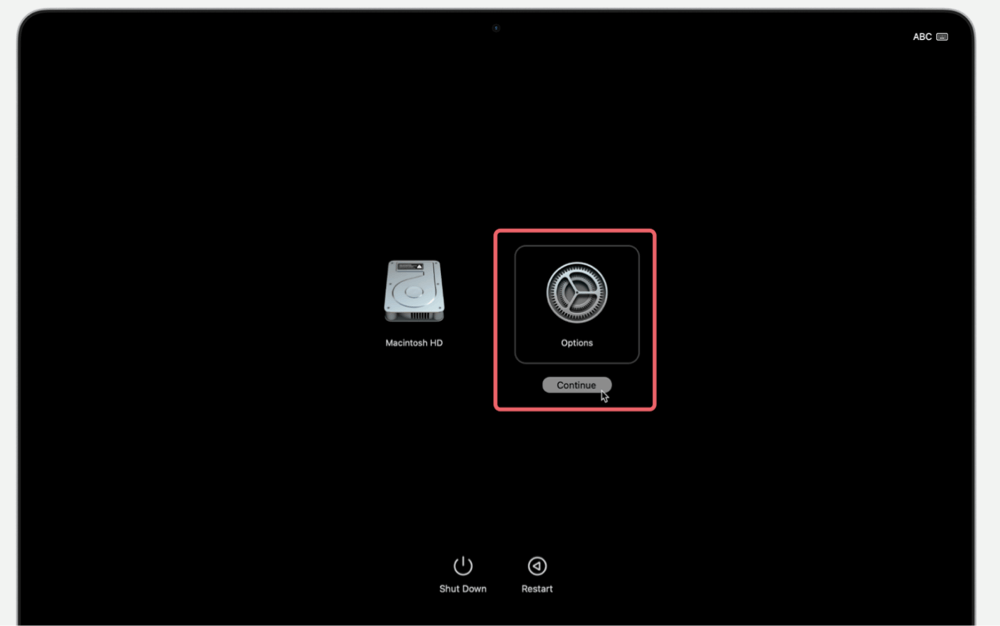
How to Enter Recovery Mode:
- Intel Mac: Hold Command + R immediately after pressing the power button.
- Apple Silicon (M-chip) Mac: Hold the Power button until "Loading startup options" appears, then click Options > Continue.
![Unable to Verify Startup Disk error on Mac]()
Run Disk Utility from Recovery:
- In Recovery Mode, select Disk Utility.
- Repeat the First Aid process on both the Volume (e.g., Macintosh HD) and the Container (e.g., Container disk1).
![Unable to Verify Startup Disk error on Mac]()
- If errors persist, proceed with Terminal-based solutions.

Troubleshooting Common Issues in Recovery Mode
First Aid Fails Immediately
- Try booting into Safe Mode and running First Aid again.
- Alternatively, use Terminal (covered in the next section) for deeper repair options.
Disk is Grayed Out or Unmounted
- Right-click the volume and choose Mount.
- If it fails to mount, there may be serious file system corruption.
No Startup Disk Appears
- Your internal disk may have failed completely.
- Use diskutil list in Terminal to verify whether macOS recognizes the disk.
- If the disk isn't listed at all, physical hardware failure is likely.
Stuck on "Verifying" or "Repairing"
- Let it run for at least 15–20 minutes - some large or badly corrupted disks take time.
- If it still doesn't complete, force-restart and proceed to Terminal-based repair.
Next Step After Recovery: Reboot and Test
After completing First Aid at all disk levels:
- Quit Disk Utility.
- Choose Apple Logo > Restart from the menu bar.
- Let macOS boot normally.
- Open Disk Utility in macOS again to confirm whether the error is resolved.
If not, your next move should be to attempt disk verification and repair via Terminal (see Fix 4), or reinstall macOS.
Fix 4. Use Terminal to Repair the Startup Disk
Terminal provides low-level tools to analyze and fix the disk when GUI tools fail.
Steps:
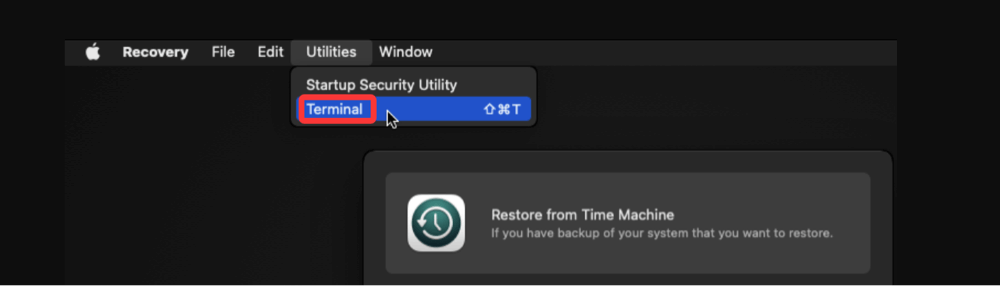
- Boot into macOS Recovery Mode as described above.
- From the menu bar, open Utilities > Terminal.
![Unable to Verify Startup Disk error on Mac]()
- Type diskutil list and press Enter to identify the disk and volume names.
- Use the following command to verify:
diskutil verifyVolume /
- If errors are detected, try:
diskutil repairVolume /
Alternatively, if the disk is APFS, use:
fsck_apfs -n /dev/disk1s5
(Replace disk1s5 with your actual volume identifier)
Terminal will attempt repairs and return messages about the state of the file system. If errors persist, more aggressive options may be necessary.
Fix 5. Boot into Safe Mode
Safe Mode automatically performs a disk check and disables third-party extensions that might cause conflicts.
How to Boot:
- Intel Mac: Restart and hold Shift until the Apple logo appears.
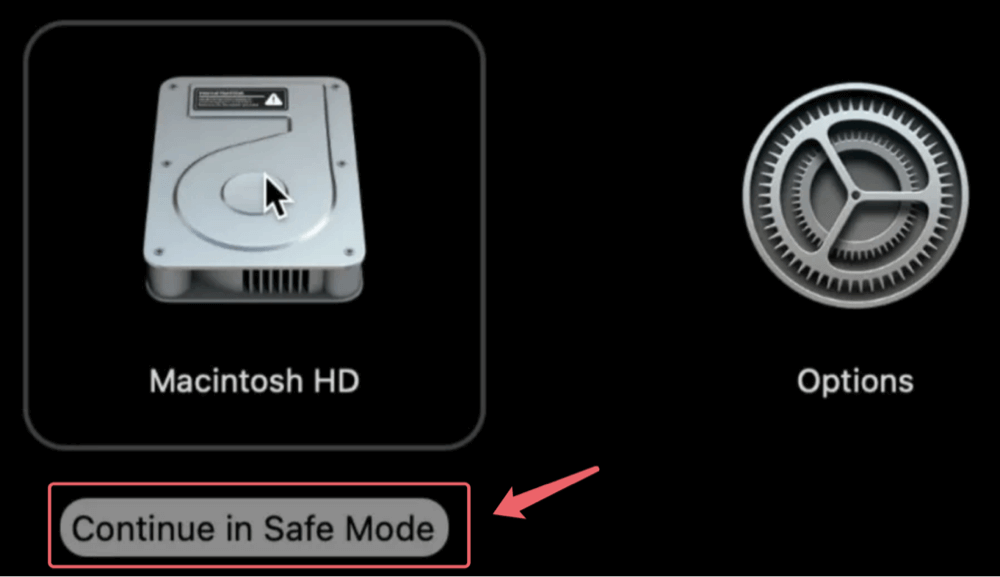
- Apple Silicon Mac: Press and hold Power → Click Startup Disk → Hold Shift → Click Continue in Safe Mode.
![Unable to Verify Startup Disk error on Mac]()
Once in Safe Mode:
- Open Disk Utility and run First Aid again.
- Reboot normally and check if the issue persists.
Fix 6. Reset NVRAM and SMC (Intel Macs)
Resetting these system-level controllers can clear hardware and firmware issues that sometimes cause disk verification errors.
Reset NVRAM:
- Turn Off your Mac.
- Press Option + Command + P + R for roughly 20 seconds after turning it on.
Reset SMC:
- For non-removable battery Macs:
- Turn Off the Mac.
- For ten seconds, simultaneously press Shift + Control + Option + Power, then let go.
- Turn on the Mac.
💡 Note: Apple Silicon Macs do not use SMC or NVRAM in the same way. Simply restarting usually resets these values.
Fix 7. Reinstall macOS (Without Data Loss)
If repairs fail but your disk is still accessible, reinstalling macOS can fix system-level issues without deleting your data.
Steps:
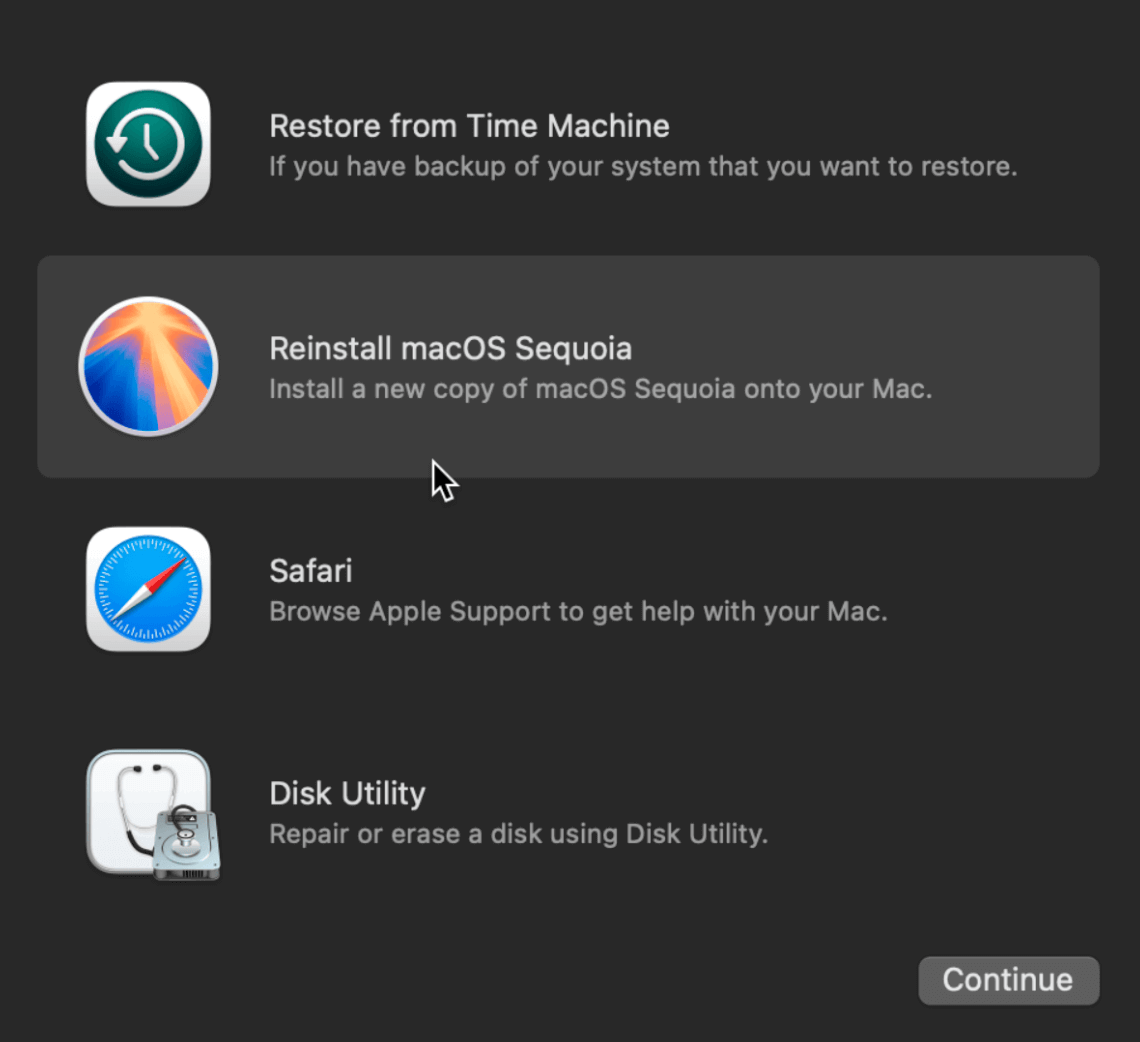
- Boot into macOS Recovery.
- Select Reinstall macOS from the utility window.
![Unable to Verify Startup Disk error on Mac]()
- Follow on-screen prompts.
This process preserves user files and apps, but backing up your data first is still recommended.
Fix 8. Erase and Restore the Disk (Last Resort)
If all else fails and the disk cannot be verified or repaired, you may need to erase and start fresh.
Before Proceeding:
- Use Time Machine or clone your drive using tools like Donemax Disk Clone for Mac.
- Back up to an external disk.
Steps to Erase and Restore:
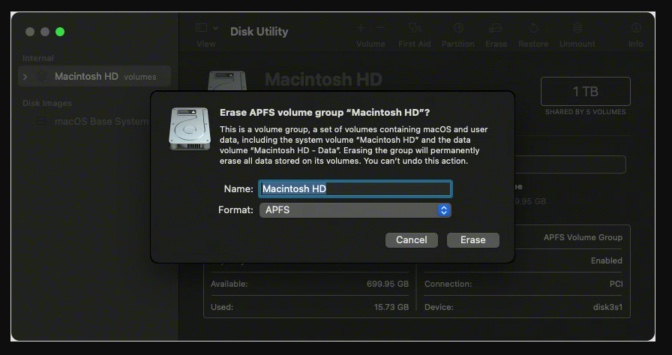
- Boot into macOS Recovery.
- Open Disk Utility and select your startup disk.
- Click Erase and choose:
- Format: APFS
- Scheme: GUID Partition Map
![Unable to Verify Startup Disk error on Mac]()
- After erasing, return to the utility window and click Reinstall macOS.
- After installation, restore from your backup using Migration Assistant.
Fix 9. Check Disk Health with SMART Status
You can check if the disk is failing at the hardware level using built-in or third-party tools.
Use Disk Utility:
- Open Disk Utility.
- Select your physical disk (not the volume).
- Check "SMART Status" at the bottom - it should say Verified.
Use Terminal:
diskutil info disk0 | grep SMART
If SMART Status says Failing, you should replace the drive as soon as possible.
Recommended Tools:
- DriveDx
- SMART Utility
Fix 10. When to Contact Apple Support
If you've tried every software fix and the issue persists, it could indicate a deeper hardware issue.
Signs You Need Professional Help:
- Disk not appearing in Disk Utility or Terminal
- Repeated SMART failures
- Mac won't boot even after clean install
- Clicking or whirring sounds from drive (for HDDs)
Options:
- Visit an Apple Store or Authorized Service Provider
- Check your AppleCare status for repair eligibility
- Request a Genius Bar appointment via Apple's support portal
Recover Lost Data After Fixing Mac Startup Issues
If you've lost data due to fixing Unable to Verify Startup Disk on Mac or reinstalling macOS, you can use Mac data recovery software - such as Donemax Data Recovery for Mac to get the lost data back.
Step 1. Download and install the reliable Mac data recovery software - Donemax Data Recovery for Mac.
Step 2. Open Donemax Data Recovery for Mac, select the startup disk to start data recovery.

Step 3. Click on Scan button to deeply scan the startup disk and find all recoverable files.

Step 4. After scanning, you can preview all recoverable files. Then select the wanted files, click on Recover button to save them.

Conclusion
The "Unable to Verify Startup Disk" error is serious but often fixable without professional intervention. By following the methods in this guide - from basic Disk Utility repairs to Terminal commands and full reinstalls - you can resolve the problem and get your Mac back to normal.
Tips to Prevent Future Issues:
- Keep regular Time Machine backups
- Don't ignore signs of disk failure (slow performance, random shutdowns)
- Use Apple's Disk Utility monthly to check for errors
- Avoid force-shutdowns or unplugging during updates
Addressing this error early helps protect your data and extend the life of your Mac's internal drive.
Donemax Data Recovery for Mac
Donemax Data Recovery for Mac is one of the best Mac data recovery software. It is easy-to-use and can help in recovering deleted, formatted, inaccessible or lost data from Mac HDD/SSD, external disk, USB drive, SD card, camera or other storage devices.
Related Articles
- Oct 18, 2024Check Free Disk Space on Mac: A Comprehensive Guide
- Aug 07, 2024How to Format SD Card on Mac?
- Jun 06, 2025Sabrent Rocket External SSD Not Mounting on Mac, Fix It Now
- Oct 05, 2024Mac Won't Shut Down: Fix It Now
- Sep 23, 2025Fix Xcode Not Working on macOS Tahoe, Sequoia, Sonoma, etc.
- Feb 06, 2025[4 Methods] Fix The Volume Macintosh HD Was Found Corrupt and Needs to Be Repaired

Contributing Writer
Christina
Christina is the senior editor of Donemax software who has worked in the company for 4+ years. She mainly writes the guides and solutions about data erasure, data transferring, data recovery and disk cloning to help users get the most out of their Windows and Mac. She likes to travel, enjoy country music and play games in her spare time.

Editor in chief
Gerhard Chou
In order to effectively solve the problems for our customers, every article and troubleshooting solution published on our website has been strictly tested and practiced. Our editors love researching and using computers and testing software, and are willing to help computer users with their problems