
Written byLucienUpdated on Jul 02, 2025
How to Fix NTFS Drive Not Mounting on Mac?
Approved byGerhard Chou
Before we start: When the NTFS drive is is not mounting normaly on Mac, check the drive health and connection first. Then try to run First Aid to fix drive issues. Besides, to enable full writable access on NTFS drives on Mac, you can use the best NTFS driver for macOS - Donemax NTFS for Mac.
PAGE CONTENT:
Annoying would be if you plugged in an external hard drive full of important information, but your Mac wouldn't see it. This problem often happens with drives that use the NTFS file system, which Microsoft made for Windows. macOS can read NTFS files but doesn't have built-in writing support, which could cause mounting problems.
You're not alone, though; there are ways to improve. This guide will show you how to fix NTFS drive mounting on Mac. Then you can get back an important work file or a collection of family pictures from the drive. We can do everything for you, from simple troubleshooting checks to complex repairs.
We can do everything for you, from simple troubleshooting checks to complex repairs. No more trouble with compatibility. It will be easy to get back to your important files. Let's get started and figure this out!
NTFS and macOS: Are Them Compatible?
NTFS, or "New Technology File System," is a file system that Microsoft made for Windows computers. Many Windows users like NTFS because because of the advanced features. However, NTFS support is a problem for macOS.
macOS can read NTFS drives by default but can't write to them (Apple silicon Macs even cannot mount NTFS drives). It can be annoying for people who need to move or change files. When you try to access NTFS files on a Mac, this limitation often makes mounting difficult. Hardware/program conflicts, damaged file system, or outdated drivers may cause the problems.
Understanding these compatible problems is important. It can help ensure that NTFS drives and macOS work well together. Then users can easily handle their data across multiple operating systems.
Why Won't My NTFS Drive Mount on My Mac?
Mac might be unable to mount your NTFS drive because of some problems. Most of the time, these are the reasons:
- macOS Limitations: By default, macOS has full read access to NTFS formatted drives. It doesn't have built-in support for writing to them. It means you can see files on the drive without changing or making new ones. You will need extra tools to get the full benefits.
- Missing NTFS Driver: Mac users can read and write to NTFS drives with third-party NTFS drivers like Donemax NTFS for Mac. Your Mac won't be able to see the drive's file system if you don't have one loaded.
- Corrupted Drive: If there are problems with the file system or the drive itself, it might not be able to mount correctly.
- Faulty Connection: The Mac and the NTFS drive may be unable to talk to each other in some cases. For example, the cord is loose, broken USB port, or the drive enclosure isn't working right.
- Software Conflicts: Sometimes, other software on your Mac could get in the way of the NTFS driver or booting a disk.
How to Fix NTFS Drive Not Mounting on Mac?
Fix 1. Basic Checks
- Restart your Mac: a simple restart can often fix short-term problems that stop the drive from mounting.
- Check the Cable and Port: Ensure the USB cable securely links the drive and your Mac. Try a different connection and USB port if the hardware is still broken.
- Verify Drive Power: If your drive has a separate power source, ensure to plug it in. It makes sure that the drive has enough power to work.
These simple checks often fix common problems and get your NTFS drive working on your Mac.
Fix 2. Use Disk Utility
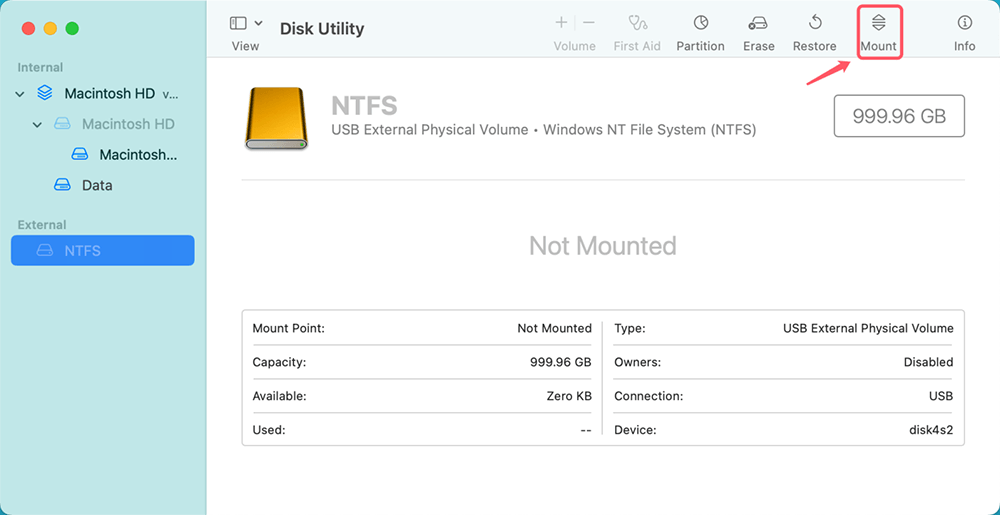
The built-in macOS app Disk Utility lets you manage your storage drives. To check if it can find your NTFS drive:
- Click on Applications > Utilities > Disk Utility to open Disk Utility.
- You can find the drive in the bar on the left.
- Your Mac knows what the drive is, but it might not mount the drive. At the top of the window, click "Mount" after picking out the drive. Try other troubleshooting steps if it fails to run. Also, Disk Utility can show you information about possible mistakes or problems with the drive.
![Use Disk Utility]()
Fix 3. Repair the Drive
You can try to fix any file system problems if Disk Utility finds the drive:
- In Disk Utility, find the NTFS drive and pick it from the list on the left.
- Click the "First Aid" button.
- Press "Run" to look for mistakes.
![Repair the Drive]()
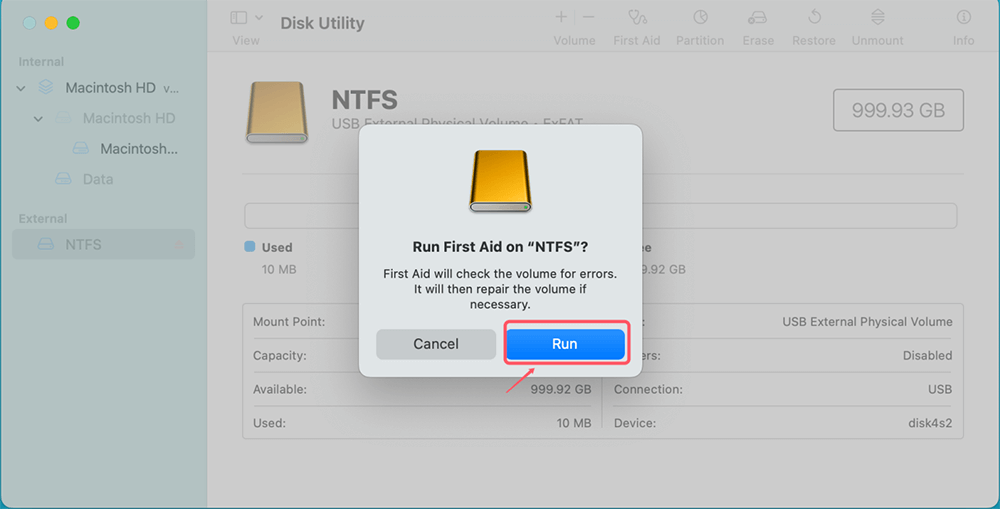
If there are problems, Disk Utility will try to fix them on its own. This process can fix many common problems that make it impossible to mount the drive. Your can use the NTFS drive again if the repair works. If that doesn't work, you may need to try more troubleshooting steps or use third-party tools to fix it.
Fix 4. Mount the Drive Manually
This method needs Terminal tools and the user should be familiar with them. Be careful and do this at your own risk, but here's a rough outline:
- Open Terminal by going to Applications > Utilities > Terminal.
- Use the diskutil list tool to find the device identifier for your NTFS drive.
- Use sudo mkdir /Volumes/ntfsDriveName to make a mount point directory. Replace ntfsDriveName with the name you want to use.
- To mount the drive, use the diskutil mount command and device ID.
Fix 5. Reformat the Drive
When you reformat a drive, it will erase all information on the drive. You should only use this choice if nothing else works and you have a copy of your data.
Backup Your Data: Before formatting the drive, ensure to back up all the important information.
- Start up Disk Utility.
- From the list of drives, choose the NTFS drive.
- Pick up the Erase tab.
- Pick a new format and name for the drive, like APFS, Mac OS Extended (Journaled), ExFAT. Press "Erase."
![Reformat the Drive]()
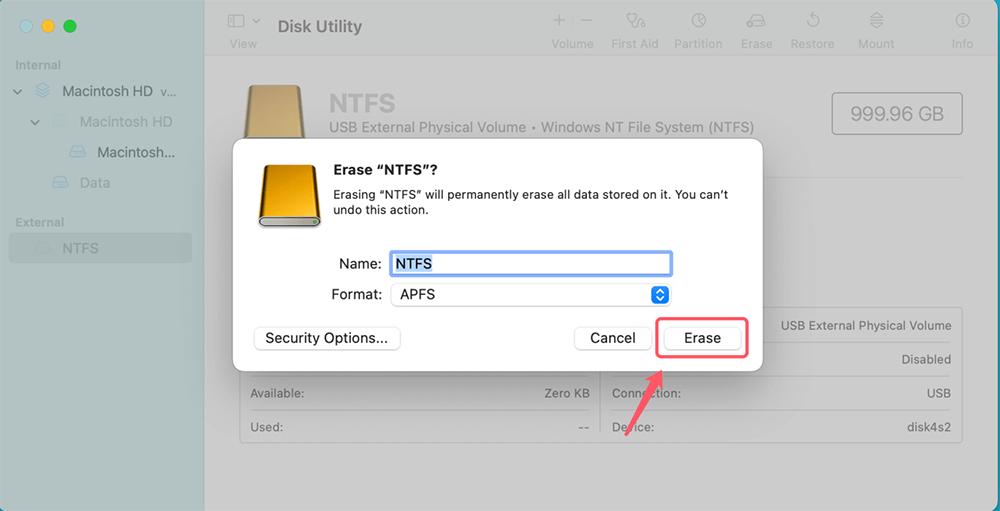
You will lose data because of erasing the NTFS drive without having a backup. You can use Mac data recovery software to help you securely unformat NTFS drive and get all lost data back.
Step 1. Download and install Donemax Data Recovery for Mac, and connect the formatted drive to your Mac.
Step 2. Open Donemax Data Recovery, it will show all drives and connected devices. Select the formatted drive to start data recovery.

Step 3. Click on Scan button to deeply scan the formatted drive and find all erased files or deleted files.

Step 4. Once the scan is completed, select the wanted files and save them.

Fix 6. Use NTFS for Mac Tool
NTFS for Mac tool can help you securely and quickly mount and use NTFS drive on Mac and enable writable for it. You can use Donemax NTFS for Mac, Mounty for NTFS, and other tools.
Step 1. Download and install NTFS for Mac tool on your Mac and connect the NTFS drive to your Mac.
Step 2. Open Donemax NTFS for Mac, select the NTFS drive, click on Mount button.
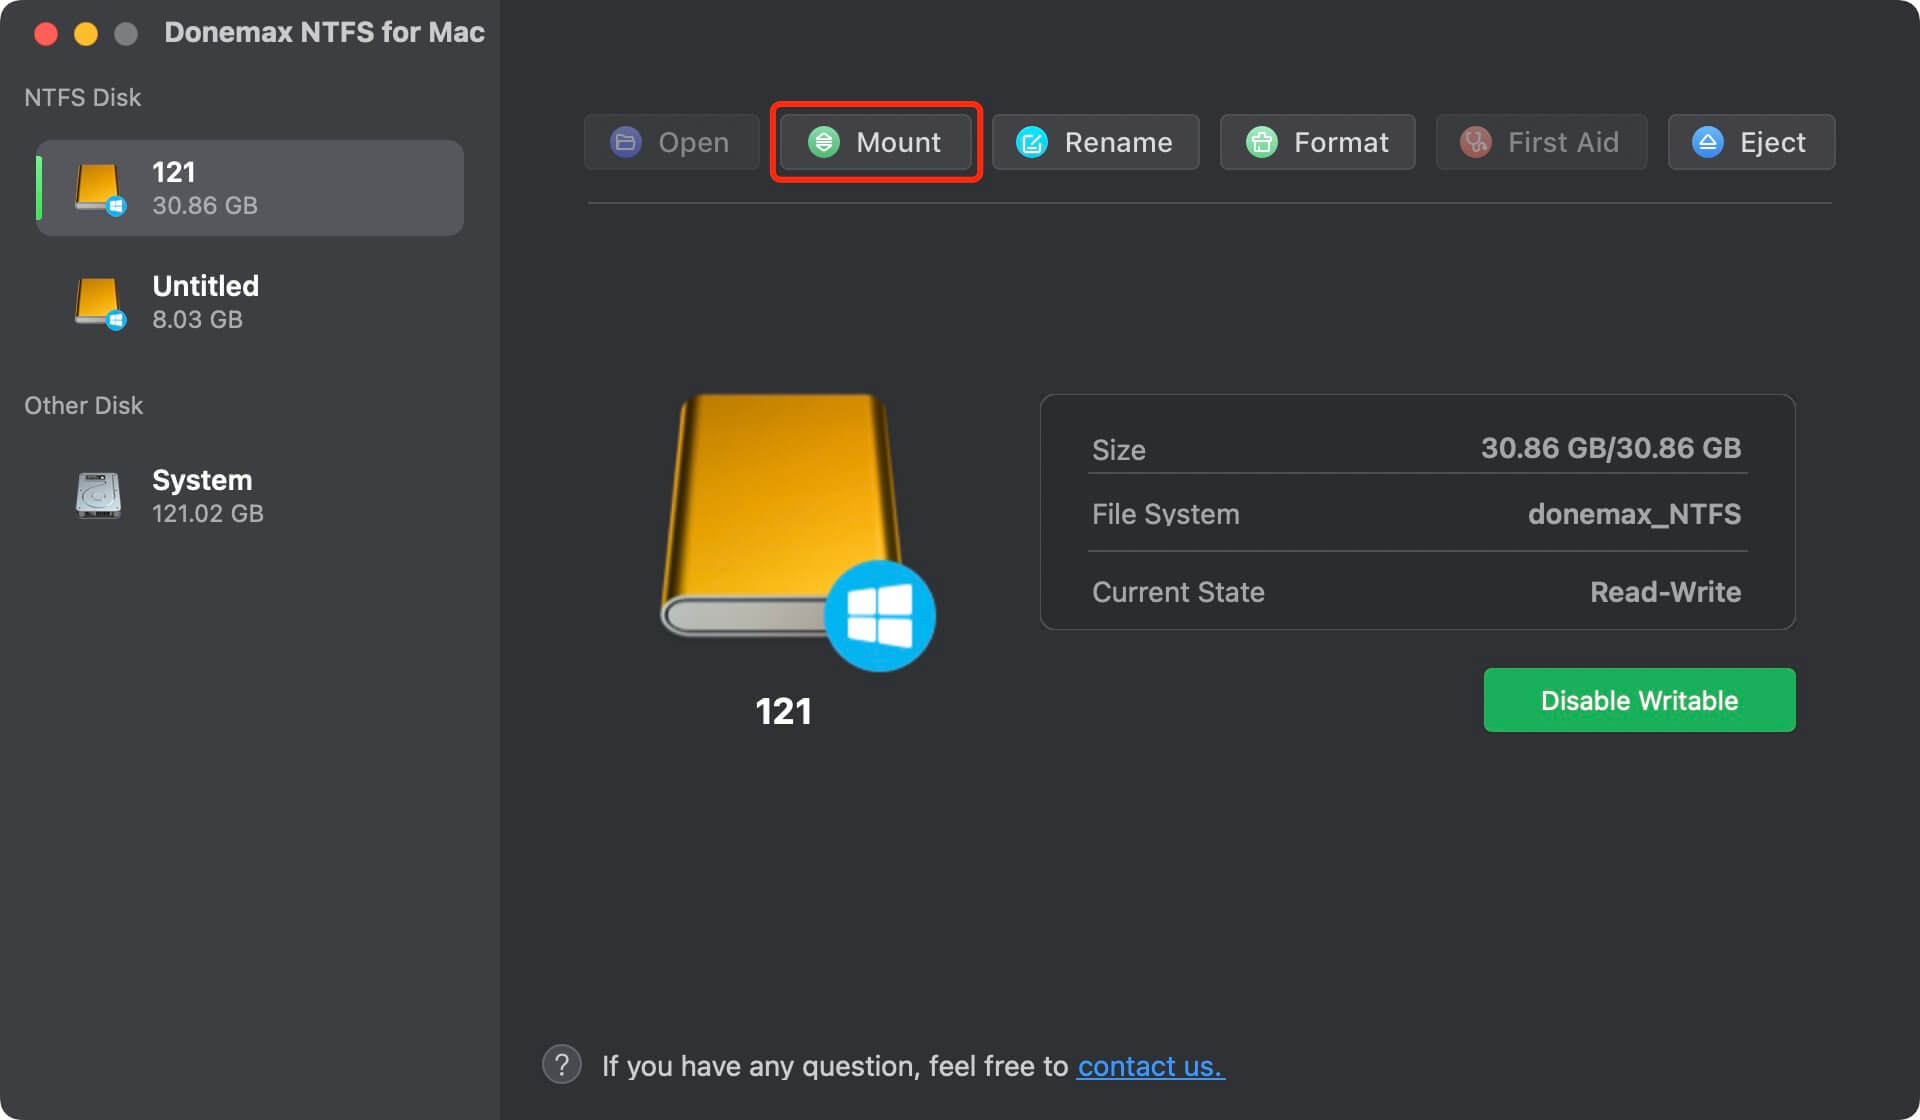
Step 3. Click on Enable Writable button to enable writable access for the NTFS drive on Mac. After that, you can read-write it without any limitation.

Conclusion:
It can be annoying when an NTFS drive won't mount on your Mac. But if you follow the steps, you can fix the problem and get back to your important files. Do some simple checks first, then use Disk Utility to find and fix the drive. To be more compatible, think about using third-party NTFS drivers.
If you have to, you can manually mount the drive in Terminal or format it as a last option. First, learn about the problems that can happen when NTFS and macOS don't work together. Second, use these steps to fix NTFS mounting issues on Mac. It can make sure that managing your data on all your devices goes smoothly.
FAQs About Mounting NTFS Drive on Mac
🇶1. How to mount an NTFS drive on Apple silicon Mac?
Here are two methods to help you mount NTFS drive on a Mac with Apple silicon:
- Open Disk Utility, select the NTFS drive, click on Mount button.
- Open Terminal, type diskutil to list all drives then find the NTFS drive. Then use diskutil mount command to mount the NTFS drive on your Mac.
🇶2. How to use an NTFS drive on Mac without formatting?
NTFS for Mac can help you mount NTFS drive on Mac and allow your Mac to read-write the NTFS drive without any limitation.
- Download and install Donemax NTFS for Mac.
- Select the NTFS drive, click on Mount button.
- Click on Enable Writable button.
🇶3. How to format an NTFS drive on Mac?
Go to Launchpad > Other > Disk Utility, then select the NTFS drive, click Erase. Select APFS, Mac OS Extended or ExFAT as the file system, click Erase again.
🇶4. How to repair damaged NTFS drive on Mac?
- Open Disk Utility.
- Select the NTFS drive.
- Click on First Aid button to repair it.
Related Articles
- Jun 23, 2025Can macOS Read NTFS Drive?
- Feb 08, 2024Lexar Portable SSD Is Read-Only on Mac, Fix It Now
- Sep 11, 2023Can't Copy Files from Mac to External SSD? Fix It Now
- Jan 22, 2026How to Format an APFS Drive to NTFS on Mac?
- Jun 23, 2025What Is NTFS for Mac? How to Use NTFS for Mac?
- Feb 27, 2024External Hard Drive Is Read-Only on M3-Chip Mac, Fix It

Contributing Writer
Lucien
Lucien is a writer and a chief programmer of Donemax software who has worked in the company for 5+ years. He has written much of the content on the site and devotes to providing troubleshooting and solution for Windows and Mac users including disk cloning, data recovery, migration, eraser, error fixes.

Editor in chief
Gerhard Chou
In order to effectively solve the problems for our customers, every article and troubleshooting solution published on our website has been strictly tested and practiced. Our editors love researching and using computers and testing software, and are willing to help computer users with their problems