
Written byStevenUpdated on Nov 13, 2025
How to Enable or Disable System Restore on Windows?
Approved byGerhard Chou
Before we start: Besides using System Restore on Windows, you can also use Donemax Disk Clone to make a full and bootable clone for the Windows system disk. It can help you reduce the computer down time by replacing the system disk with the cloned one directly.
PAGE CONTENT:
System Restore is a crucial Windows feature that helps users recover from system-level issues without losing personal files. Whether you're a home user troubleshooting after a failed driver update or an IT administrator optimizing system performance, knowing how to enable or disable System Restore can save time and frustration.

In this guide, we'll explain what System Restore does, when to enable or disable it, and how to do it using both graphical user interface (GUI) and command-line methods across Windows 11, 10, 8, and 7.
What Is System Restore in Windows?
System Restore is a Windows utility that automatically creates "restore points," which are snapshots of system files, installed applications, registry settings, and system drivers at a given point in time.
It does not back up personal documents, photos, or emails. Instead, it allows users to roll back their system configuration to a previous working state when problems arise due to bad updates, software installations, or driver failures.
Restore points can be created:
- Automatically (during updates, software installations, etc.)
- Manually by users
- By third-party applications or Windows services
Why Enable or Disable System Restore?
Reasons to Enable System Restore
- Quick Recovery from System Issues
Restore your system to a working state without reinstalling Windows.
- Protection Against Faulty Updates or Drivers
Undo recent changes that cause instability or boot problems.
- Non-Destructive Repair Option
Keeps your personal files intact while restoring system components.
Reasons to Disable System Restore
- Save Disk Space
Restore points can consume several gigabytes of space, especially on SSDs.
- Security Concerns
Malware could hide within restore points; some IT admins prefer to manage recovery differently.
- Enterprise Policy Compliance
Businesses often use full-disk backup and recovery solutions that make System Restore redundant.
How to Enable System Restore on Windows
You can enable System Restore using the System Properties window or via the Command Prompt / PowerShell. The methods work similarly across Windows 11, 10, 8, and 7.
Method 1: Enable via System Properties (GUI)
This is the easiest and most user-friendly method to enable System Restore on Windows. It works on Windows 11, 10, 8, and 7, with only slight visual differences across versions.
Step 1: Open System Properties
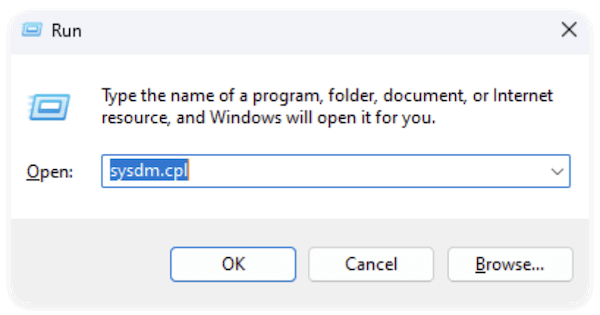
Press Windows + R to open the Run dialog. Type sysdm.cpl and press Enter. This opens the System Properties window directly.
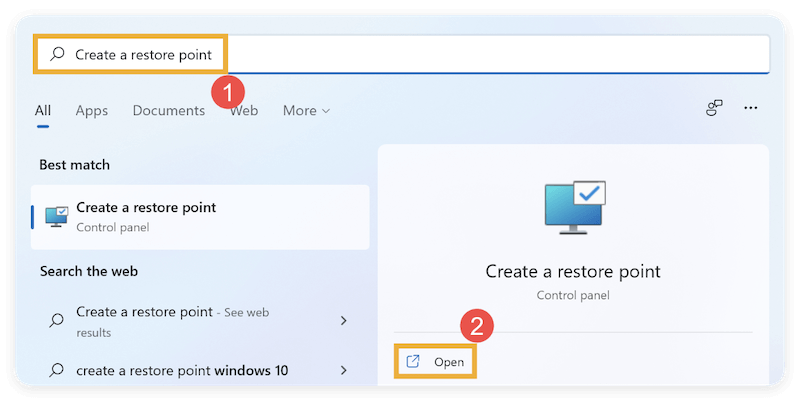
Alternatively: You can search for "Create a restore point" in the Start Menu and click the result with the System Properties tab.
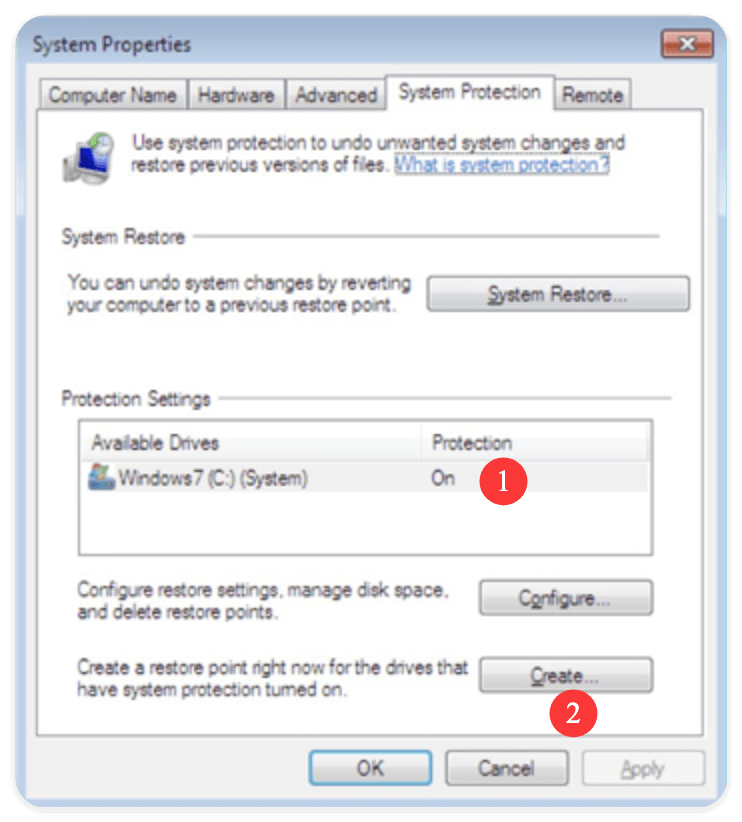
Step 2: Access the System Protection Tab
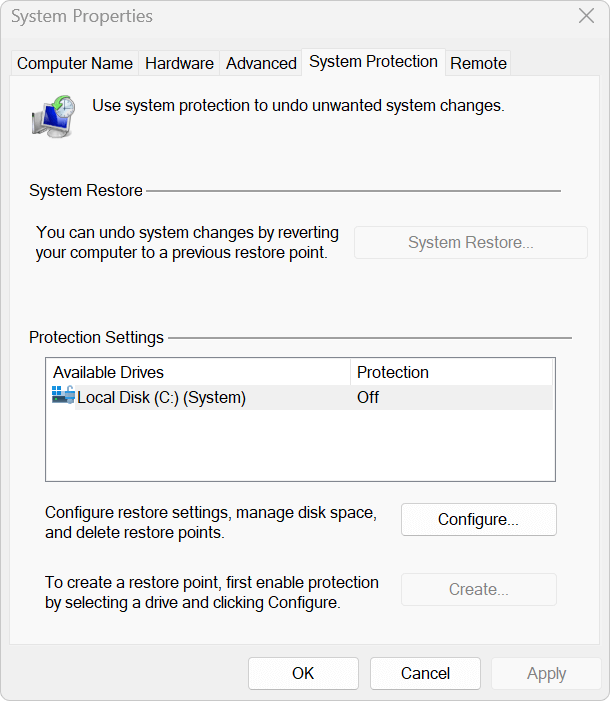
In the System Properties window, click the System Protection tab (usually the fifth tab at the top). Under the Protection Settings section, you'll see a list of available drives with their protection status: On or Off.
Click on the drive labeled (System) — this is usually C:. Click the Configure button below the list.
Step 3: Turn on System Protection
In the new window, select the radio button labeled Turn on system protection. Below, you'll see a slider called Max Usage. This controls how much disk space is reserved for restore points.
- Recommended: 5%–10% of the total disk space for general users.
- On smaller SSDs, you can choose a lower value to save space.

📌 Note: If the disk space is too small (e.g., less than 1GB), restore points may be overwritten too frequently or not created at all.
Step 5: Apply the Settings
Click Apply to activate System Restore on the selected drive. Click OK to return to the System Protection tab. You've now successfully enabled System Restore!
What to Do If the "Configure" Button is Grayed Out
If the Configure button is disabled, it could mean:
- System Restore is disabled by Group Policy – This is common in enterprise environments.
- You're not logged in as an administrator – Switch to an admin account or right-click "Create a restore point" and select Run as Administrator.
To fix Group Policy restrictions:
- Press Windows + R, type gpedit.msc, and press Enter.
- Go to: Computer Configuration → Administrative Templates → System → System Restore.
- Ensure the settings "Turn off System Restore" and "Turn off Configuration" are Not Configured.

How to Confirm System Restore Is Working
After enabling, you can test that it works:
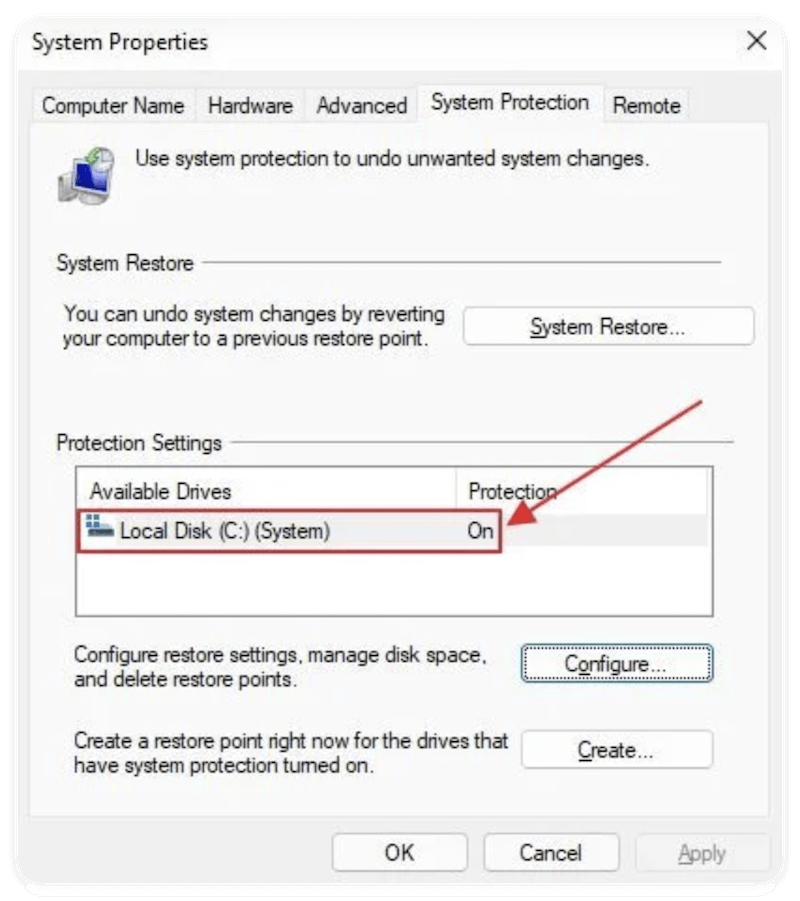
- Go back to the System Protection tab.
- The status next to your system drive should now show: Protection: On
- Click System Restore to walk through the wizard — this won't restore anything unless you confirm.
Optional: Manually Create a Restore Point
It's a good idea to manually create a restore point before making major changes to your system (like installing a new program or driver).
To create one:
- In the System Protection tab, click Create.
- Enter a description, like Before NVIDIA Driver Install.
- Click Create again.
- Windows will create a restore point within 1–2 minutes.
📌 Tip: Manually creating restore points gives you more control and ensures that recent system states are saved.
Important Warnings & Tips
- Don't rely on System Restore alone! It does not back up personal data like photos, documents, or videos. Use File History or a third-party backup tool, like Donemax Disk Clone in parallel.
- Restore Points are Automatically Created:
- During Windows updates
- During driver/software installation
- Every 7 days (if no recent restore points exist)
Old restore points may be deleted if the disk usage exceeds the allocated maximum. Always double-check that important ones are still available if needed.
Method 2: Enable via Command Prompt or PowerShell
This method is helpful for IT admins or when scripting deployments.
Step-by-Step (Command Prompt):
- Launch the Command Prompt in Administrator mode.
- Type the below mentioned command:
wmic /namespace:\\root\default path SystemRestore call Enable "C:\"
This makes the C: drive's System Restore functional.
PowerShell Alternative:
Enable-ComputerRestore -Drive "C:\"
📌 Note: You may need to import the Restore module in PowerShell:
Import-Module -Name Restore
How to Disable System Restore on Windows
Disabling System Restore stops the creation of restore points and deletes existing ones (optional). Use caution, especially if no other backup methods are in place.
Method 1: Disable via System Properties
Step-by-Step Instructions:
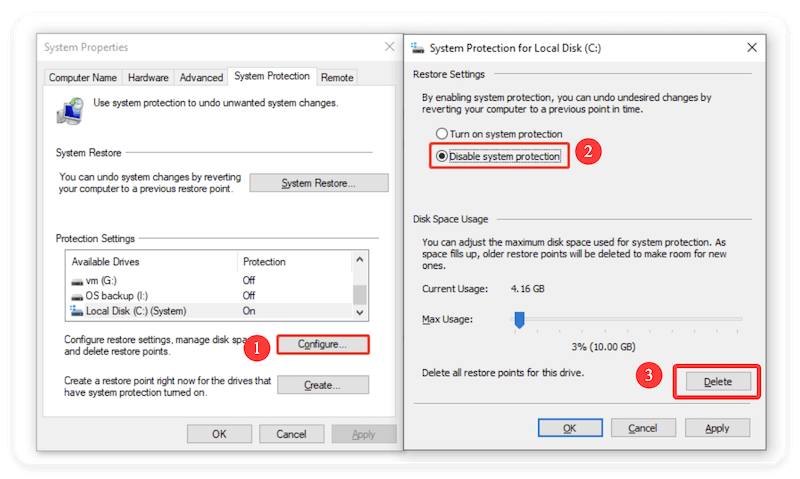
- Type sysdm.cpl using Win + R, then press Enter.
- Select the tab under System Protection.
- Click Configure after selecting the C: system drive.
- Choose to turn off system security.
- Optionally, click Delete to remove all existing restore points.
- Click Apply > OK.
Method 2: Disable via Command Prompt or PowerShell
Command Prompt:
wmic /namespace:\\root\default path SystemRestore call Disable "C:\"
PowerShell:
Disable-ComputerRestore -Drive "C:\"
As with enabling, you may need to import the Restore module in PowerShell.
How to Check If System Restore Is Enabled
Use the System Properties window or run a command to verify the status.
GUI Method:
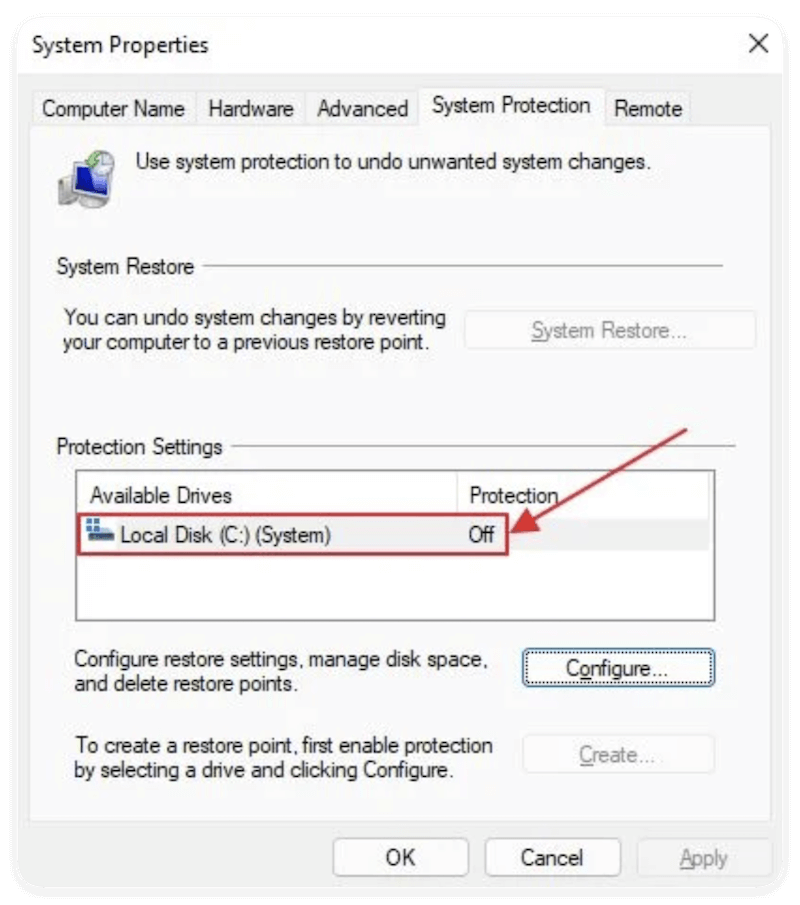
- Open sysdm.cpl → System Protection tab.
- Under "Protection Settings," look for the system drive:
- On = Enabled
- Off = Disabled
Command Line:
vssadmin list shadowstorage
If shadow copies are listed, System Restore (or Volume Shadow Copy) is active.
Tips and Warnings
System Restore Limitations:
- Does not protect user files: Always use File History or external backups for documents.
- May be disabled by Windows during low disk space.
- Cannot recover deleted files or media. It's for system files and configuration only.
Security Tip:
- Some malware can infect restore points. Always scan for viruses after restoring.
Disk Usage Considerations:
- Restore points can use several gigabytes.
- You can limit this under the Max Usage slider in the System Properties configuration.
Troubleshooting System Restore
System Restore Not Working?
- Boot into Safe Mode and try again.
- Temporarily disable antivirus software, which might block the restore.
- Use Command Prompt in Recovery Mode:
rstrui.exe
Can't Delete Old Restore Points?
Use Disk Cleanup:
- Run cleanmgr
- Choose Clean up system files
- Select More Options → System Restore and Shadow Copies → Clean up
Conclusion
System Restore is a powerful built-in safety net for Windows systems. It's particularly useful for recovering from problematic updates, software installs, or driver issues—without affecting your personal files.
For regular users, keeping System Restore enabled is highly recommended. It takes up minimal disk space and can save hours of troubleshooting. For advanced users or IT professionals, disabling it may make sense in scenarios involving disk optimization or corporate backup policies.
Whether you choose to enable or disable System Restore, always have a secondary backup solution in place—because prevention is better than reinstallation.
Donemax Disk Clone
An award-winning disk cloning program to help Windows users and Mac users clone HDD/SSD/external device. It also can create full bootable clone backup for Windows PCs and Macs.
FAQs about System Restore
No. System Restore only affects system files, drivers, and registry settings. Your personal files (e.g., documents, photos) remain untouched.
Windows creates restore points:
- Before major updates
- Before new driver/software installs
- Manually (if you choose)
- Automatically (once every 7 days by default)
Yes. Boot into Safe Mode, open rstrui.exe, and choose a restore point.
Yes, if you disable it through System Properties and choose to delete points, all current restore data will be erased.
Related Articles
- Dec 06, 2024Learn Everything About Recycle Bin on Windows Computer
- May 26, 2025What's EFI Partition? Is It Safe to Delete the EFI Partition on Windows?
- May 12, 2026Guide to the Library Folder on Mac: Everything You Need to Know
- Nov 23, 2024Full Disk Access on Mac: Should I Enable It?
- Nov 27, 2024What is ReFS File System?
- Apr 29, 2025What is SSD TRIM, How to Enable or Disable TRIM on SSD on Windows?

Contributing Writer
Steven
Steven has been a senior writer & editor of Donemax software since 2020. He's a super nerd and can't imagine the life without a computer. Over 6 years of experience of writing technical solutions and software tesing, he is passionate about providing solutions and tips for Windows and Mac users.

Editor in chief
Gerhard Chou
In order to effectively solve the problems for our customers, every article and troubleshooting solution published on our website has been strictly tested and practiced. Our editors love researching and using computers and testing software, and are willing to help computer users with their problems
Hot Donemax Products

Clone hard drive with advanced clone technology or create bootable clone for Windows/Mac OS.

Completely and easily recover deleted, formatted, hidden or lost files from hard drive and external storage device.

Certified data erasure software - permanently erase data before selling or donating your disk or any digital device.