Written byLucienUpdated on Apr 30, 2025
How to Clean a Disk Using CMD (Command Prompt)?
Approved byGerhard Chou
Tip: If you are not good at Command Lines, you can use another software - Donemax Data Eraser to help you clean a disk on Windows computer. It also can help you clean a disk on Mac. Once the data is erased by Donemax Data Eraser, the data is lost permanently, can't be recovered by any data recovery method.
PAGE CONTENT:
Cleaning your disk is an essential part of regular computer maintenance. It ensures your system runs smoothly by freeing up space, removing unnecessary files, and sometimes fixing potential errors. While many graphical tools offer disk-cleaning features, using Command Prompt (CMD) is a powerful alternative that provides more control, especially when dealing with advanced disk management tasks.
In this article, we'll dive into the process of cleaning a disk using CMD, explain why it's advantageous, and provide a comprehensive, step-by-step guide on how to perform this task.
Why Use CMD for Disk Cleaning?
While graphical tools like Windows Disk Cleanup or third-party software may be sufficient for basic disk cleaning, using Command Prompt offers a level of control that's hard to match. Here's why:
- Precise Control: CMD lets you perform operations with greater precision, especially when you need to manage partitions, format disks, or troubleshoot disk errors.
- Advanced Features: Tools like diskpart provide advanced features like deleting partitions or cleaning the entire disk, which may not be easily accessible through graphical interfaces.
- Efficient and Quick: Running disk cleaning tasks via CMD is often faster and more efficient, especially for users familiar with command-line interfaces.
- Fixing Disk Errors: CMD is great for solving underlying disk errors that may not be fixable using GUI-based methods.
Prerequisites
Before diving into the cleaning process, there are a few things you need to ensure:
- Administrator Privileges: Since disk operations can affect system integrity, you need to run CMD as an administrator.
- Backup Your Data: Cleaning a disk can erase all data on the selected disk. Ensure you back up important files before proceeding with the cleaning process.
- Understanding diskpart: The primary tool you'll use to clean disks in CMD is called diskpart. This utility allows for detailed disk management, such as partitioning, formatting, and cleaning.
Step-by-Step Guide to Cleaning a Disk Using CMD (Command Prompt, diskpart)
1. Opening Command Prompt as Administrator
To run the necessary disk management commands, you'll first need to open Command Prompt with administrative privileges. Here's how:
For Windows 10/11:
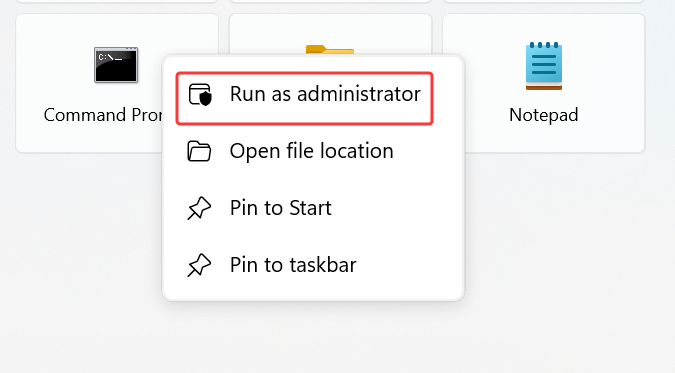
- ress the Windows key and type "cmd" or "Command Prompt."
- Right-click on the "Command Prompt" app from the search results and select Run as administrator.
![Opening Command Prompt as Administrator]()
- If prompted, click Yes to grant administrator permissions.
Running CMD as an administrator ensures you have the necessary privileges to execute disk cleaning commands.
2. Using the diskpart Command
The core utility used for cleaning a disk in CMD is called diskpart. It is a powerful disk partitioning tool that can handle a variety of disk management tasks.
Here’s how to invoke diskpart:
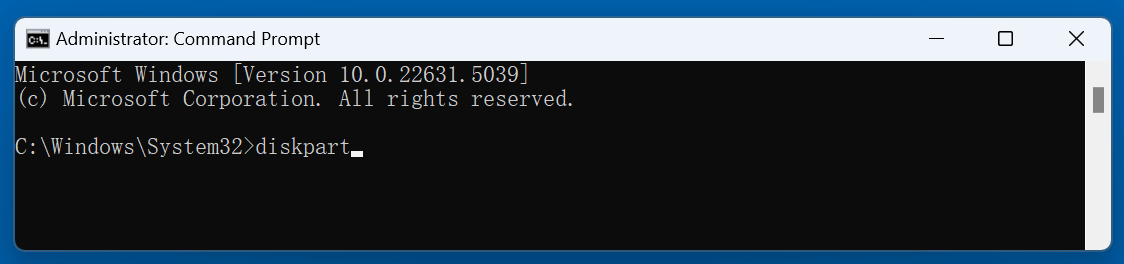
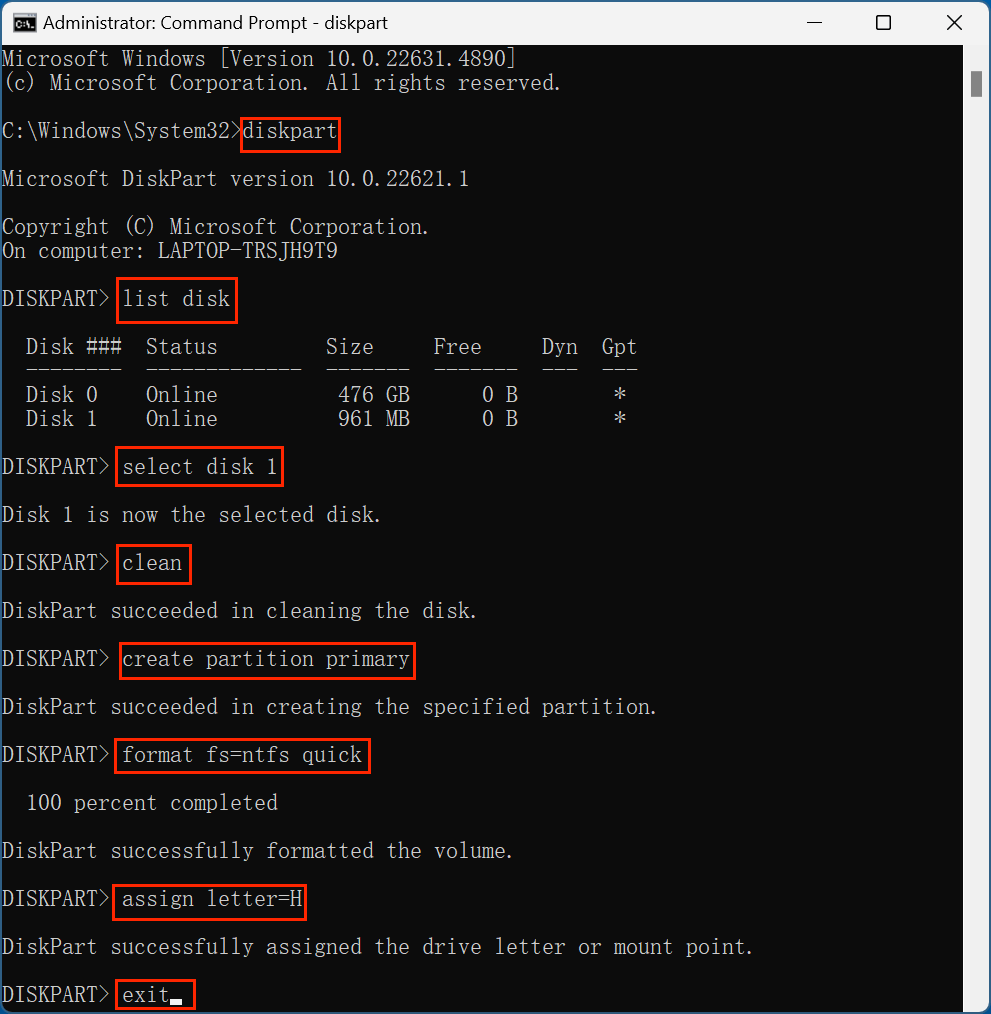
- Type the command diskpart into the Command Prompt window and hit Enter.
![Type the command diskpart]()
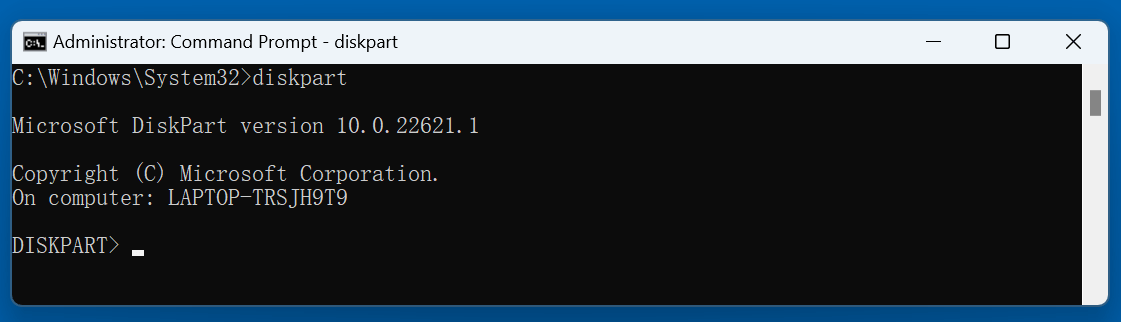
- You should now be in the diskpart environment, where you can run additional commands.
![run additional commands]()
3. Listing All Disks
Before you proceed with cleaning, it's crucial to identify which disk you want to clean. To do this, you'll need to list all available disks on your system.
- Type the following command and press Enter:
list disk
- This will display all connected disks on your system, including the primary disk (usually Disk 0) and any additional drives like external hard drives or USB flash drives. Each disk will be labeled by its number (e.g., Disk 0, Disk 1, etc.).
Take note of the disk number that corresponds to the drive you want to clean. Be very careful with this step - cleaning the wrong disk could result in the loss of important data.
4. Selecting the Disk to Clean
Once you’ve identified the disk you want to clean, use the select disk command to choose it. For example, if you want to clean Disk 1, you would enter the following command:
select disk 1
Press Enter, and the system will confirm that the correct disk has been selected.
5. Cleaning the Disk
Now comes the critical step: cleaning the disk. This command will remove all data and partitions from the selected disk.
- To initiate the cleaning process, type:
clean
Press Enter, and the system will begin erasing all data from the selected disk. This process removes the partition table, making the drive appear as unallocated space.
Warning: This step is irreversible. All files on the disk will be lost, and you won't be able to recover them unless you use advanced data recovery tools.
If you want to securely erase all data, you can use the clean all command instead:
clean all
The clean all command performs a more thorough cleaning by overwriting all sectors on the disk with zeros, making data recovery more difficult.
6. Optional: Creating a New Partition
After cleaning the disk, you may want to create a new partition to store data. Here's how you can do it using diskpart:
- Type the following command to create a new primary partition:
create partition primary
- If successful, you should see a message confirming the creation of the partition.
7. Formatting the Disk
Once you've created a partition, the next step is to format the disk so it can be used for storing files. To format the disk, follow these steps:
- First, you need to select the newly created partition. You can do this by typing:
select partition 1
(Assuming the new partition is labeled as Partition 1.)
- Now, format the partition using the format command:
format fs=ntfs quick
This command formats the disk to the NTFS file system using the "quick" method, which is faster than a full format.
- Once the formatting process is complete, the disk will be ready for use.
Important Considerations:
Before you proceed with cleaning your disk using CMD, there are several crucial points to keep in mind:
- Data Loss: Both clean and clean all will permanently erase data from the disk. If you're cleaning a system disk or a drive that contains important files, make sure to back up your data first.
- Selecting the Correct Disk: Always double-check the disk number before issuing the clean command. Choosing the wrong disk could result in losing important system or personal data.
- Disk Errors: If you're cleaning a disk to resolve errors (e.g., bad sectors or corrupt partitions), cleaning and reformatting the disk can be an effective solution, but it doesn't always guarantee success. For persistent errors, you might need to replace the disk.
Cleaning Disk Using CMD Common Issues and Troubleshooting
While cleaning a disk using CMD is usually straightforward, you may encounter a few issues along the way. Here's a look at some common problems and how to resolve them:
1. Diskpart Doesn't Recognize the Disk
Sometimes, diskpart may not recognize the disk or show an error when trying to select it. This could be due to several reasons:
- Disk is not initialized: If the disk is new or has been used on a different system, it might need to be initialized. You can do this by right-clicking the disk in Disk Management (GUI tool) and selecting "Initialize Disk."
![Diskpart Doesn't Recognize the Disk]()
- Disk is locked or in use: Ensure no programs are using the disk and try again.

2. Errors While Formatting
If you encounter errors when formatting the disk (e.g., "The format did not complete successfully"), this could indicate that the disk has physical issues. In this case, try running a disk check:
chkdsk [drive letter]: /f
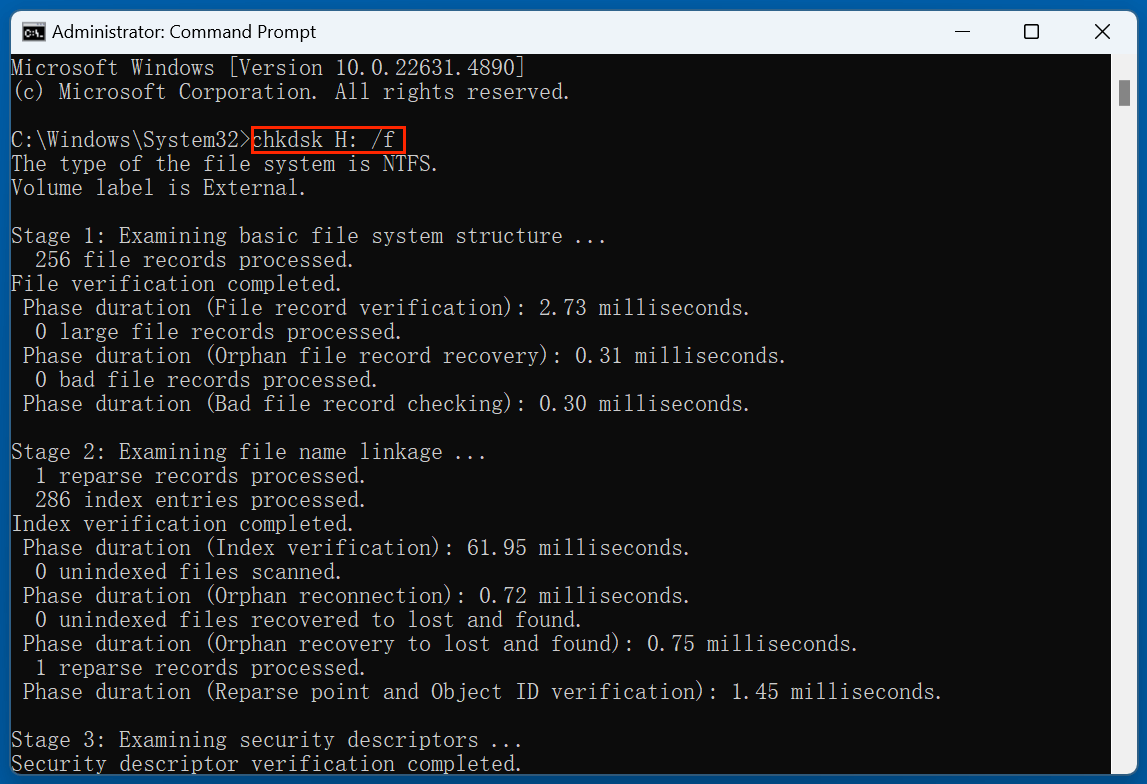
This command attempts to fix file system errors.
How to Recover Lost Data After Cleaning a Disk Using CMD?
If you want to recover lost data from a disk which is erased by CMD - diskpart, you can try Donemax Data Recovery.
Step 1. Download and install Donemax Data Recovery on your computer.
Step 2. Open Donemax Data Recovery, select the erased disk.

Step 3. Click on Scan button to deeply scan the disk and find all lost files.

Step 4. After scan, you can preview the images, videos and documents, then select the wanted files, click on Recover button to save them.

Alternatives to Cleaning a Disk with CMD
While CMD provides a powerful way to clean a disk, it's not the only option. Here are a few alternatives:
- Disk Management (GUI): You can clean and format disks using the Windows Disk Management tool, which is easier for beginners.
- Third-party Disk Cleaning Software: Tools like Donemax Data Eraser or Donemax Data Recovery offer user-friendly interfaces for cleaning and managing disks.
However, CMD is often preferred for advanced users who need more control over disk operations.
If you are going to sell, donate or dispose of your disk, you need to wipe the disk. Donemax Data Eraser can help you wipe the disk and permanently erase all data from it, ensure no data is recoverable.
Step 1. Download and install Donemax Data Eraser on your computer.
Step 2. Open Donemax Data Eraser, choose Erase Hard Drive mode, select the disk, click on Erase Now button. It will securely and permanently erase all data from the disk.

Conclusion
Cleaning a disk using CMD can be a highly effective way to manage your system's storage, especially for advanced users who need to perform detailed disk operations. By following the steps outlined in this article, you can clean and format disks with precision, optimize system performance, and resolve common disk errors.
Remember, always back up your important data before cleaning a disk, as the process is irreversible. If you're unsure about the steps or worried about data loss, consider using graphical tools or third-party software for a simpler approach.
By mastering CMD disk operations, you’ll have a powerful tool at your disposal for managing your computer's storage with ease.
FAQs About Cleaning a Disk Using CMD
1. Can I recover data after using the clean command?
Once you use the clean command, recovering data is difficult but not impossible. Specialized data recovery software may help, but success is not guaranteed, especially with the clean all command.
2. How do I clean a disk without formatting it?
If you don't want to format the disk but still wish to clean it, you can use the clean command to remove partitions and reset the drive without creating a new partition.
3. Can I use CMD to clean a USB drive?
Yes, you can clean a USB drive using the same process as for internal hard drives. Just make sure to select the correct disk number corresponding to your USB drive.
Donemax Data Eraser
One of the best data erasure programs for permanently erase data from PC, Mac, HDD, SSD, USB drive, digital camera and other devices. Once the data is erased, it is lost for good, cannot be recovered by any method.
Related Articles
- Jul 27, 2025How to Wipe FAT32 Drive on Windows or macOS?
- Feb 02, 2024What Is Diskpart Clean and How to Use It to Wipe Data?
- Jan 14, 20262026 Best SD 6 Card Formatter: Format/Wipe/Repair SD Card
- Feb 23, 2024How to Destroy Data on Hard Drive to Make Data Be Unrecoverable?
- Oct 17, 2023How to Use CCleaner Wipe Free Disk Space?
- Jan 27, 2024How to Execute Unrecoverable Delete on Windows/macOS/External Storage Device?

Contributing Writer
Lucien
Lucien is a writer and a chief programmer of Donemax software who has worked in the company for 5+ years. He has written much of the content on the site and devotes to providing troubleshooting and solution for Windows and Mac users including disk cloning, data recovery, migration, eraser, error fixes.

Editor in chief
Gerhard Chou
In order to effectively solve the problems for our customers, every article and troubleshooting solution published on our website has been strictly tested and practiced. Our editors love researching and using computers and testing software, and are willing to help computer users with their problems