Written byLucienUpdated on Jul 01, 2026
Best File Systems for External Drives: How to Format & Partition
Approved byGerhard Chou
Summary: To format an external hard drive on Windows, open Disk Management, right-click your drive, and select Format. On a Mac, use Disk Utility, select the drive, and click Erase. To permanently wipe data and avoid data recovery, use the professional tool Donemax Data Eraser
PAGE CONTENT:
Formatting is the best way to factory reset an external hard drive or rebuild a file system for the drive. If you are planning to format an external hard drive on your PC or Mac, you should make a backup first since formatting will erase all files stored on the external hard drive.
Format External Hard Drive on Windows
There are many reasons behind why you format your external hard drive (HDD/SSD/USB Storage), here are some of them:
- Quickly delete all data from the external hard drive.
- The external hard drive becomes RAW or gets damaged, format it to fix logical errors.
- Factory reset the external hard drive before selling or donating.
- The external hard drive is not compatible with the computer’s OS, format it to a compatible file system.
- Format the external hard drive for both Windows and Mac OS. (Format the external hard drive to ExFAT)
If you are going to format an external hard drive on Windows, make sure you have backed up the important data. Then choose a solution to start:
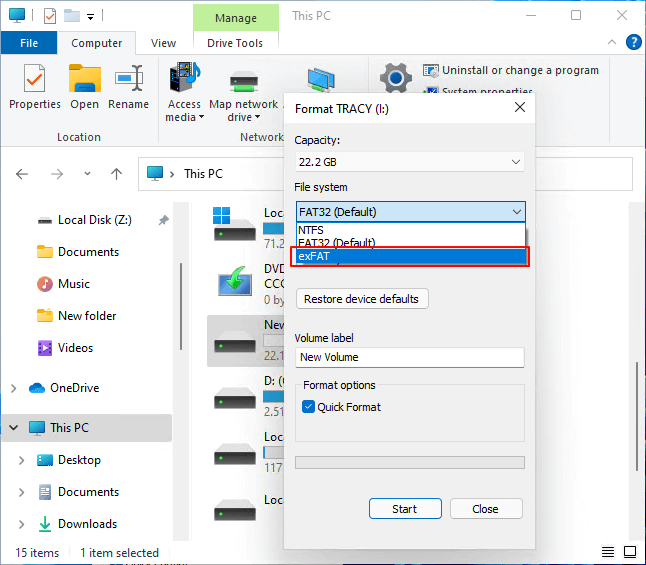
Solution 1. Format external drive in Explorer
Step 1. Connect the external hard drive to your Windows PC, then open This PC or My Computer.
Step 2. Find the external hard drive, right-click the external hard drive, choose Format.
Step 3. Enter a name for the drive, then select a file system.
- NTFS: Default file system for Windows and most of external hard drives.
- FAT32: The old file system for most of USB flash drives and SD cards, compatible with both Windows and macOS. A single file on the FAT32 drive can’t be over 4GB.
- exFAT: It is fully compatible with Windows and macOS, allowing you to stored files larger than 4GB
Step 4. Click Start button to format the external hard drive.
🎯 Note: Quick Format will quickly delete the data stored on the external hard drive; the Full Format will find the bad sectors and erase every sector of the external hard drive, overwrite the disk space. In most cases, just choose Quick Format to format the external hard drive.
Solution 2. Format external hard drive in Disk Management
Disk Management is a comprehensive disk management tool offered by Windows OS. Right-click This PC > Choose Manage > Computer Management > Disk Management. Or just press and hold Windows key+R, enter diskmgmt.msc, click Run to open Disk Management.
Follow the steps below to format external hard drive in Disk Management:
Step 1. Connect the external hard drive to your computer.
Step 2. Open Disk Management, then find the external hard drive, right-click it.
Step 3. Choose Format.
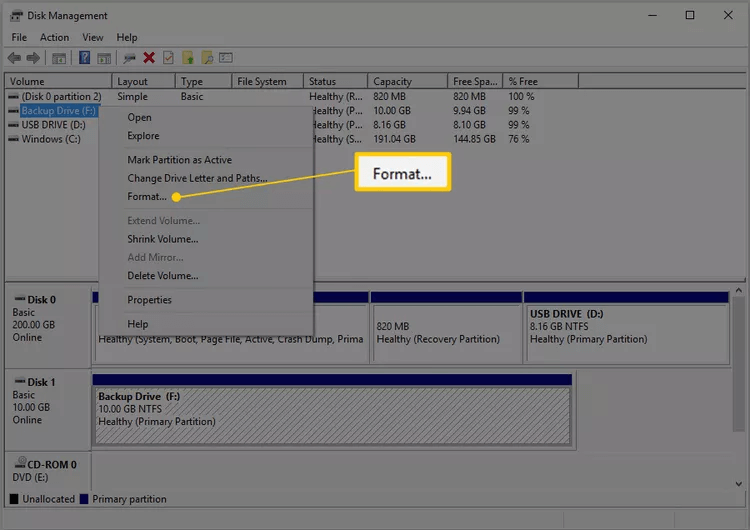
Step 4. Select a file system, then start to format the external hard drive.
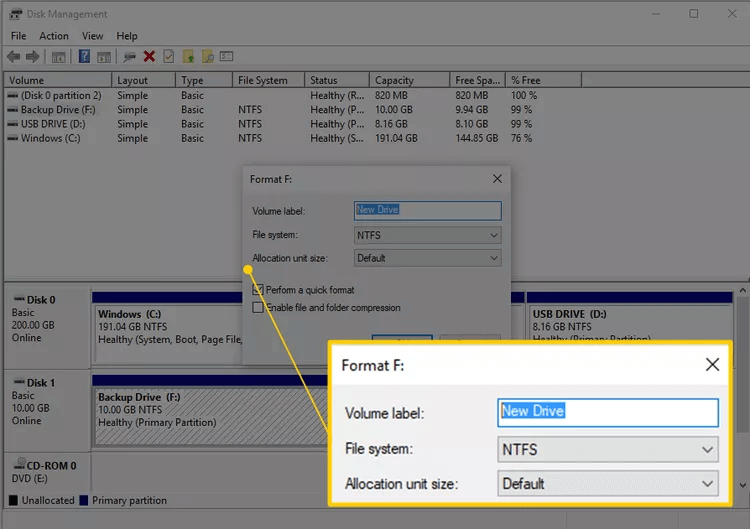
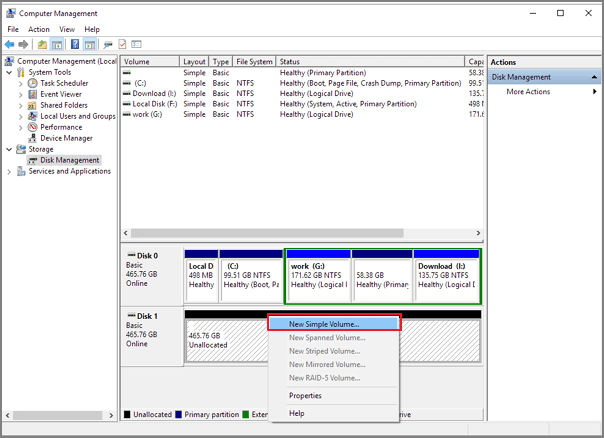
If the external hard drive is a RAW drive, right-click it and choose New Simple Volume to create a new disk volume on the external hard drive.
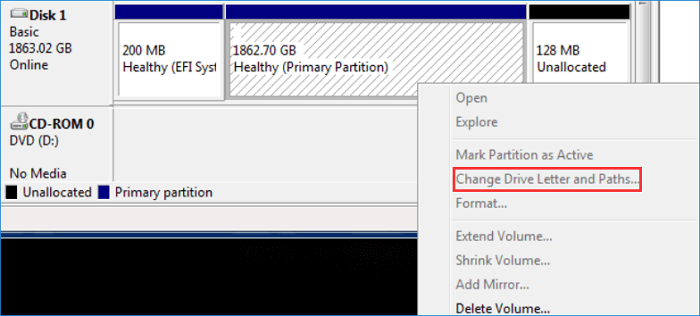
Drive letter conflict? Right-click the external hard drive, then choose Change Drive Letter and Path...
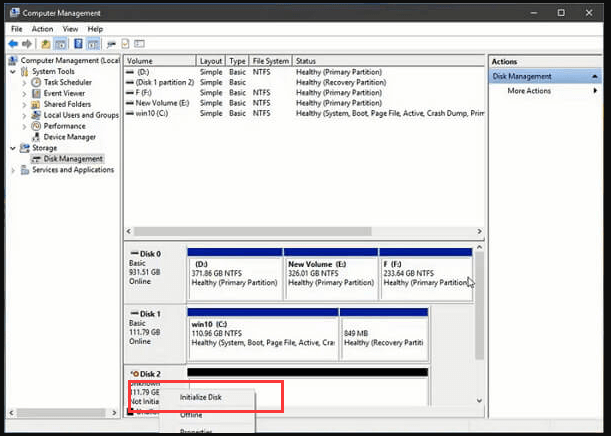
In some cases, the external hard drive may not initialize, just choose Initialize to fix this issue.
Fix External Hard Drive Not Detected on Windows 11/10/8/7
Use disk management to fix the issue of external hard drive not showing up on Windows computer without losing data.
Format External Hard Drive on macOS
When the external hard drive is not compatible with your Mac OS or the drive gets damaged, you can format it so that it can work on your Mac. Disk Utility is the universal tool for any Mac user to format any type of external HDDs, SSDs, USB flash drives, memory cards, etc. Actually, formatting an external hard drive on Mac is a simple process.
Step 1. Open Finder > Applications > Utilities > Disk Utility, open this application.
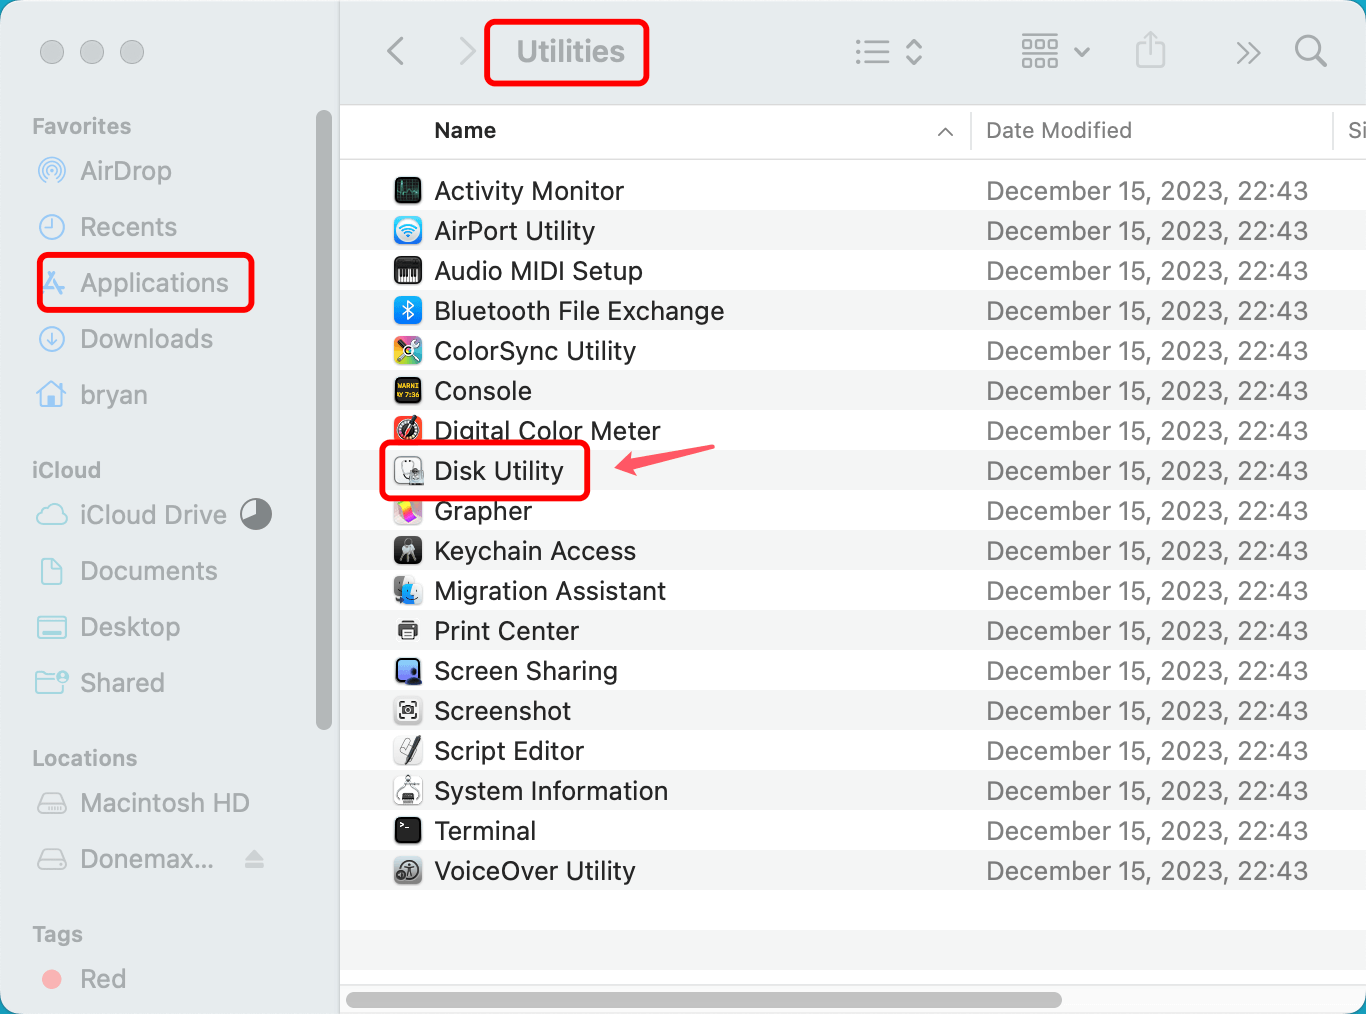
Step 2. Connect the external hard drive to your Mac, then select it.
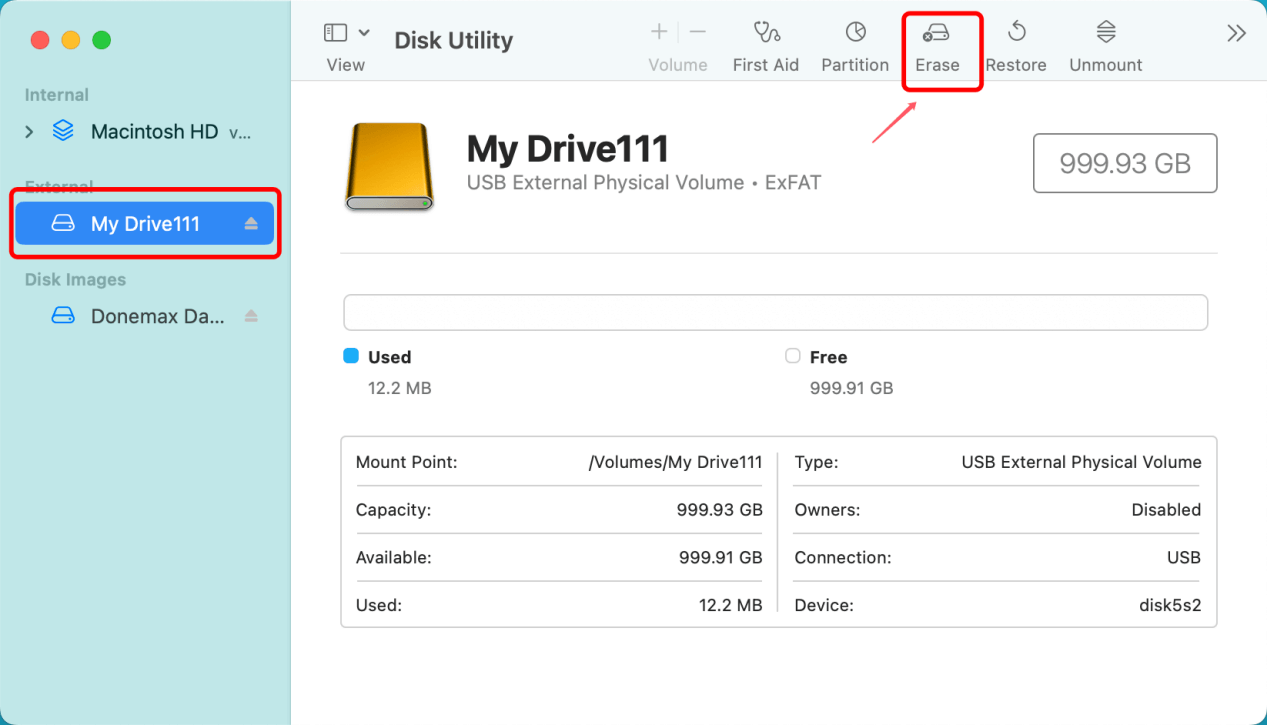
Step 3. Select Erase, then you should select a file system, rename the drive if needed.

Step 4. Click on Erase button again. Once the process completes, click on Done button.
🎯 Note:
Select the correct file system depending on your needs:
|
Use Case |
Recommended Format |
Compatibility |
|---|---|---|
|
Windows Only |
NTFS |
Best for PC performance/security. |
|
Mac Only |
APFS |
Fastest for modern macOS (SSD). |
|
Mac & PC |
exFAT |
Universal compatibility for large files. |
|
Older Devices |
FAT32 |
Best for cameras and old consoles. |
Format and Wipe External Hard Drive [Files Unrecoverable]
Formatting an external hard drive does not means wiping an external hard drive.
Before you sell, donate or dispose of your external HDD, SSD or USB storage device, you can completely wipe the drive, but you'll need to do more than simply delete all files stored on the drive or format the drive. Most of computer user know that the deleted or formatted data is not lost forever, and can be easily recovered by data recovery programs.
In order to properly wipe an external hard drive, you need to download and install a third-party data erasure program on your computer.
Donemax Data Eraser is a 100% safe data erasure program which is able to securely and permanently wipe data from HDD/SSD, USB flash drive, digital camera, memory cards, etc.
Donemax Data Eraser
- Wipe data permanently to prevent being recovered.
- Support multiple international data wiping algorithms.
- 100% safe and easy to use.
Now, follow the steps to format and wipe an external hard drive on Windows or macOS:
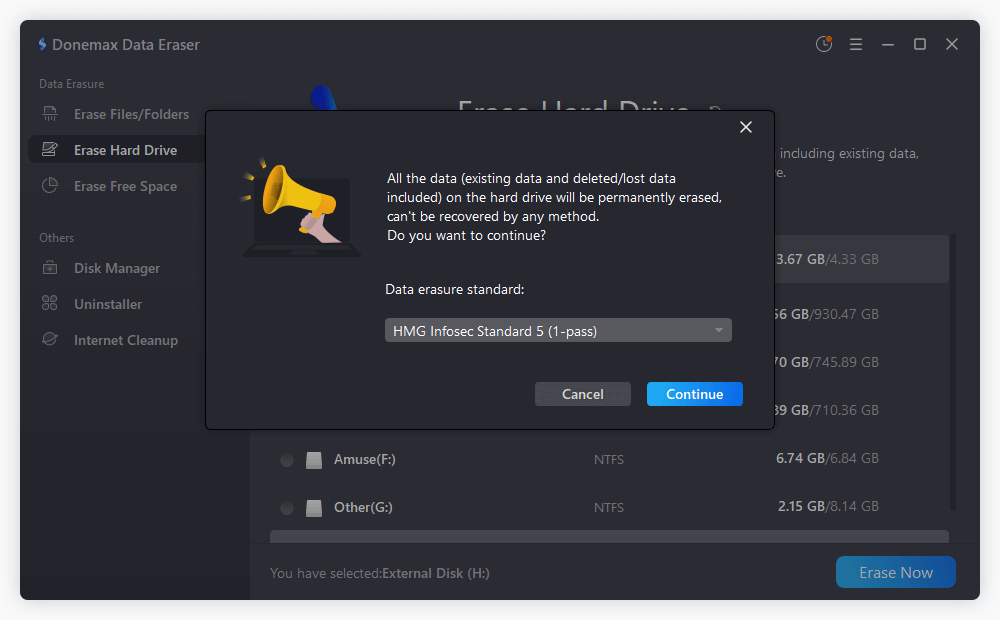
Step 1. Connect the external hard drive to your computer and open Donemax Data Eraser.
Step 2. Choose data erasure mode - Erase Hard Drive. This data erasure mode will wipe the hard drive and permanently erase all data from the drive, leaving no trace for data recovery.

Step 3. Click on Erase Now button and select a data erasure algorithm to permanently erase all data from the external hard drive.
FAQs About Formatting External Hard Drive
ExFAT is the file system that can work on both Windows and macOS. When you format your external hard drive, just select the ExFAT as the file system, then click Format button.
No, the formatted data is not lost forever. With data recovery program, you can recover lost data from the formatted external hard drive. We also call this process as “Unformat.” If you want to permanently erase all data from the external hard drive, just try data erasure software - such as Donemax Data Eraser.
Here is the quickest way to factory reset an external hard drive:
- Connect the external hard drive to your computer.
- Open Donemax Data Eraser.
- Choose mode - Erase Hard Drive.
- Select the external hard drive and click on Erase Now button.
There are many tools can help in formatting external hard drive, such as:
- Disk Management (for Windows)
- Disk Utility (for Mac)
- Donemax Data Eraser
- Donemax Start Menu
- Terminal (for Mac Pro users)
- Command Prompt (for Windows Pro users)
Conclusion
Formatting an external hard drive is pretty simple. Before formatting your external hard drive, you should make a backup of your important data since formatting will erase all data stored on the external hard drive. Make sure you have selected the correct file system, then click on Start button to format the external hard drive for Windows or macOS. If you will sell, donate or discard an old external hard drive, try data erasure software to help you wipe and format the external hard drive, permanently erasing all data from the HDD or SSD.
Donemax Data Eraser
One of the best data erasure programs can permanently delete data. It works on PCs, Macs, HDDs, SSDs, USB drives, digital cameras, and other devices. Once the tool erases the data, no one can recover it by any method.
Related Articles
- May 30, 2025How to Wipe A Drive with CCleaner?
- Mar 04, 2024Blancco Drive Eraser Review: Pros, Cons, Alternatives, How To Use It
- Feb 06, 20242025 Two Effective Methods to Wipe HDD?
- May 10, 2024How to Wipe An USB Flash Drive on Windows 11?
- Mar 09, 2026How to Permanently Erase Data on Windows 11?
- Apr 07, 2024How to Erase A SSD from BIOS?

Contributing Writer
Lucien
Lucien is a writer and a chief programmer of Donemax software who has worked in the company for 5+ years. He has written much of the content on the site and devotes to providing troubleshooting and solution for Windows and Mac users including disk cloning, data recovery, migration, eraser, error fixes.

Editor in chief
Gerhard Chou
In order to effectively solve the problems for our customers, every article and troubleshooting solution published on our website has been strictly tested and practiced. Our editors love researching and using computers and testing software, and are willing to help computer users with their problems