
Written byStevenUpdated on Apr 25, 2025
How to Erase Locked or Encrypted Drive (such as BitLocker or FileVault Drive)?
Approved byGerhard Chou
Before we start: Donemax Data Eraser is a powerful disk wipe program. It can help you securely wipe a locked or encrypted drive such as BitLocker drive, FileVault drive, encrypted APFS drive, etc. Once the drive is wiped, all data stored on the drive is lost for good, can't be recovered by any recovery method.
PAGE CONTENT:
In today's digital world, data security is paramount. Whether you're looking to sell, repurpose, or simply erase sensitive data from your old drives, understanding how to properly erase a locked or encrypted drive is critical. Locked or encrypted drives can present challenges when trying to clear data, but with the right approach, it's entirely possible. This article will guide you through the steps to securely erase data from locked or encrypted drives, explaining the various methods available depending on the situation.
Understanding Locked vs. Encrypted Drives
Before diving into the methods of erasing data, it's important to understand the difference between a locked and an encrypted drive.
Locked Drive
A locked drive generally refers to a drive that is protected with a password or other access restriction. The lock could be physical (e.g., a BIOS password), software-based (like Windows BitLocker or macOS FileVault), or even part of the drive's firmware. This lock prevents unauthorized users from accessing the data, ensuring privacy and security.
- BitLocker (Windows): BitLocker is a built-in tool in Windows that encrypts a drive, making it inaccessible without a password or recovery key.
- FileVault (macOS): FileVault is macOS's equivalent of BitLocker, offering full disk encryption to protect data.
- Firmware Lock (BIOS): Some laptops or desktops have hardware-based locks embedded into the BIOS or UEFI. These are especially common in high-security environments.
Encrypted Drive
An encrypted drive is one that uses cryptographic techniques to secure the data stored on it. Encryption transforms the data into an unreadable format unless the correct key is provided. Encryption is commonly used in modern systems to protect data from unauthorized access.
- BitLocker or FileVault encryption: These systems encrypt the entire hard drive. Without the password or recovery key, the data remains inaccessible, but the drive is still locked.
- Third-Party Encryption Software: Many users rely on third-party tools for encryption, such as VeraCrypt, to secure their data.
While both locked and encrypted drives may seem similar, they have some distinct differences when it comes to erasure. It is possible to erase encrypted data through decryption, while locked drives often require bypassing the lock to gain access.
Back Up Data Before Wiping Locked or Encrypted Drive
Before attempting to erase a locked or encrypted drive, there are some key considerations to ensure you're proceeding correctly and responsibly:
▪️ Backup Important Data
If you can still access your locked or encrypted drive and there's any data you might need, make sure to back it up before attempting erasure. Once erased, it may be impossible to recover any data, especially from encrypted drives.
▪️ Verify Ownership and Legal Access
Ensure that you legally own the drive or have proper authorization to erase it. In some cases, such as with company devices or encrypted drives, you may need explicit permission before proceeding with erasure.
▪️ Check for Passwords or Recovery Keys
If the drive is encrypted or password-protected, ensure you have access to the password or recovery key. Without these, erasing the drive becomes significantly more challenging.
▪️ Determine the Drive Type
Whether you're working with a hard disk drive (HDD), solid-state drive (SSD), or an external drive, it's important to know the specifics of the drive. Different methods may apply depending on the type of storage.
Methods to Erase Locked or Encrypted Drives
Now, let's look at the methods for erasing data from locked or encrypted drives. The method you choose will depend on whether you have access to the password or recovery key, or whether you need to bypass the lock.
Method 1. Erase Data If You Have the Password or Recovery Key
Using Built-in Tools (BitLocker, FileVault, etc.)
If you have access to the password or recovery key for the encrypted or locked drive, the process of erasing it becomes straightforward. In most cases, the first step will be to decrypt the drive.
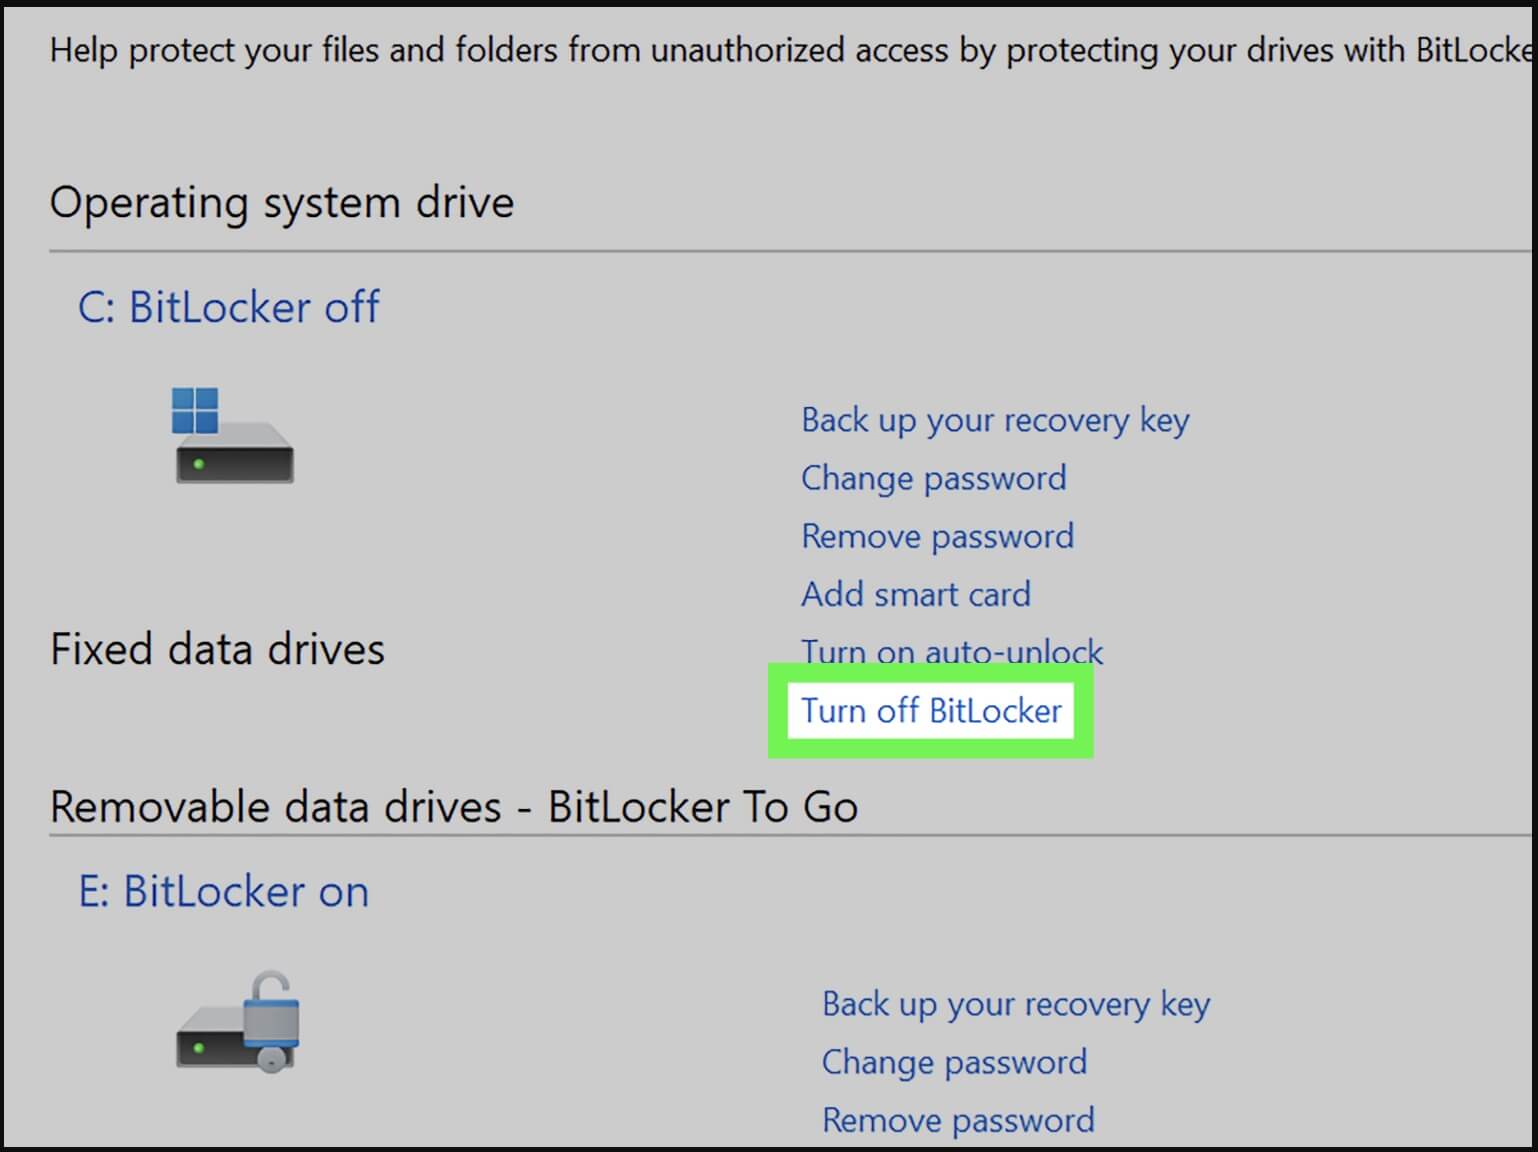
- Windows (BitLocker):
- Open the Control Panel.
- Navigate to System and Security > BitLocker Drive Encryption.
- Find the locked drive and click Turn off BitLocker.
![securely erase data from locked or encrypted drives]()
- Enter your recovery key or password.
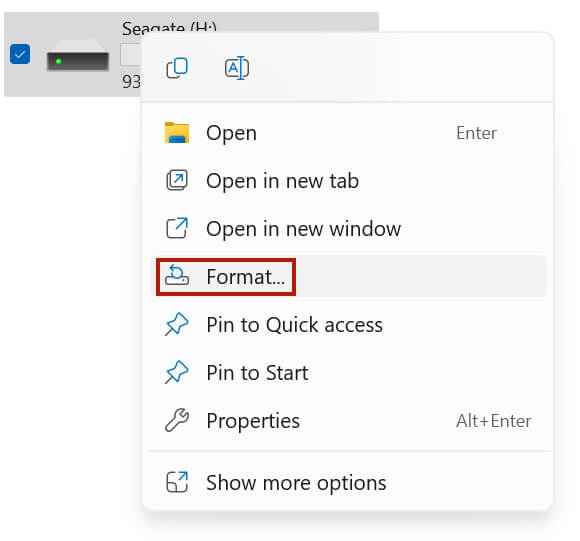
- After decryption, format the drive by right-clicking on it in This PC and selecting Format.
![securely erase data from locked or encrypted drives]()
- macOS (FileVault):
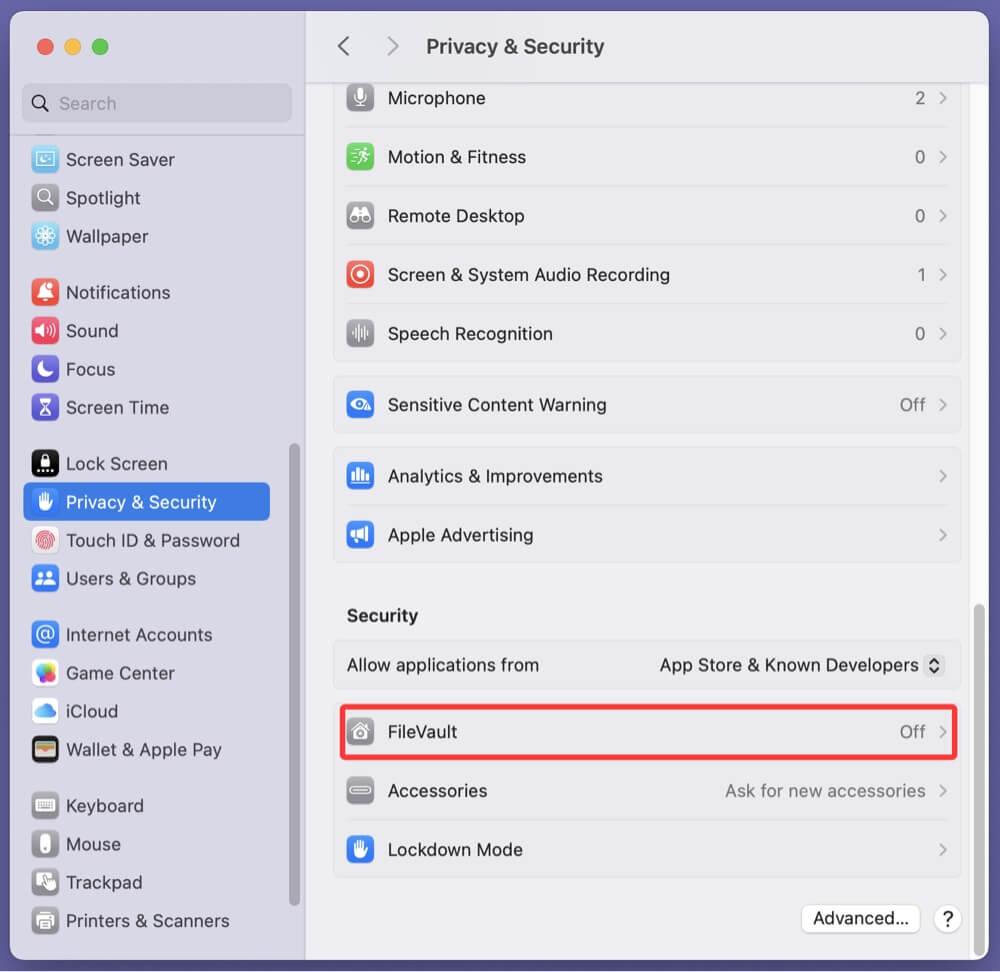
- Go to System Settings > Privacy & Security > FileVault.
![securely erase data from locked or encrypted drives]()
- Unlock FileVault by entering the password.
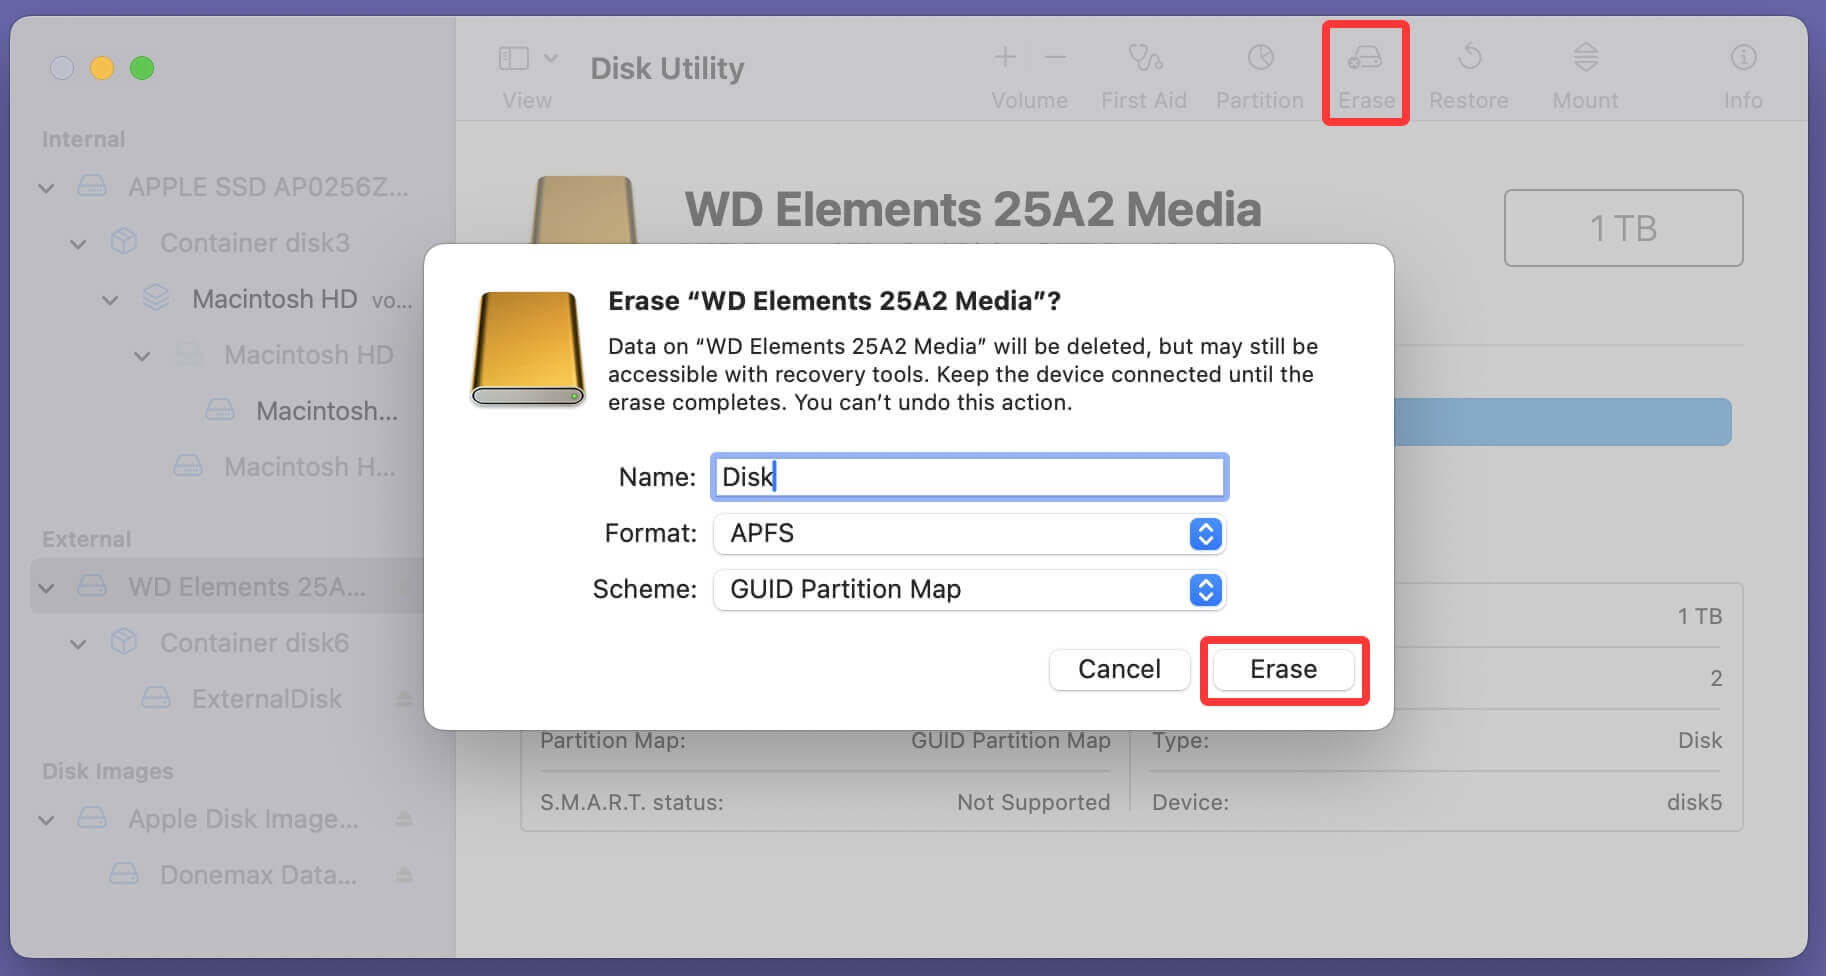
- Once FileVault is turned off, open Disk Utility.
- Select the drive and click on Erase.
![securely erase data from locked or encrypted drives]()
- Go to System Settings > Privacy & Security > FileVault.
Once the drive is decrypted, you can proceed to erase the drive completely. If the drive isn't encrypted with BitLocker or FileVault, you can use basic formatting tools, such as Disk Management on Windows or Disk Utility on macOS.
Method 2. Wipe Drive If You Don't Have the Password or Recovery Key
If you don't have access to the password or recovery key, erasing the drive becomes more complex. However, there are still methods to erase the data, though it may involve bypassing the lock or using third-party tools.
Using DiskPart (Windows)
In the case of a locked drive (e.g., a BitLocker-protected drive), you can use DiskPart to force a format. However, note that this method will only work if the drive is not encrypted. For BitLocker, decryption is required beforehand.
- Press Windows + R, type cmd, and press Enter.
- In the Command Prompt, type diskpart and press Enter.
- Type list disk to see all the connected drives.
- Type select disk X (where X is the number of the locked disk you want to erase).
- Type clean to erase the drive completely.
- Once cleaned, type create partition primary and then format fs=ntfs or to format fs=ntfs quick (perform quick format) format the drive.
![securely erase data from locked or encrypted drives]()

Using Terminal (macOS)
For Mac or Linux users, the process of erasing a locked drive can be done through the Terminal. However, it's essential to decrypt the drive before proceeding.
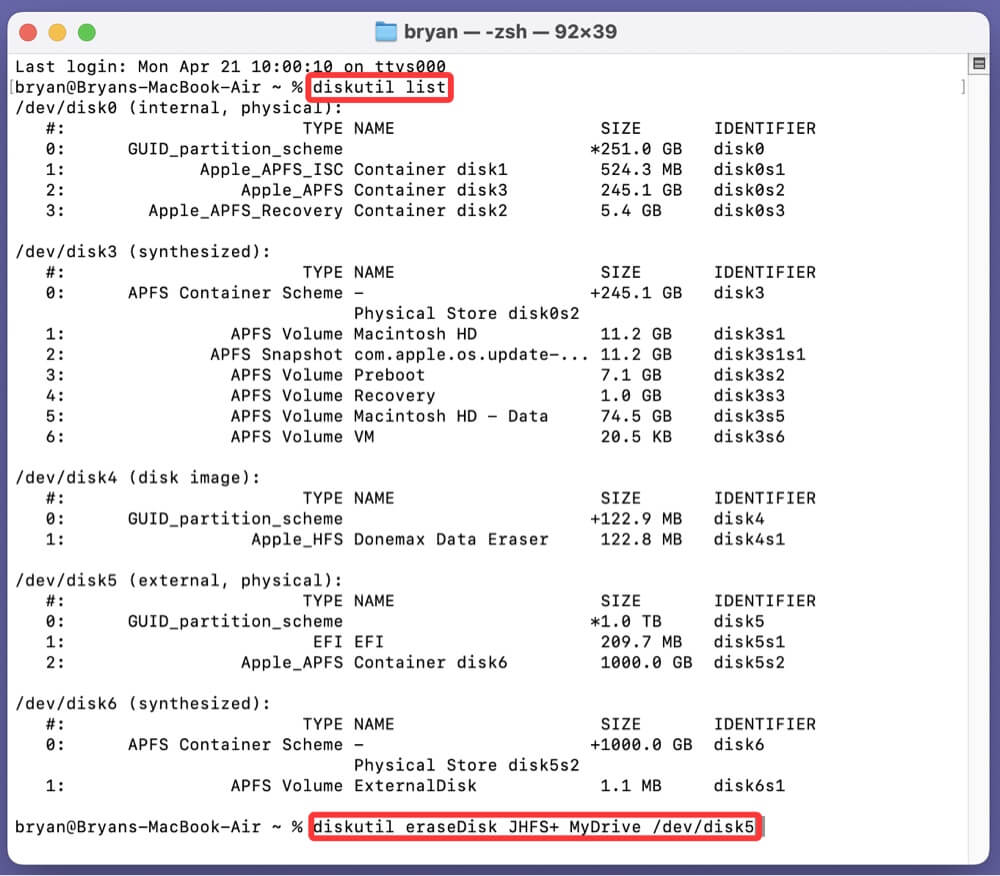
macOS (using diskutil):
- Open Terminal.
- Type diskutil list to find the drive you wish to erase.
- Use the command diskutil eraseDisk JHFS+ MyDrive /dev/diskX to erase the disk (replace X with the disk number).
![securely erase data from locked or encrypted drives]()
Third-Party Disk Wipe Tools
If you're unable to access the drive through built-in tools, third-party software might help bypass the password or recovery key and securely erase the drive.
- Donemax Data Eraser: The best disk wipe & erasure program which offers certified data erasure standards such as HMG Infosec Standard 5, NIST 800-88, Peter Gutmann's algorithm, DoD 5220.22-M, U.S. Army AR380-19, DoD 5220.22-M ECE. It can help in securely wiping a locked or encrypted drive without password.
- DBAN (Darik's Boot and Nuke): A popular open-source tool for securely erasing data from hard drives. It can be used by creating a bootable USB and running the program from outside the operating system.
- KillDisk: Another powerful tool for wiping data. KillDisk offers both free and paid versions that provide various erasure algorithms.
- Active@ KillDisk: This is another reliable tool that can erase drives even when they are locked or encrypted, but it often requires physical access to the machine.
Steps to wipe a locked or encrypted drive using Donemax Data Eraser:
Step 1. Click Download button below to download Donemax Data Eraser and install it on your computer.
Step 2. Open Donemax Data Eraser, choose Erase Hard Drive mode. This mode will format and wipe the drive, permanently erase all data from it.
Step 3. Select the locked or encrypted drive, click on Erase Now button.

Once the process gets finished, all data stored on the drive is lost for good, can't be recovered by any method.
BIOS/UEFI Reset (if Drive is BIOS-Locked)
Some drives have a password set within the BIOS or UEFI, preventing access even at the system level. In such cases, you may need to reset the BIOS password or use a jumper on the motherboard to bypass the lock.
- Power down the computer and disconnect it from the power supply.
- Open the case and locate the CMOS jumper or battery.
- Reset the BIOS password by following the manufacturer's instructions.
- If this doesn't work, contact the manufacturer for assistance.
Secure Erasure Techniques for Encrypted Drives
When dealing with encrypted drives, a common misconception is that the data is still "physically" present on the drive. In reality, encryption ensures that without the decryption key, the data is unreadable and effectively gone. However, to be absolutely sure, you may want to overwrite the drive with random data.
- Overwriting: Overwriting an encrypted drive with random data or zeros can help ensure that the data is not recoverable, even if the encryption is bypassed. Tools like Donemax Data Eraser can help perform this task effectively.
- Full-Drive Erasure: Tools like Donemax Data Eraser, CCleaner, Eraser, and Active@ KillDisk provide options for full drive erasure, securely erasing all data on the disk.
What to Do If the Drive Still Can't Be Erased
If all methods fail, there could be a more serious issue with the drive, such as hardware encryption or firmware locks. In this case, you might need to:
- Manufacturer Tools: Check if the manufacturer provides a utility to erase the drive, especially for SSDs. For example, Samsung's Magician tool or Western Digital's utilities may offer secure erasure options.
- Drive Destruction: If all else fails and you cannot erase the data, physical destruction of the drive is the last option. This involves shredding, crushing, or incinerating the drive to ensure data is completely unrecoverable.
Tips for Future Data Management
To avoid these issues in the future, consider the following tips:
- Store recovery keys securely: Keep recovery keys in a safe place, preferably offline.
- Use secure erasure tools: Use built-in or third-party secure erasure tools to make sure data is wiped completely.
- Encrypt before disposal: Always encrypt drives before selling or disposing of them to add an extra layer of security.
Conclusion
Erasing data from a locked or encrypted drive can be challenging, but with the right knowledge and tools, it is entirely possible. Whether you have the password or not, following the correct procedures will ensure that your data is securely wiped, and the drive can be reused or disposed of without risking sensitive information. Always remember to take precautions, back up important data, and verify legal access before proceeding with any erasure.
If you will sell, donate or dispose of the old locked or encrypted drive, just use Donemax Data Eraser to wipe the drive and permanently erase data from it.
Donemax Data Eraser
One of the best data erasure programs for permanently erase data from PC, Mac, HDD, SSD, USB drive, digital camera and other devices. Once the data is erased, it is lost for good, cannot be recovered by any method.
Related Articles
- Feb 15, 2024What Is DBAN, How to Use DBAN to Erase Data?
- Jan 12, 2025How to Securely Wipe Samsung SSD before Disposal? [4 Reliable Methods]
- Mar 04, 2025Best Data Removal Tool or Data Cleaning Tool
- Jan 10, 2024Windows 11 Factory Reset: Step-by-step Detailed Guide
- Jul 02, 2024How to Securely Wipe SSD Without Shortening the Service Life of the SSD?
- Mar 08, 2024How to Use KillDisk to Wipe Data?

Contributing Writer
Steven
Steven has been a senior writer & editor of Donemax software since 2020. He's a super nerd and can't imagine the life without a computer. Over 6 years of experience of writing technical solutions and software tesing, he is passionate about providing solutions and tips for Windows and Mac users.

Editor in chief
Gerhard Chou
In order to effectively solve the problems for our customers, every article and troubleshooting solution published on our website has been strictly tested and practiced. Our editors love researching and using computers and testing software, and are willing to help computer users with their problems