Written byLucienUpdated on May 30, 2025
How to Wipe A Drive with CCleaner?
Approved byGerhard Chou
Summary: The guide outlines the steps to wipe a drive with CCleaner by wiping the free space or entire drive. Also, another advanced and professional data erasure tool Donemax Data Eraser is introduced.
PAGE CONTENT:
Nowadays, data security has become an essential aspect of everyday computing. Whether you're selling your computer, disposing of an old hard drive, or simply want to make sure deleted files cannot be recovered, wiping a drive is the most effective method to ensure your sensitive information is gone for good. One popular tool that offers this functionality is CCleaner—a lightweight, user-friendly utility known primarily for cleaning junk files but also includes features for securely wiping drives. In this guide, we'll walk you through everything you need to know about how to wipe a drive with CCleaner, step-by-step.
What Does It Mean to Wipe A Drive?
When you delete files from your hard drive or format the drive, the data isn't truly gone—it's just marked as free space. Data recovery software can often retrieve those files unless they are overwritten. That's where drive wiping comes in. Wiping a drive means overwriting the entire drive or the free space with random data, making it nearly impossible for any recovery tool to bring back the erased data.
This process is especially important if you're:
- Disposing of or recycling an old computer.
- Selling or donating your storage device.
- Removing sensitive information permanently.
- Preparing a drive for re-use without risk of data leakage.
Why Use CCleaner to Wipe A Drive?
CCleaner, developed by Piriform (a subsidiary of Avast), is a trusted utility that helps users clean temporary files, browser history, cache, and other system clutter. However, a lesser-known feature is its Drive Wiper tool, which can securely erase the free space on a drive or the entire drive itself.
CCleaner is available in both free and paid versions, and fortunately, the Drive Wiper functionality is included in the free version as well, making it accessible for most users.
Key benefits of using CCleaner to wipe drives:
- Easy-to-use interface suitable for beginners.
- Supports multiple wiping algorithms (1-pass, 3-pass, 7-pass, and 35-pass).
- Compatible with both HDDs and SSDs (though special care is needed with SSDs).
- Free for basic drive wiping tasks.
Understanding CCleaner's Wiping Options
Before proceeding, it's essential to understand the two types of wiping operations CCleaner provides:
- Free Space Only: This option only wipes the space marked as available on the drive. Existing files are left intact, but previously deleted files are overwritten and unrecoverable. Ideal if you want to clean traces of deleted files without affecting current data.
- Entire Drive (All Data Will Be Erased): This is a full wipe. Every file on the drive, including the operating system and programs, will be deleted. This is useful when you're preparing a drive for disposal or resale. (Note: This option cannot be used on the system drive while it is in use.)
Preparing to Wipe A Drive with CCleaner
Before you jump into wiping your drive, take a few critical preparatory steps:
1. Back Up Important Data - Wiping a drive is irreversible. Make sure to back up any important files before starting.
2. Identify the Correct Drive - Double-check that you're selecting the correct drive or partition to wipe. Choosing the wrong one can result in unintended data loss.
3. Close Running Applications - Ensure no other applications are using the drive you're wiping. This will prevent errors during the process.
4. Understand the Impact on SSDs - SSDs have different data management techniques (like TRIM). Frequent multi-pass wiping can reduce the lifespan of an SSD. For SSDs, use a built-in secure erase tool from the manufacturer when possible.
How to Wipe A Drive with CCleaner: Step-by-Step Guide
Wiping a drive using CCleaner is a straightforward process, but each step must be followed carefully to avoid accidental data loss. This section expands each step with more detailed instructions, visual expectations, and troubleshooting tips.
Step 1: Download and Install CCleaner
Navigate to CCleaner's official website. Avoid downloading from third-party websites to prevent installing malicious software. Choose the Free or Professional version to download.
Run the downloaded .exe file. Choose installation settings (you can uncheck options like browser extension offers). Launch CCleaner once installation is complete.
Step 2: Navigate to the Drive Wiper Tool
On the left sidebar of the CCleaner interface, click on "Tools." A sub-menu will open; select "Drive Wiper."
The Drive Wiper interface includes drop-down menus for Wipe type, Security level, and Drive selection.
Step 3: Choose Your Wipe Method
You will now configure how CCleaner wipes the drive:
- Select the data wipe mode, you can choose "Free Space Only" or "Entire Drive (All data will be erased)". For most users wanting to prevent data recovery before selling or recycling a drive, wiping free space is adequate.
- Choose the security level, there are 4 options available: "Simple Overwrite (1 pass)," "Advanced Overwrite (3 passes)," "Complex Overwrite (7 passes)," "Very Complex Overwrite (35 passes)."
Step 4: Select the Drive to Wipe
CCleaner will show all non-system drives in a list. Check the box next to the drive(s) you want to wipe. Ensure you do not select the wrong drive, especially external backups or storage devices still in use.
💡Pro Tip: You can also use this feature on USB flash drives and external hard drives.
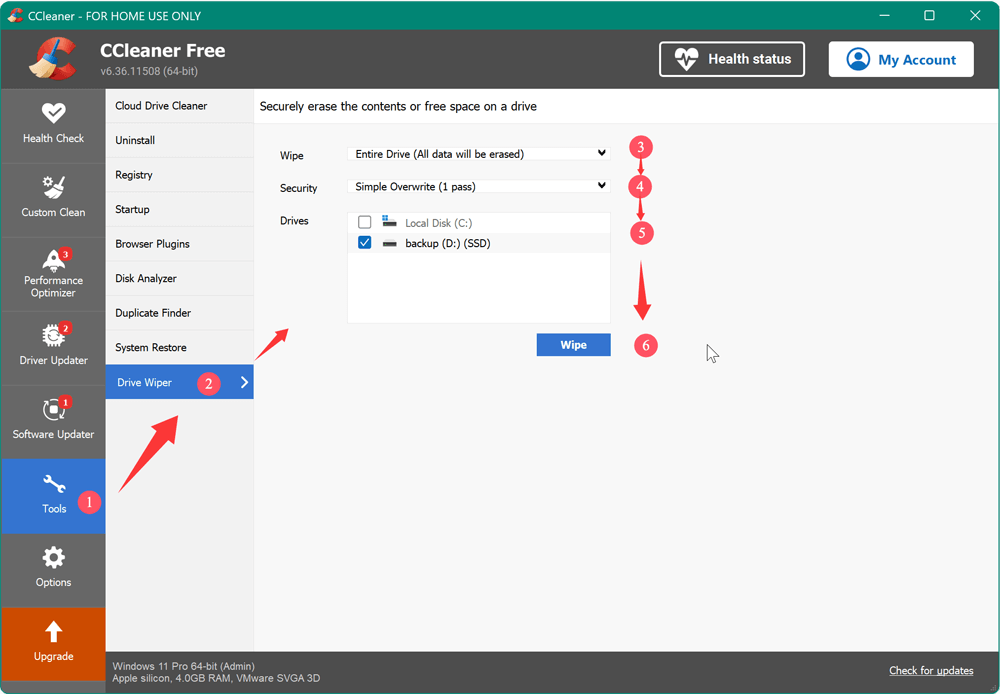
Step 5: Start the Wipe Process
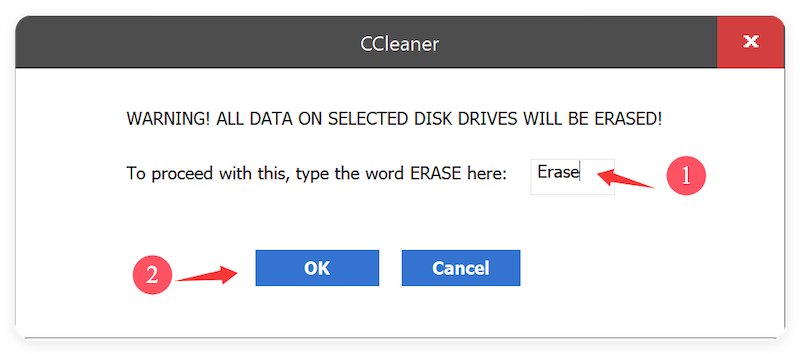
After confirming your settings, click the "Wipe" button. A confirmation pop-up will appear. This is your last chance to cancel if you've selected the wrong drive. Click "OK" to proceed.
Step 6: Monitor the Progress
A progress bar will appear, showing the status of the operation. Do not turn off your computer or disconnect the drive during the process. Depending on the size of the drive and wipe method selected, the process may range from a few minutes to many hours.
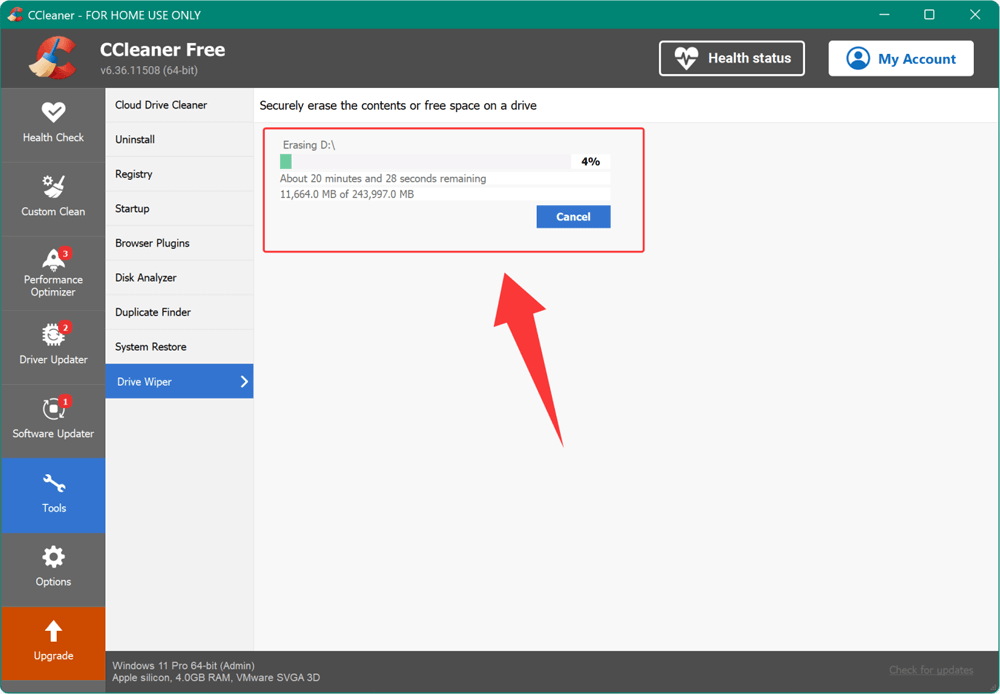
It's best not to use your computer for other tasks during the wipe, especially if you're using an advanced overwrite method.
Step 7: Completion and Post-Wipe Actions
Once the process finishes, you'll see a confirmation message indicating the wipe was successful. If wiping "Free Space Only," you can continue using the drive normally. If wiping "Entire Drive," the drive is now ready for disposal, repurposing, or resale.
Warnings and Best Practices for Drive Wiping
- Double-check before you wipe – Selecting the wrong drive can result in irreversible data loss.
- Don't interrupt the process – Stopping a wipe mid-way can leave corrupted or partially erased data.
- Wiping SSDs – Be cautious. Overwriting SSDs multiple times can degrade their lifespan. Use SSD manufacturer tools when available.
- System Drive Wiping – You cannot wipe the system drive while Windows is running. Use a bootable drive wiping utility for that.
Best Alternatives to CCleaner for Drive Wiping
If CCleaner doesn't meet your needs, several other tools offer drive wiping capabilities:
1. Donemax Data Eraser [Recommended]
- International data erasure algorithms supported.
- 3 data erasure modes: shred files, wipe free space, erase entire drive.
- Intuitive UI and easy-to-use wizard.
- Fully compatible with both Windows and macOS.
2. DBAN (Darik's Boot and Nuke)
- A powerful bootable utility for wiping entire drives.
- Free and supports most drive types.
- Not suitable for SSDs.
3. Eraser
- Windows-based tool for secure file and drive wiping.
- Offers flexible scheduling and custom wipe patterns.
4. Windows Built-in Tools
- Command Prompt with cipher /w:C: to wipe free space.
- Reset this PC (Windows 10/11) with full wipe options.
5. Manufacturer Tools for SSDs
- Samsung Magician, Intel SSD Toolbox, and others offer secure erase functions tailored for SSDs.
Steps to Wipe A Drive with Donemax Data Eraser
Donemax Data Eraser is a professional data specified in data erasure. The software offers more and advanced features to wipe data. With international data erasure algorithms, the software can wipe data fast and permanently. There will be no way to recover the data wiped by the software. Also, the software is easy-to-use with intuitive UI. Here are the steps to wipe a drive with the software:
Step 1. Download and install the software on your computer. The software support both Windows and Mac, check and download the right version.
Donemax Data Eraser
- Reliable data erasure software with 3 data wiping modes.
- Permanently wipe data to prevent data recovery.
- 100% secure and easy-to-use data wiping software.
Step 2. Start Donemax Data Eraser and select the Erase Hard Drive mode to wipe a drive. Choose the right drive you want to wipe.

Step 3. Select a data erasure algorithm from the drop-down list. Note that an algorithm with more passes will take more time.
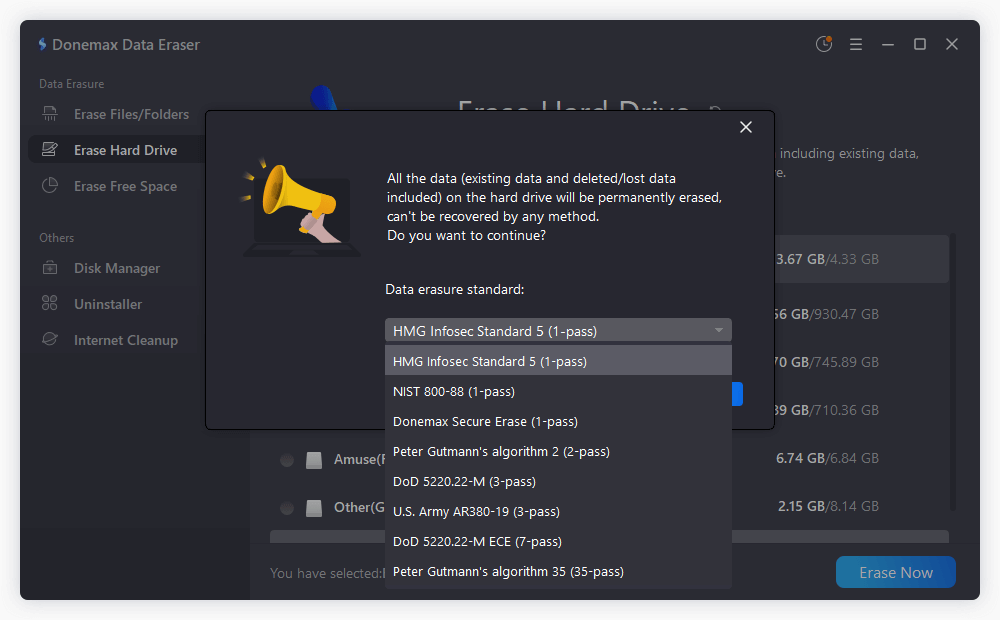
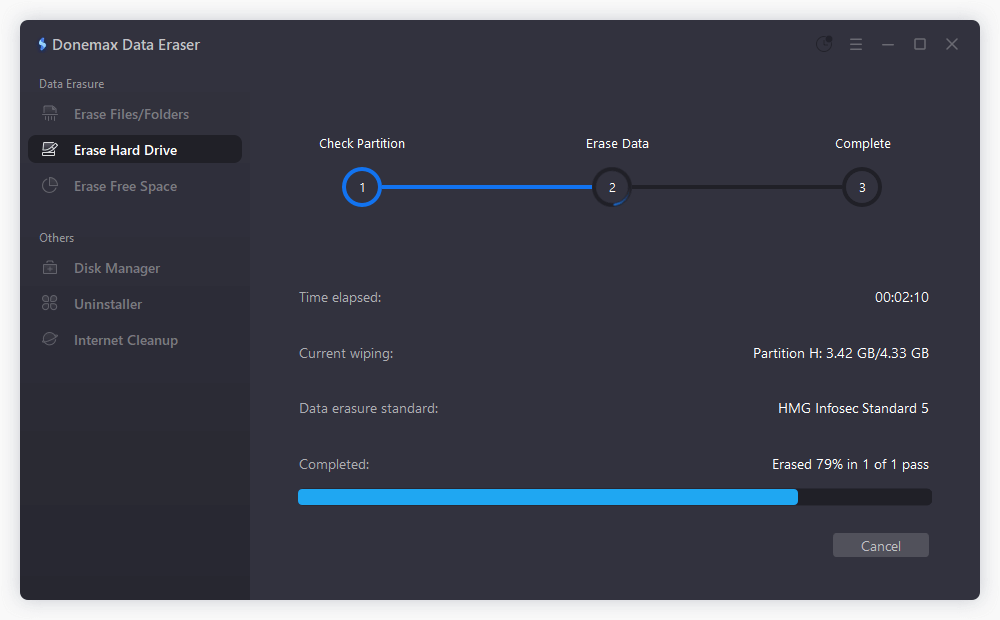
Step 4. Start wiping data from the selected drive. It will permanently wipe data from the drive and ensure the data is gone forever beyond data recovery.
Frequently Asked Questions (FAQs) about Wiping Drive
Yes, if your goal is to remove traces of deleted files while keeping the rest of your data, wiping free space is sufficient.
Not while the OS is running. You'll need to use a bootable disk wiping tool like DBAN or run Windows from an external drive.
Generally, no. If done correctly with multiple passes, data recovery is virtually impossible.
Yes, it's a well-established tool. However, always download from the official website to avoid bundled adware or malicious versions.
Donemax Data Eraser is the best one recommended. The software is specified in data wiping with user-friendly interface. 3 data wiping modes make it flexible to wipe data in different scenarios.
Conclusion
Wiping a drive with CCleaner is a simple yet effective way to protect your personal data and ensure that deleted files are unrecoverable. Whether you're donating an old laptop, selling a USB stick, or just want to clean up sensitive information, CCleaner provides a user-friendly solution to securely erase free space or entire drives. With multiple overwrite options and an intuitive interface, it's a reliable tool for beginners and experienced users alike. If you need advanced features to wipe data, Donemax Data Eraser is the best choice.
Just remember to double-check your drive selection, back up important files, and use appropriate wipe settings depending on your needs. When in doubt, 3-pass wiping offers a good balance between speed and security. For SSDs or advanced scenarios, consider specialized tools. In all cases, taking the time to properly wipe your data is a wise step toward maintaining digital privacy and security.
Donemax Data Eraser
One of the best data erasure programs for permanently erase data from PC, Mac, HDD, SSD, USB drive, digital camera and other devices. Once the data is erased, it is lost for good, cannot be recovered by any method.
Related Articles
- May 10, 2024How to Wipe An USB Flash Drive on Windows 11?
- Apr 25, 2025How to Erase Locked or Encrypted Drive (such as BitLocker or FileVault Drive)?
- Feb 06, 20242025 Two Effective Methods to Wipe HDD?
- Jan 28, 2024How to Wipe Toshiba External Hard Drive?
- May 10, 2025What is DoD Disk Wipe and How to Use It?
- Jun 12, 2023Permanently Erase Data Before Selling A Windows 8/8.1 PC

Contributing Writer
Lucien
Lucien is a writer and a chief programmer of Donemax software who has worked in the company for 5+ years. He has written much of the content on the site and devotes to providing troubleshooting and solution for Windows and Mac users including disk cloning, data recovery, migration, eraser, error fixes.

Editor in chief
Gerhard Chou
In order to effectively solve the problems for our customers, every article and troubleshooting solution published on our website has been strictly tested and practiced. Our editors love researching and using computers and testing software, and are willing to help computer users with their problems