PAGE CONTENT:
The Recycle Bin is a familiar feature on Windows computers, serving as a safety net that temporarily stores deleted files before they are permanently removed. It's a simple but essential tool that helps prevent accidental data loss by allowing users to recover files they've deleted by mistake. However, over time, the Recycle Bin can accumulate unwanted files, occupying valuable disk space. To keep your system running smoothly and free up storage, it's important to regularly wipe the Recycle Bin.
In this article, we will explore why and how to wipe the Recycle Bin on Windows, delve into various methods to achieve this, and discuss best practices to ensure your system remains clean and efficient.
Why Should You Wipe the Recycle Bin?
Free Up Storage Space
One of the primary reasons for wiping the Recycle Bin is to free up disk space. As files accumulate in the Recycle Bin, they still take up space on your hard drive. If you frequently work with large files such as videos, images, or software applications, these can quickly fill up the bin. Wiping it regularly helps maintain an optimal amount of available storage on your computer.
Improve System Performance
An overfilled Recycle Bin can slow down your system. Even though the files are technically deleted, the Recycle Bin still has to manage them, which can take a toll on system performance. This is especially true for older computers or machines with limited memory and processing power. Clearing the bin periodically helps improve overall system efficiency.
Protect Privacy and Security
While files in the Recycle Bin are considered deleted, they can still be recovered with relative ease. Sensitive or personal information that you think has been erased could still be accessible to someone with the right recovery tools. Permanently wiping the Recycle Bin ensures that these files are fully removed and cannot be retrieved, protecting your privacy and security.
Organizational Benefits
Keeping a tidy Recycle Bin is part of maintaining an organized and efficient digital environment. It reduces clutter and helps you better manage your workspace, ensuring that important tasks and files aren't lost amid unnecessary digital debris.
Now that we understand the importance of regularly wiping the Recycle Bin, let's dive into the different ways you can do it on a Windows computer.
How to Wipe the Recycle Bin on Windows: Step-by-Step Methods
Windows provides several methods to clear the Recycle Bin, from quick manual options to automated processes. Below, we cover various approaches depending on your preference and technical expertise.
Method 1: Manually Emptying the Recycle Bin [Files Can Be Recovered]
The easiest and most common method for wiping the Recycle Bin is to do it manually through Windows' graphical user interface. Here’s how:
- On your desktop, right-click the Recycle Bin icon.
- Click the context menu and choose Empty Recycle Bin.
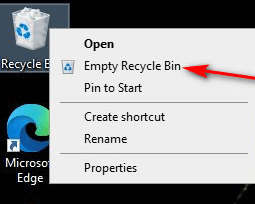
- You'll be prompted to confirm that you really want to remove the files permanently. To confirm, click Yes.
This method is straightforward and effective if you simply want to empty the Recycle Bin once in a while. However, it requires you to remember to do it manually, which can be inconvenient for some users.
Method 2: Wiping the Recycle Bin Using Disk Cleanup
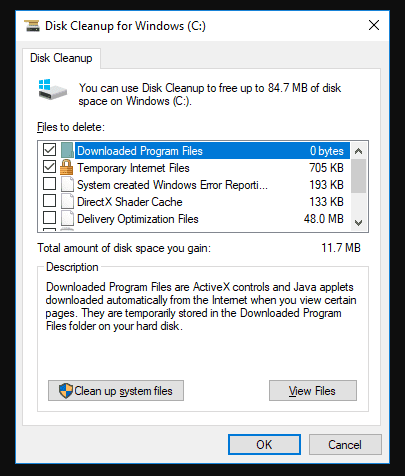
Windows provides a built-in utility called Disk Cleanup, which is designed to help users free up disk space by removing unnecessary files. It can also be used to wipe the Recycle Bin. Here's how:
- Start typing Disk Cleanup by pressing the Windows key.
- Select the Disk Cleanup application from the search results.
- Once opened, the tool will prompt you to select the drive you want to clean. Click OK after selecting the C: disk, which is often where Windows is installed.
- After the tool calculates how much space can be freed, a list of file categories will appear. Check the box next to Recycle Bin.
![Wiping the Recycle Bin Using Disk Cleanup]()
- Click OK and then select Delete Files in the confirmation box.
Disk Cleanup offers a more comprehensive approach to wiping the Recycle Bin, as it also allows you to delete other unnecessary system files, making it a great all-in-one solution for freeing up disk space.
Method 3: Automating the Process with Storage Sense
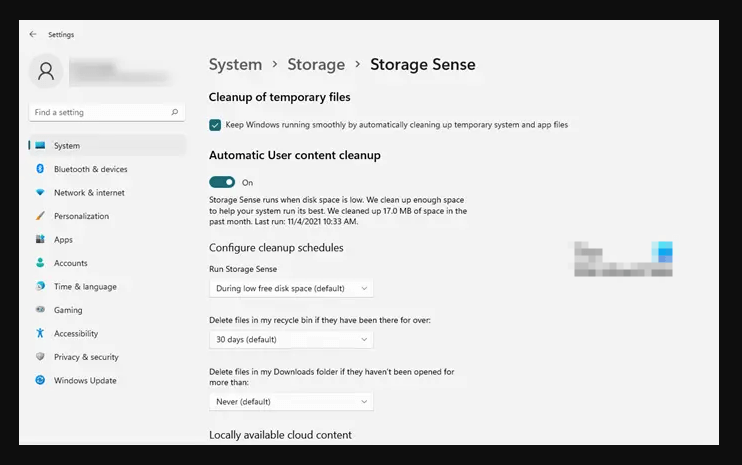
If you often forget to wipe the Recycle Bin, Windows 10 and later versions offer a feature called Storage Sense that can automate this process for you. Here's how you can set it up:
- Open the Settings app by pressing the Windows key and selecting the gear icon.
- Go to System > Storage.
- Toggle on Storage Sense to enable the feature.
- To alter Storage Sense's functionality, click Configure Storage Sense or run it immediately.
- Select the duration (1 day, 14 days, 30 days, or 60 days) and check the box next to Delete items from my Recycle Bin if they have been there for more than under Temporary items.
![Automating the Process with Storage Sense]()
Storage Sense will now automatically empty your Recycle Bin according to the schedule you set, eliminating the need for manual intervention.
Method 4: Using Command Prompt to Wipe the Recycle Bin
For more advanced users, the Command Prompt offers a quick and efficient way to wipe the Recycle Bin. Here's how:
- Press the Windows key and type "cmd".
- From the search results, right-click Command Prompt and choose "Run as administrator."
- In the Command Prompt window, type the following command:
rd /s /q C:\$Recycle.Bin
- Press Enter to execute the command.
This command deletes all files in the Recycle Bin without any confirmation prompts. It’s a quick and efficient method, but should only be used by users comfortable with the Command Prompt, as incorrect commands can cause issues with the system.
Method 5: Wiping the Recycle Bin Using PowerShell
PowerShell is a powerful scripting tool that can be used for various administrative tasks, including wiping the Recycle Bin. Here’s how:
- Type "PowerShell" into the Windows key.
- Click Windows PowerShell using a right-click menu and choose "Run as administrator."
- Enter the following command in the PowerShell window:
Clear-RecycleBin -Force
- Press Enter to execute the command.
Like the Command Prompt method, PowerShell allows for quick deletion of all files in the Recycle Bin. The -Force parameter skips the confirmation prompt, making the process faster.
Method 6: Third-Party Tools for Wiping the Recycle Bin
In addition to the built-in tools offered by Windows, there are several third-party applications available that provide more robust and automated options for managing and wiping the Recycle Bin. Some popular ones include:
- CCleaner: A well-known system optimization tool that includes the ability to wipe the Recycle Bin. CCleaner also offers advanced features such as scheduling and deeper cleaning of temporary files.
- BleachBit: An open-source cleaning tool that can delete files from the Recycle Bin along with other unnecessary data from your system.
- Glary Utilities: Another comprehensive system maintenance tool that can automate the wiping of the Recycle Bin and perform other cleaning tasks.
These tools offer additional features, such as deeper cleaning of residual files, secure deletion to prevent file recovery, and scheduling, making them ideal for users who want more control over their system’s maintenance.
Note: The files which have been emptied from recycle bin are not lost for good and can be recovered by data recovery software.

Recover Deleted Files from Emptied Recycle Bin
Data recovery software can deeply scan the hard drive and find the deleted files which have been emptied from the recycle bin.
Securely Wiping the Recycle Bin: Ensuring Files Can't Be Recovered
While wiping the Recycle Bin using the methods mentioned above will remove files from your system, they can still be recovered with specialized tools. If you want to ensure that files are unrecoverable, you'll need to securely wipe the Recycle Bin using third-party disk wipe software.
Step 1. Download and install the reliable disk wipe software - Donemax Data Eraser on your computer.
Step 2. Open Donemax Data Eraser, choose Erase Hard Drive mode, then select the drive where you delete the files.
Step 3. Click on Erase Now button to wipe free disk space of the drive and permanently erase all already deleted/formatted/lost data from the drive.
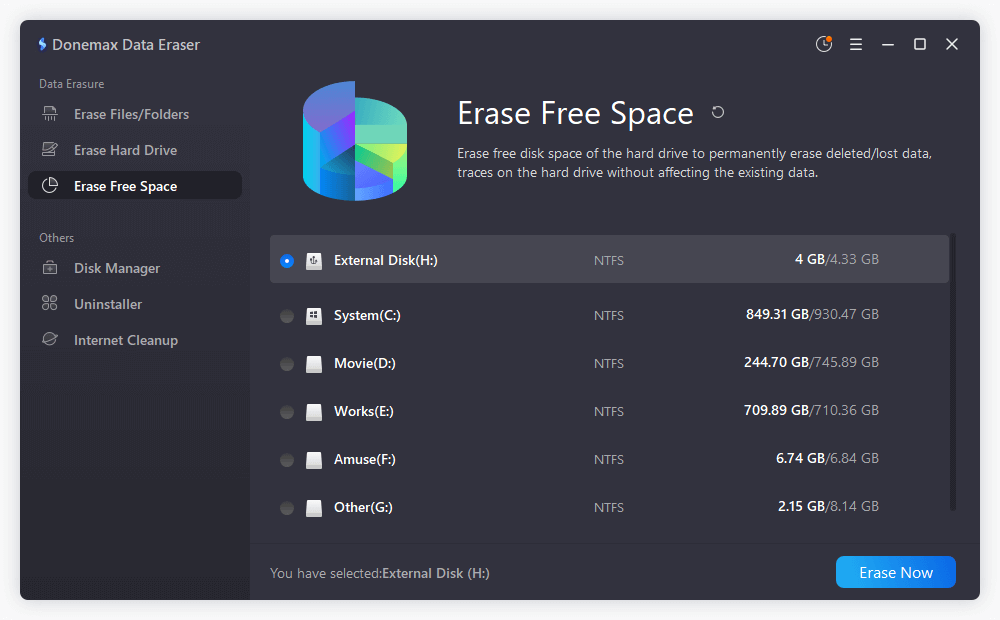
Note: Once the process gets finished, the deleted/formatted/lost data is lost for good, cannot be recovered by any method.
Best Practices for Managing the Recycle Bin
Set a Regular Schedule:
To keep your system running smoothly and avoid wasting disk space, it's a good idea to set a regular schedule for wiping the Recycle Bin. You can either do this manually, use Windows' built-in Storage Sense feature, or set up scheduled cleanups using third-party software like CCleaner.
Keep an Eye on File Sizes:
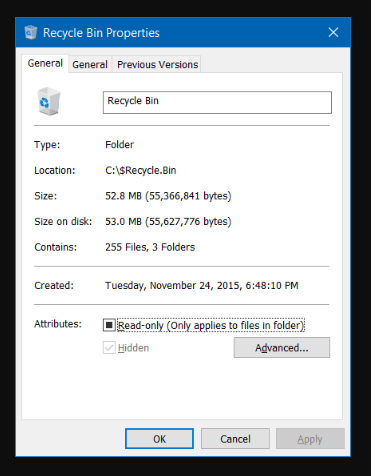
If you frequently work with large files, such as video or graphic design projects, you should pay close attention to the size of your Recycle Bin. Windows allows you to adjust the maximum size of the Recycle Bin, ensuring it doesn't take up too much space on your hard drive. You can adjust the size by right-clicking the Recycle Bin, selecting Properties, and setting a custom size limit.
Secure Deletion for Sensitive Files:
For files that contain sensitive or personal information, consider using secure deletion methods or file-shredding tools to ensure that the data is truly unrecoverable.
Backup Important Data:
Before permanently deleting files, make sure to back up any important data you might need in the future. A cloud storage service or external hard drive can help you keep a copy of crucial documents and projects.
Check how to create a full bootable clone backup for Windows >>
Conclusion
Wiping the Recycle Bin on Windows is a simple yet essential task for maintaining system performance, freeing up disk space, and protecting your privacy. Whether you prefer manual methods, built-in automation like Storage Sense, or advanced tools such as Command Prompt or PowerShell, there are numerous ways to achieve this task. For users dealing with sensitive data, secure deletion tools provide an extra layer of protection, ensuring that your files are truly gone for good. By incorporating these methods and best practices into your routine, you can keep your Windows system clean, efficient, and secure.
Related Articles
- Feb 26, 2025Fix Memory Stick Not Showing Up on Windows Without Losing Data
- Oct 23, 2024How to Format a Drive to FAT32?
- Dec 05, 2025Free PC Health Check Software for Windows 11/10
- Feb 17, 202510 Fixes for Fixing External Hard Drive Not Showing Up in File Explorer or This PC
- Feb 07, 2025Fix Windows 10 Not Detecting My Seagate External Hard Drive
- Oct 09, 2024Fix Error Code 43 on Windows: A Comprehensive Guide

Coco Lin
Coco has been a writer and a chief programmer at Donemax software since 2018. Over 10 years of experience of writing troubleshooting articles in the software industry, she is passionate about programming and loves to providing solutions to Windows and Mac users. Also she enjoys music and palying tennis in her free time.

Gerhard Chou
In order to effectively solve the problems for our customers, every article and troubleshooting solution published on our website has been strictly tested and practiced. Our editors love researching and using computers and testing software, and are willing to help computer users with their problems
