
Written byMariaUpdated on Jun 06, 2025
Clone Hard Drive with Command Prompt
Approved byGerhard Chou
Before we start: There are different command-line tools you can choose to clone hard drive with Command Prompt. Also, you can use the easy-to-use software Donemax Disk Clone to copy disk.
PAGE CONTENT:
Cloning a hard drive refers to creating an exact copy of the data, partitions, and system files on a hard disk drive (HDD) or solid-state drive (SSD). It is an essential operation for various reasons, including upgrading to a larger or faster disk, creating a backup of important data, or transferring all data from an old drive to a new one. While many third-party software tools offer a graphical interface to clone a hard drive, it is also possible to clone hard drive using Command Prompt on Windows. This approach may appeal to users who prefer the command-line interface, have limited system resources, or want to learn more about disk management at a deeper level.
In this article, we will discuss how to clone a hard drive using Command Prompt, including the prerequisites, basic commands, and step-by-step instructions. Additionally, we'll cover troubleshooting tips and alternative methods for users who may encounter difficulties during the cloning process.
Understanding Disk Cloning
Disk cloning involves copying everything from one drive to another. Unlike a simple file copy, disk cloning duplicates the entire content of the source drive, including the operating system, installed software, system settings, partitions, and even empty space. This results in a bootable copy of the original drive, making it useful for upgrading to a new disk without needing to reinstall Windows or applications.
A crucial distinction should be made between cloning and other methods such as backing up or imaging. When you back up a drive, you're usually creating a compressed file of your data, whereas cloning creates an exact, sector-by-sector replica of the original drive.
There are several use cases for cloning a hard drive:
- Upgrading to a Larger or Faster Drive: If you are upgrading your hard drive to a new, more spacious one, cloning allows you to transfer everything seamlessly.
- Creating a Backup: Disk cloning is an excellent method for creating a full backup of your system in case of hardware failure or other issues.
- Data Migration: If you need to migrate data to a new system, cloning can help preserve your existing setup, including your operating system and software.
Prerequisites for Hard Drive Cloning via Command Prompt
Before attempting to clone a hard drive, it's essential to ensure that the process goes smoothly. Here are the key prerequisites you should have in place:
- Source Hard Drive: This is the drive you want to clone. It contains all the data you need to copy to the destination disk. It can be an internal or external hard drive, and it may contain an operating system, software programs, documents, and other personal files.
- Destination Hard Drive: The destination disk is where the cloned data will be copied. This drive should have at least as much storage capacity as the source drive. If you're upgrading to a larger drive, make sure that the destination disk has enough space to hold all the data from the source drive.
- Command Prompt: You will use Command Prompt to run the necessary commands. For full access to system resources, make sure to open Command Prompt with administrative privileges.
- Backup: Always back up your important files before cloning any drive. Although cloning should be a safe process, it's better to be cautious in case anything goes wrong.
- Windows Operating System: Ensure that your computer is running a version of Windows that supports Command Prompt. The process discussed in this article works on all modern versions of Windows, including Windows 10 and Windows 11.
Steps to Clone Hard Drive with Command Prompt
Step 1. Accessing Command Prompt
To clone a hard drive, you will need to use the Command Prompt. Here's how to access it:
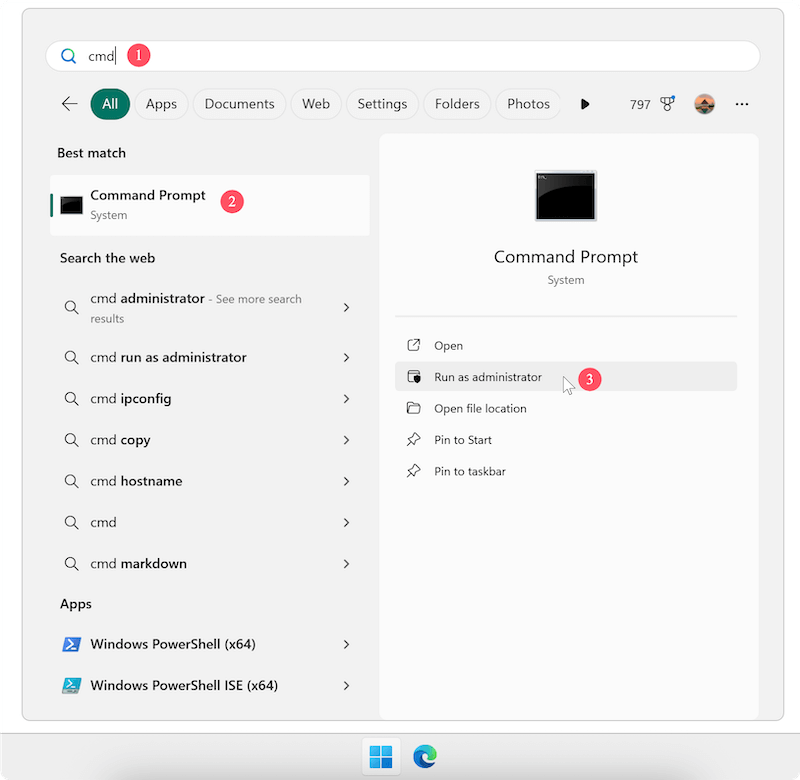
- Open Start Menu: Click on the Start menu and type "cmd" in the search bar.
- Run as Administrator: Right-click the "Command Prompt" option and choose "Run as administrator." This ensures that you have the necessary permissions to modify disk structures.
Step 2. Using Diskpart to List and Locate Drives
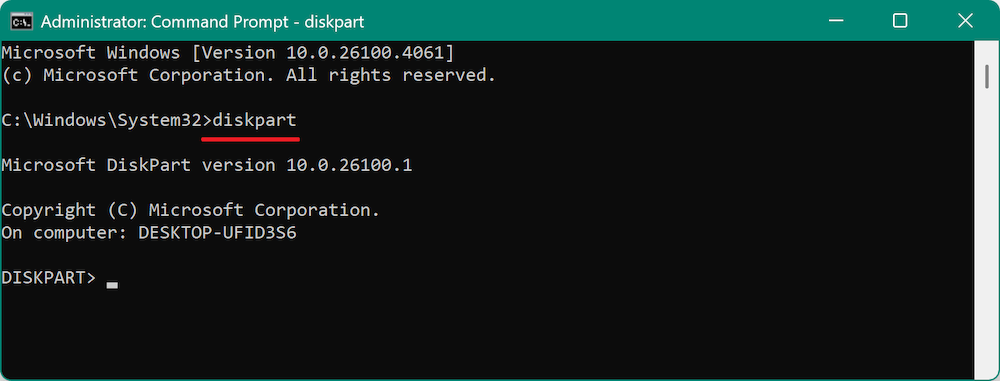
The diskpart utility is a command-line tool that enables you to manage disks, partitions, and volumes. Before cloning, you must identify and select the source and destination disks.
- Type the following command to start the Diskpart utility:
diskpart
![clone hard drive with Command Prompt]()
- Once inside diskpart, list all the connected disks by typing:
list disk
![clone hard drive with Command Prompt]()
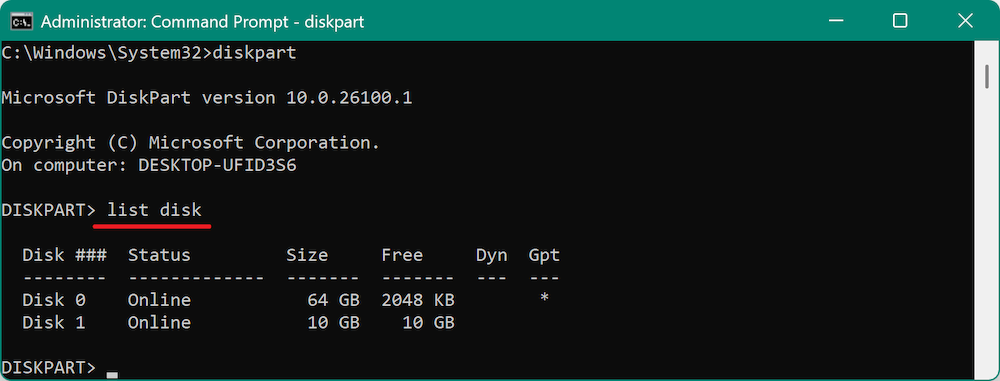
This will display a list of all the disks connected to your system. The disks will be numbered (e.g., Disk 0, Disk 1). Identify your source and destination disks by their sizes.
Step 3. Cloning the Hard Drive
There are multiple ways to clone a hard drive using Command Prompt, depending on the method you choose. The two most common ways are using xcopy or robocopy for file-based cloning and third-party utilities like dd for sector-by-sector cloning.
Option 1. Using xcopy (File-Based Cloning)
xcopy is a simple command that allows you to copy files from one directory to another. However, it doesn't handle system files, boot sectors, or hidden files. For basic file cloning, you can use xcopy to clone the contents of the source disk.
- Command:
xcopy E:\ F:\ /E /H /K /O /X
- Replace D: with the letter of the source disk.
- Replace E: with the letter of the destination disk.
- /E copies all subdirectories, including empty ones.
- /H copies hidden files.
- /K, /O, /X maintain permissions and ownership info.
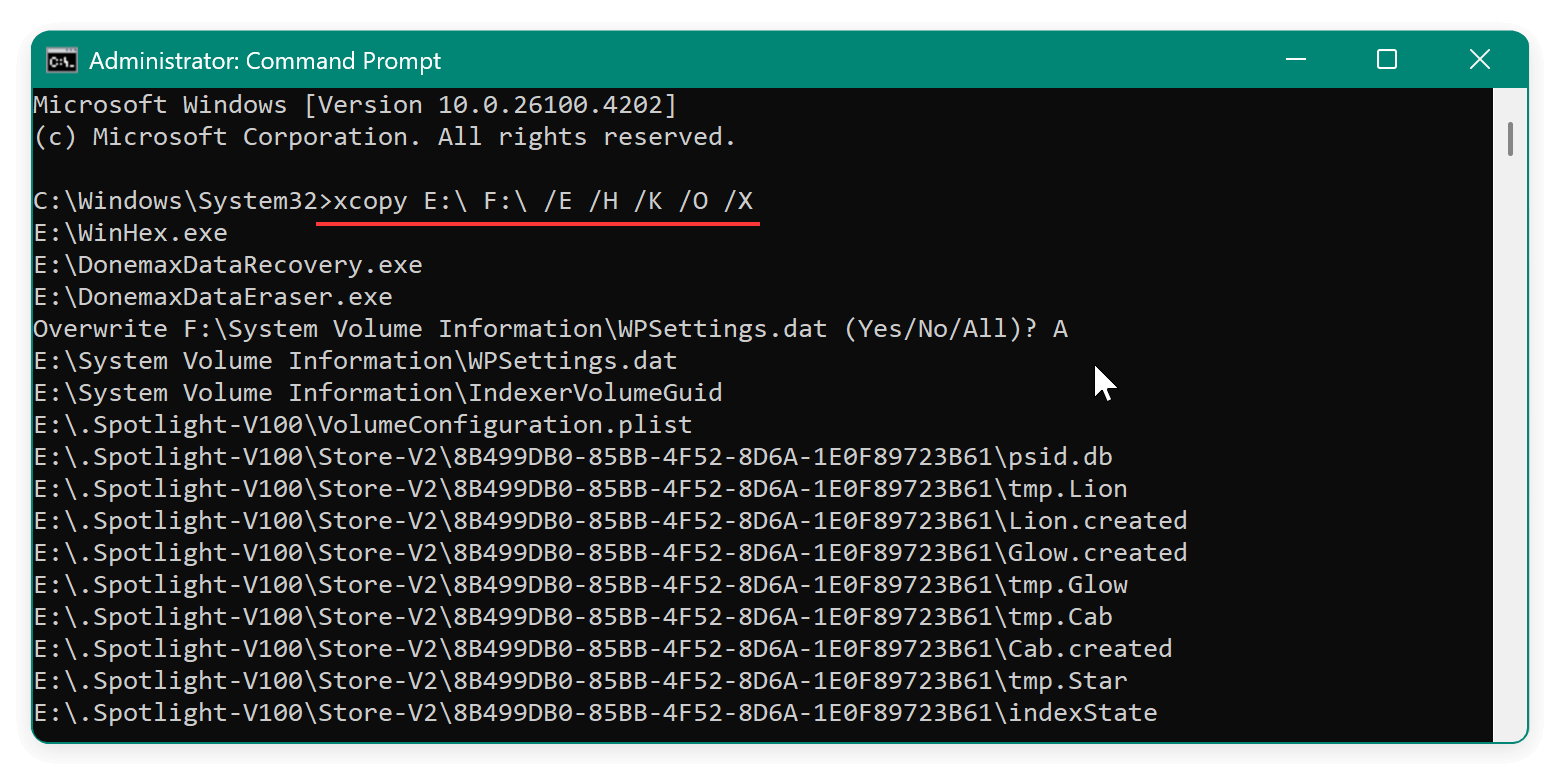
While this approach works for copying files, it's not a true cloning process, as it doesn't replicate the entire disk structure.
Option 2. Using robocopy (Advanced File-Based Cloning)
robocopy is another command-line utility that is more robust than xcopy. It is capable of copying larger directories and handling file permissions more effectively.
- Command:
robocopy E:\ F:\ /MIR /COPYALL /XJ
- Replace E: with the letter of the source disk.
- Replace F: with the letter of the destination disk.
- /MIR mirrors the directory structure.
- /COPYALL copies all file attributes (including timestamps, permissions, etc.).
- /XJ excludes junction points to prevent loops.
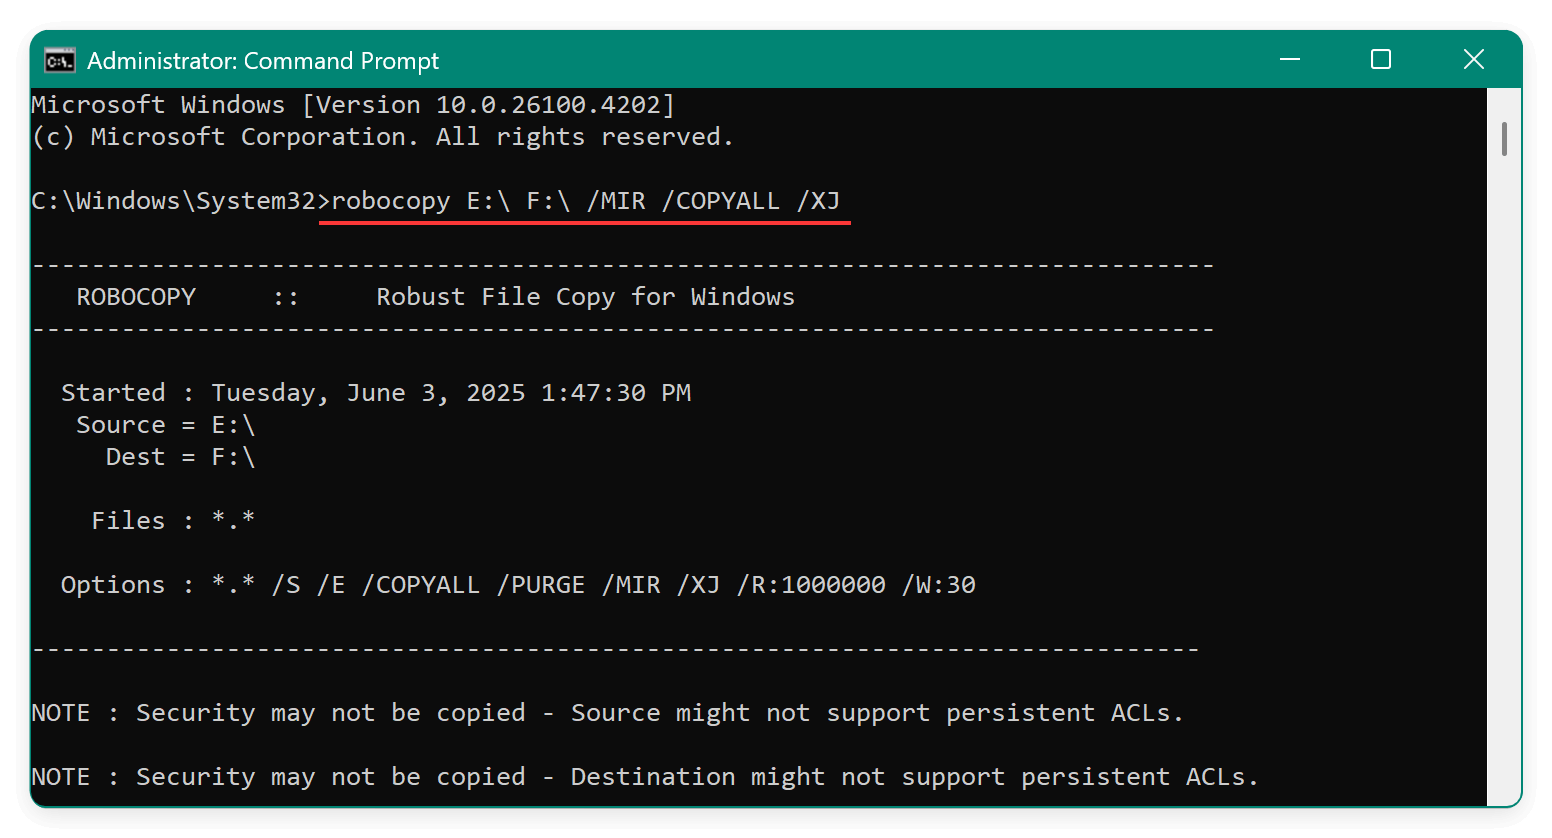
While robocopy is more reliable than xcopy, it still cannot clone the operating system, boot records, or hidden partitions.
Options 3. Using dd (Sector-by-Sector Cloning)
For a true, bit-by-bit clone of your drive, you can use dd, a Unix-based utility that copies data sector-by-sector. Though not natively available on Windows, you can install a version of dd via Cygwin or use a third-party tool like "dd for Windows."
- Command:
dd if=/dev/sda of=/dev/sdb bs=4096 status=progress
- if specifies the input file (source disk).
- of specifies the output file (destination disk).
- bs=4096 sets the block size to 4 kilobytes.
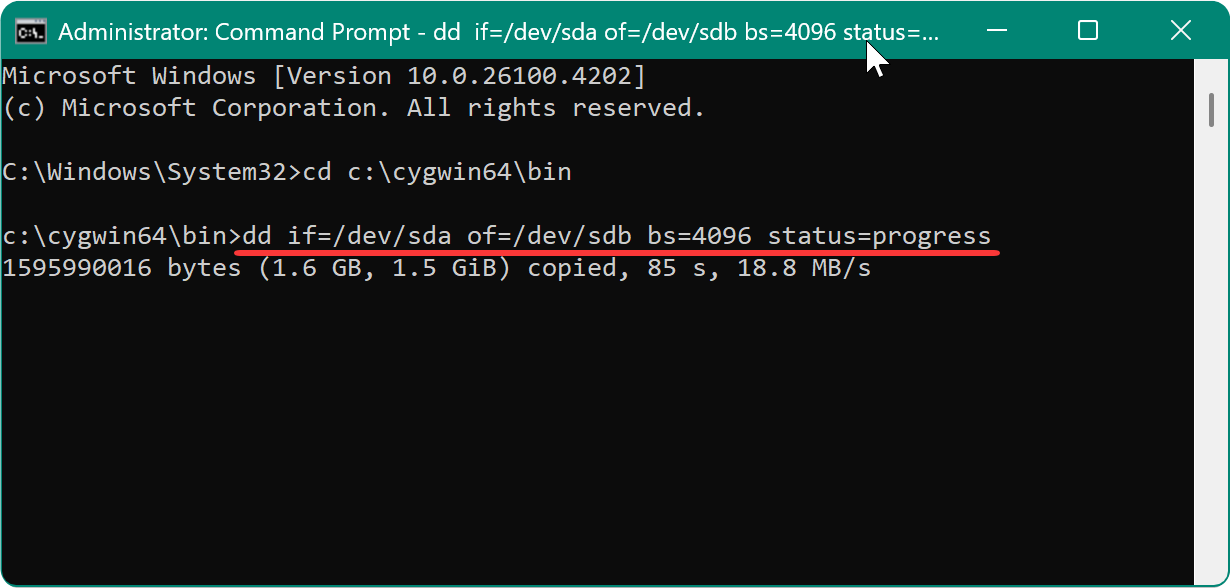
This method creates an exact, byte-for-byte copy of the source disk, including the boot sector, operating system, partitions, and all other data.
Step 4. Verifying the Cloning Process
After the cloning process is complete, it's essential to verify that the cloning was successful and that the destination drive contains all the necessary data.
- Check Data Integrity: You can manually check the files and directories on the destination drive to ensure they match the source drive. Compare the total file sizes and ensure that all files are present.
- Boot from the Destination Disk: If you cloned a system drive, try booting from the destination disk to verify that it functions properly. You may need to adjust BIOS settings to boot from the cloned disk.
Troubleshooting Common Hard Drive Cloning Issues
While cloning a hard drive with Command Prompt is straightforward, there are several potential issues that users may encounter:
- Insufficient Space: If the destination drive is too small to hold all the data from the source drive, the cloning process will fail. Always check that the destination disk has enough space before starting.
- Access Denied Errors: If you encounter permission issues, ensure that you're running Command Prompt as an administrator and that no files on the source disk are in use.
- Bad Sectors: If the source disk has bad sectors, the cloning process may fail. Consider using disk repair tools to check the health of the source disk before cloning.
- Boot Issues: After cloning a bootable drive, if the destination disk isn't bootable, you may need to repair the boot record. You can use Windows Recovery Environment (WinRE) to repair boot issues.
Alternative Methods and Tools to Clone Hard Drive
While Command Prompt offers a powerful method for cloning drives, there are alternative tools and methods that may be more user-friendly:
Option 1. Third-Party Cloning Software
Tools like Donemax Disk Clone provide a more intuitive graphical interface for cloning drives. These tools offer advanced and easy-to-use features. Here we will show you how to easily clone hard drive with the software steps by step:
Step 1. Download and install the software. Check and ensure to download the right version for your computer.
Donemax Disk Clone
- Professional hard drive cloning software.
- Compatible with both Windows and Mac.
- Make exact and bootable clone for system.
Step 2. Run the software Donemax Disk Clone and select Disk Clone mode. Choose the right source and destination disks.

Step 3. Preview the disk layout and modify it if necessary. If the destination drive is an SSD, tick "Check the option if the destination is SSD."

Step 4. Click Clone button to start the disk cloning process. It will clone everything from the source drive to the destination drive.
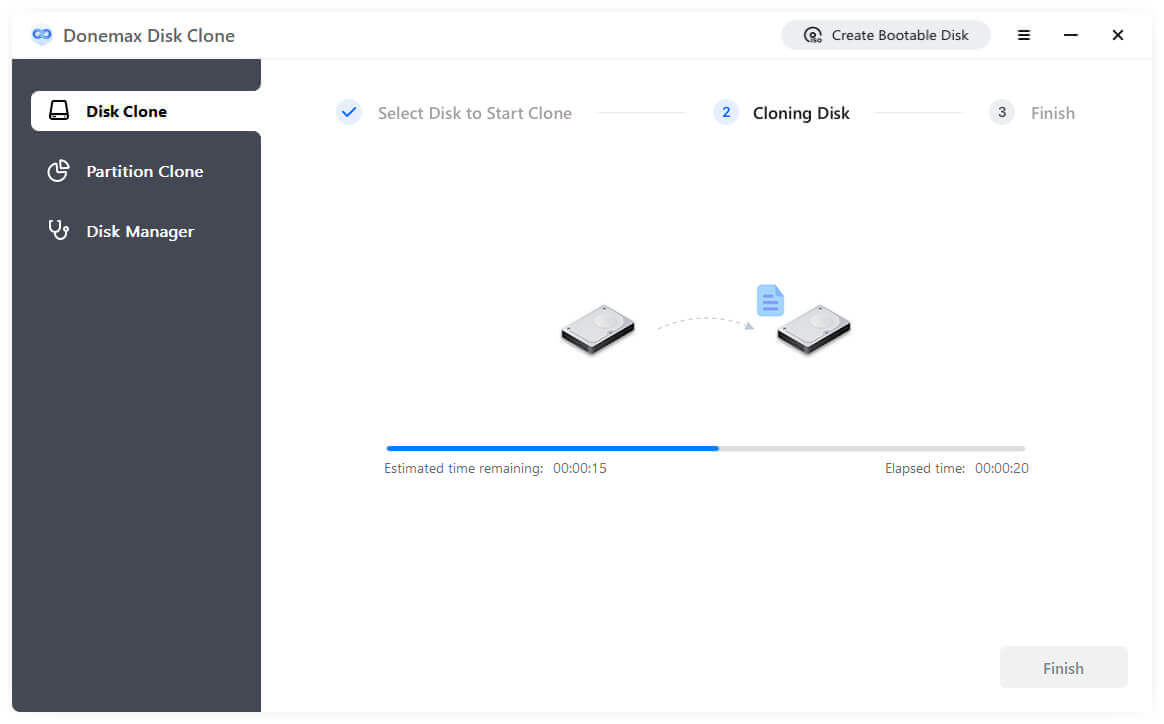
After the disk cloning is finished, you can then check the data on the destination drive to confirm if the disk cloning is successful or not. If the source disk is a system disk, the cloned disk will also be bootable.
Options 2. Disk Imaging
Unlike cloning, disk imaging creates a compressed file of the disk's contents. This can be restored to another drive when needed, though it doesn't provide the same immediate bootability as cloning.
Conclusion
Cloning a hard drive using Command Prompt is a valuable skill for users who prefer the command line or want to avoid third-party software. The process involves using tools like diskpart, xcopy, and robocopy to copy files or dd for sector-by-sector cloning. While it requires some technical knowledge, it's an effective method for transferring data and upgrading hard drives.
Whether you need to back up important files, migrate to a larger drive, or simply perform a system upgrade, understanding how to clone a hard drive with Command Prompt or disk clone software can save time and effort. Always make sure to back up your data before proceeding and verify that the cloning process is successful to avoid data loss.
Donemax Disk Clone
An award-winning disk cloning program to help Windows users and Mac users clone HDD/SSD/external device. It also can create full bootable clone backup for Windows PCs and Macs.
Related Articles
- Apr 21, 2024How to Replace A Hard Drive in HP Laptops
- Apr 30, 2025How to Clone a Hard Drive to a USB Drive: A Step-by-Step Guide
- Jun 21, 2023Best Disk Cloning Software in 2025 [Windows 11 Supported]
- Sep 19, 2023Clone A Hard Drive With Bad Sectors
- May 17, 2024How to Clone Windows 8 or 8.1 to A SSD?
- Jun 03, 2025How to Clone an exFAT Drive to a FAT32 Drive?

Contributing Writer
Maria
Maria is one of the senior writers & editors of Donemax who lives and works in Sydney, Australia. She loves PC, Mac and Internet Technology. She has 6 years of writing articles about data recovery on PC/Mac, disk cloning solution, data eraser and computer OS optimization, etc. She is also interested in testing various software and digital products.

Editor in chief
Gerhard Chou
In order to effectively solve the problems for our customers, every article and troubleshooting solution published on our website has been strictly tested and practiced. Our editors love researching and using computers and testing software, and are willing to help computer users with their problems