
Written byChristinaUpdated on Apr 29, 2025
How to Clone SD Card to a USB Drive or External Disk?
Approved byGerhard Chou
Before we start: How to clone an SD card to an USB drive or external disk? You can just copy files from the SD card to the USB drive/external disk or use disk cloning program - such as Donemax Disk Clone to clone everything from the SD card to the USB drive or external disk.
PAGE CONTENT:
Cloning an SD card to a USB drive or external disk is a practical solution for data backup, system migration, or creating a one-to-one copy of your media card. Whether you're duplicating an SD card used in cameras, Raspberry Pi systems, or other embedded devices, cloning ensures you get an exact replica - including partitions, boot records, and system files.
In this guide, we'll walk you through why you might want to clone an SD card, the tools required, and detailed step-by-step instructions using multiple methods for Windows, macOS, and Linux. By the end of this article, you'll be equipped to perform a safe, successful clone of your SD card to a USB or external drive.
Why Clone an SD Card to USB or External Disk?
There are several reasons to clone an SD card:
- Backup important data: Cameras, smartphones, and IoT devices often save critical information on SD cards. A clone keeps your data safe from corruption or accidental deletion.
- Migrate to larger storage: You might want to move from a smaller SD card to a larger USB drive or external disk.
- Preserve bootable systems: Systems like Raspberry Pi OS or Android emulators rely on bootable SD cards. A cloned copy can serve as a recovery solution if the original fails.
- Simplify troubleshooting: Keeping a cloned version of an SD card allows developers or users to quickly restore a known-good state.
Things You'll Need Before Cloning
Before diving into the cloning process, gather the following:
- SD card with the data you want to clone.
- USB drive or external hard disk (must be the same size or larger than the SD card).
- SD card reader (if your PC doesn't have a built-in slot).
- Cloning software (we'll cover both graphical and command-line tools).
- Computer running Windows, macOS, or Linux.
⚠️ Backup warning: Cloning overwrites data on the destination disk. Make sure there's nothing important on your USB or external drive before starting.
Steps to Clone SD Card to USB Drive or External Disk
Donemax Disk Clone is a powerful disk cloning program. It supports to securely and easily clone an SD card to an USB drive or external disk.
Step 1. Click on Download button below to download Donemax Disk Clone on your computer, then install it.
Step 2. Connect the SD card and the USB drive or external disk to your computer.
Step 3. Choose Disk Clone mode, then select the SD card as the source disk and select the USB drive or external disk as the destination disk.

💡 Note: If you want to perform a sector-by-sector clone, just tick "Sector-by-sector clone."
Step 3. You can preview the clone layout and edit it, then click on Clone button to completely clone the SD card to the USB drive or external disk.

More methods for cloning SD card to USB drive or external disk:
Method 1: Clone SD Card to USB Using Win32 Disk Imager (Windows)
Win32 Disk Imager is a free tool that reads and writes raw disk images - perfect for cloning SD cards.
Steps:
- Download and install Win32 Disk Imager.
- Insert the SD card into your PC via a reader.
- Open the software and choose the SD card as the source device.
- Click "Read" to create an image file (.img) from the SD card. Save it to your PC.
- Insert the USB or external drive you want to clone to.
- Select the new destination drive.
![Cloning an SD card to a USB drive or external disk]()
- Click "Write" and choose the image file you created earlier.
- Confirm and begin writing. Once complete, your USB drive is now a cloned copy of the SD card.
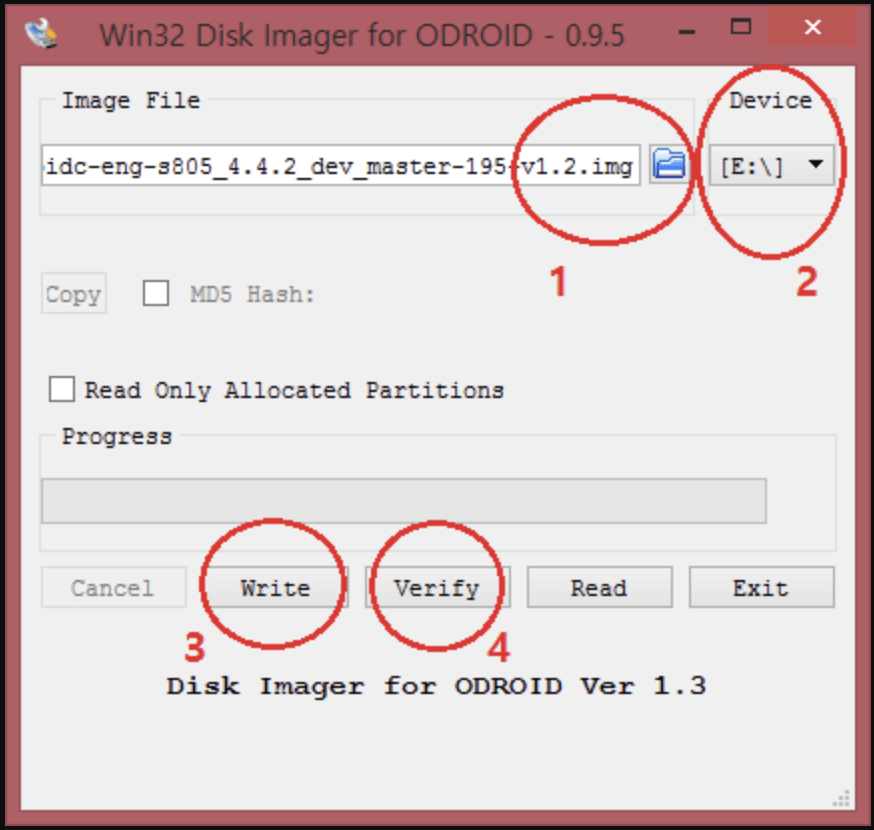
💡 Tip: Use USB 3.0 ports and drives for faster performance.
Method 2: Clone SD Card Using Clonezilla (Windows, macOS, Linux)
Clonezilla is a powerful, free, and open-source disk cloning tool. It works by booting from a live USB.
Steps:
- Download Clonezilla ISO from clonezilla.org.
- Create a bootable Clonezilla USB using Rufus or balenaEtcher.
- Boot your PC from the Clonezilla USB (you may need to change BIOS/UEFI settings).
- Choose "device-device" mode for direct disk cloning.
![Cloning an SD card to a USB drive or external disk]()
- Select source disk (SD card) and target disk (USB or external disk).
- Confirm the operation and start the cloning.
- Wait for the process to finish and shut down your PC.
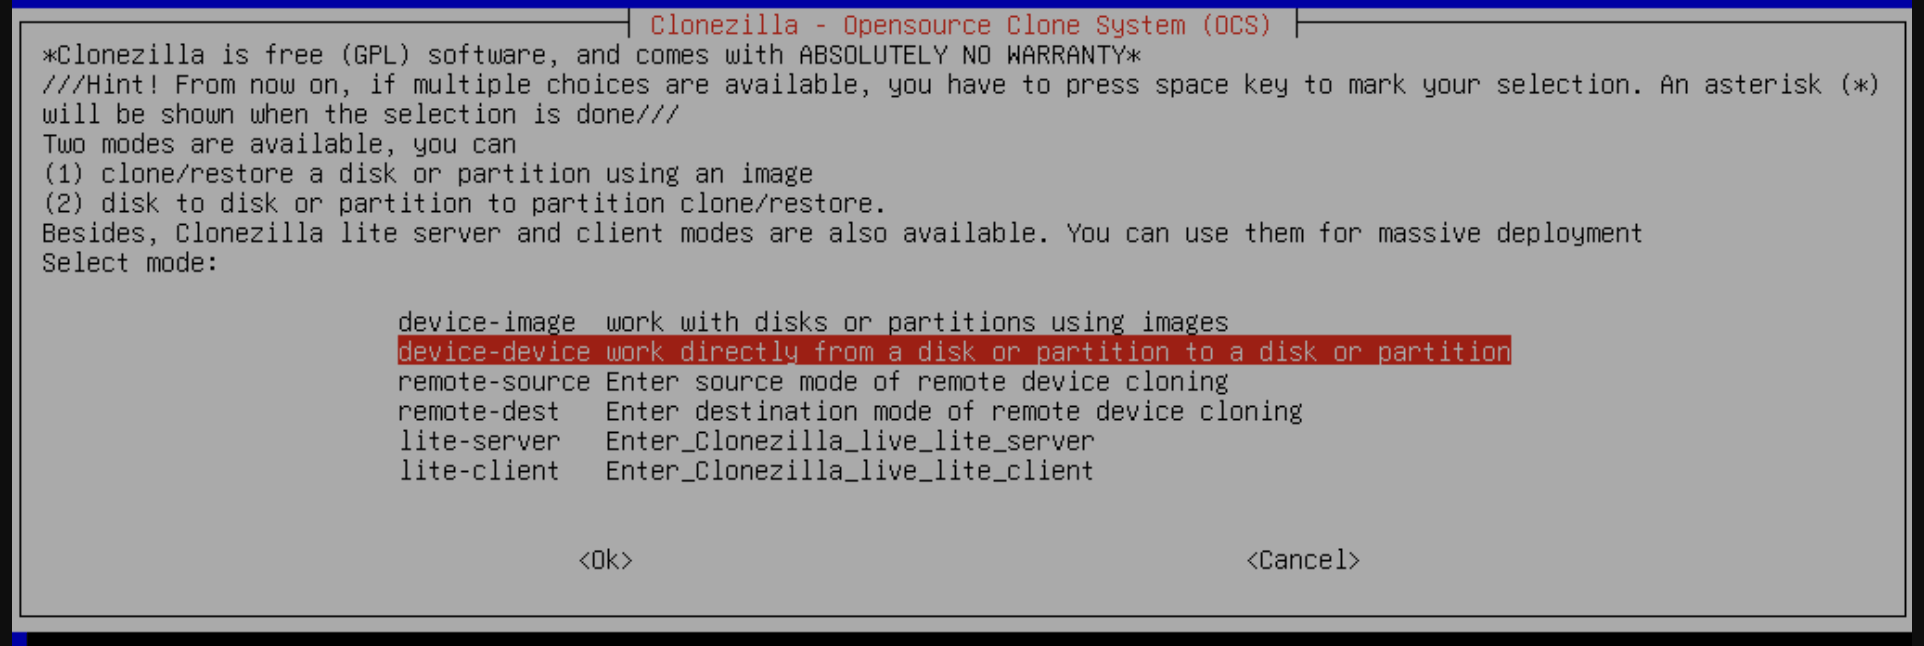
⚠️ Warning: Clonezilla uses a text-based UI, so proceed carefully to avoid overwriting the wrong disk.
Method 3: Clone SD Card Using dd on macOS or Linux
The dd command is a powerful UNIX utility that can clone storage bit-for-bit. It's ideal for experienced users who prefer the command line.
Steps:
- Insert the SD card and USB drive.
- Open Terminal and type:
diskutil list # macOS
Identify the correct device paths (e.g., /dev/disk2, /dev/sdb).
- Unmount the SD card and destination drive:
diskutil unmountDisk /dev/disk2 # macOS
- Run the dd command:
sudo dd if=/dev/disk2 of=/dev/disk3 bs=4m status=progress
Replace disk2 with your SD card and disk3 with your USB/external disk. - Wait — it may take a while depending on SD card size and speed.
- Once done, eject both drives safely.
💡 Pro tip: You can also create a compressed image by piping through gzip:
sudo dd if=/dev/disk2 | gzip > sd_backup.img.gz
Tips for a Successful SD Card to USB Drive/External Disk Clone
Cloning an SD card might seem straightforward, but small mistakes can lead to wasted time or even data loss. To ensure your cloning process goes smoothly and your copied drive works as intended, keep the following tips in mind:
1. Double-Check Source and Destination Drives
One of the most common and dangerous mistakes when cloning is selecting the wrong drive. This can result in overwriting your original SD card or other important drives.
- Always verify device paths before proceeding, especially if using tools like dd, Clonezilla, or any tool that doesn't label drives by name.
- In Windows, use Disk Management (diskmgmt.msc) to identify the correct drive letters and sizes.
- On macOS or Linux, use diskutil list or lsblk to verify device names and mount points.
💡 Pro Tip: Label your devices beforehand (e.g., rename USB to “BackupDrive”) to avoid confusion.
2. Unmount Drives Before Cloning (macOS/Linux)
Before cloning with terminal-based tools, unmount the file systems to ensure that the tool can access the device directly.
- Use diskutil unmountDisk /dev/disk2 on macOS.
- On Linux, use umount /dev/sdb1 or umount /media/yourusername/sdcard.
This step prevents read/write conflicts and ensures all data is flushed to the disk.
3. Use Reliable SD Card Readers and USB Hubs
Poor-quality card readers can cause timeouts, corrupted data, or failed clones. Always use:
- A USB 3.0-compatible reader for faster data transfer (backward compatible with USB 2.0).
- Direct USB ports on your computer rather than unpowered USB hubs, which can drop connections under load.
If your device frequently disconnects, try using a different cable, port, or reader.
4. Keep Your System Idle During the Process
To minimize the risk of interference during cloning:
- Avoid running heavy applications or disk-intensive tasks in the background.
- On laptops, disable sleep mode and ensure you're connected to power.
- Close unnecessary background services (especially antivirus or disk indexing tools) that could access the drives.
5. Always Clone to a Drive of Equal or Greater Size
While some tools can resize partitions during cloning, it's safest to use a destination disk that is:
- Equal to or larger than the SD card’s total capacity (not just used space).
- Fully formatted or cleaned beforehand (optional, but helps with compatibility).
You can use tools like DiskPart (Windows) or GParted (Linux) to prepare the target drive before cloning.
6. Perform a File System Check After Cloning
After the cloning process, it's a good idea to verify the integrity of the file system:
- On Windows: Run chkdsk on the cloned drive.
- On Linux/macOS: Use fsck on the appropriate device.
This step ensures the file system has been cloned correctly and helps resolve minor issues automatically.
7. Make the Clone Bootable (If Needed)
If you're cloning a bootable SD card (e.g., for Raspberry Pi OS or Android), the clone must retain bootloader and partition structure:
- Most raw cloning tools (e.g., dd, Clonezilla) preserve boot information automatically.
- If the cloned USB drive doesn't boot, you might need to restore the bootloader using tools like Boot Repair (Linux) or BCDBoot (Windows).
8. Use Verifiable Cloning Tools That Offer Checksums
Tools like Clonezilla offer integrity verification using checksums before and after the clone. Enabling this adds extra time but ensures:
- No data corruption occurred during cloning.
- The source and destination are byte-for-byte identical.
If you use dd, you can manually compare image hashes using:
md5sum /dev/sdX
9. Store the Cloned Image Safely
If you created an image file (e.g., .img or .iso) instead of cloning directly to another disk:
- Store it in two separate physical locations (e.g., cloud + external drive).
- Consider encrypting sensitive backups using tools like VeraCrypt or LUKS.
10. Test the Clone Before Relying on It
Before deleting your original SD card or moving forward with your project:
- Boot from the cloned drive if it's meant to be bootable.
- Open a few important files or run applications to make sure they work.
- If cloning a development environment or device OS, connect it to the actual hardware for a live test.
What to Do After Cloning
Once cloning is complete, you can:
- Verify the contents of the USB/external disk.
- Test bootability, if you cloned a system card like Raspberry Pi OS.
- Label or document the clone for future reference.
- Encrypt the cloned copy for added security, if necessary.
- Use partitioning tools (e.g., Disk Management on Windows or gparted on Linux) to resize volumes if you cloned to a larger drive.
Troubleshooting Common Issues
Cloned drive doesn't show up
- Use Disk Management (Windows) or diskutil list (macOS) to check if the drive needs to be initialized or mounted.
Cloning process is stuck
- This may occur with large SD cards or slow drives. Wait at least 10-15 minutes before canceling. If it hangs indefinitely, cancel and retry with another tool.
Boot failure from cloned media
- Ensure the destination drive is marked as active/bootable.
- Some systems might require the bootloader to be manually reinstalled.
"Device is busy" errors in Linux/macOS
- Make sure all volumes are unmounted before running cloning commands. Use lsof or fuser to find which processes are using the disk.
Conclusion
Cloning an SD card to a USB drive or external disk is an efficient and secure way to back up data, migrate to new storage, or replicate a working system environment. Whether you prefer a user-friendly tool like Donemax Disk Clone, Win32 Disk Imager or the flexibility of dd, there's a solution that fits your skill level and OS.
Just remember: always double-check your source and destination drives, and test the clone before making changes to the original. With the right tools and steps, you can confidently preserve and replicate your SD card data.
Donemax Disk Clone
An award-winning disk cloning program to help Windows users and Mac users clone HDD/SSD/external device. It also can create full bootable clone backup for Windows PCs and Macs.
Related Articles
- Apr 11, 2024How to Replace M.2 SSD in PC?
- Jun 04, 2026Ultimate Ghost Clone Guide & Best Ghost Clone Alternatives
- Apr 16, 2024How to Upgrade HDD to SSD on Windows 7?
- Jun 19, 2024How to Upgrade Microsoft Surface Pro SSD?
- Feb 06, 2026Best Disk Cloning Software for Windows 10
- Jun 04, 2025How to Upgrade My Computer SSD to WD Black SN850X?

Contributing Writer
Christina
Christina is the senior editor of Donemax software who has worked in the company for 4+ years. She mainly writes the guides and solutions about data erasure, data transferring, data recovery and disk cloning to help users get the most out of their Windows and Mac. She likes to travel, enjoy country music and play games in her spare time.

Editor in chief
Gerhard Chou
In order to effectively solve the problems for our customers, every article and troubleshooting solution published on our website has been strictly tested and practiced. Our editors love researching and using computers and testing software, and are willing to help computer users with their problems