Written byCoco LinUpdated on Feb 26, 2026
Data Loss after Upgrading from Windows 10 to 11, How to Recover?
Approved byGerhard Chou
Before we start: If you lost data due to upgrading from Windows 10 to Windows 11, you can first check the Windows.old folder, backups, and temp account folders. Otherwise,m you can still recover the missing files with the recovery software Donemax Data Recovery.
PAGE CONTENT:
Upgrading to Windows 11 promises a fresh interface, faster performance, and enhanced security. But for many users, that excitement quickly turns to frustration when important files—photos, documents, or even entire folders—seem to vanish right after the upgrade. If you're experiencing data loss after upgrading from Windows 10 to 11, you're not alone. This issue is more common than it seems, and the good news is that in most cases, your data isn't permanently gone.
In this article, we'll explain why files disappear during the upgrade, what quick checks you should do first, and how to recover your lost data using both built-in Windows tools and reliable recovery software.
Common Causes of Data Loss after Upgrading to Windows 11
Before jumping into recovery steps, it's essential to understand why files may go missing after an upgrade. Knowing the root cause helps you choose the right recovery approach.
- Temporary User Profile Issue: Sometimes, Windows 11 logs you into a temporary profile instead of your original one after the upgrade. When this happens, your desktop and user folders appear empty, even though your files still exist under your old account directory. It's a login mismatch, not actual deletion.
- Windows.old Folder Relocation: During major OS upgrades, Windows automatically creates a folder called Windows.old in your C: drive. This folder contains the previous version of your system, including user files, program data, and configurations. Many users overlook this folder, unaware that it's a goldmine for recovering lost data.
- File Path or Directory Changes: An upgrade can reset or redirect folders like Documents, Pictures, and Downloads. For example, Windows might create new folder paths or sync your files differently if you're using OneDrive or a Microsoft account.
- Partition or Drive Alterations: Windows 11 setup sometimes modifies partitions—especially on systems with multiple drives or complex configurations. As a result, some files may become hidden or inaccessible, making it seem as if they've disappeared.
- Interrupted or Failed Upgrade Process: If the installation was interrupted due to a power cut, system crash, or insufficient space, parts of your user data may become corrupted or unreadable.
- Third-party Software Conflicts: Antivirus programs, system optimizers, or disk encryption tools may interfere with the file migration process during an upgrade, temporarily "hiding" or quarantining files.
Initial Checks after Upgrading from Windows 10 to 11
Before diving into advanced tools, perform a few quick checks. Many users have recovered their files simply by exploring hidden folders or switching user accounts.
1. Check for a Temporary Account
- Go to Settings > Accounts > Your info.
- Confirm whether you're logged in with your original Microsoft or local account.
If you see a message like "You're logged in with a temporary profile", log out and sign in with your main account. Your old files should reappear.
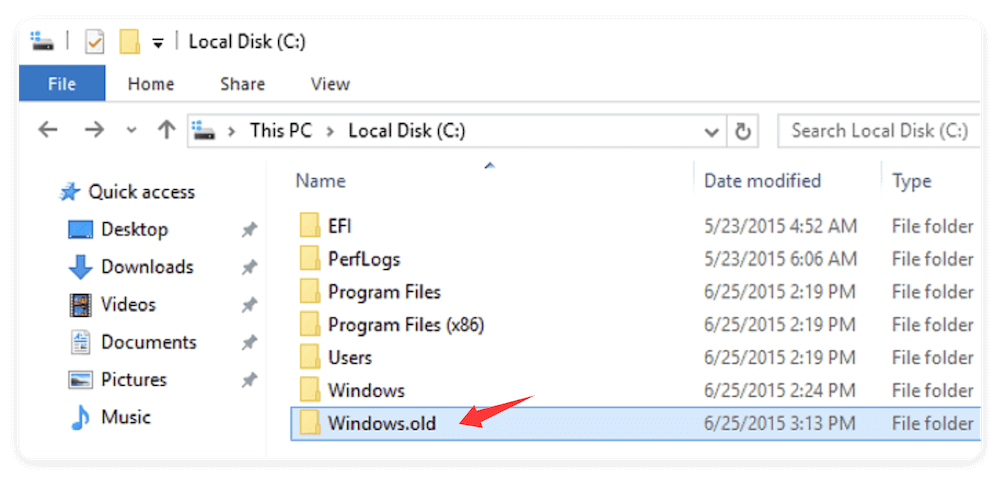
2. Look Inside the Windows.old Folder
Even if you didn't back up your system, the Windows.old folder can help you recover documents, pictures, and videos.
- Open File Explorer and go to C:\Windows.old\Users\[YourUsername]\.
- Copy the missing files and paste them into your current user folders, like Documents, Pictures, Downloads, and Desktop.
- This folder is automatically deleted after 10 days (in some cases 28 days), so act quickly.
If you can't find the Windows.old folder, it may have been deleted automatically. In such cases, move on to data recovery software.
3. Use the Search Feature in File Explorer
Use search filters like *.docx, *.jpg, or *.pdf in File Explorer to locate misplaced files. Sometimes, Windows places files under slightly renamed folders or directories.
4. Show Hidden Files and Folders
- Open File Explorer > View > Show > Hidden items.
- Check your C: drive and user directories again.

Hidden folders like AppData or system-protected files may contain missing data.
5. Check OneDrive or Cloud Storage
If you were signed in with a Microsoft account, your files might have synced to OneDrive.
- Open the OneDrive folder or go to onedrive.live.com to verify.
Cloud storage often auto-backups documents and pictures during system changes.
Advanced Methods for Data Loss after Upgrading to Windows 11
If your files aren't found through these initial checks, don't panic. The data may still exist in recoverable form. Try the following advanced recovery methods step-by-step.
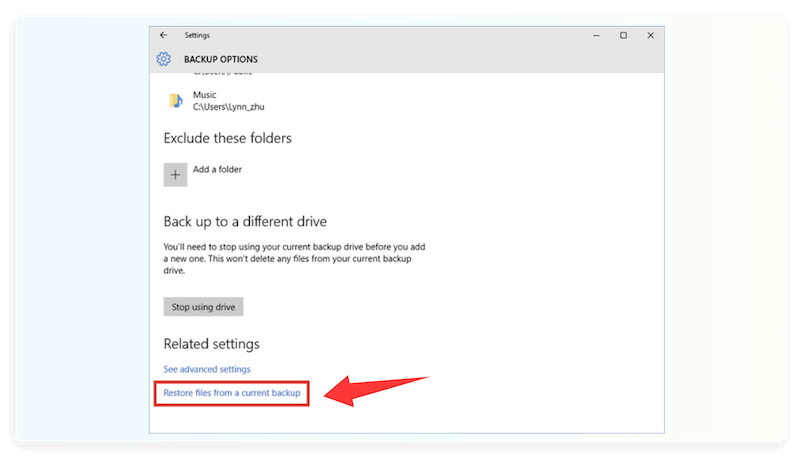
Method 1: Restore from File History or Backup
If you had File History enabled before the upgrade:
- Go to Settings > Update & Security > Backup.
- Click More options > Restore files from a current backup.
- Browse through the timeline and restore previous versions of important files.
Alternatively, check for any external backups created through Windows Backup or third-party tools.
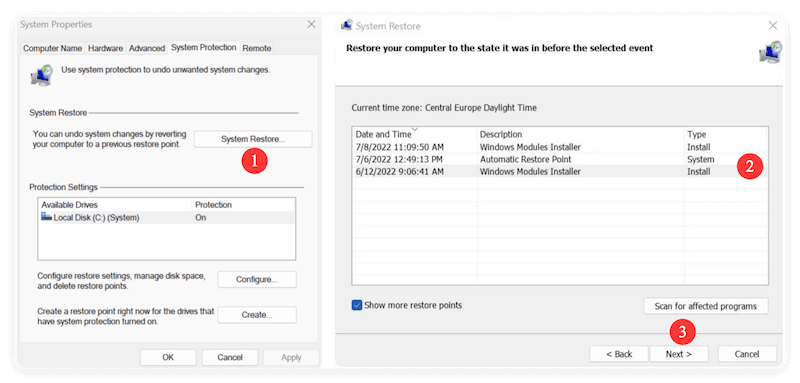
Method 2: Use System Restore to Roll Back
If your upgrade caused system instability or file loss:
- Open the Start Menu, type System Restore, and choose Create a Restore Point.
- Click System Restore and select a restore point from before the Windows 11 upgrade.
- Follow the prompts to revert your system without affecting personal data.
💡 Note: This won't always recover all lost files, but it can restore certain user configurations and missing directories.
Method 3: Recover Files Using Professional Data Recovery Software
When built-in tools fail, data recovery software offers the best chance of restoring deleted or lost files after an upgrade. As a reliable data recovery software, Donemax Data Recovery is highly suggested.
Donemax Data Recovery
- Reliable data recovery software for Windows and macOS.
- Recover data easily within only a few clicks.
- High data recovery success rate with deep scan.
Steps for Data Recovery:
- Install the software on a different drive (not the C: drive where files were lost) to prevent overwriting.
- Launch the software and select the drive or partition where data loss occurred.
![recover lost data after upgrading from Windows 10 to 11]()
- Run a deep scan to locate recoverable files.
![recover lost data after upgrading from Windows 10 to 11]()
- Preview and recover files to a safe location, such as an external drive.
![recover lost data after upgrading from Windows 10 to 11]()


The software supports file type filtering, allowing you to search only for specific extensions like photos, documents, or videos. Also, you can preview the files to confirm if they are recoverable before recovering the files.
Method 4: Recover Data from Lost or Deleted Partitions
Sometimes, the upgrade alters or hides entire partitions. In this case, you'll need software that supports partition recovery.
If a drive is just hidden, you can check it in Disk Management and assign a drive letter to it. Then you can see the drive again in File Explorer.
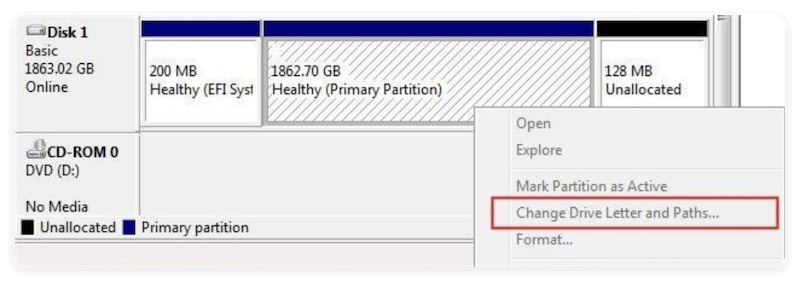
If you find the partition becomes unallocated, the partition was lost. Then you can try to recover the lost partition or recover data from the lost partition. Partition recovery is especially effective if your D: or E: drives disappeared after the upgrade.
Preventing Data Loss During Future System Upgrades
The best data recovery strategy is prevention. Before upgrading to a major OS version, follow these guidelines to protect your files and reduce the risk of loss.
1. Create a Full Backup Before Upgrading
Always back up your system using:
- Windows Backup and Restore
- File History
- Third-party tools like Donemax Disk Clone, Macrium Reflect or Acronis True Image.
- Store your backup on an external drive or cloud storage service.
2. Check Disk Health Before Installation
Use chkdsk or S.M.A.R.T. monitoring tools to ensure your disk isn't failing before the upgrade. Corrupted sectors can lead to data loss during installation.
Run command:
chkdsk C: /f /r
3. Disconnect External Drives
Remove unnecessary external HDDs, SSDs, or USB drives before upgrading. This minimizes the chance of accidental formatting or data misallocation.
4. Ensure Stable Power and Internet Connection
Power interruptions or network failures during installation can cause incomplete upgrades and data corruption.
5. Keep Data Recovery Software Ready
Having a recovery tool pre-installed ensures you can act quickly if something goes wrong—before new data overwrites your lost files.
When to Seek Professional Help
If your attempts to recover data fail, or if the drive appears as RAW, unallocated, or unreadable, it's best to consult a professional recovery service.
Professional labs like Ontrack, Stellar, or DriveSavers specialize in physically or logically damaged drives. They can extract data even from corrupted partitions, failed SSDs, or formatted disks.
When to choose professional recovery:
- Files are critical business or academic documents.
- The disk is making clicking or grinding noises (possible hardware damage).
- The drive doesn't appear in File Explorer or Disk Management.
While professional recovery can be expensive, it's often the only safe option when DIY methods can worsen the damage.
Conclusion
Upgrading to Windows 11 offers many benefits—but unprepared users may experience data loss due to profile errors, path changes, or system glitches.
Here's a quick recap of what to do:
- Check your user account – Ensure you're not logged into a temporary profile.
- Search and restore from the Windows.old folder – Retrieve files from your previous installation.
- Use File History or backups – Restore older file versions.
- Run professional recovery software – Deep-scan your drives for deleted files.
- Take preventive steps – Always back up your data before any major system change.
By following these steps carefully, you can recover most—if not all—of your lost data and ensure your upgrade experience remains smooth and secure.
💡 Final Tip: Always keep multiple backups—local and cloud—before performing major OS upgrades. Data loss is unpredictable, but with preparation, you can avoid permanent damage and enjoy Windows 11's benefits worry-free.
Donemax Data Recovery
Powerful, safe & easy-to-use data recovery software. Easily and completely recover deleted, formatted, or other lost data. The tool supports PC, Mac, HDD, SSD, USB drive, camera, SD card, RAID and other storage devices.
Related Articles
- Jan 21, 2025How to Recover Data from a RAW Partition on Windows 11/10/8?
- Oct 23, 2023External Hard Drive Data Recovery: 4 Methods to Recover Lost Data from External HDD/SSD
- Jun 11, 2025How to Recover Deleted C4D Files in Cinema 4D?
- Jul 02, 20252025 Best 4 Methods to Recover Deleted or Lost MP4 Videos – Complete Guide
- Jul 15, 2025What is HEIC File, How to Convert HEIC to JPG, PNG or JPEG, How to Recover Deleted HEIC File
- Apr 10, 2025Pictures Disappeared from SD Card, How to Recover Them?

Contributing Writer
Coco Lin
Coco has been a writer and a chief programmer at Donemax software since 2018. Over 10 years of experience of writing troubleshooting articles in the software industry, she is passionate about programming and loves to providing solutions to Windows and Mac users. Also she enjoys music and palying tennis in her free time.

Editor in chief
Gerhard Chou
In order to effectively solve the problems for our customers, every article and troubleshooting solution published on our website has been strictly tested and practiced. Our editors love researching and using computers and testing software, and are willing to help computer users with their problems