Written byMariaUpdated on Jun 11, 2025
Recover Deleted Files from OneDrive: A Complete Guide
Approved byGerhard Chou
Summary: In this article, we will introduce all methods for OneDrive data recovery including recovering deleted files from OneDrive web's recycle bin, local recycle bin, recovering lost files using File History, data recovery software, etc. Donemax Data Recovery is a powerful data recovery tool, it can easily recover deleted files from local drives and external storage devices.
PAGE CONTENT:
OneDrive is a widely used cloud storage service from Microsoft that helps users store, sync, and share files seamlessly across devices. It's integrated deeply with Windows and Microsoft 365, making it a convenient choice for individuals and businesses alike. However, even with such reliable platforms, file deletion - whether accidental or intentional - happens. Losing important files can be stressful, but thankfully, OneDrive offers several recovery options to help you retrieve deleted data quickly and efficiently.
This article will walk you through everything you need to know about recovering deleted files from OneDrive, covering personal accounts, business setups, and best practices to prevent future data loss.
Understanding OneDrive's File Deletion and Recovery System
Before diving into recovery methods, it's important to understand how OneDrive handles deleted files. Unlike a simple deletion that permanently erases data, OneDrive uses a two-stage deletion process that helps safeguard your files:
★ The Role of the OneDrive Recycle Bin
OneDrive's Recycle Bin acts much like the Recycle Bin or Trash on your computer but with cloud-specific functionality. When you delete a file or folder from OneDrive - whether from the web interface, synced folders on your PC or Mac, or a mobile device - it is not immediately erased. Instead, the file moves to the Recycle Bin, a secure, temporary storage space that holds deleted files for a period.
This design has two main advantages:
- Protection from Accidental Deletion: Users can recover files mistakenly deleted, reducing the risk of permanent data loss.
- Centralized Management: The cloud Recycle Bin provides a single place to review and manage deleted files, accessible from anywhere.
★ Retention Period and Storage Limits
Deleted files in the OneDrive Recycle Bin are stored for a specific retention period, after which they are permanently deleted. The exact duration and behavior depend on the type of OneDrive account:
- OneDrive Personal Accounts:
Deleted files remain in the Recycle Bin for 30 days. If the Recycle Bin exceeds its quota (roughly 10% of your total OneDrive storage), the oldest files will be purged to make space for new deletions. This means it's important to act quickly if you want to recover files, especially if you have a lot of data or frequently delete files.
- OneDrive for Business Accounts:
Business accounts, which are part of Microsoft 365 enterprise services, typically retain deleted files for 93 days. The retention period can sometimes be configured by administrators based on company policies. Additionally, the system includes a secondary Recycle Bin, often called the Site Collection Recycle Bin, that provides an extra safety net after the first-stage Recycle Bin is emptied.
★ Two-Stage Recycle Bin in OneDrive for Business
OneDrive for Business (and SharePoint Online, on which it is built) uses a two-stage Recycle Bin system to maximize data protection:
- First-stage Recycle Bin:
This is where deleted files initially go. Users can access this directly from their OneDrive interface to restore files easily.
- Second-stage (Site Collection) Recycle Bin:
If a user deletes files from the first-stage Recycle Bin, or if the 93-day retention window is not yet over, the files move to this second stage. Only site collection administrators typically have access to this bin, providing a last chance to recover files before permanent deletion.
This system is particularly important for business environments where accidental deletions by users or even malicious actions can have serious consequences. The two-stage Recycle Bin helps IT administrators restore critical files without needing backups or specialized recovery software.
★ Version History
In addition to the Recycle Bin, OneDrive features version history - a powerful tool for restoring earlier versions of files without recovering the entire deleted file. Version history tracks changes made to documents, spreadsheets, presentations, and many other file types over time.
Key points about version history include:
- Automatic Version Tracking: OneDrive saves multiple versions automatically whenever a file is edited or saved.
- Granular Restoration: Users can browse and restore individual previous versions of a file, which is helpful if unwanted changes or corruption occur.
- Supported File Types: Version history works best with Microsoft Office files but can also apply to other supported file formats.
How to Recover Deleted Files from OneDrive?
The Recycle Bin is the first and easiest place to check when a file goes missing. Here's how to recover your files from the Recycle Bin across different platforms.
1. Recover Files from OneDrive Online (Web)
Using the OneDrive website is the most straightforward method for file recovery.
Step-by-step guide:
- Go to https://onedrive.live.com in your web browser.
- Enter your Microsoft account information to log in.
- On the left sidebar, click Recycle Bin.
- Browse or search for the files or folders you want to recover.
- Select one or more items by clicking the checkbox.
- Click Restore at the top menu.
![recovering deleted files from OneDrive]()

The restored files will return to their original locations in your OneDrive folder.
2. Recover Files Using Windows File Explorer (Synced OneDrive Folder)
If you have OneDrive syncing enabled on your Windows PC, your OneDrive files appear in File Explorer.
- Open Recycle Bin on your desktop.
- Search for the deleted files.
- Right-click the file and select Restore.
![recovering deleted files from OneDrive]()
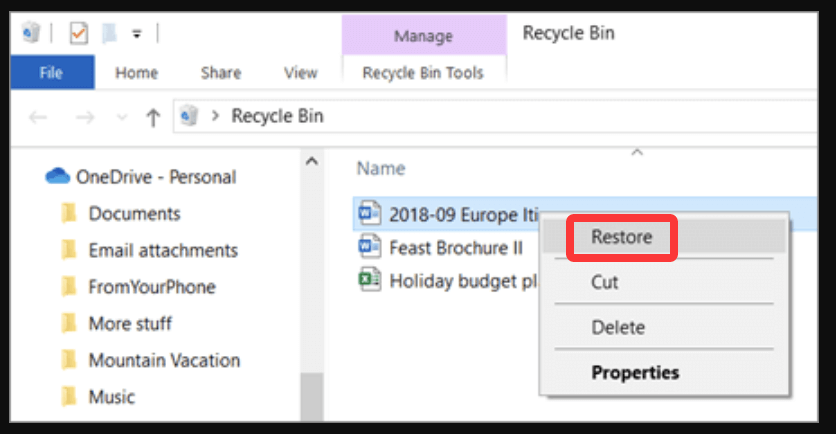
💡 Note: This method only works if the file was deleted locally on your PC and synced to OneDrive. If you are using a Mac, just open trash, right-click the deleted file, choose Put Back.
3. What If Files Are Deleted From the Recycle Bin?
If you empty the Recycle Bin or the retention period expires, the files may be permanently deleted. However, for OneDrive for Business users, there's still a chance to recover files from the Second-stage Recycle Bin:
- In OneDrive for Business online, scroll down in the Recycle Bin view and click Second-stage recycle bin.
![recovering deleted files from OneDrive]()
- Locate and restore files as before.
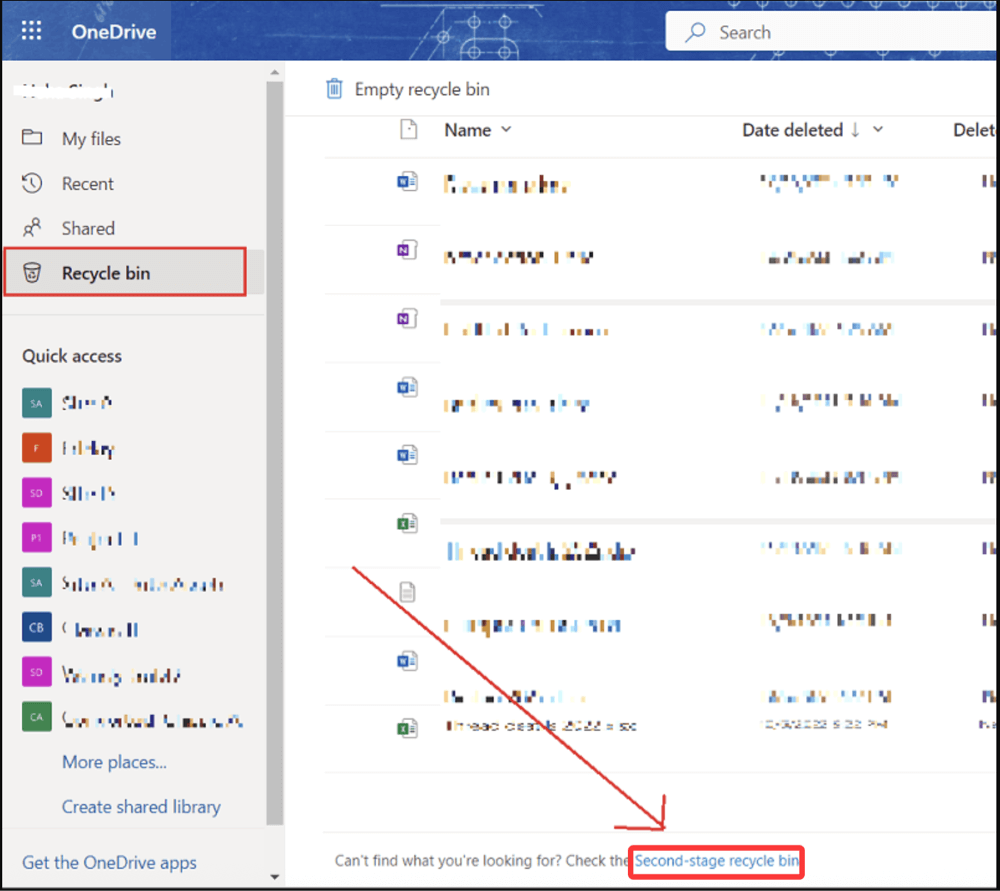
For personal OneDrive users, once the Recycle Bin is emptied, recovery options become very limited.
Recovering Files Using Version History
Sometimes you don't lose a file entirely - instead, you might have accidentally overwritten or corrupted it. OneDrive's version history allows you to roll back to a previous version of a file.
How to Use Version History
- Go to OneDrive Online and sign in.
- Go to the folder where the file is located.
- Choose Version history with a right-click on the file.
![recovering deleted files from OneDrive]()
- A list of earlier iterations together with timestamps will show up.
- Click Open version to preview the file.
- To restore, select Restore on the version you want.
![recovering deleted files from OneDrive]()
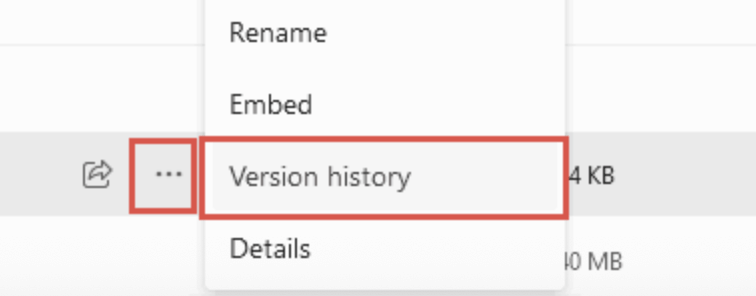

This feature works with Office files like Word, Excel, and PowerPoint, as well as many other file types.
Recovering Files from OneDrive for Business / SharePoint
If you use OneDrive as part of a Microsoft 365 Business subscription or your files are stored in SharePoint Online, recovery options are slightly different.
Steps to Recover Deleted Files in OneDrive for Business
- Sign in to your OneDrive for Business portal.
- Click Recycle Bin on the left pane.
![recovering deleted files from OneDrive]()
- Select files to restore and click Restore.

Using SharePoint Site Recycle Bin
Because OneDrive for Business is built on SharePoint technology, files deleted from OneDrive may also be recoverable via SharePoint's recycle bin:
- From your OneDrive page, click on Settings (gear icon) and select Site contents.
- At the bottom, click Recycle Bin.
![recovering deleted files from OneDrive]()
- You will see files deleted from both OneDrive and SharePoint.
- Select the files and click Restore.

Admin-Level Recovery
If users permanently delete files or clear their recycle bins, SharePoint administrators can still recover files from the Site Collection Recycle Bin for a limited period.
Using Third-Party Tools for OneDrive Recovery
If files are permanently deleted and all native recovery options are exhausted, third-party recovery software may be considered. However, these tools work mostly on your local devices and can’t restore files deleted directly from the OneDrive cloud.
When to Use Third-Party Tools
- Files deleted from synced folders on your PC but not yet overwritten on the disk.
- Corrupted local copies of files synced with OneDrive.
- Accidental formatting or disk errors affecting synced OneDrive data locally.
Donemax Data Recovery is a powerful data recovery program and it can completely recover lost data from your computer's local drives.
Step 1. Download and install Donemax Data Recovery on your computer.
Step 2. Open Donemax Data Recovery, choose the drive where you delete or lose the files.

Step 3. Click on Scan button to deeply scan the drive and find all deleted/lost files.

Step 4. After scanning, you can preview all recoverable files. Then select the wanted documents, images or videos, etc, then click on Recover button to save them.

Tips to Prevent Data Loss on OneDrive
While OneDrive offers solid protection and recovery features, prevention is always better than cure. Here are some practical tips to keep your files safe:
1. Regularly Check Your Recycle Bin and Restore Files Promptly
Don't wait until months later to recover deleted files. The sooner you restore from the Recycle Bin, the higher the chance of success.
2. Enable Offline Backups and Sync
Keep local copies of important files synced to your device. This helps in cases where you need to use third-party recovery tools or want to work offline.
3. Use OneDrive's Files Restore Feature (Business Plans)
OneDrive for Business offers a Files Restore option, allowing you to revert your entire OneDrive to a previous state within the last 30 days. This is great for recovering from ransomware or mass deletion.
4. Maintain Good File Management Practices
- Avoid deleting files unless you’re sure.
- Organize files into folders.
- Use naming conventions that reduce accidental overwrites.
5. Keep Your Devices Protected
Install reliable antivirus software and update your system regularly to avoid malware that could delete or corrupt files.
Conclusion
Accidentally deleting important files can be alarming, but OneDrive's multiple recovery features provide peace of mind. From the Recycle Bin and version history to advanced options for business users and admins, there's usually a way to retrieve lost files quickly.
If you act promptly and follow the outlined steps, you can minimize data loss and restore your files without hassle. Remember to back up regularly and use best practices for file management to reduce risks.
With the power of OneDrive combined with good digital hygiene, your files remain safe and recoverable, helping you stay productive and secure.
Donemax Data Recovery
One of the best data recovery programs to recover deleted, formatted or lost data from PC, Mac, HDD, SSD, USB drive, SD card, camera, RAID, Sever or other storage devices.
Related Articles
- Jul 09, 2025How to Recover Deleted TIFF Image – Comprehensive Guide 2025
- Jul 15, 2025How to Recover Deleted TOD File? [3 Methods]
- Jun 20, 2025How to Recover Deleted ODT File (OpenDocument Text File)? [5 Methods]
- Apr 01, 2025Data Recovery from Damaged SD Card: A Comprehensive Guide
- May 10, 2025How to Recover Lost Data from Sabrent Rocket External SSD?
- Nov 06, 2025PhotoRec Review and Better Alternative

Contributing Writer
Maria
Maria is one of the senior writers & editors of Donemax who lives and works in Sydney, Australia. She loves PC, Mac and Internet Technology. She has 6 years of writing articles about data recovery on PC/Mac, disk cloning solution, data eraser and computer OS optimization, etc. She is also interested in testing various software and digital products.

Editor in chief
Gerhard Chou
In order to effectively solve the problems for our customers, every article and troubleshooting solution published on our website has been strictly tested and practiced. Our editors love researching and using computers and testing software, and are willing to help computer users with their problems