Written byStevenUpdated on Sep 08, 2025
iMac's Fusion Drive Not Mounting, How to Fix It?
Approved byGerhard Chou
Before we start: Here are different ways to fix the Fusion Drive not mounting on iMac. If the fixes doesn't work, you can try to save the files with Donemax Data Recovery before you reformat the Fusion Drive.
PAGE CONTENT:
Apple's Fusion Drive is an innovative storage solution that combines the speed of a solid-state drive (SSD) with the capacity of a traditional hard disk drive (HDD). Introduced with macOS in 2012, this hybrid drive system was designed to deliver faster performance without sacrificing storage space. However, like all storage devices, Fusion Drives are not immune to issues. One of the most frustrating problems users face is when the Fusion Drive won't mount—leaving files inaccessible and the iMac partially or completely unusable.
If your iMac's Fusion Drive isn't mounting, don't panic. This guide walks you through proven methods to diagnose and fix the issue, ranging from basic checks to advanced Terminal commands and data recovery options.
Understanding the Fusion Drive
Before jumping into solutions, it's helpful to understand how a Fusion Drive works. A Fusion Drive appears as a single volume to the user but is actually a logical volume created by Core Storage that spans an SSD and an HDD. macOS intelligently moves frequently accessed files to the faster SSD, while storing less-used data on the larger HDD.
Mounting issues typically stem from:
- Logical volume corruption
- Power failures or improper shutdowns
- Disk Utility misconfigurations
- File system corruption
- Disk splitting (accidental or otherwise)
- Hardware failure
Common symptoms include:
- Fusion Drive not appearing in Finder
- Disk Utility showing "Not Mounted"
- iMac booting into recovery or showing a blinking folder icon
- Terminal showing CoreStorage issues
Initial Checks for Fusion Drive Not Mounting on iMac
Start with these simple checks:
- Restart Your iMac
A basic restart can sometimes resolve minor system glitches.
- Boot into Safe Mode
- Shut down your iMac.
- Press and hold Shift while powering on.
- Safe Mode runs a disk check during startup.
- Check Disk Utility
- Go to Applications > Utilities > Disk Utility.
- Look for your Fusion Drive. If it's listed but not mounted, you may be able to mount it manually.
- Update macOS
Outdated macOS versions can have Fusion Drive bugs. Try updating via System Settings > General > Software Update if possible.
If these steps don't resolve the issue, proceed to the fixes below.
Fixes for iMac's Fusion Drive Not Mounting Issue
Fix 1: Mount Fusion Drive via Disk Utility
Sometimes the Fusion Drive is detected but not mounted. Here's how to manually mount it:
- Open Disk Utility from Utilities via Applications.
- Select your Fusion Drive volume from the sidebar.
- Click the Mount button at the top.
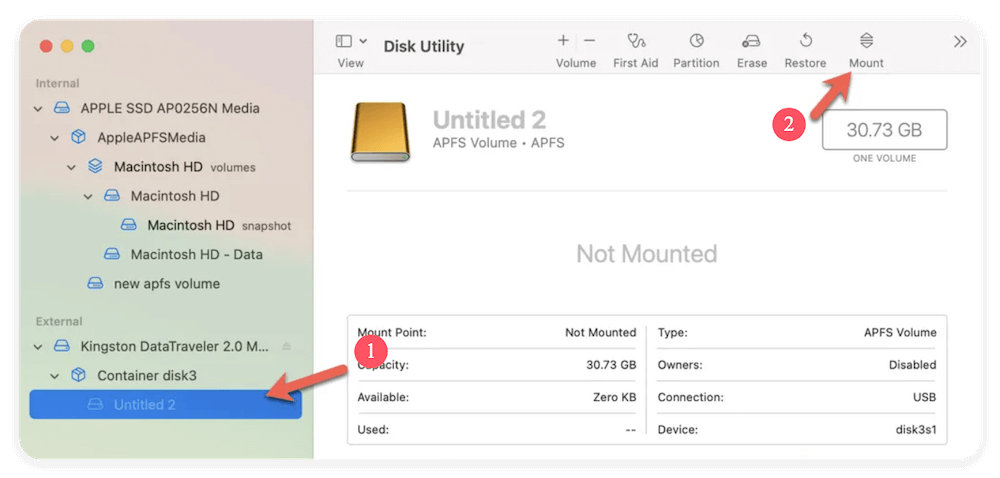
If the "Mount" button is grayed out, check if the volume is listed as "uninitialized" or "unallocated"—if so, data recovery might be needed before repair.
Fix 2: Repair the Fusion Drive with First Aid
Disk Utility's First Aid feature checks and repairs minor disk errors.
- Open Disk Utility.
- Select the Fusion Drive volume or container.
- Click First Aid, then Run.
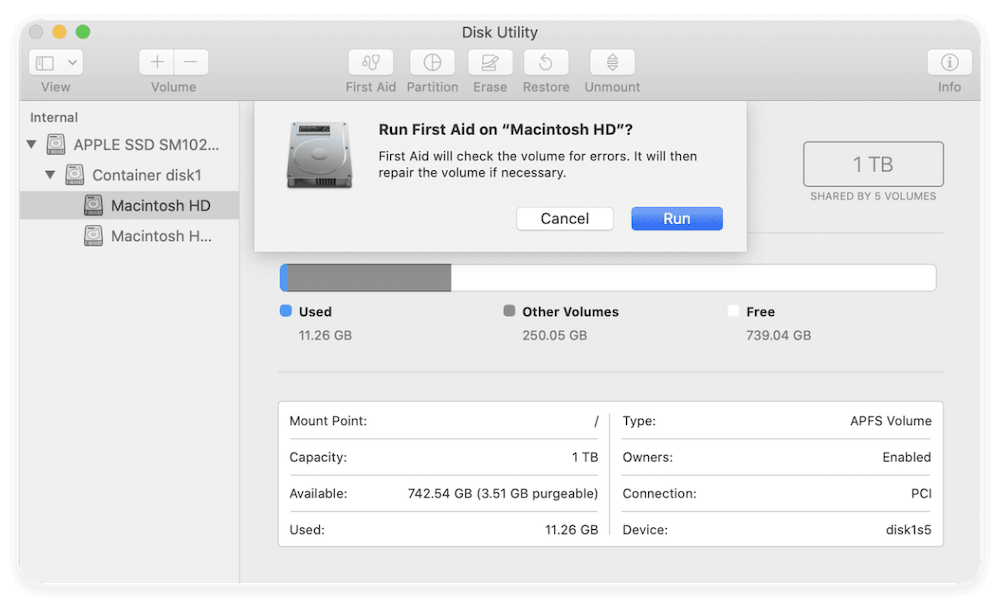
If First Aid Fails:
- Note the error message. If it says something like "B-tree invalid" or "file system check exit code is 8", the volume may be too corrupted for First Aid to fix.
- Consider using a Terminal command like fsck or proceed to data recovery and rebuilding options.
Fix 3: Use Terminal to Mount the Drive
While Disk Utility offers a user-friendly graphical interface to manage disks, it's not always powerful enough to handle complex disk issues—especially when a Fusion Drive becomes unmounted due to file system or CoreStorage problems. In such cases, using Terminal commands can help force macOS to recognize and mount the drive, providing more diagnostic information and control over the mounting process.
This fix is especially helpful when:
- The Fusion Drive appears grayed out in Disk Utility.
- The "Mount" button is disabled.
- You receive errors like "Could not mount disk" or "Resource busy."
Step-by-Step Guide to Mounting with Terminal
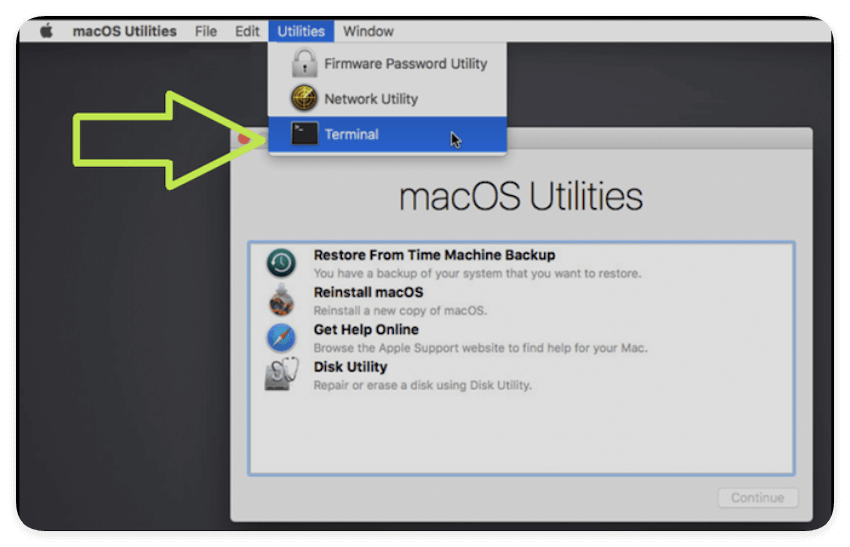
Step 1: Boot into macOS Recovery Mode
- Shut down your iMac.
- Press and hold the power button until you see "Loading startup options" message.
- Select the Options and then click Continue to get into macOS Utilities.
- Once in macOS Utilities, select Utilities > Terminal from the top menu bar.
Step 2: Identify Your Fusion Drive
In Terminal, run the following command to list all available disks and partitions:
diskutil list
This command displays a list of all connected drives, partitions, and their identifiers. Look for:
- A physical HDD and SSD (e.g., /dev/disk0, /dev/disk1)
- A CoreStorage Logical Volume Group (LVG) or Logical Volume (e.g., /dev/disk2, sometimes labeled as "Apple_CoreStorage" or "Fusion Drive")
If you're unsure, look at the sizes and volume names to help identify which ones are part of your Fusion Drive.
Step 3: Attempt to Mount the Drive
If you've located the logical volume representing your Fusion Drive (usually something like /dev/disk2), try mounting it manually:
diskutil mountDisk /dev/disk2
If the drive has separate partitions (like a Boot and Recovery volume), you can mount them individually:
diskutil mount /dev/disk2s1
Step 4: Check for Errors
Terminal will respond with a status message. Here are a few examples:
- Success:
Volume on disk2s1 mounted successfully
Your Fusion Drive should now be visible in Finder and Disk Utility.
- Common Errors:
- Volume could not be mounted: Indicates the file system might be corrupted.
- Resource busy: Disk is in use—try unmounting first with diskutil unmountDisk.
- Invalid content or Invalid node structure: Suggests deeper corruption, possibly requiring disk repair or recovery.
Step 5: Check Core Storage (Optional)
If diskutil list shows CoreStorage volumes, inspect them using:
diskutil cs list
This command displays CoreStorage configurations, including Logical Volume Groups (LVG), Logical Volumes (LV), and their statuses.
Look for:
- The LVG UUID
- Volume states like Online, Mounted, Locked, or Failed
If the Logical Volume shows as Locked or Failed, you may need to unlock it or rebuild the Fusion Drive (see Fix 4).
Bonus Tip: Unlock Encrypted Fusion Drive
If your Fusion Drive is FileVault-encrypted, you'll need to unlock it before mounting:
diskutil cs unlockVolume [UUID] -passphrase [your_password]
💡 Note: Replace [UUID] with the actual Logical Volume UUID and [your_password] with your FileVault password.
Fix 4: Rebuild the Fusion Drive (Advanced)
If the Fusion Drive was accidentally split (e.g., formatted via Terminal or erased separately), you'll need to rebuild it manually.
💡 WARNING: This will erase all data. Only proceed if data has been recovered or is not needed.
- Boot into macOS Recovery Mode.
- Open Terminal.
- Identify the SSD and HDD:
diskutil list
- Find the identifiers for both drives (e.g., /dev/disk0 and /dev/disk1).
- Create a new Core Storage volume group:
diskutil cs create FusionDrive disk0 disk1
- Get the Logical Volume Group (LVG) UUID from the output.
- Create the logical volume:
diskutil cs createVolume [LVG UUID] jhfs+ MacintoshHD 100%
- Once done, reinstall macOS using Reinstall macOS in Recovery Mode.
Fix 5: Use Data Recovery Software
If your data is critical and the Fusion Drive is corrupted or unmountable, use a reliable data recovery tool before reformatting. You can try the top macOS-compatible recovery tool Donemax Data Recovery for Mac.
Here is how to recover data from Fusion Drive on iMac with Donemax Data Recovery:
- Install the software on a separate Mac or external bootable disk. Connect the affected iMac or Fusion Drive as a target disk (via Target Disk Mode) or use external enclosure.
- Launch the data recovery software and choose the Fusion Drive from the drive list in the software.
![recover not mounted Fusion Drive on iMac]()
- Scan the drive to find lost files. The software will deeply scan the drive automatically.
![recover not mounted Fusion Drive on iMac]()
- Locate, preview, and recover important files to an external drive after the scanning process is finished.
![recover not mounted Fusion Drive on iMac]()


Fix 6: Reformat and Reinstall macOS
If all else fails and you've recovered your data:
- Boot into Recovery Mode.
- Open Disk Utility, select the Fusion Drive, click Erase.
- Choose the drive Format: APFS (recommended) or Mac OS Extended (Journaled) for older macOS versions.
- Quit Disk Utility and return to the main menu.
- Select Reinstall macOS and follow on-screen instructions.
This will provide a clean slate with a freshly mounted and functioning Fusion Drive.
When to Seek Professional Help
Sometimes the issue isn't software or configuration related. Here's when to get help:
- Disk Utility and Terminal can't detect either the SSD or HDD portion of the Fusion Drive
- Loud clicking noises or signs of physical damage
- Rebuilding fails or gives persistent errors
- Data is extremely important and cannot be recovered using consumer tools
Contact:
- Apple Support for warranty or Genius Bar appointments
- Certified Mac technicians for out-of-warranty issues
- Professional data recovery services (e.g., DriveSavers, Ontrack) for physical drive recovery
Conclusion
Fusion Drive mounting issues can feel overwhelming, but they're often fixable with the right tools and knowledge. Whether it's a minor software hiccup or a more serious logical volume corruption, this guide gives you a full set of solutions—from simple Disk Utility actions to advanced Terminal fixes and recovery.
Key Takeaways:
- Always back up your data regularly using Time Machine or cloud storage.
- Use Disk Utility and Terminal for diagnostics and repair.
- Recovery software is crucial before formatting a corrupted drive.
- Know when to escalate the problem to a professional.
A healthy Fusion Drive ensures your iMac runs at its best. With this guide, you can take control and bring your system back to life.
Donemax Data Recovery for Mac
Donemax Data Recovery for Mac is one of the best Mac data recovery software. It is easy-to-use and can help in recovering deleted, formatted, inaccessible or lost data from Mac HDD/SSD, external disk, USB drive, SD card, camera or other storage devices.
Related Articles
- Jan 02, 2025Fix External Hard Drive Not Showing Up After Force Ejecting: A Detailed Guide
- May 22, 2026How to Fix SanDisk USB Drive Not Recognized?
- Jun 27, 2023How to Convert NTFS to ReFS or Convert ReFS to NTFS?
- Sep 03, 2025Can't Open USB Drive on Windows 11/10/8/7? Fix It Now
- Nov 29, 2024How to Format ExFAT or FAT32 Drive to NTFS on Mac?
- Apr 06, 2025How to Format a Seagate External Hard Drive?

Contributing Writer
Steven
Steven has been a senior writer & editor of Donemax software since 2020. He's a super nerd and can't imagine the life without a computer. Over 6 years of experience of writing technical solutions and software tesing, he is passionate about providing solutions and tips for Windows and Mac users.

Editor in chief
Gerhard Chou
In order to effectively solve the problems for our customers, every article and troubleshooting solution published on our website has been strictly tested and practiced. Our editors love researching and using computers and testing software, and are willing to help computer users with their problems