
Written byLucienUpdated on Jan 04, 2024
How to Use Samsung Portable SSD T9 for Windows and Mac?
Approved byGerhard Chou
PAGE CONTENT:
We need dependable, ultra-fast storage solutions now more than ever before since our digital footprint is growing at an unprecedented rate. The Samsung Portable SSD T9 is here to change everything about data storage, access, and transfer. It's a pocket-sized powerhouse, after all. Envision a small, stylish drive that reliably transfers massive amounts of data at lightning rates and works with Mac and Windows computers.
If you love technology, work in a creative field, or want a reliable device that's easy to use, the Samsung Portable SSD T9 is a great choice. Come along as we reveal the tricks to getting the most out of this state-of-the-art SSD on Mac and Windows, allowing you to harness its remarkable performance to its utmost.
Why Choose Samsung Portable SSD T9 for Windows and Mac OS?
Compatibility with Windows:
The Samsung Portable SSD T9 is designed to integrate into Windows users' workflows easily. If you're using Windows, here are the simple steps to start using the drive:
Step 1: Physical Connection
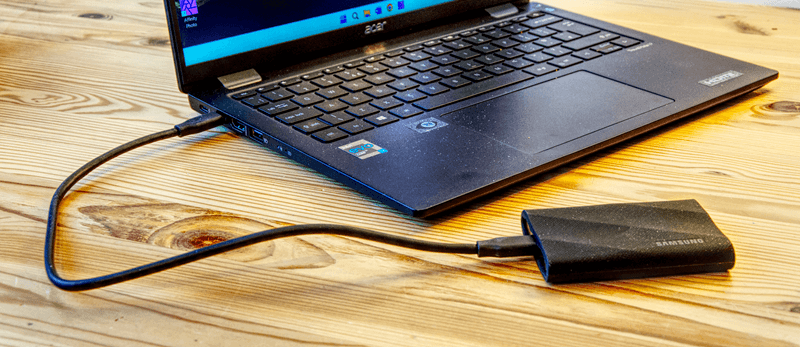
Depending on the ports on your Windows PC, you can connect the Samsung SSD T9 to it using either the Type-C to Type-A cable that comes with it or the USB Type-C to Type-C cord that comes with it.
Step 2: Drive Recognition
Windows ought should identify the drive automatically after you attach it. You can find the Samsung SSD T9 in "This PC" or "My Computer" if it doesn't show up immediately.
Step 3: Drive Setup (If Required)
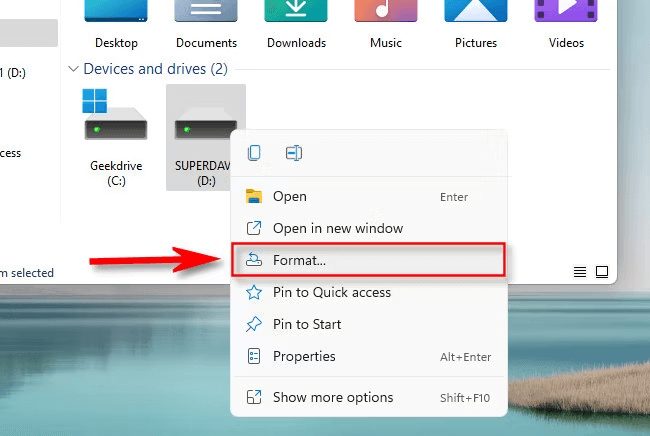
It may be necessary to initialize the disk if it is new or has not been formatted for Windows. Right-click the drive icon, choose "Format," choose the file system (usually NTFS for Windows), give the drive a name, and then click "Start" to format it.
Step 4: Data Transfer
Upon the SSD T9's recognition and readiness, file transfers can be initiated using cut-copy-paste or dragging-and-drop methods. Take advantage of the lightning-fast transfer speeds while painlessly transferring files to and from the disk.
Compatibility with Mac:
Mac users will easily incorporate the SSD T9 into their routine. To avoid any problems, follow these steps:
Step 1: Physical Connection
Use the USB Type-C to Type-C or Type-C to Type-A cord that came with the Samsung SSD T9 to attach it to your Mac. The cable you receive will depend on the ports that your computer has.
Step 2: Drive Recognition
Your Mac should automatically detect the drive after you attach it. Find the SSD T9 icon in the Finder's sidebar or on your desktop.
Step 3: Drive Setup (If Required)
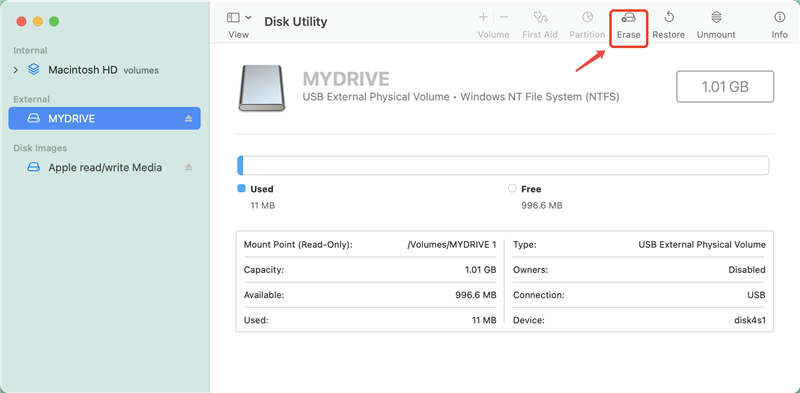
It may ask you to initialize the drive if it is new or not formatted for Mac. After launching Disk Utility (Applications > Utilities > Disk Utility), navigate to the SSD T9 in the sidebar. Select "Erase," then choose the format give the drive a name, and last, click "Erase" to format it for Mac use.
Step 4: Data Transfer
Now that you've formatted and recognized the drive, you may move files to and from the SSD T9. You can easily and quickly transfer data using copy-paste or drag-and-drop methods.
Samsung SSD T9 Advanced Features and Tips:
- Security and Encryption:
Protect critical information with hardware-based encryption on the Samsung SSD T9. With Samsung's software, users can set up password security and encryption so their contents will be safe if the drive is lost or stolen.
- Firmware Updates:
The performance and security of the drive can be improved with regular firmware updates. It allows them to ensure that their Portable SSD T9 is always up-to-date.
- Software Management Tools:
To facilitate effective drive management, Samsung provides software solutions such as Samsung SSD Software for Windows and Portable SSD for Mac. Performance optimization, data backup, and security settings are some of the capabilities offered by these utilities.
- Performance Optimization:
Ensure the USB port you use to connect the Samsung Portable SSD T9 can handle its maximum speed for the best performance. This solid-state drive performs at its peak when connected to a USB 3.2 Gen 2 connection.
- Backup Solutions:
The Samsung Portable SSD T9 is an excellent choice for safeguarding critical data and documents. Make sure your data is safe and accessible by backing it up regularly.
How to Format A Samsung Portable SSD T9 for Windows and Mac OS?
Normally, the Samsung Portable SSD T9 is pre-formatted to NTFS file system. If you want to use this SSD on your PC and Mac, you can reformat it.
On Windows PC:
Connect the Samsung Portable SSD T9 to your PC, then find the Samsung Portable SSD T9 under This PC, right-click the Samsung Portable SSD T9. Then choose Format, select ExFAT as the file system, click on Start button.
On a Mac:
Connect the Samsung Portable SSD T9 to your Mac, then Open Disk Utility. Select the Samsung Portable SSD T9, click Erase. Then select the ExFAT as the file system, and then click Erase again. It will format the Samsung Portable SSD T9 to ExFAT (which is compatible with both Windows and Mac OS.)
How to Use Samsung Portable SSD T9 (NTFS) on PC and Mac Without Formatting?
If you want to use an NTFS Samsung Portable SSD T9 on both Windows and Mac OS, you can try NTFS for Mac tool. You only need to install an NTFS for Mac tool on your Mac, then run it to enable writable for all NTFS drives on your Mac, then you can use the Samsung Portable SSD T9 without any issue.
Step 1. Download and install Donemax NTFS for Mac tool on your Mac, run it from Launchpad.
Step 2. Connect the Samsung Portable SSD T9 to your Mac, then it will be listed on Donemax NTFS for Mac, select it.
Step 3. Click on Enable Writable button. Then the NTFS Samsung Portable SSD T9 will become read-write.

This Mac disk management tool also can help you mount/repair/open/eject/format Samsung Portable SSD T9 on your Mac.
FAQs About Using Samsung Portable SSD T9 on Windows and Mac
Just use disk management tool such as Windows Disk Management and Mac Disk Utility to format the Samsung Portable SSD T9 to ExFAT, then you can use this SSD on both Windows and Mac OS.
Yes, follow the steps below:
- Download and install Donemax NTFS for Mac on your Mac.
- Open the NTFS for Mac tool, select the Samsung Portable SSD T9.
- Click on Enable Writable button.
Yes, you can use a data recovery program to unformat the Samsung Portable SSD T9. For example:
- Download and install Donemax Data Recovery.
- Open the data recovery software, and select the Samsung Portable SSD T9.
- Click on Scan button.
- Recover lost files after scanning.
Conclusion:
Finally, the Samsung Portable SSD T9's compatibility with Mac and Windows operating systems is a major selling point, as it bodes well for the ease of data storage and transfer. This small wonder goes above and beyond, providing customers incredibly fast speeds and rock-solid reliability. Seize its potential as a trustworthy companion in easily accessing your info. Experience the ease and reliability of its platform, guaranteeing that your data is always accessible and prepared to back up your pursuits. As you step into the realm of the Samsung Portable SSD T9, you will find storage solutions that are both innovative and efficient.
If the Samsung Portable SSD T9 gets crashed or it becomes read-only on your PC or Mac, run a disk formatting tool to format it to compatible file system or you can try NTFS for Mac tool to help you enable writable for NTFS drives on your Mac.
Related Articles
- Oct 09, 2025External Hard Drive/USB Drive Not Readable on macOS Tahoe, Fix It
- Apr 17, 2024How to Mount An External Hard Drive or Other Storage Device on Mac?
- Jul 01, 2024How to Format and Unformat XQD Card on Windows PC or Mac?
- Jun 15, 2026What to Do If a Hard Drive Is Unallocated on Windows?
- Dec 03, 2024Fix External Drive, USB Drive, SD Card Not Mounting on macOS Sequoia
- Mar 27, 2024How to Mount and Read EXT4 Partition on Mac?

Contributing Writer
Lucien
Lucien is a writer and a chief programmer of Donemax software who has worked in the company for 5+ years. He has written much of the content on the site and devotes to providing troubleshooting and solution for Windows and Mac users including disk cloning, data recovery, migration, eraser, error fixes.

Editor in chief
Gerhard Chou
In order to effectively solve the problems for our customers, every article and troubleshooting solution published on our website has been strictly tested and practiced. Our editors love researching and using computers and testing software, and are willing to help computer users with their problems