Written byStevenUpdated on May 26, 2025
Create a New Partition Using Diskpart on Windows
Approved byGerhard Chou
Before we start: It's powerful and effective to run Diskpart commands and make a new partition on a disk. It's necessary to check the commands before you execute. If there are issues and data loss happened, use Donemax Data Recovery to get back the lost files.
PAGE CONTENT:
Partitioning a hard drive is a fundamental task for many Windows users, whether you're organizing data, preparing for a multi-boot setup, or creating dedicated backup areas. While Windows offers a graphical interface through Disk Management, some advanced users prefer the precision and control of the Diskpart command-line utility. This article provides a comprehensive guide on how to create a new partition using Diskpart on Windows.

What Is Diskpart on windows?
Diskpart is a powerful command-line utility included in all modern versions of Windows, starting from Windows XP. It allows users to manage disks, partitions, and volumes with precision. Unlike the graphical Disk Management interface, Diskpart provides more advanced control over storage configuration.
Diskpart supports operations such as:
- Creating, deleting, and formatting partitions
- Assigning or removing drive letters
- Converting disks between MBR and GPT
- Cleaning all data from disks
- Managing dynamic disks
It's especially useful for automation, scripting, and managing remote or headless systems.
Why Use Diskpart Over Disk Management?
While Disk Management offers a visual interface, it lacks the flexibility that advanced users sometimes require. Diskpart is beneficial when:
- Disk Management fails or shows limited options
- You need to automate partitioning tasks
- You're working in recovery mode or command-line-only environments
- You want to force a partition alignment or specific size
Precautions Before Creating A New Partition Using Diskpart
Before diving in, it's crucial to take a few precautions:
- Backup Important Data: Diskpart commands can lead to data loss if used incorrectly.
- Run as Administrator: Diskpart requires administrative privileges to make system changes.
- Check for Unallocated Space: You must have unallocated space on a disk to create a new partition. If no unallocated space exists, you must shrink an existing volume.
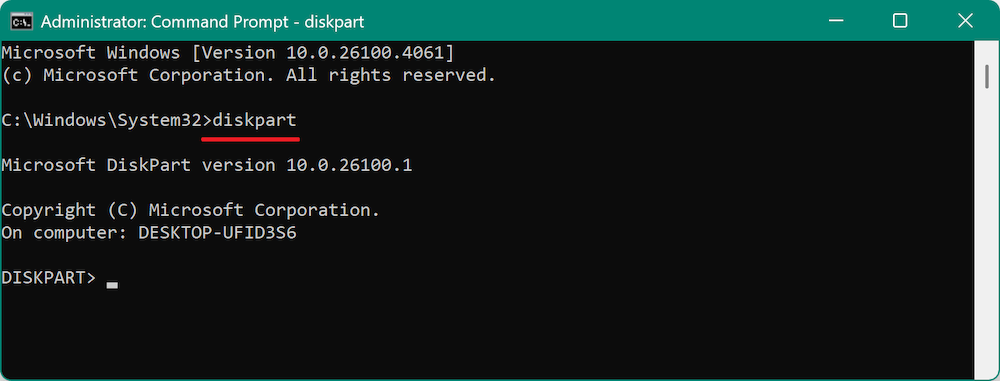
How to Open Diskpart on Windows
Follow these steps to launch Diskpart:
- Type cmd into the Command Prompt, right-click it, and choose Run as administrator.
- In the Command Prompt window, type:
diskpart
- Press Enter. You will enter the Diskpart interface, where you can begin issuing disk management commands.
![create new partition using Diskpart]()
Creating a New Partition Using Diskpart
Let's walk through the full process of creating a new partition from unallocated space using Diskpart.
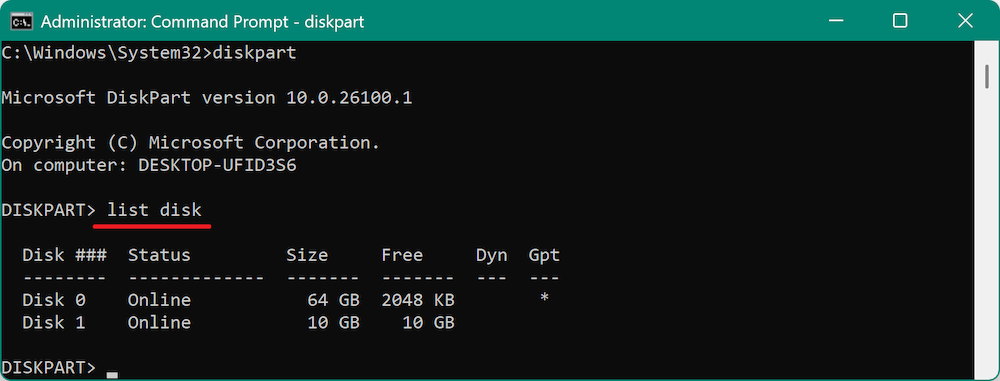
Step 1: List All Disks
First, you need to see all the available disks:
list disk
This command will show each connected disk and their corresponding numbers (e.g., Disk 0, Disk 1). Make note of the correct disk number where you want to create the new partition.
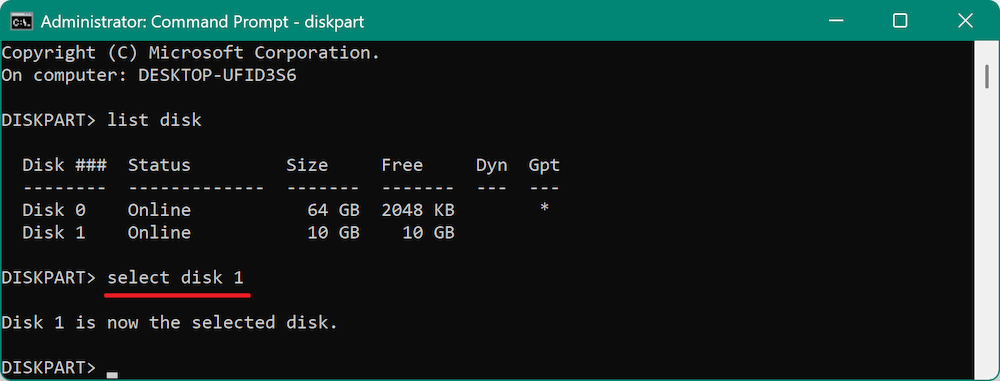
Step 2: Select the Target Disk
Next, select the disk:
select disk X
Replace X with the number of the disk.
Diskpart will confirm: Disk 1 is now the selected disk.
📍 Warning: Ensure you're selecting the correct disk. Operations will affect the selected disk only.
Step 3: Create the New Partition
Now that the disk is selected, you can create a new primary partition:
create partition primary size=XXXXX
Replace XXXXX with the partition size in megabytes. For example:
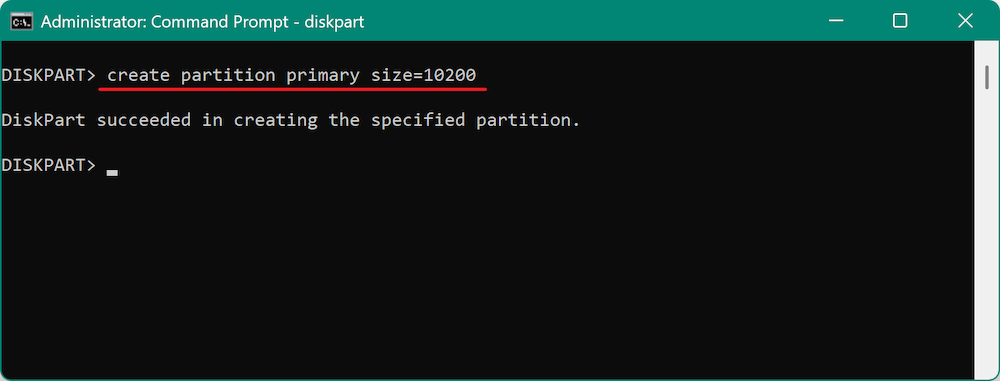
If you want to use all the remaining unallocated space, omit the size:
create partition primary
Step 4: Format the Partition
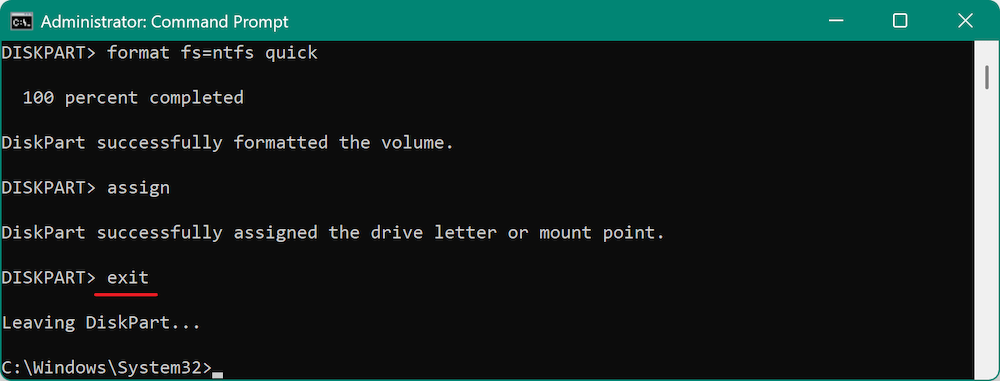
Next, format the partition with a file system such as NTFS:
format fs=ntfs quick
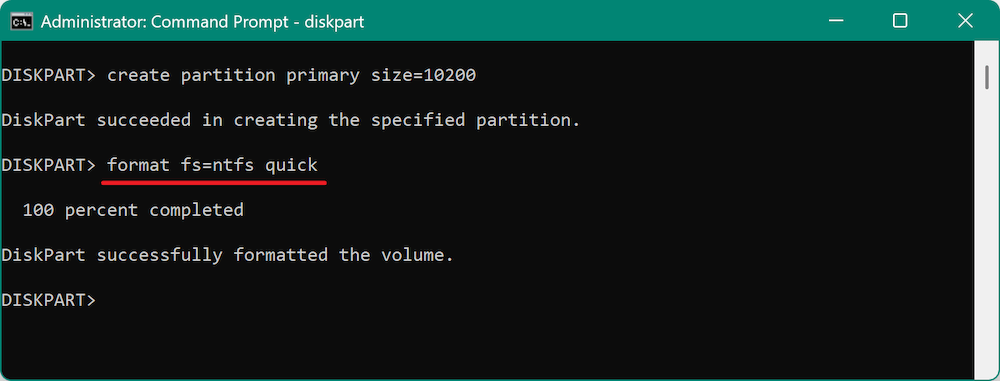
The quick option speeds up the process. If you want a full format, remove the quick flag:
format fs=ntfs
Other supported file systems include:
- exfat: Suitable for flash drives and SD cards
- fat32: Legacy support; cannot handle files over 4GB
Select the file system that best meets your requirements.
Step 5: Assign a Drive Letter
To make the partition accessible in File Explorer, assign a drive letter:
assign

It will assign an unused drive letter to the partition. You can also choose any available letter not already used by another drive.
assign letter=F
Step 6: Exit Diskpart
Once done, exit Diskpart by typing:
exit
Then, you can close the Command Prompt window.
Verifying the New Partition
To confirm that your new partition was created successfully:
- Open File Explorer and check for the newly assigned drive letter.
- As an alternative, choose Disk Management by right-clicking the Start button. Your new partition should be listed with the label, file system, and size you specified.
You can now begin using the partition like any other drive—store files, install applications, or set it up for backup.
Shrinking a Volume to Create Unallocated Space (If Needed)
If your disk doesn't have unallocated space, you can shrink an existing volume before creating a new partition. Here's how:
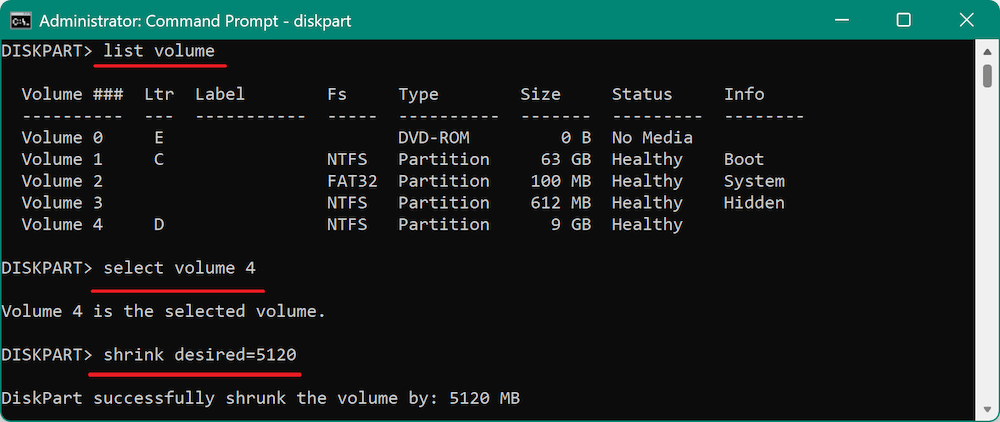
- In Diskpart, list volumes:
list volume
- Select the volume you want to shrink:
select volume #
- Shrink it:
shrink desired=XXXX
Replace XXXX with the amount in megabytes. For example, shrink desired=10240 shrinks the volume by 10GB.
After shrinking, use the steps above to create and format a partition from the new unallocated space.
Cleaning a Disk Before Partitioning (Optional)
In some cases—especially with corrupted or pre-used drives—it's a good idea to clean the disk completely.
📍 Warning: This erases all data.
- Select the disk:
select disk X
- Clean it:
clean
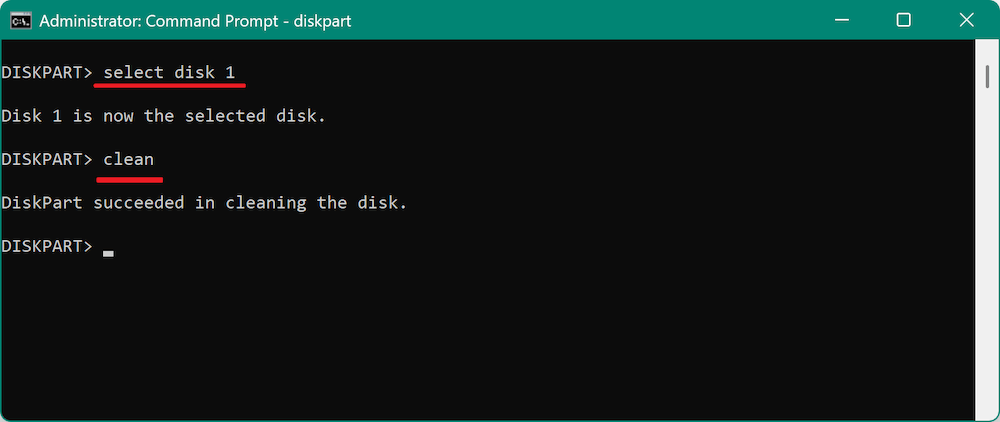
This deletes all partitions and turns the disk into unallocated space. You can now repeat the earlier steps to create a new partition.
Best Practices When Partitioning
- Always backup data before making changes.
- Use meaningful drive letters and labels to stay organized.
- Avoid excessive partitioning—too many partitions can complicate backups and space management.
- Monitor drive health using tools like chkdsk or CrystalDiskInfo to ensure partitioning doesn't mask underlying disk issues.
Alternatives to Diskpart
While Diskpart is robust, it may not be the best option for everyone. Alternatives include:
1. Disk Management GUI
- Access via diskmgmt.msc
- Useful for visual management of partitions
- Suitable for beginners
2. Third-party Partition Tools
- MiniTool Partition Wizard
- AOMEI Partition Assistant
These tools offer user-friendly interfaces and additional features like migrating OS, merging partitions, or converting file systems without data loss.
Recover Data after Running Wrong Diskpart Commands
Diskpart is a powerful command-line tool that can manage hard drive easily. However, it's hard to remember each command, so problems may happen if you entered wrong commands. It would cause data and partition loss.
When running wrong Diskpart commands and leading to data loss, what to do? Don't worry. With professional data recovery software, you can still get back the lost files. Donemax Data Recovery is recommended to recover data in such a case.
Donemax Data Recovery
- Data recovery software for deleted, formatted or other lost data.
- Recover lost data from memory card, USB drive, SSD, etc.
- 100% safe and easy-to-use recovery software for Windows and Mac.
After losing data by entering wrong Diskpart commands, stop using the drive immediately to avoid further damage to the lost data on the drive. Then download and install the software to recover data. Here are the steps to recover lost data with Donemax Data Recovery:
Step 1. Run the software and you will see all the connected disks on the computer. Check and choose the drive where you lost data.

Step 2. Click the Scan button, the software will start to scan the disk and search for the lost files.

Step 3. The software will list all the found files after the scanning process is finished. Check and preview the files to locate the wanted files. Select the files and recover to another drive.

Common Diskpart Errors and Fixes
Using Diskpart grants low-level control over disk and volume management—but with that power comes the potential for errors, especially if you're working with multiple partitions, external drives, or disks that have been formatted in non-standard ways. Below are the most common issues users encounter when creating a new partition with Diskpart, along with their causes and detailed fixes.
1. "There is not enough usable space for this operation"
Cause:
This error typically occurs when you try to create a partition larger than the unallocated space available, or if the space is fragmented in such a way that Diskpart cannot use it effectively.
Fix:
- First, run list partition after selecting the disk to check if there's any already defined partition taking up space.
- If you don't see unallocated space, shrink an existing volume:
list volume
select volume X
shrink desired=10240 - Then reattempt:
create partition primary size=10240
2. "The media is write protected"
Cause:
This is common with USB flash drives or SD cards where a physical write-protect switch is enabled or the device has been software-locked due to corruption.
Fix:
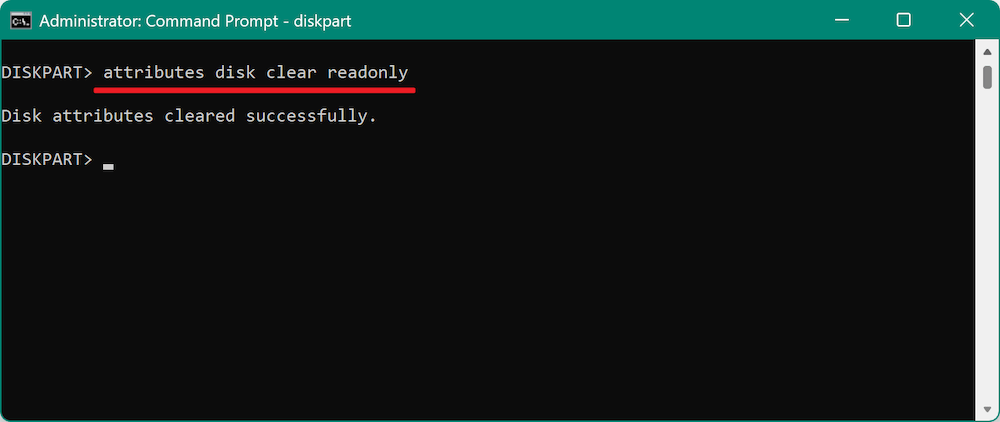
First, try clearing the read-only attribute:
attributes disk clear readonly
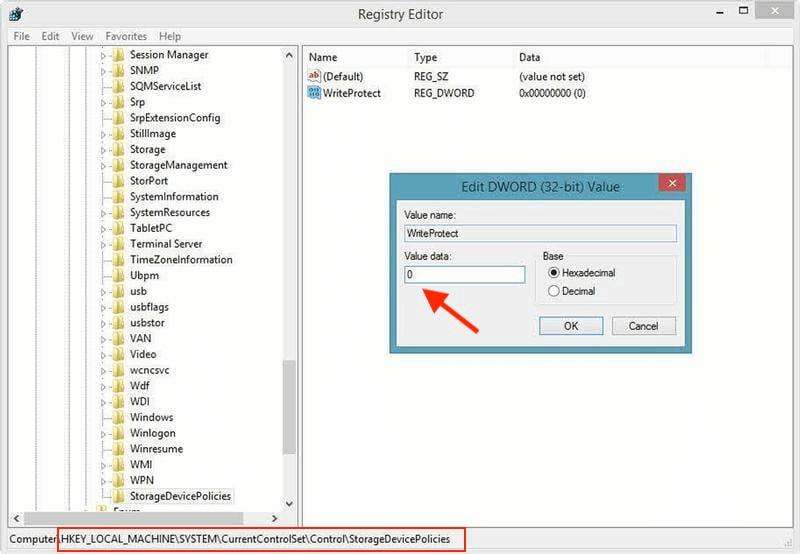
If the device still won't allow writes, check if there's a physical switch on the device and disable it. Use Windows Registry Editor (advanced users only):
- Run regedit
- Go to:
HKEY_LOCAL_MACHINE\SYSTEM\CurrentControlSet\Control\StorageDevicePolicies
- Double-click WriteProtect and set the value to 0. Reboot and retry Diskpart.
3. "The operation is not allowed on removable media"
Cause:
Certain operations like creating multiple partitions are not allowed on USB drives formatted as Removable Media (most flash drives).
Fix:
- Convert the USB to a Fixed Disk using manufacturer tools (not always possible).
- Instead, create a single partition using:
create partition primary
format fs=exfat quick
assign
For more complex needs, use third-party tools like Rufus or AOMEI Partition Assistant, which may bypass Windows restrictions.
4. "Virtual Disk Service error: The volume size is too big"
Cause:
This happens when trying to format a large partition (usually over 32GB) with FAT32, which has file system limitations in Windows.
Fix:
Switch to a more modern file system:
format fs=exfat quick
or
format fs=ntfs quick
If you must use FAT32 (e.g., for an older device), use third-party tools like FAT32 Format GUI that can bypass the 32GB limitation imposed by Windows.
5. "DiskPart has encountered an error: Access is denied"
Cause:
Access is restricted due to system policies, antivirus software, or lack of administrative rights.
Fix:
- Ensure you launched Command Prompt as Administrator.
- Temporarily disable third-party antivirus or security tools.
- Use the Command Prompt or Windows Recovery Environment (WinRE) to boot into Safe Mode if you are in charge of system drives.
6. "No usable free extent could be found"
Cause:
The selected disk may have no continuous block of free space large enough for the requested partition.
Fix:
- Shrink or delete an existing partition to consolidate unallocated space.
- Use clean (as a last resort):
select disk X
clean
Then try to recreate the partition using the create partition command.
7. "Cannot create a partition on this removable media"
Cause:
Windows often restricts creating multiple partitions on Removable drives (USB sticks, SD cards).
Fix:
- You can typically only create one primary partition on removable media.
- Try using third-party partition managers like MiniTool Partition Wizard to bypass these limitations.
- Use the DISKPART alternative:
create partition primary
format fs=exfat quick
assign
8. "The selected disk is not fixed MBR disk"
Cause:
This occurs if you're trying to create a partition on a dynamic or GPT disk using MBR-specific commands.
Fix:
- Convert the disk:
convert mbr
Only if no data exists, as this erases the drive. Or:
- Create a new volume using GPT-compatible commands.
General Tips to Avoid Errors
- Always double-check disk numbers before executing commands.
- Use list disk and list volume frequently to verify selections.
- Don't run clean command unless you're 100% sure—it wipes the entire disk.
- When in doubt, test on a spare USB or virtual machine first.
Conclusion
Creating a new partition using Diskpart on Windows is a powerful, flexible process that gives you control beyond what the GUI can offer. By following the steps outlined above—listing disks, selecting the right disk, creating and formatting a partition, and assigning a drive letter—you can organize your system exactly how you want.
Whether you're an IT professional looking to automate deployments, or a power user managing your own system, mastering Diskpart is a valuable skill. Just remember to tread carefully—command-line tools don't offer an undo button.
Donemax Data Recovery
Powerful, safe & easy-to-use data recovery software to easily and completely recover deleted, formatted, inaccessible and lost data from PC, Mac, HDD, SSD, USB drive, camera, SD card, RAID and other storage devices.
Related Articles
- May 10, 2025How to Find BitLocker Recovery Key (Unlock Password)?
- Jun 17, 2026Repair a Disk with PowerShell: Step-by-Step Guide
- Sep 01, 2025How to Fix Dead WD External HDD or SSD?
- May 13, 2025How to Install A New SSD on Lenovo Laptop?
- Sep 16, 2025Turn Off BitLocker on Windows 11/10
- Oct 24, 2023How to Use FileVault to Encrypt A Hard Drive on Mac?

Contributing Writer
Steven
Steven has been a senior writer & editor of Donemax software since 2020. He's a super nerd and can't imagine the life without a computer. Over 6 years of experience of writing technical solutions and software tesing, he is passionate about providing solutions and tips for Windows and Mac users.

Editor in chief
Gerhard Chou
In order to effectively solve the problems for our customers, every article and troubleshooting solution published on our website has been strictly tested and practiced. Our editors love researching and using computers and testing software, and are willing to help computer users with their problems