
Written byStevenUpdated on Jul 27, 2025
Best 8 Fixes for USB Drive Not Detected on Mac
Approved byGerhard Chou
Before we begin: USB drive not detected on your Mac? Before fixing this issue, you can use Mac data recovery software - such as Donemax Data Recovery for Mac to help export/recover all files from the USB drive to your Mac. Then you can repair the USB drive, change Finder Settings or update macOS to fix this issue.
PAGE CONTENT:
USB drives are a convenient way to store and transfer data between devices. However, it can be frustrating when your Mac fails to detect a USB drive you need. Whether you're trying to access backup files, transfer media, or install software, a USB not showing up on macOS can interrupt your workflow. This comprehensive guide covers all the possible causes and fixes for USB drive detection issues on a Mac. Follow the step-by-step solutions below to get your USB drive working again.
Common Reasons Why a USB Drive Is Not Detected on Mac
Before diving into troubleshooting, it's important to understand the potential causes behind the problem. Here are the most common reasons:
1. Faulty USB Port or Cable
Your USB port or cable might be physically damaged or malfunctioning, preventing the system from recognizing the device.
2. Incompatible or Corrupt File System
If the USB drive is formatted in a file system not supported by macOS (e.g., EXT4 or a corrupt NTFS partition), the Mac may not be able to read it.
3. Software or macOS Glitches
Occasional system bugs or software crashes can block the proper mounting of external drives.
4. Power Issues
Some external drives need more power than the Mac's USB port can provide, especially older MacBooks with a single USB-C port.
5. Hidden or Disabled Drive Settings
Finder preferences/settings or Disk Utility settings might hide external drives by default.
Preliminary Checks Before Troubleshooting
Before diving into more technical fixes, perform these basic checks to rule out simple issues:
1. Test the USB Drive on Another Device
Try connecting the USB drive to another Mac or even a Windows PC to determine if the issue is with the drive itself.
2. Try a Different Port or Cable
Switch to another USB port on your Mac or use a different cable to eliminate hardware failure.
3. Restart Your Mac
A simple reboot can often fix minor bugs and refresh system processes that might be blocking USB recognition.
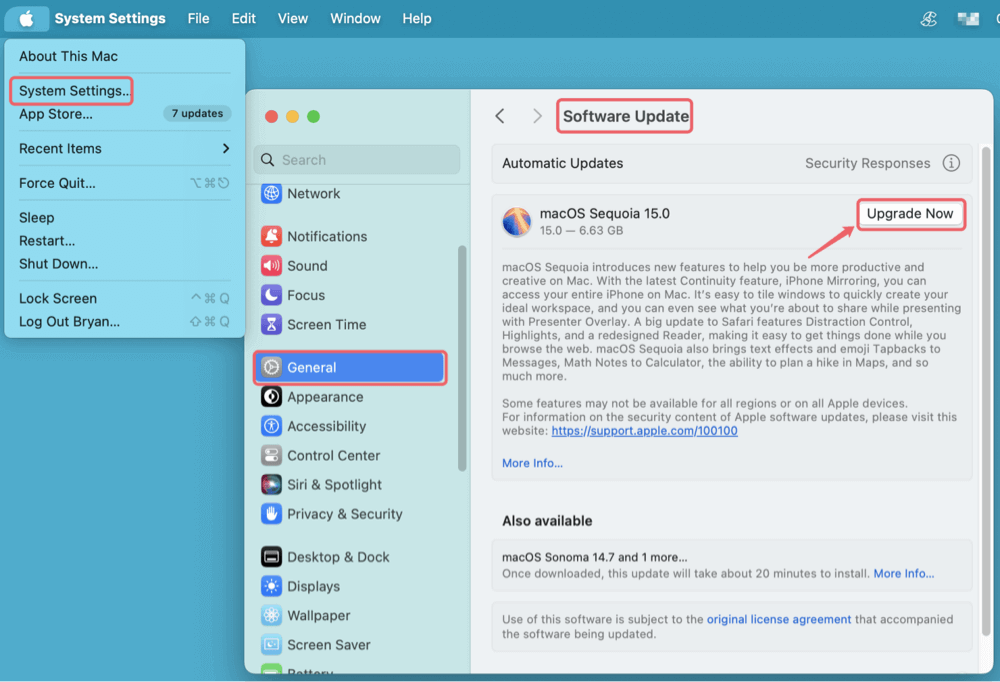
4. Update macOS
Go to System Settings > General > Software Update and install any pending updates. Compatibility and bug fixes are often included in macOS updates.
Recover Data from the USB Drive Before Fixing It
Before fixing the USB drive not detected issue, you can use Mac data recovery software - such as Donemax Data Recovery for Mac to completely export/recover all data from the USB drive to your Mac.
Step 1. Download and install Donemax Data Recovery for Mac, then run it.
Step 2. Open Donemax Data Recovery, select the USB drive from the drive list.
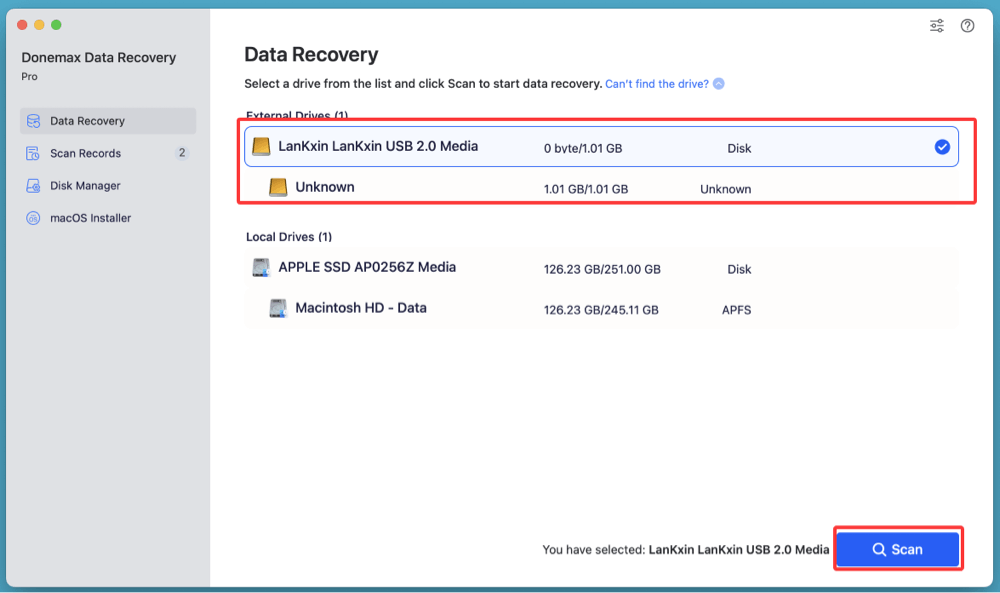
Step 3. Click on Scan button. This Mac data recovery software will deeply scan the selected USB drive and find all recoverable files including existing files, inaccessible files, deleted/formatted/lost files, etc.
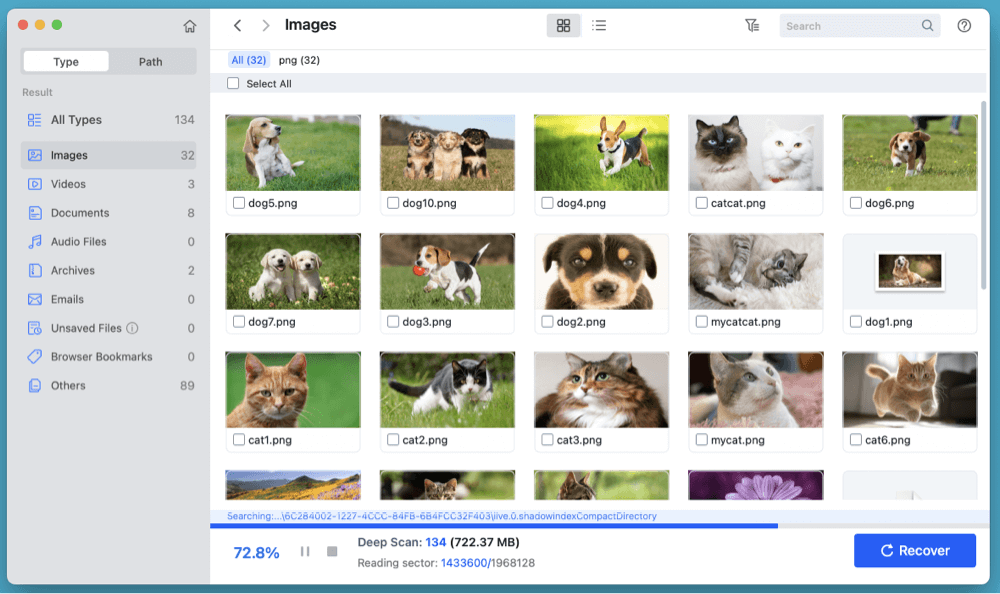
Step 4. After scanning, select the wanted files, click on Recover button to save these files to a safe location.

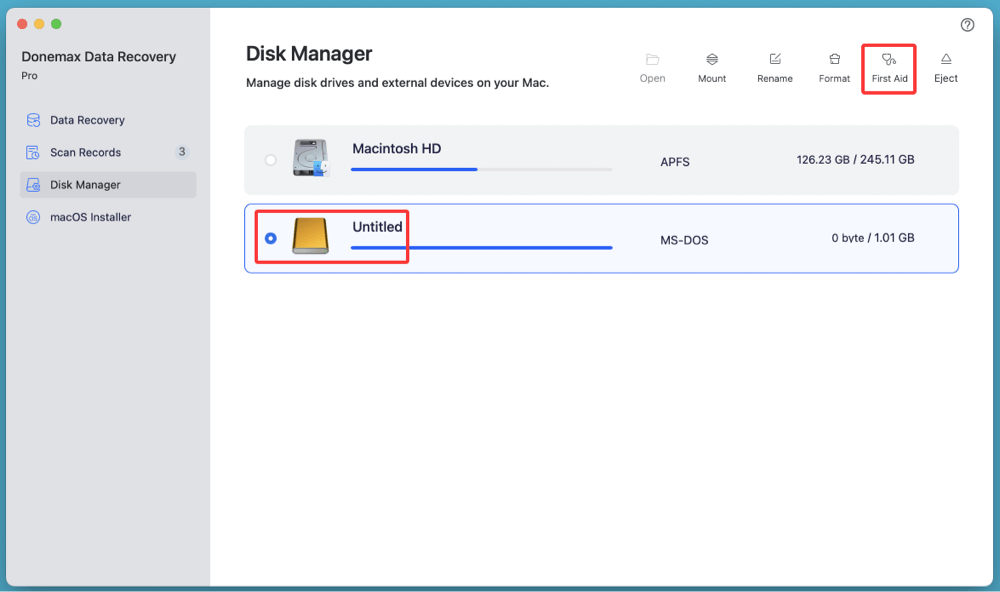
If the USB drive gets corrupted, choose Disk Manager. Select the USB drive, click on First Aid button to repair the drive.
8 Methods to Fix USB Drive Not Detected/Not Showing Up on Mac
Fix 1. Show USB Devices in Finder Settings
Your Mac might detect the USB drive, but it's simply not showing in Finder due to user settings.
Steps:
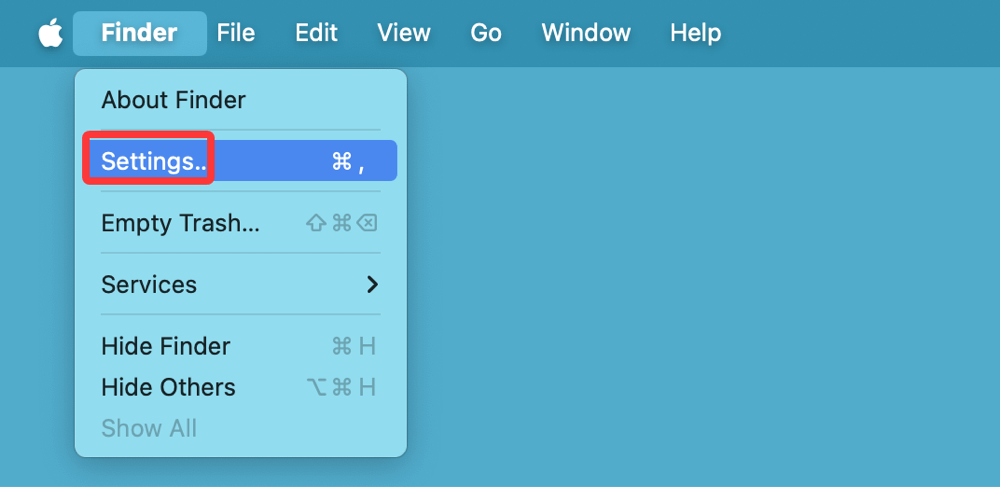
- Open Finder.
- Go to Finder > Settings (or Preferences) from the top menu.
![fixes for USB drive detection issues on a Mac]()
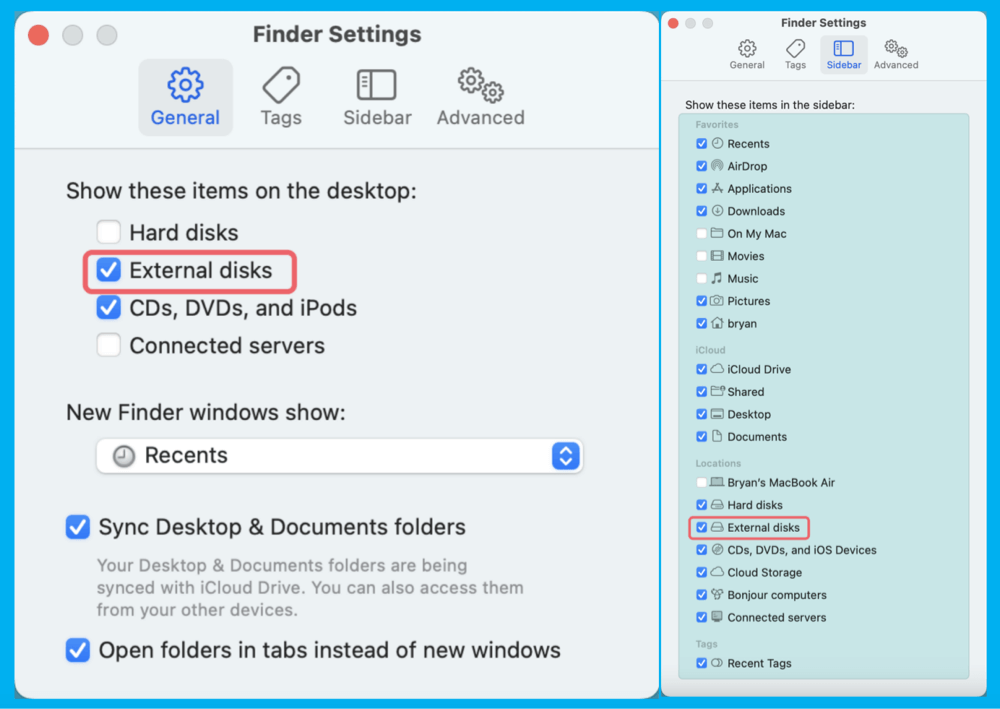
- Under the Sidebar tab, make sure External Disks is checked.
- Under the General tab, also check External Disks so they appear on the desktop.
![fixes for USB drive detection issues on a Mac]()
If these options were disabled, enabling them should immediately make your USB drive visible.
Fix 2. Check and Mount USB Drive in Disk Utility
Even if the USB drive isn't visible in Finder, it may appear in Disk Utility.
Steps:
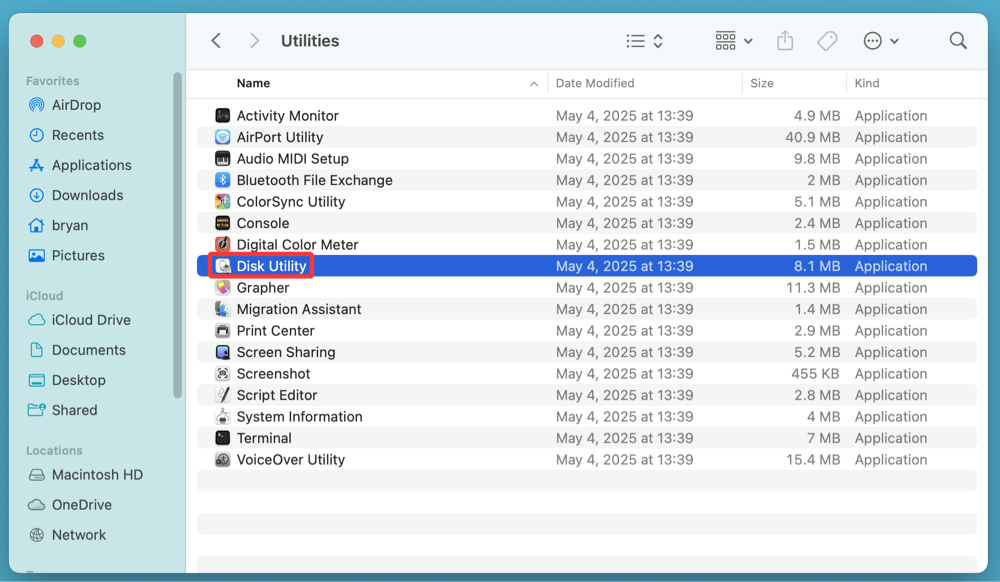
- Open Disk Utility from Utilities via Applications.
![fixes for USB drive detection issues on a Mac]()
- Look at the left-hand panel for your USB drive. If it appears but is grayed out, it means the drive is not mounted.
- Select the drive and click Mount.
![fixes for USB drive detection issues on a Mac]()
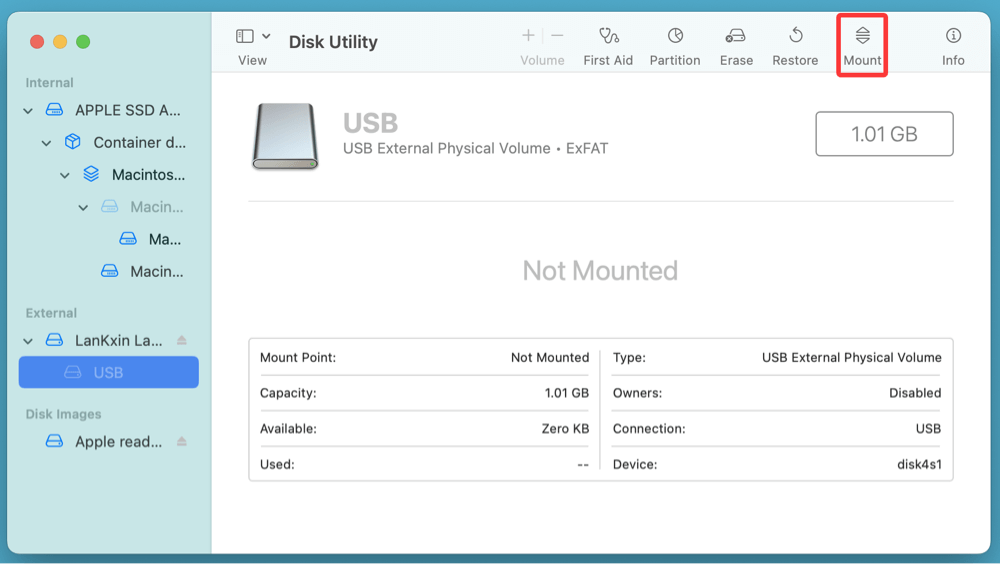
If the Mount option is unavailable or fails, continue with the First Aid or reformatting steps.
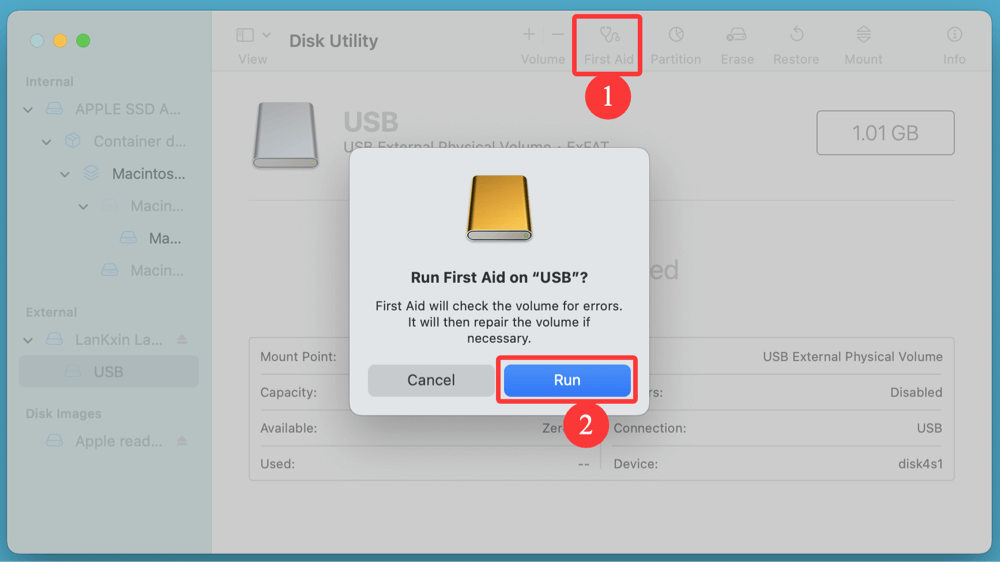
Fix 3. Run First Aid in Disk Utility
Disk Utility's First Aid tool can scan and repair minor errors on your USB drive.
Steps:
- Open Disk Utility and select your USB drive.
- Click First Aid at the top.
![fixes for USB drive detection issues on a Mac]()
- Wait for the scan to complete. If it reports a successful repair, try mounting the drive again.
![fixes for USB drive detection issues on a Mac]()
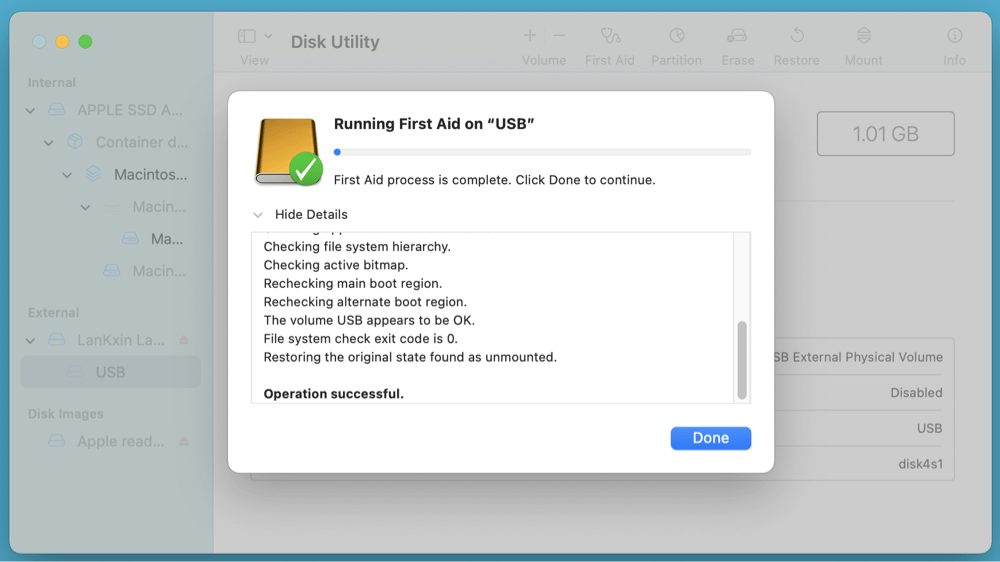
If First Aid fails, the drive may be severely corrupted or physically damaged.
Fix 4. Reset SMC and NVRAM
Your Mac's System Management Controller (SMC) and NVRAM manage USB detection and port power. Resetting them can fix hardware-related issues.
Resetting SMC (for Intel Macs):
- Turn Off your Mac.
- For ten seconds, press and hold Shift + Control + Option + Power.
- Turn your Mac back on after releasing all the keys.
- Turn Off your Mac.
- Press Option + Command + P + R as soon as you turn it on.
- Release after holding for roughly 20 seconds.
💡 Note: M-chip Macs handle SMC and NVRAM resets automatically during reboot. Simply restart the machine.
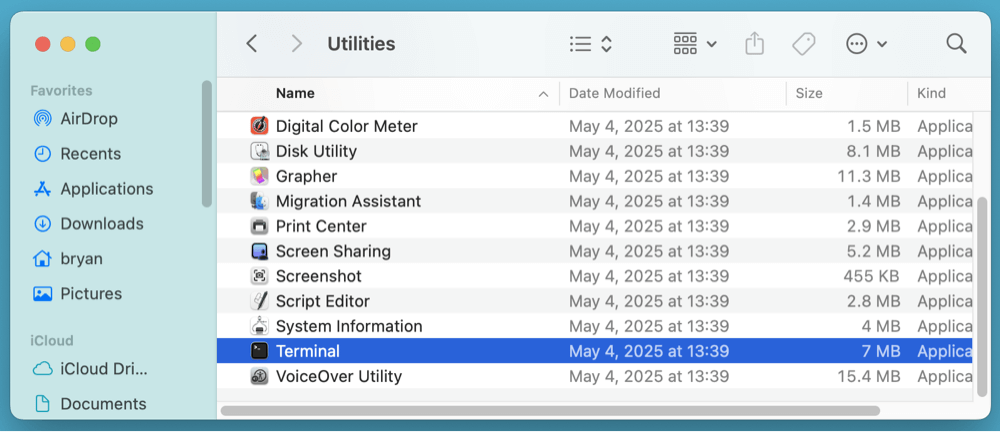
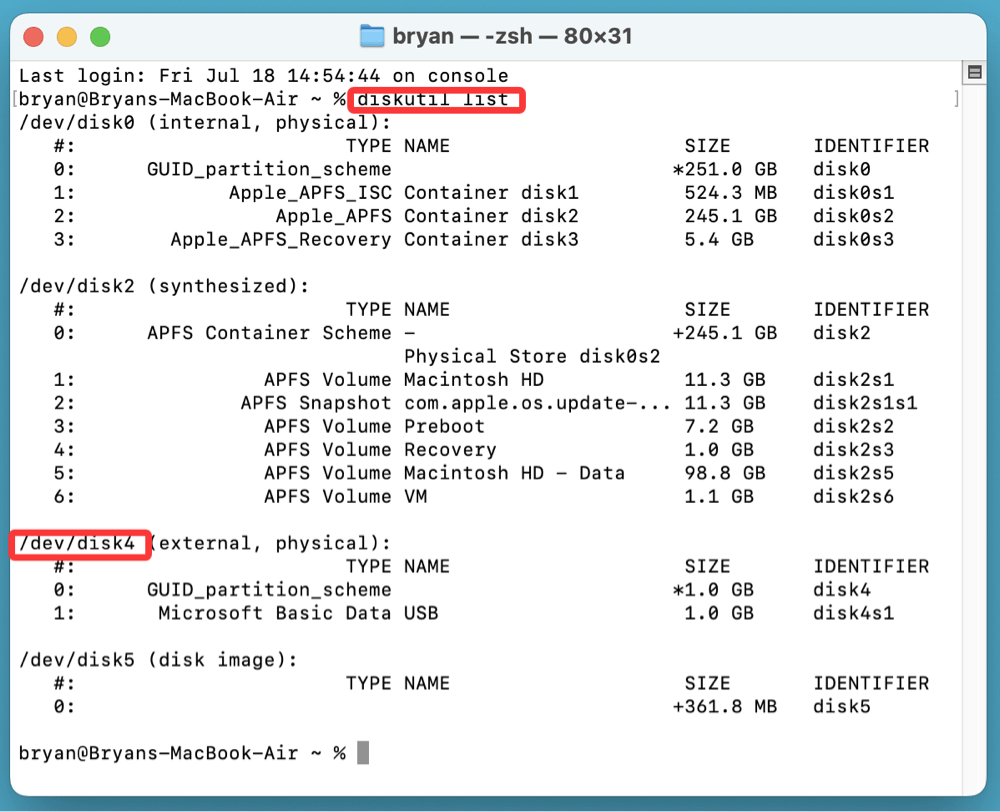
Fix 5. Use Terminal to Detect USB Drive
If your drive is not visible in Disk Utility or Finder, try using Terminal to detect it manually.
Steps:
- Open Terminal from Utilities via Applications.
![fixes for USB drive detection issues on a Mac]()
- Type:
diskutil list
This will list all connected storage devices.
- If your USB shows up, note its disk identifier (e.g., /dev/disk4).
![fixes for USB drive detection issues on a Mac]()
- To attempt mounting it manually, use:
diskutil mountDisk /dev/disk4
![fixes for USB drive detection issues on a Mac]()
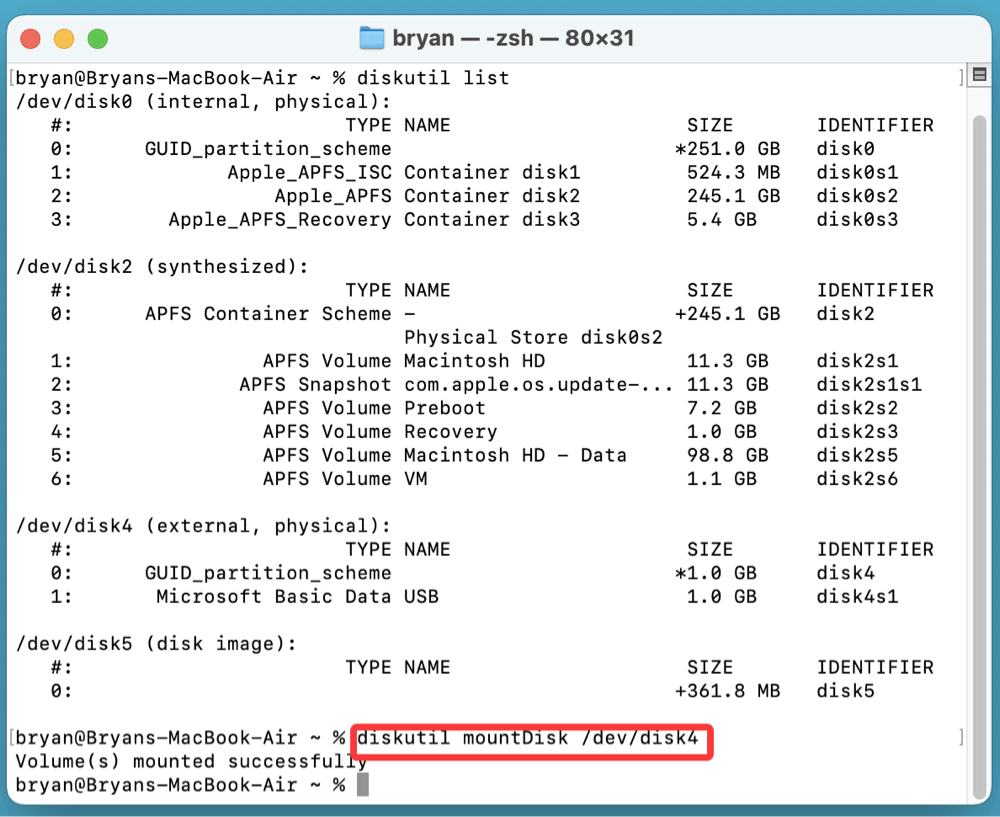
You can also try ejecting and replugging the drive, then re-running diskutil list.
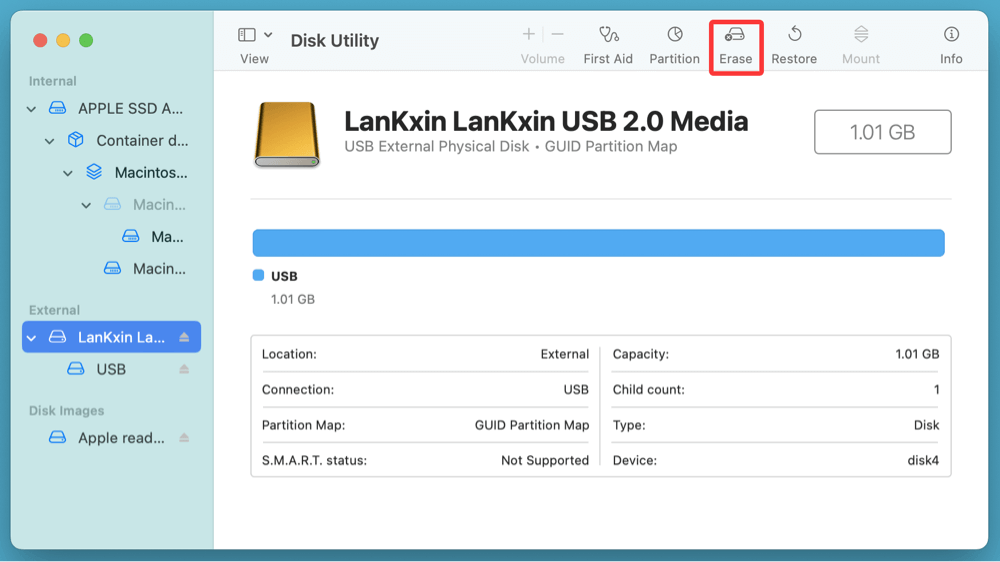
Fix 6. Reformat the USB Drive (If Recognized but Unreadable)
If the USB drive is detected in Disk Utility or Terminal but unreadable, formatting may be required. Warning: This will erase all data on the drive.
Steps:
- Open Disk Utility.
- Select the USB drive, then click Erase.
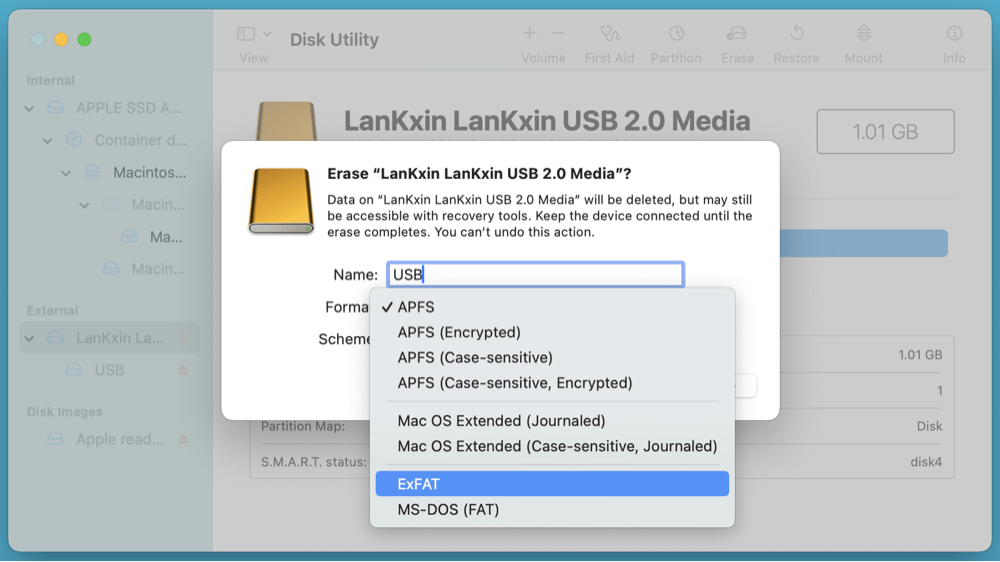
![fixes for USB drive detection issues on a Mac]()
- Choose a format:
- APFS (for use with macOS only)
- Mac OS Extended (Journaled) (older Macs)
- ExFAT / MS-DOS (FAT) (for compatibility with both Windows and Mac)
![fixes for USB drive detection issues on a Mac]()
- Give it a name and click Erase.
![fixes for USB drive detection issues on a Mac]()
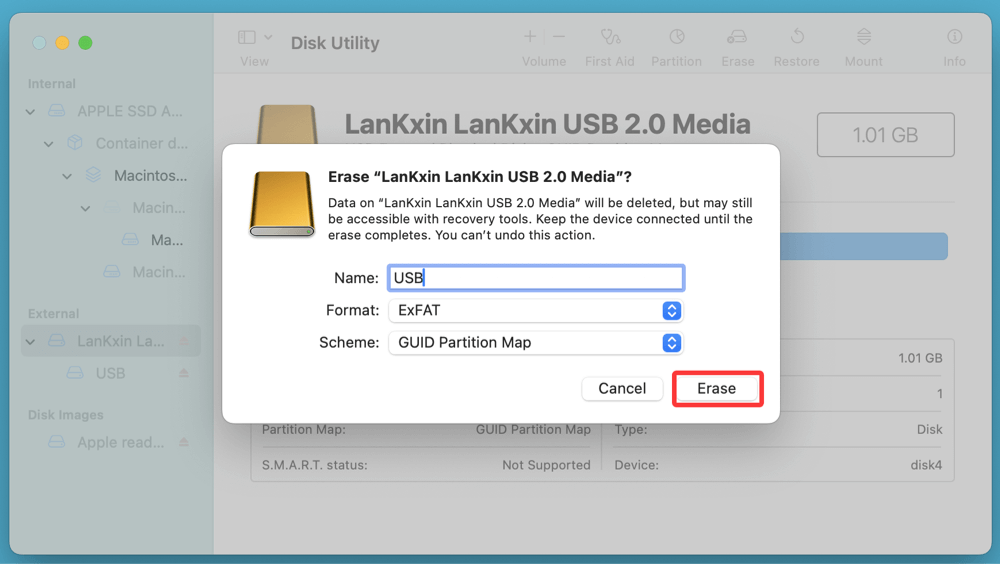
After formatting, the drive should mount automatically.
Fix 7. Fix NTFS USB Drive Not Mounting on Mac Without Formatting
Some drives (especially those pre-formatted in NTFS) require additional drivers on Mac.
NTFS Drives:
macOS can read NTFS but cannot write to it without third-party software.
Recommended NTFS Tools for Mac:
- Donemax NTFS for Mac
- Tuxera NTFS
- Mounty for NTFS
Ensure any required drivers are installed and updated.
For example, you can use Donemax NTFS for Mac to mount and write data to NTFS USB drive on Mac:
Step 1. Download and install Donemax NTFS for Mac on your Mac.
Step 2. Open Donemax NTFS for Mac, select the NTFS USB drive, click on Mount button.
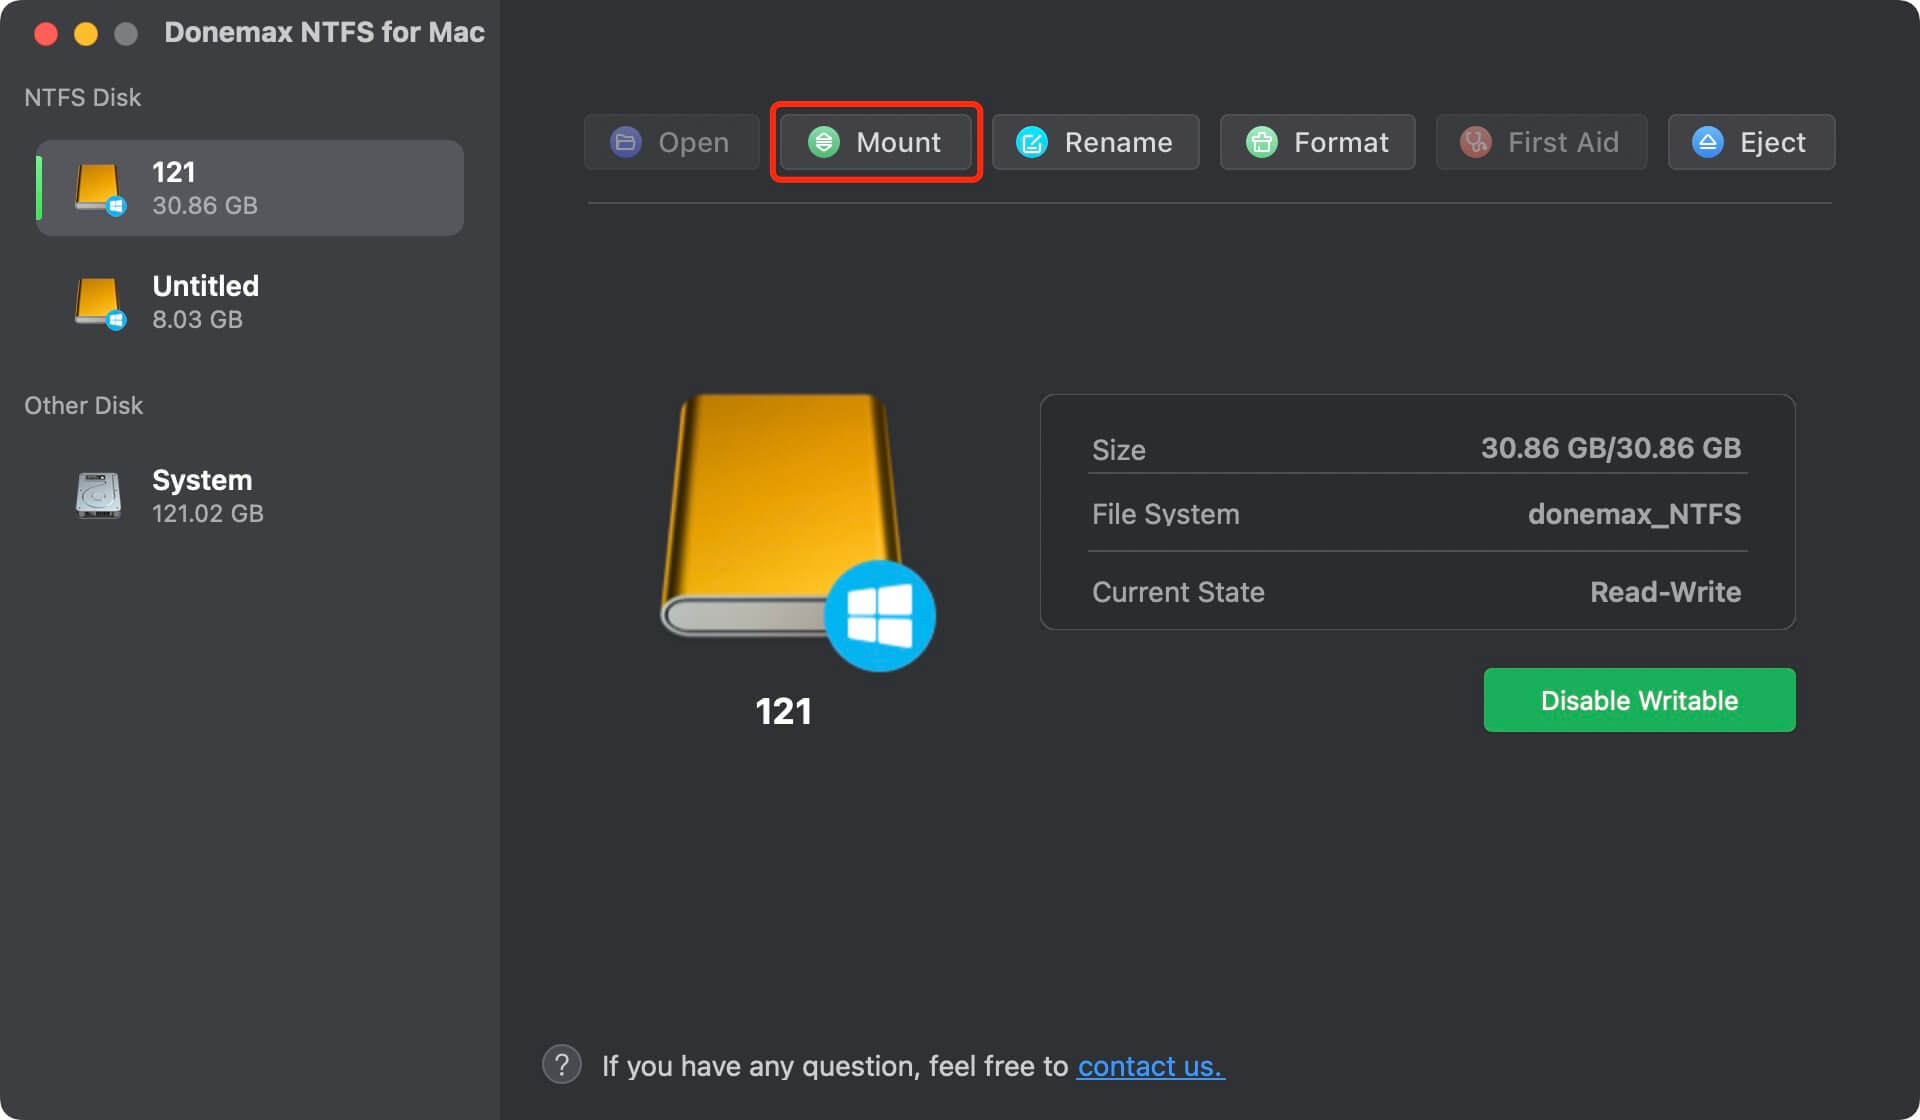
Step 3. To write data to the NTFS USB drive, click on Enable Writable button.

Manufacturer-Specific Tools:
Check the drive manufacturer's website for Mac utilities. Western Digital and Seagate often bundle software that affects USB detection.
Fix 8. Contact Apple Support or Use Data Recovery Services
If the USB drive still isn't recognized:
- Test with another computer. If it's also unrecognized there, it may be physically damaged.
- Contact Apple Support if you suspect hardware issues with the USB ports or macOS.
- For important data, contact a professional data recovery service like Ontrack or DriveSavers.
Bonus Tips to Prevent USB Detection Issues
- Eject Drives Properly
Always eject drives before unplugging them to avoid corruption.
- Use High-Quality USB Drives
Cheap or no-brand drives are more prone to failure.
- Avoid Excessive Plug-Unplug Cycles
Repeated removal can wear out USB ports and connectors.
- Keep macOS Updated
Security and stability updates often include USB-related bug fixes.
Conclusion
A Mac not detecting your USB drive can be stressful, especially if critical files are involved. Fortunately, most issues are software-related and fixable using built-in tools like Disk Utility and Terminal. Begin with simple checks such as restarting your Mac, updating macOS, and inspecting Finder settings/preferences. For more stubborn issues, use First Aid, reset system settings, or rely on professional recovery tools. With patience and the right steps, you can often recover access to your USB drive without losing data.
If your USB drive still doesn't show up after these steps, it may be time to seek help from Apple or a professional recovery service. Always maintain regular backups to avoid future data loss situations.
FAQs About Fixing USB Drive Not Detected on Mac
1️⃣ How to fix USB drive not showing up on Mac?
First of all, open Finder Settings, click General and Sidebar, ensure External disks is selected. If the USB drive is still not showing up, open Disk Utility to mount or repair the USB drive.
2️⃣ How to use data recovery software to recover data from corrupted USB drive on Mac?
When your USB drive is detected in Disk Utility or Terminal but cannot be mounted or accessed, there's a high likelihood that the file system is corrupted. In such situations, reformatting the drive without first retrieving your data can lead to permanent data loss. Fortunately, professional data recovery software for macOS can help recover files before reformatting.
When Should You Use Recovery Software?
Use recovery software if:
- The USB drive is listed in Disk Utility but can't be mounted.
- The drive shows as "RAW" or "uninitialized."
- First Aid fails to repair the volume.
- Finder shows an error like "The disk you inserted was not readable by this computer."
- Files were deleted or the drive was accidentally formatted.
Best Practices Before Running Recovery:
- Stop using the USB drive immediately. Continued use may overwrite recoverable files.
- Do not attempt repeated reformatting or erasing.
- Avoid saving recovered files back to the same USB drive. Use your Mac’s internal disk or another external drive.
Recommended Data Recovery Tools for Mac
1. Donemax Data Recovery for Mac
Pros: Clean UI, supports most file types and drives, repair corrupted USB drive
How to Use:
- Download and install Donemax Data Recovery for Mac.
- Open Donemax Data Recovery for Mac, select your USB drive from the list.
- Click Scan.
- Preview files (photos, videos, documents).
- Select and recover them to a safe location.
2. EaseUS Data Recovery Wizard for Mac
Pros: Simple wizard interface, fast deep scanning, recovers deleted partitions.
How to Use:
- Install from EaseUS official site.
- Launch the app and scan the unrecognized USB drive.
- Filter by file type (e.g., images, videos).
- Recover and export files.
3. Stellar Data Recovery for Mac
Pros: Excellent at photo and video recovery, supports encrypted drives.
How to Use:
- Download from StellarInfo.
- Select "USB drive" from the list of available volumes.
- Choose scan type: Quick or Deep.
- Review and restore critical files.
Security and Privacy Note
Reputable data recovery apps do not transmit your data to cloud servers. All scanning and recovery operations happen locally on your Mac. Always download recovery software from the official websites to avoid malware and counterfeit programs.
What to Expect from Recovery
- Recovery success depends on how much the data structure is damaged.
- Files may be recovered with original names or assigned generic filenames.
- Previewing files before recovery helps verify the success rate.
Cost Consideration
While most of these tools offer a free scan and preview, full data recovery typically requires a paid license. Expect pricing to range between $49 ~ $99 for a single Mac license.
3️⃣ What is the best USB repair tool for Mac?
Here is the list of top 5 USB drive repair tool for Mac:
- Donemax Data Recovery for Mac
- Donemax NTFS for Mac
- Terminal
- Disk Utility
- DMcleaner for Mac
Donemax Data Recovery for Mac
Donemax Data Recovery for Mac is one of the best Mac data recovery software. It is easy-to-use and can help in recovering deleted, formatted, inaccessible or lost data from Mac HDD/SSD, external disk, USB drive, SD card, camera or other storage devices.
Related Articles
- Mar 19, 2025How to Use Seagate Game Drive PS5 SSD?
- Sep 01, 2025How to Fix Dead WD External HDD or SSD?
- Feb 17, 2025Fix External Hard Drive Not Responding Without Losing Data [6 Solutions]
- Apr 14, 2026How to Clean Install macOS Monterey: The Ultimate 2026 Step-by-Step Guide
- Dec 26, 2024Format a WD External Hard Drive for Both Windows and macOS
- Apr 16, 2025How to Remove BitLocker Password of My USB Drive: A Step-by-Step Guide

Contributing Writer
Steven
Steven has been a senior writer & editor of Donemax software since 2020. He's a super nerd and can't imagine the life without a computer. Over 6 years of experience of writing technical solutions and software tesing, he is passionate about providing solutions and tips for Windows and Mac users.

Editor in chief
Gerhard Chou
In order to effectively solve the problems for our customers, every article and troubleshooting solution published on our website has been strictly tested and practiced. Our editors love researching and using computers and testing software, and are willing to help computer users with their problems