
Written byStevenUpdated on Apr 15, 2025
How to Wipe APFS Volume on Mac: A Complete Guide
Approved byGerhard Chou
Before we start: Donemax Data Eraser for Mac is a powerful disk wipe program. It can help securely wipe an APFS volume on Mac and permanently erase all data from the volume. Once the data is erased by Donemax Data Eraser for Mac, the data is lost for good, cannot be recovered by any method.
PAGE CONTENT:
If you're planning to reset your Mac, fix file system issues, or repurpose your storage, knowing how to wipe an APFS volume safely is crucial. Apple's APFS (Apple File System) is the modern standard for Macs using macOS 10.13 High Sierra and later, offering better performance, snapshot support, and space sharing features. However, its structure can be a bit tricky for users who aren't familiar with terms like volumes, containers, or disk identifiers.
In this guide, we'll walk you through everything you need to know about wiping an APFS volume - from what it is, when to wipe it, how to do it using Disk Utility or Terminal, and how to troubleshoot common errors.
What is an APFS Volume?
APFS stands for Apple File System, introduced by Apple in 2017 to replace HFS+. It is optimized for SSDs and flash storage but works across all types of disks. One of APFS's most important innovations is the container-based structure.

In APFS, a container is like a disk partition, and it can host one or multiple volumes. Each volume within a container shares the available storage dynamically, which is a key difference from traditional fixed partitions.
Key Components:
- APFS Container: A logical storage area that holds volumes.
- APFS Volume: A logically independent storage space inside the container, with its own file system.
- Snapshots: Read-only instances of a volume at a particular point in time.
Volume vs. Container:
- Wiping a Volume: Deletes the data in that specific volume, leaving other volumes intact.
- Wiping a Container: Erases all volumes inside it.
Knowing the difference ensures you don't accidentally erase more than intended.
Why Wipe an APFS Volume?
There are several reasons why you might want to wipe an APFS volume on your Mac:
- Preparing to sell or donate your Mac.
- Resolving persistent file system issues or corruption.
- Removing malware or unwanted software completely.
- Performing a clean installation of macOS.
- Reclaiming storage space.
However, wiping is irreversible - so always back up your data before you begin.
Backup Your Data Before You Wipe
Before you proceed with wiping any disk or volume, back up your data. This step is essential and cannot be emphasized enough.
Recommended Backup Methods:
- Time Machine: Apple's built-in backup tool that stores snapshots of your system.
- External Drive: Manually copy important files to an external HDD or SSD.
- iCloud Drive: Use Apple’s cloud service to sync and store key files.
- Third-party backup tools: Donemax Disk Clone for Mac, Carbon Copy Cloner or SuperDuper! for bootable backups.
Backup Checklist:
- Documents, downloads, and desktop files.
- Photos, videos, and music.
- Email archives.
- Application preferences.
- Browser bookmarks.
Once you've ensured your data is secure, you're ready to proceed.
Three Methods to Wipe an APFS Volume on Mac?
Method 1: How to Wipe APFS Volume Using Disk Utility
Disk Utility is the most user-friendly way to erase an APFS volume. It comes pre-installed with macOS and allows you to manage internal and external drives.
Steps:
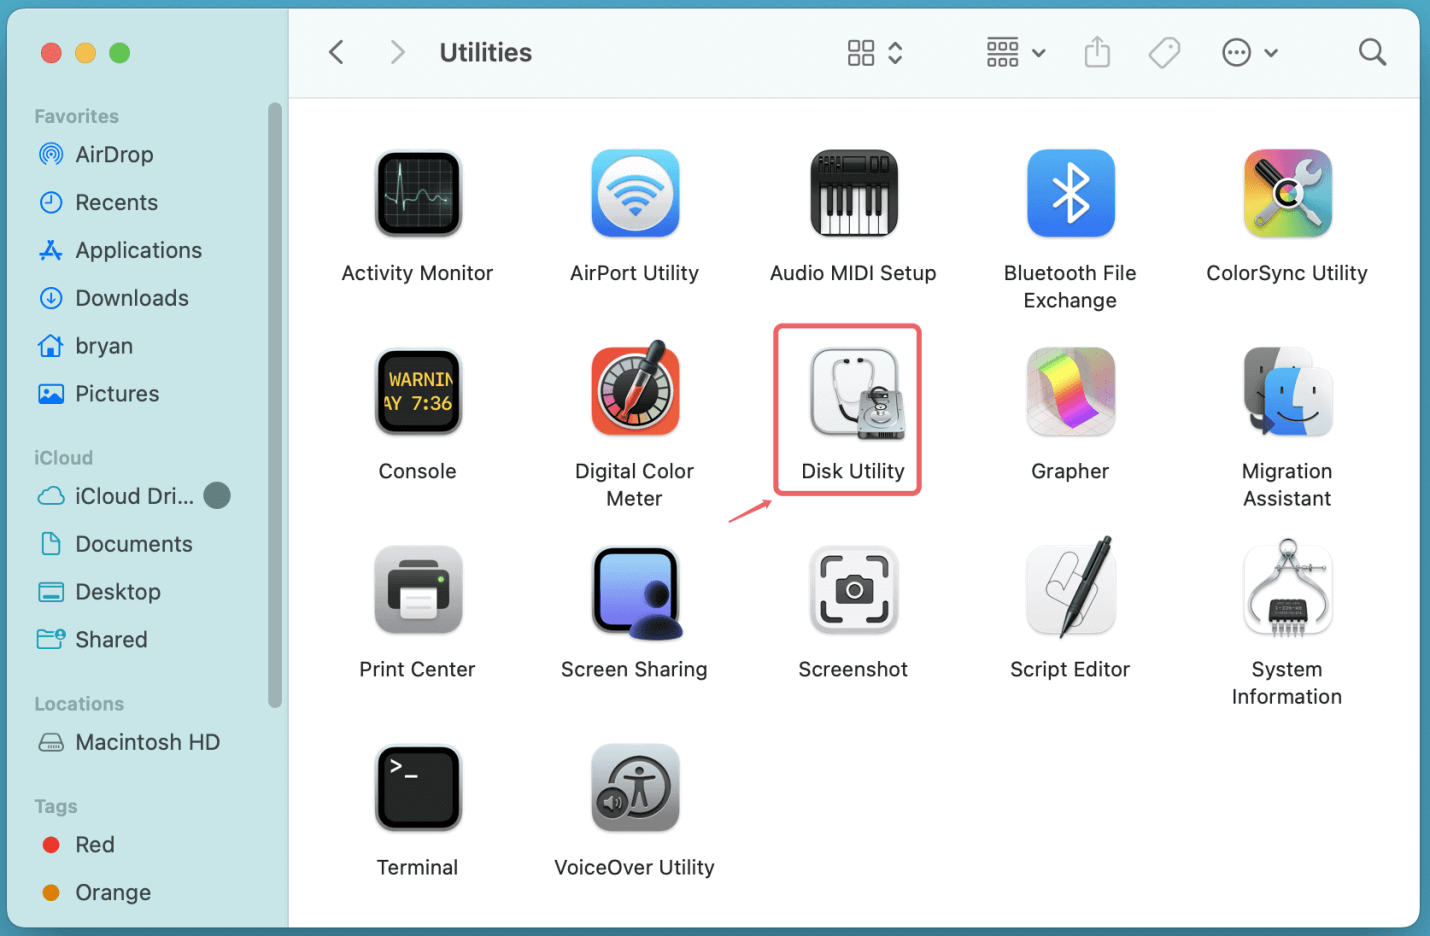
- Launch Disk Utility: Go to Disk Utility from Utilities via Applications.
![Wiping an APFS volume on Mac]()
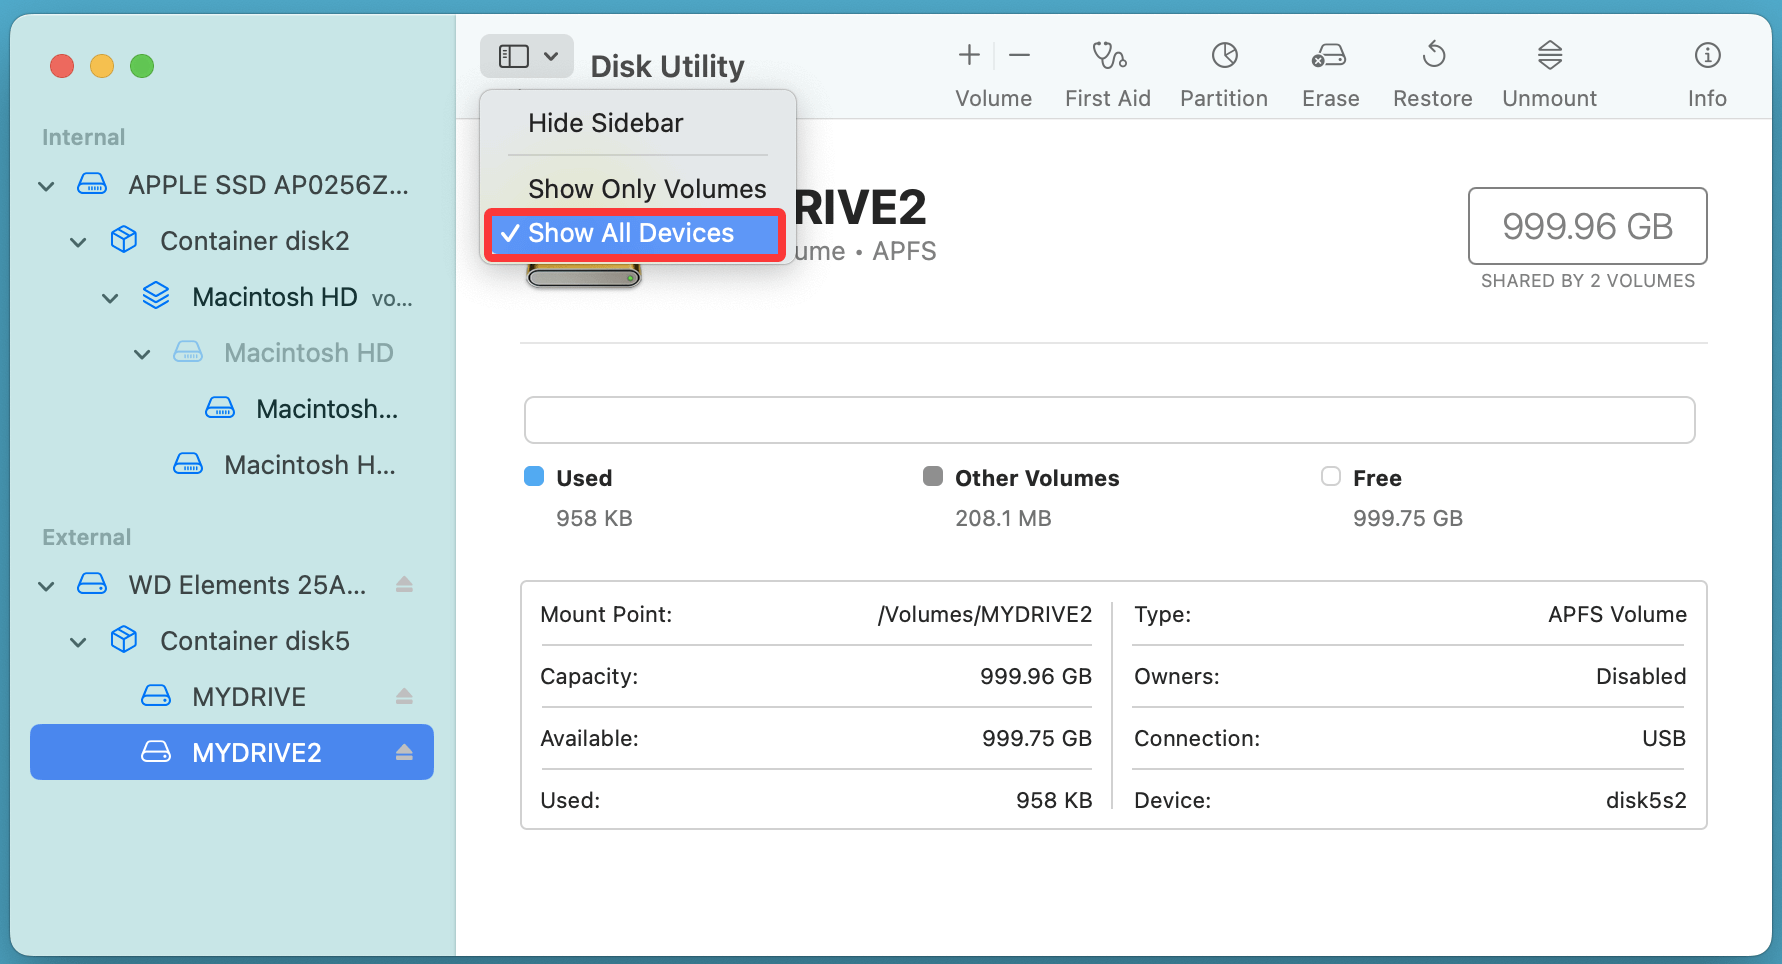
- Show All Devices: Click View in the top-left and select Show All Devices to reveal the disk hierarchy (containers, volumes).
![Wiping an APFS volume on Mac]()
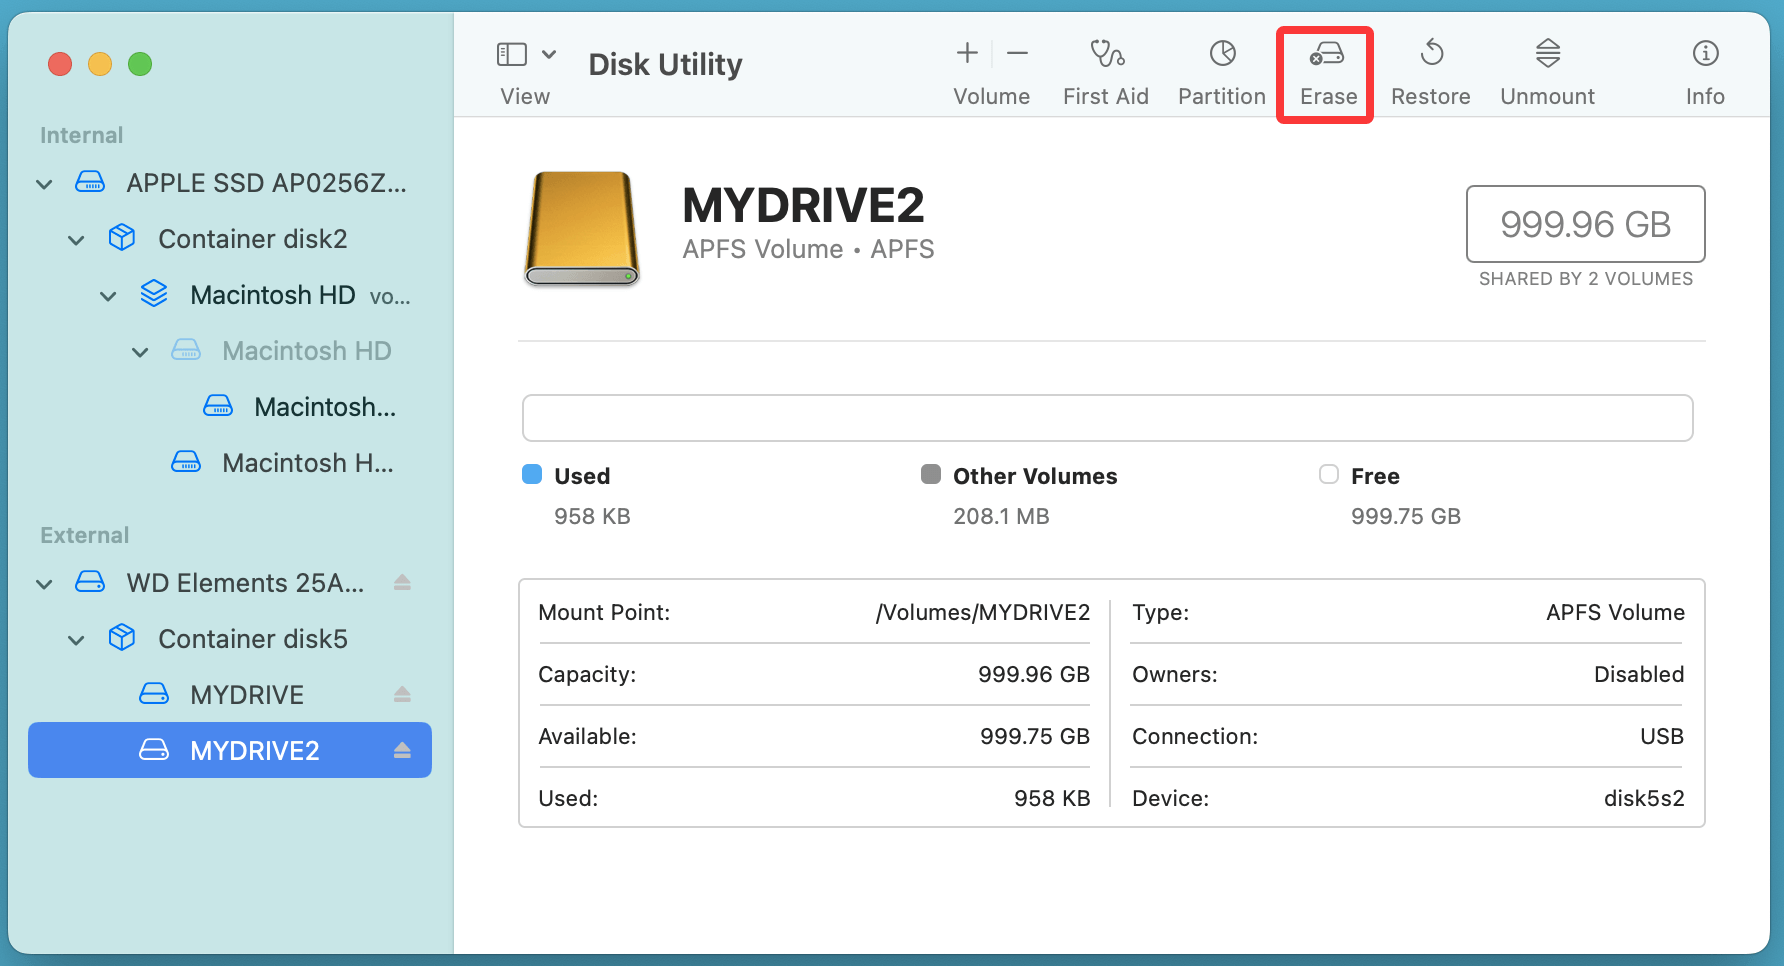
- Select the Volume: In the sidebar, select the specific APFS volume you want to wipe - not the container unless you want to erase everything inside.
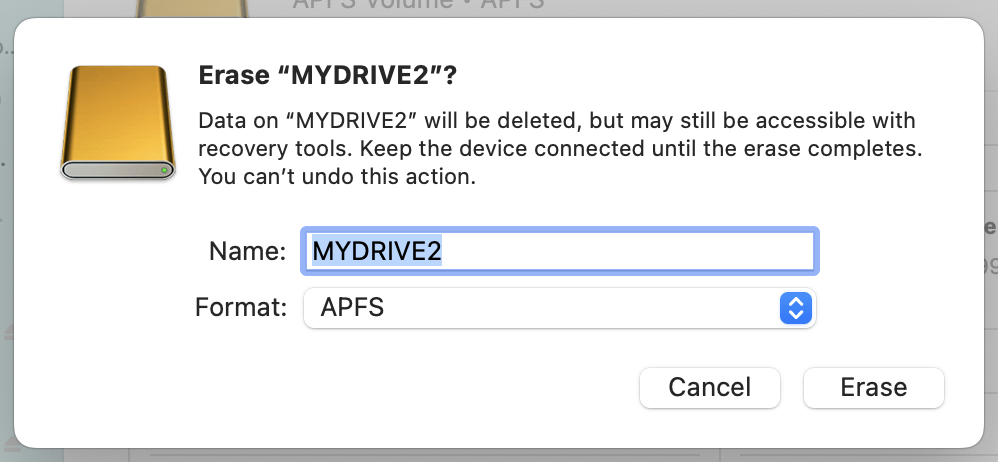
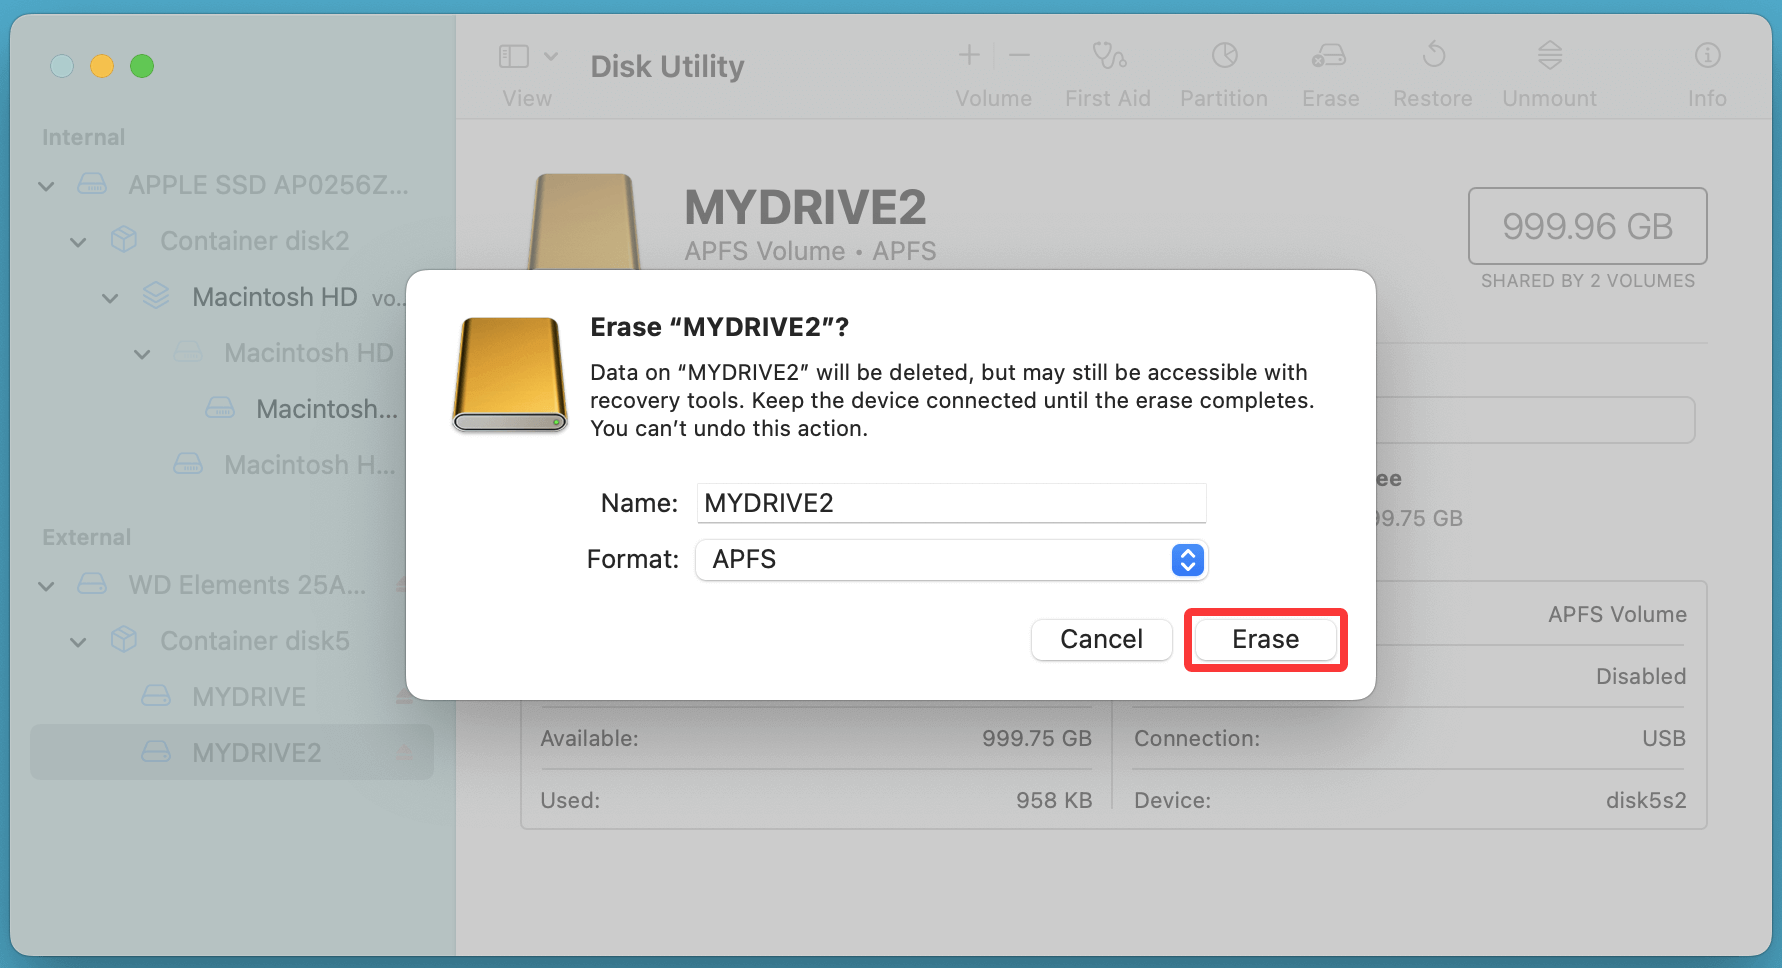
- Click Erase: In the toolbar, click Erase.
![Wiping an APFS volume on Mac]()
- Choose Format and Name: Format: Select APFS, or another format if needed. Name: Give the volume a name (or keep the default).
![Wiping an APFS volume on Mac]()
- Click Erase to Confirm: Wait for the process to complete. It usually takes seconds to minutes.
![Wiping an APFS volume on Mac]()
- Done: Once complete, the volume will be empty and ready for reuse.
💡 Note: Avoid erasing the Startup Disk while you're logged into it. You must boot from another volume or macOS Recovery to erase it.
Method 2: How to Wipe APFS Volume Using Terminal
For advanced users or when Disk Utility fails, Terminal offers more flexibility through the diskutil command.
Step-by-Step:
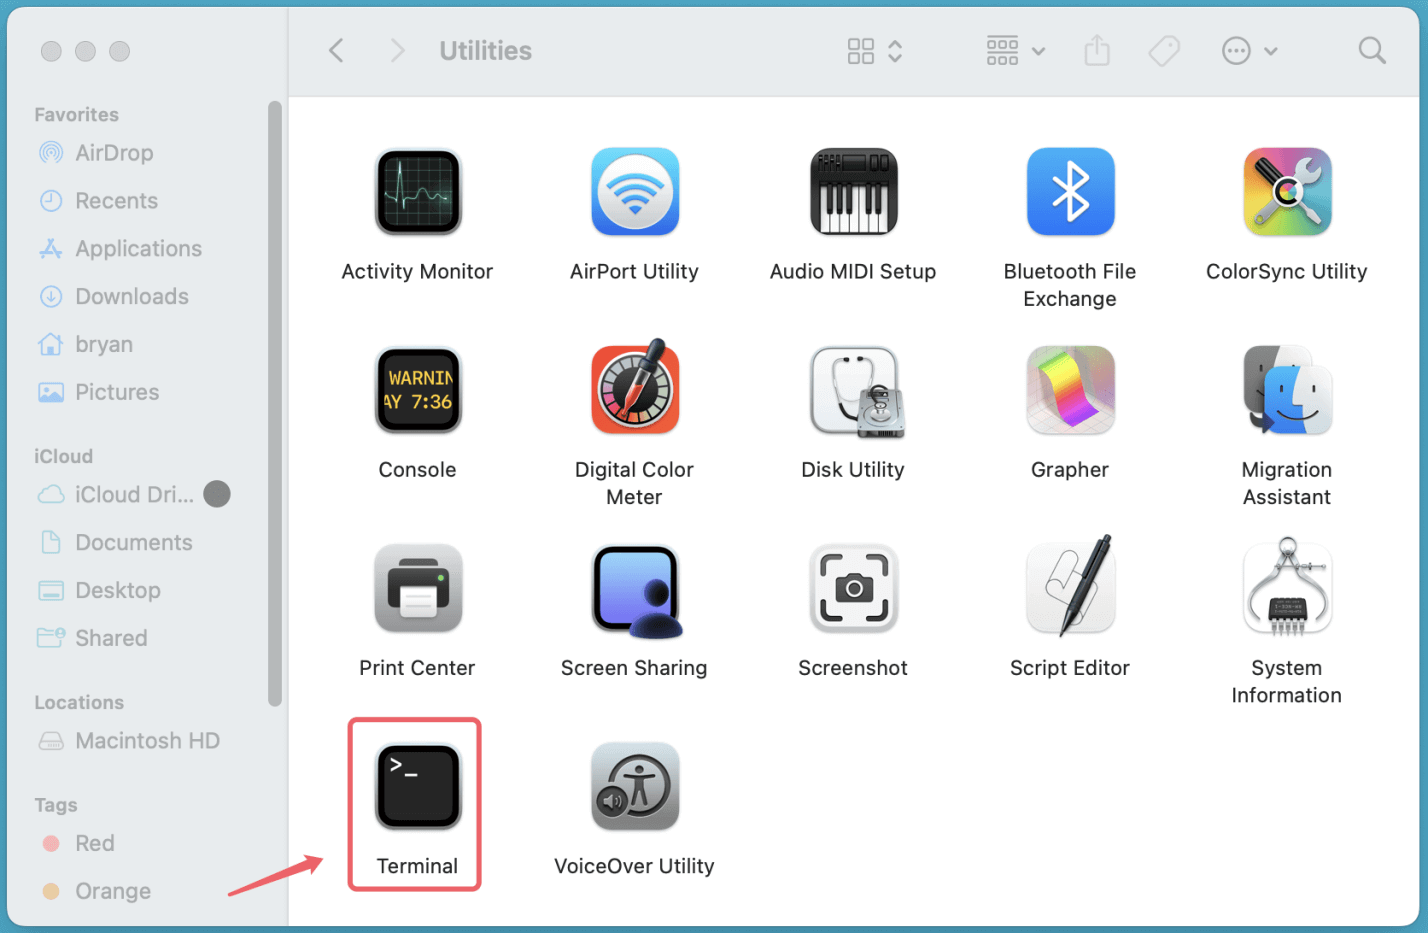
- Open Terminal: Terminal from Utilities via Applications.
![Wiping an APFS volume on Mac]()
- Identify the Volume:
diskutil list
This lists all volumes, containers, and disk identifiers (like /dev/disk4s2).
- Unmount the Volume (if needed):
diskutil unmount /dev/disk4s2
- Erase the Volume:
diskutil eraseVolume APFS NewName /dev/disk4s2
![Wiping an APFS volume on Mac]()
- Replace "NewName" with your desired volume name.
- Replace /dev/disk4s2 with your actual volume identifier.
- Verify: Run diskutil list again to confirm the volume has been erased and renamed.

This method gives you more control and is often faster than using Disk Utility, especially for scripting or remote management.
Method 3: How to Wipe an APFS Volume Using Mac Disk Wipe Software
Whether the APFS volume is erased by Disk Utility or Terminal, the data stored on the APFS volume is not lost for good and can be recovered by data recovery software. If you want to permanently erase data from an APFS volume on Mac, you can try Mac disk wipe software.
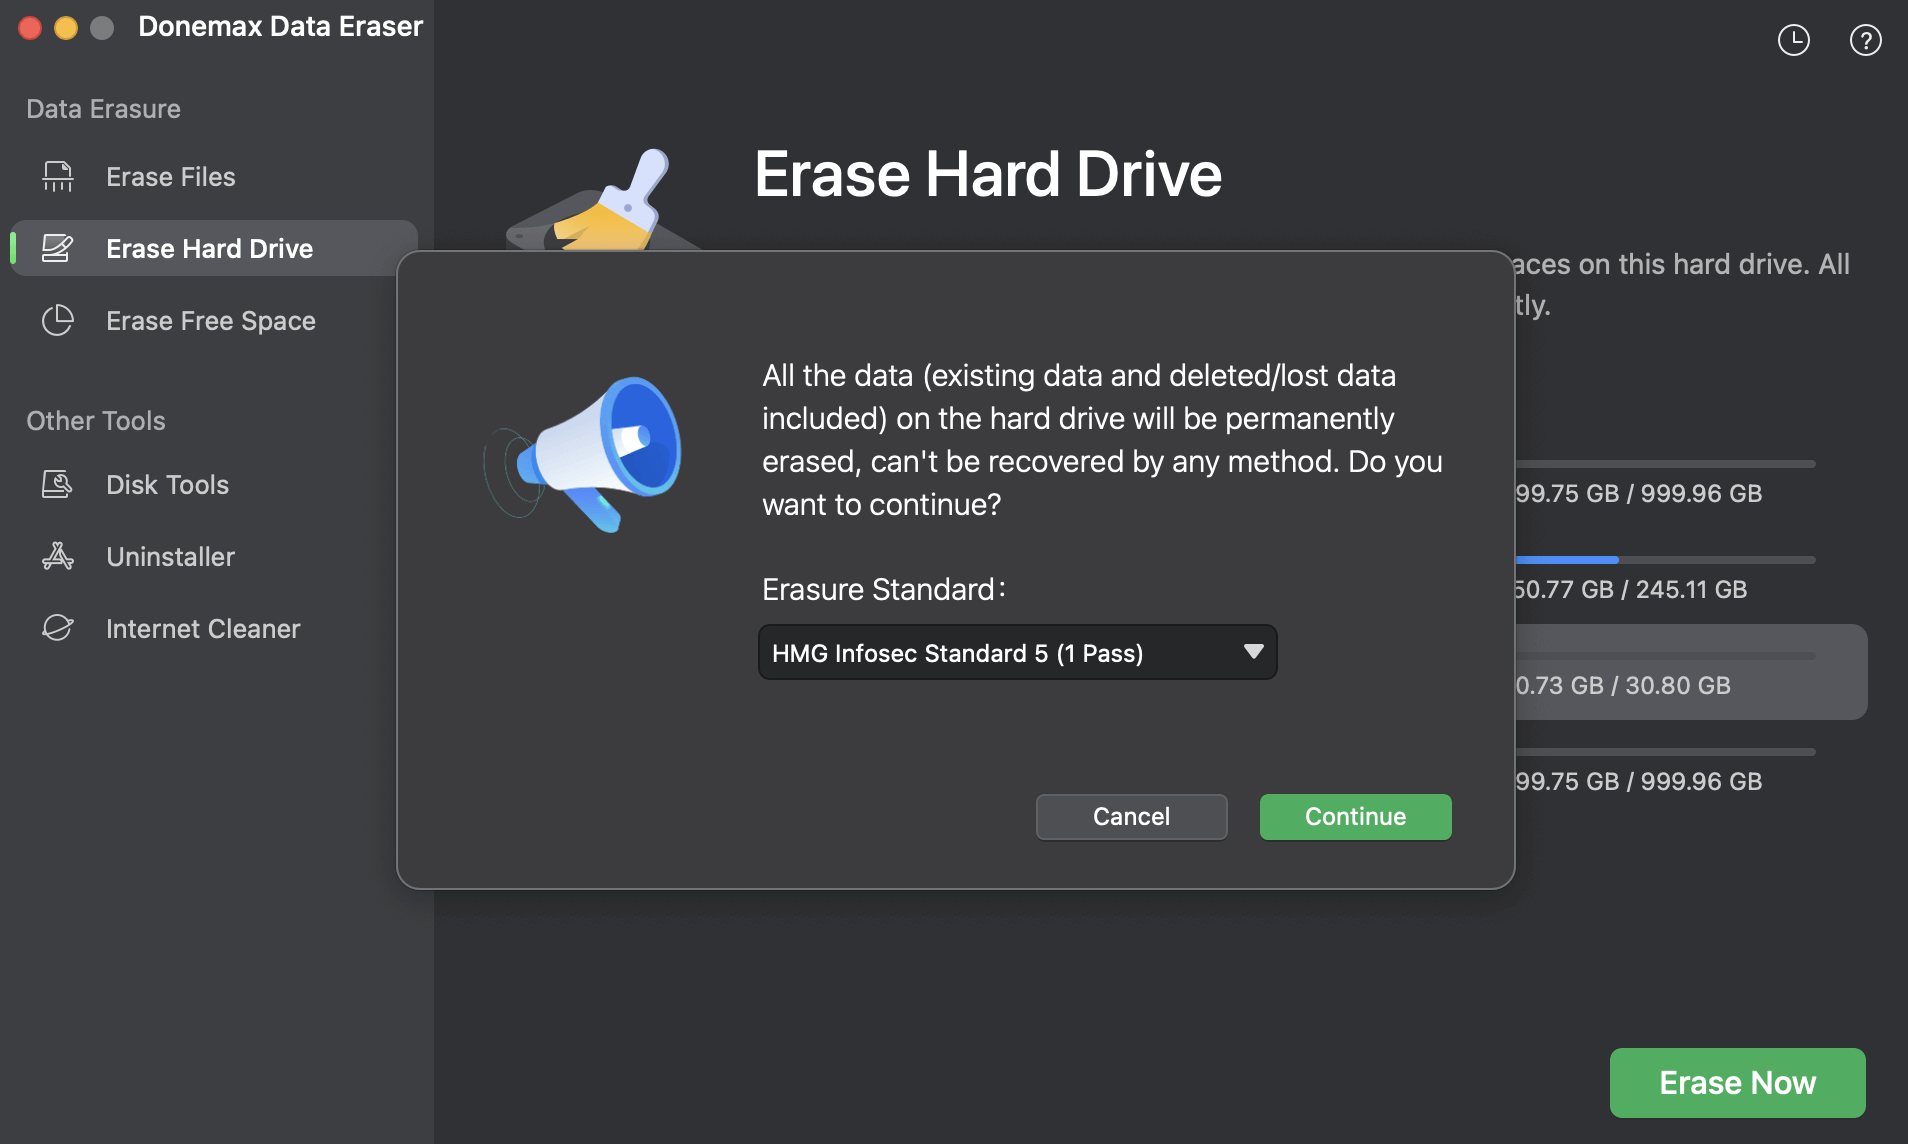
Step 1. Download and install the best disk wipe software - Donemax Data Eraser for Mac on your Mac.
Step 2. Open Donemax Data Eraser for Mac, choose Erase Hard Drive mode. Then select the APFS volume you want to wipe, click on Erase Now button.
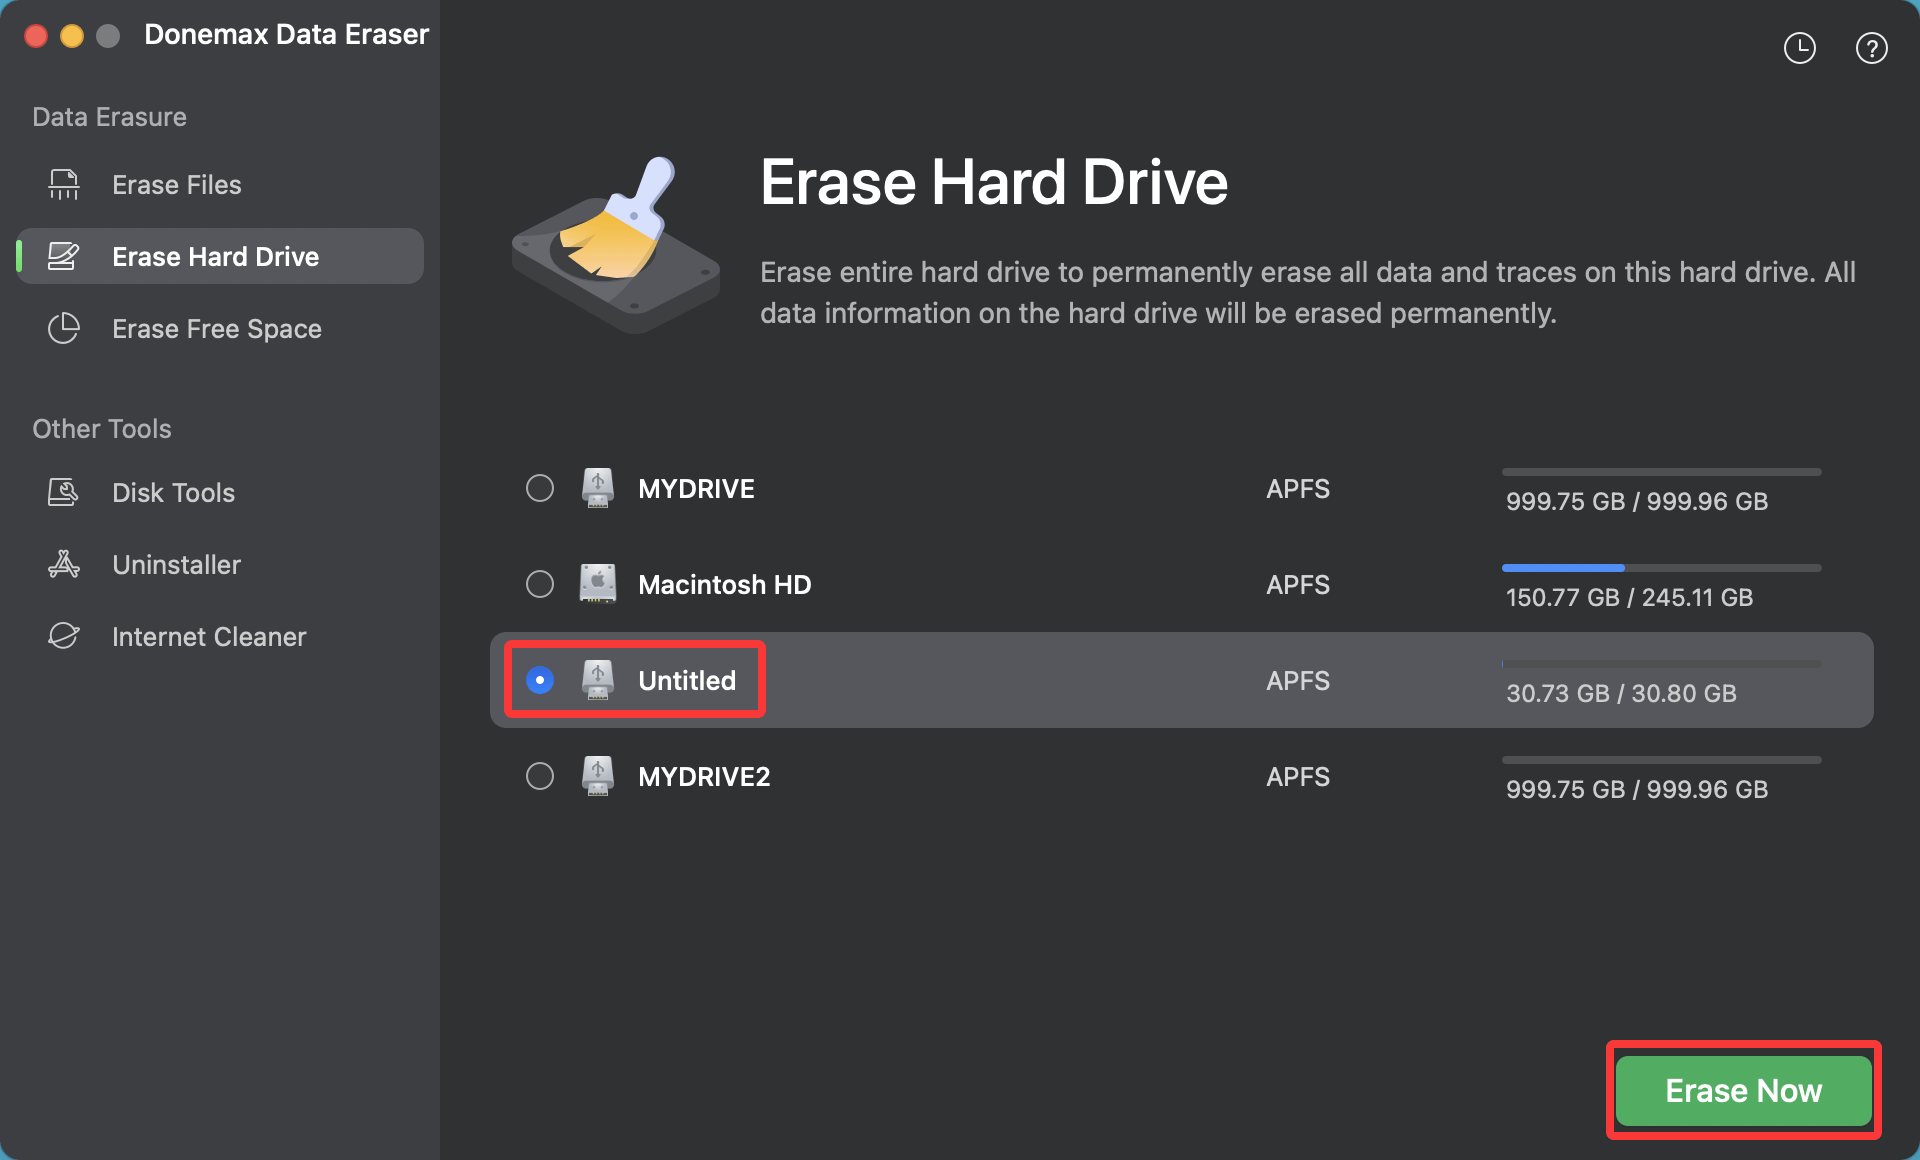
Choose a data erasure standard, click Continue. Donemax Data Eraser will securely wipe the selected APFS volume and permanently erase all data from it, beyond the scope of data recovery.
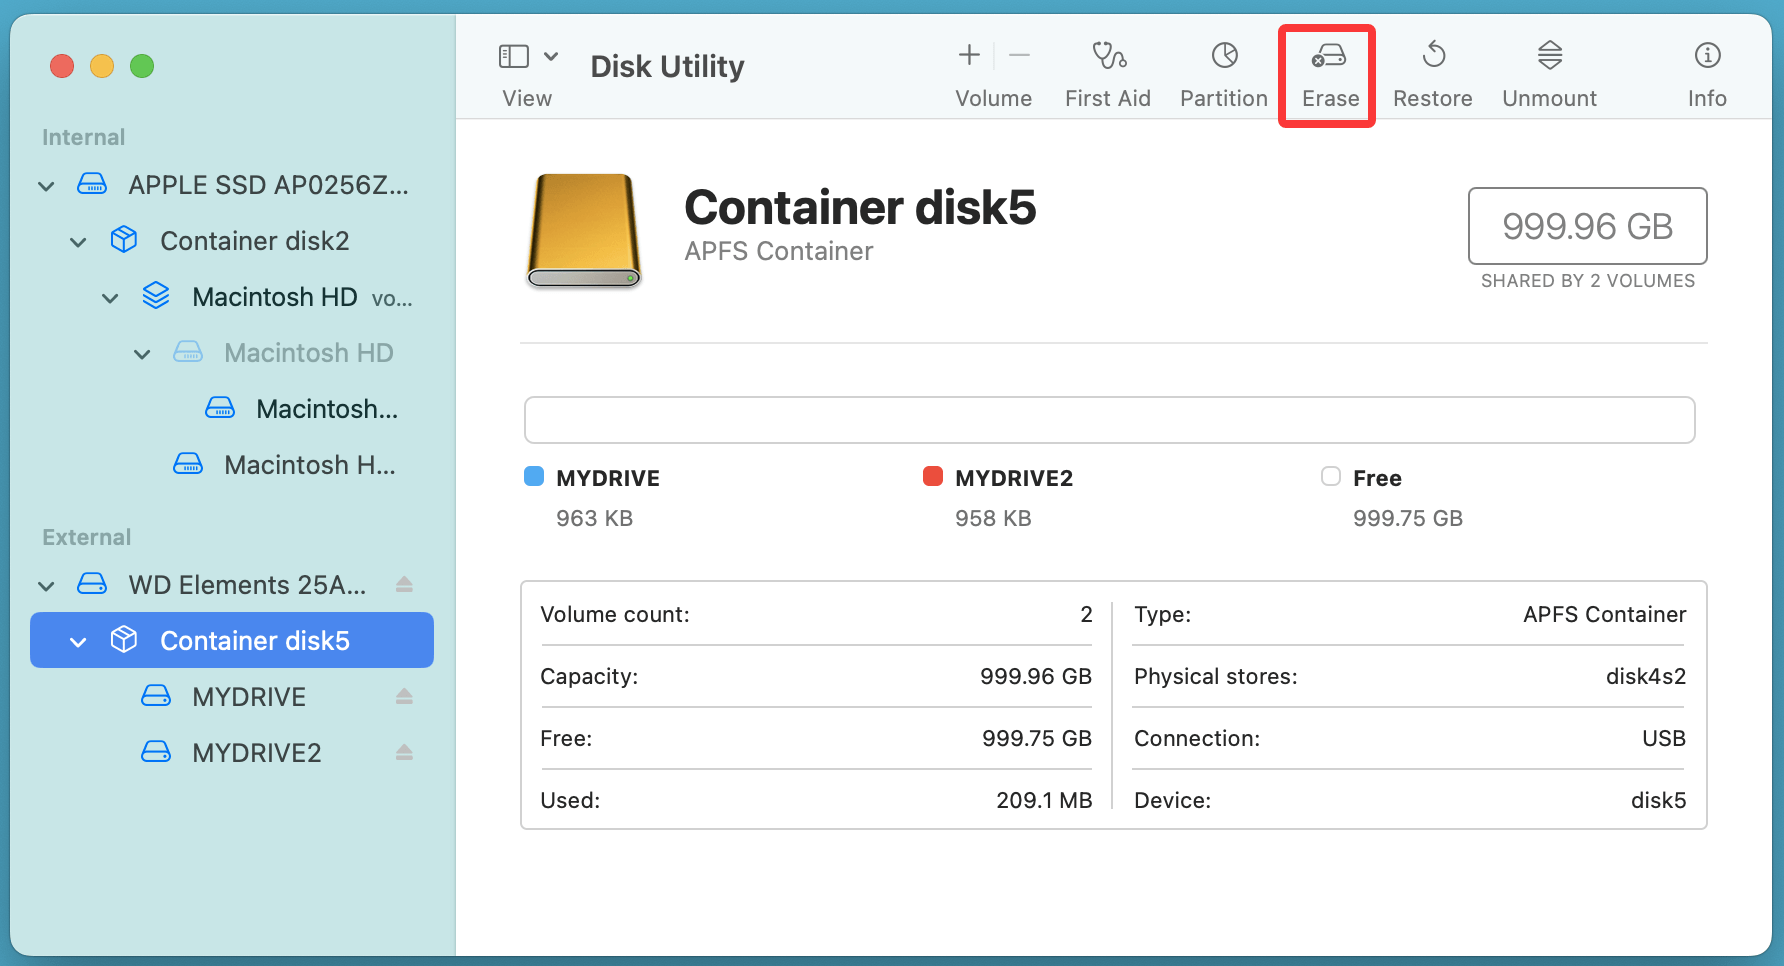
How to Wipe an APFS Container or Entire Disk?
If you're planning to completely reset your Mac, sell it, or eliminate all volumes, you'll need to erase the entire container or disk.
Using Disk Utility:
- Go to Disk Utility from View via Show All Devices.
- Select the container or physical disk in the sidebar.
- Click Erase.
![Wiping an APFS volume on Mac]()
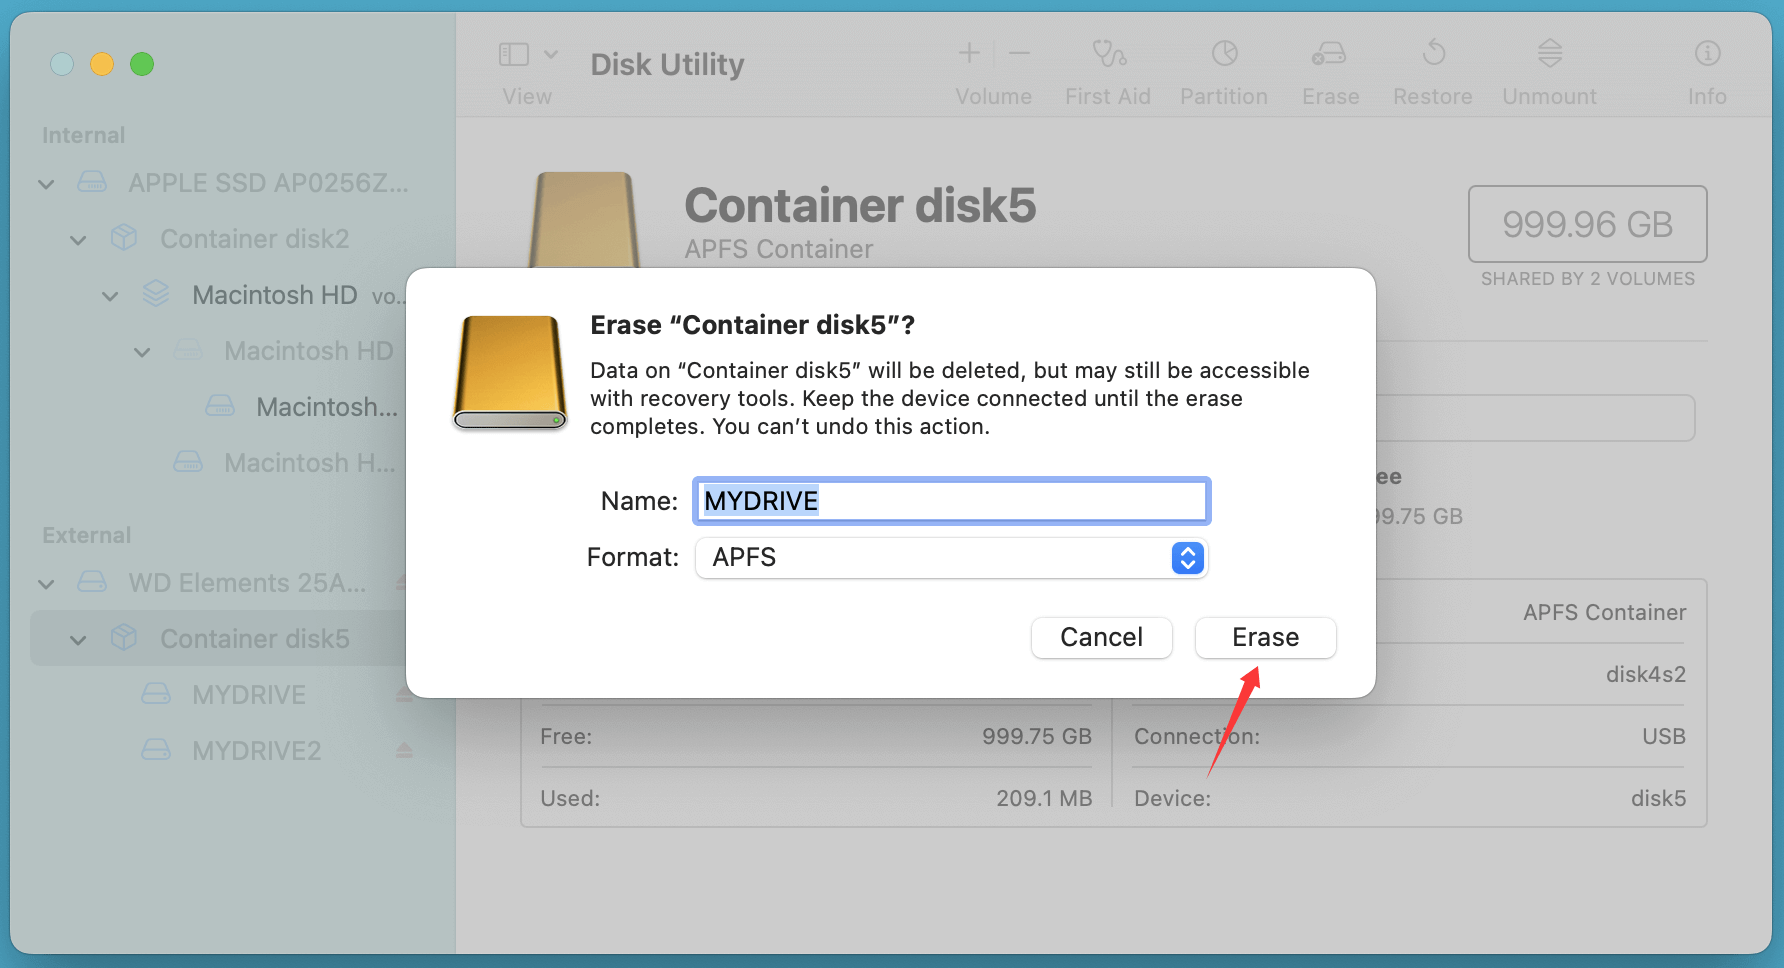
- Choose Format (usually APFS or Mac OS Extended).
- Click Erase again to confirm.
![Wiping an APFS volume on Mac]()
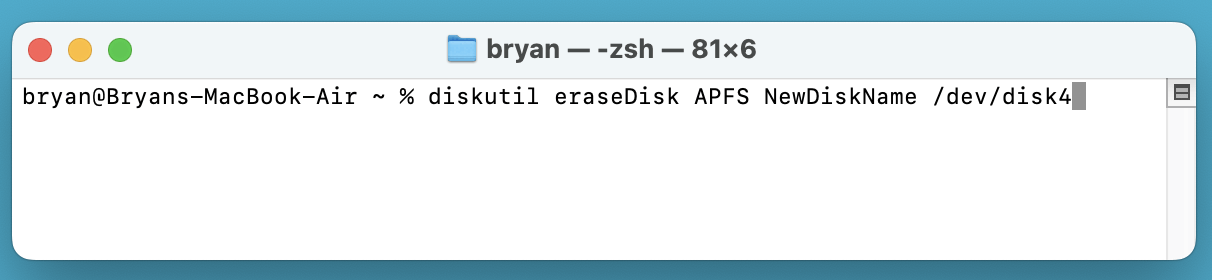
Using Terminal:
diskutil eraseDisk APFS NewDiskName /dev/diskX
Replace diskX with the correct disk identifier (e.g., disk4).
💡 Caution: This will remove all volumes and data from the container or disk.
Secure Erase Options (If Required)
With traditional hard drives (HDDs), wiping data securely meant overwriting it multiple times. However, with SSDs (which most Macs use), the secure erase process works differently due to TRIM and wear-leveling.
Why Secure Erase Matters
Data privacy laws (like GDPR or HIPAA) and best practices in IT security recommend that sensitive data be irrecoverable before transferring or disposing of a device. Even personal devices can contain:
- Saved passwords and browser data
- Banking or financial information
- Emails and personal documents
- Deleted files that may still be recoverable
If this data remains on the drive - even if it's "deleted" - it could be recovered by someone with the right tools.
Secure Erase on Traditional Hard Drives (HDDs)
On HDDs, Disk Utility used to provide a "Security Options" slider that allowed users to:
- Zero out data (1-pass overwrite)
- Perform a 7-pass or 35-pass erase (DoD and Gutmann standards)
How to Access (for HDDs only):
- Open Disk Utility
- Select the HDD (not an SSD)
- Click Erase
- Click Security Options
- Choose how thoroughly you want the drive overwritten
![Wiping an APFS volume on Mac]()
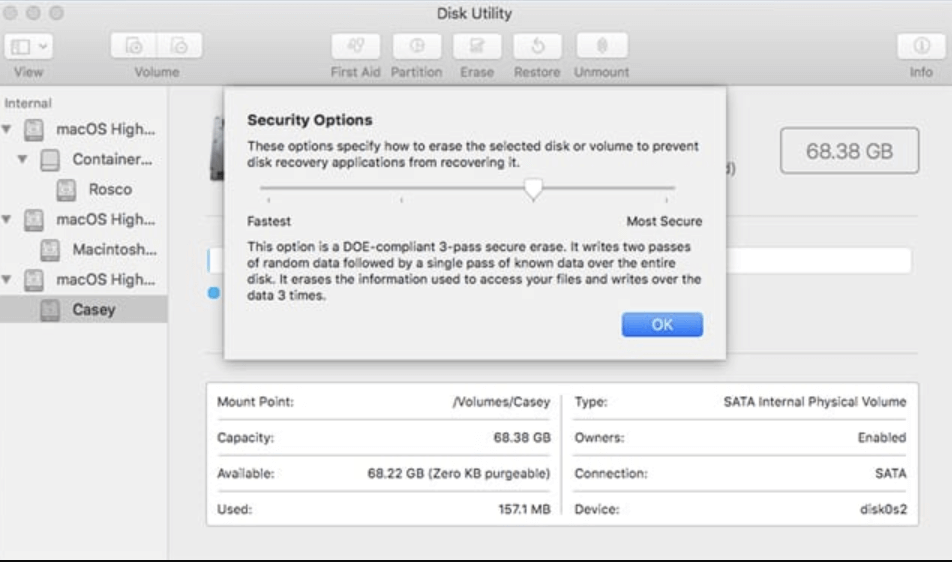
Each pass increases the time required, but also decreases the possibility of data recovery.
Secure Erase on SSDs: Different Rules Apply
Solid State Drives work differently from HDDs. They use wear-leveling and block-level management, which makes traditional overwriting methods less effective or even damaging.
Important Notes:
- macOS removed the "Security Options" slider for SSDs starting in OS X El Capitan, recognizing that it doesn't work as intended on solid-state storage.
- SSDs use TRIM, which tells the OS which blocks can be erased internally by the drive controller. While TRIM helps manage space and performance, it doesn't guarantee secure deletion.
Best Practices for Securely Erasing SSDs
1. Enable FileVault Before Erasing
- FileVault encrypts your entire drive with XTS-AES-128 encryption.
- If FileVault is enabled, erasing the encryption key makes the underlying data inaccessible.
- Steps:
- Go to System Settings > Privacy & Security > FileVault
- Turn on FileVault and wait for encryption to complete
- Then wipe the volume
This is Apple's recommended method for secure erasure of SSDs.
2. Use Terminal's secureErase (for HDDs only)
diskutil secureErase 1 /dev/diskX
- 1 = Single-pass zero fill
- Replace /dev/diskX with your disk identifier
- Other values (2–5) correspond to different erase levels
This command does not work with APFS volumes or SSDs. It’s effective for older Macs with spinning hard drives.
3. Third-Party Secure Erase Tools
- Donemax Data Eraser for Mac, Drive Genius, ShredIt X, and Paragon Hard Disk Manager offer secure erase functions.
- Look for utilities that are certified for government or enterprise-level data destruction.
Quick Checklist for a Secure Erase:
- Did you back up any important files?
- Is FileVault enabled (for SSD)?
- Have you selected the correct disk or volume?
- If using HDD, did you choose a multi-pass overwrite?
- If selling, did you log out of iCloud and disable Activation Lock?
By following the right secure erase technique based on your storage type, you can rest assured that your data won't fall into the wrong hands.
What to Do After Wiping an APFS Volume?
After wiping, you'll likely want to either reuse the volume, install macOS, or restore data.
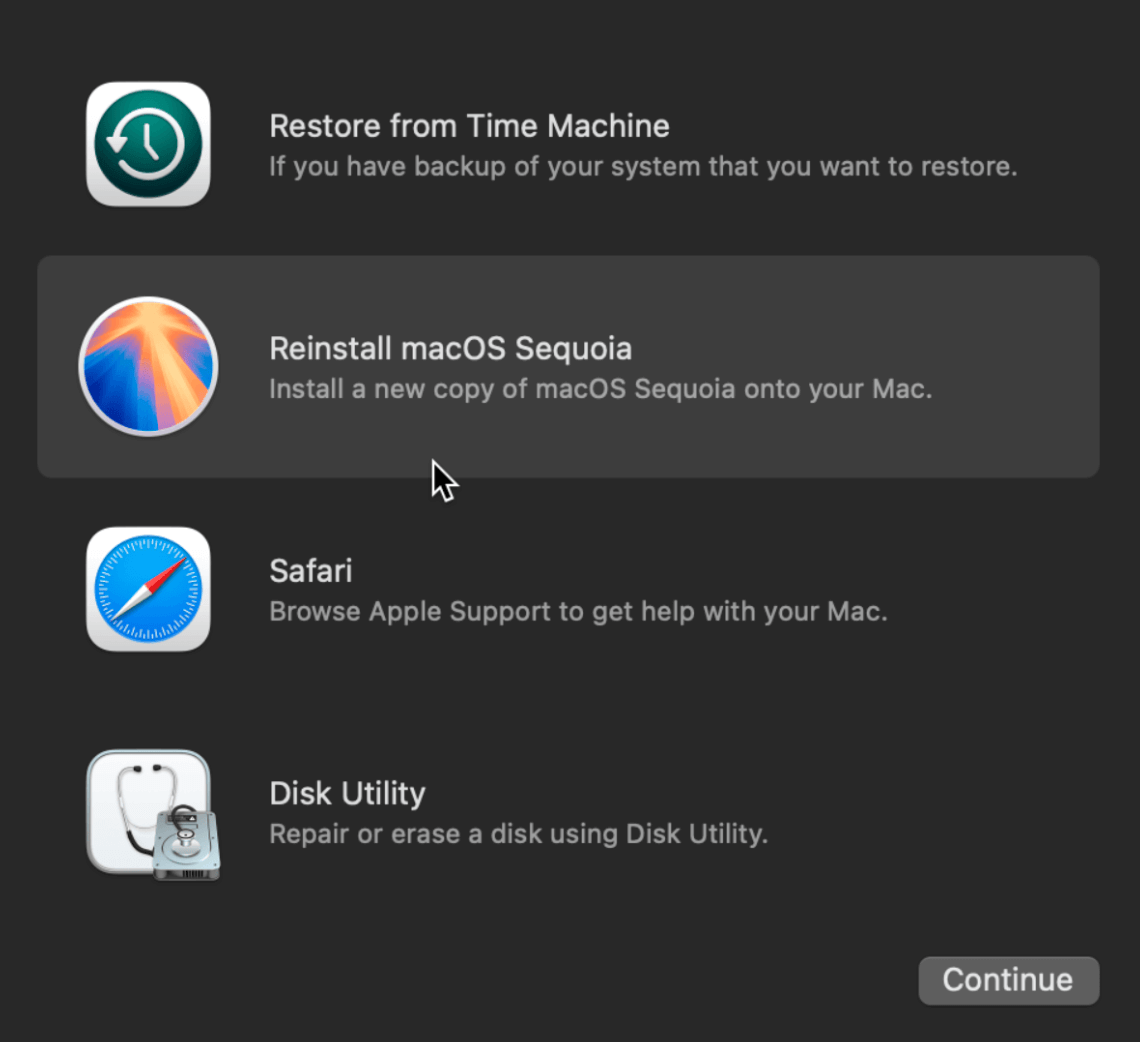
1. Reinstall macOS:
- Boot into macOS Recovery (hold Command + R (for Intel-based Mac) or Power button (for Apple silicon Mac) during startup).
- Choose Reinstall macOS.
![Wiping an APFS volume on Mac]()
- Select the wiped volume and proceed.
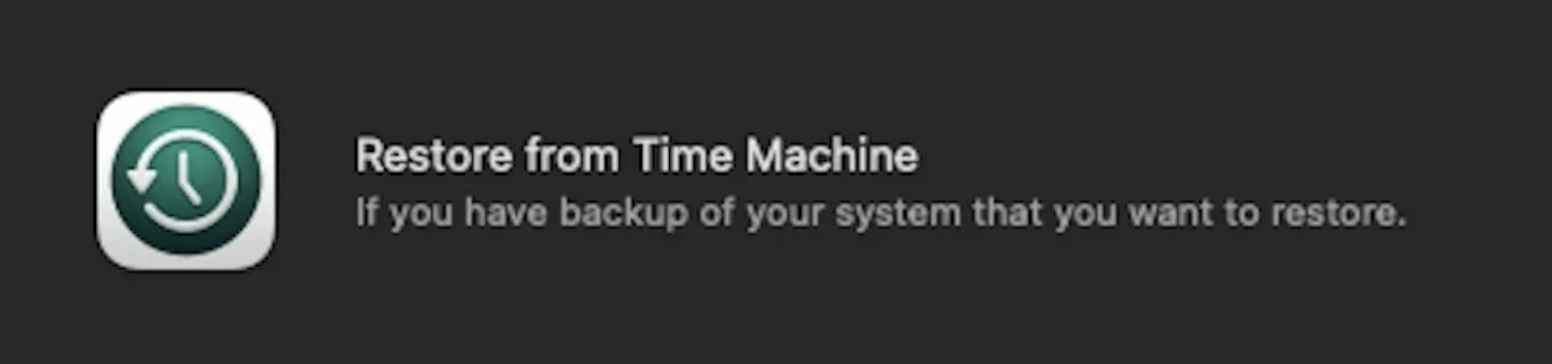
2. Restore from Backup:
- During macOS setup, choose Restore from Time Machine Backup.
![Wiping an APFS volume on Mac]()
- Follow the prompts to select your backup source.
3. Use for Other Purposes:
- Format the volume as ExFAT or MS-DOS (FAT) if you plan to use it with Windows.
- Designate it as a Time Machine backup drive.
Troubleshooting: Common Issues and Fixes
Volume Not Appearing in Disk Utility:
- Click View > Show All Devices.
- Try running diskutil list in Terminal.
- Check connection if it's an external drive.
"Erase Failed" Error:
- Ensure the volume is unmounted first.
- Use Terminal for more detailed output.
- Check for active APFS snapshots preventing the erase.
Unable to Erase Startup Volume:
- Boot into macOS Recovery.
- Use Disk Utility from recovery mode.
Disk is Read-Only:
- Run diskutil info /dev/diskXsY to check permissions.
- Consider checking and disabling SIP (System Integrity Protection) if necessary (advanced).
Conclusion
Wiping an APFS volume on Mac isn't difficult once you understand the APFS structure and use the right tools. Whether you're using Disk Utility for a graphical interface or Terminal for command-line precision, following the correct steps ensures a clean, safe, and purposeful erase.
Remember: Always back up your data, double-check the volume you're wiping, and make sure you understand the difference between a volume, container, and disk. With this guide, you're well-equipped to securely and efficiently wipe any APFS volume on macOS.
Donemax Data Eraser for Mac
100% safe and powerful Mac data erasure program. It offers certified data erasure standards including U.S. Army AR380-19, DoD 5220.22-M ECE to help in securely and permanently erase data from Mac HDD/SSD and external storage device, making data recovery be impossible.
Related Articles
- Jan 07, 2026Best Data Eraser for macOS Mojave 10.14
- Apr 27, 2026How to Factory Reset a MacBook Air?
- Apr 18, 2025How to Factory Reset an M3-Chip Mac?
- Oct 15, 2025How to Erase SSD Data Securely on Mac?
- Sep 28, 2025How to Wipe Startup Disk on macOS Tahoe?
- Oct 13, 2025Permanently Erase Data in APFS File System

Contributing Writer
Steven
Steven has been a senior writer & editor of Donemax software since 2020. He's a super nerd and can't imagine the life without a computer. Over 6 years of experience of writing technical solutions and software tesing, he is passionate about providing solutions and tips for Windows and Mac users.

Editor in chief
Gerhard Chou
In order to effectively solve the problems for our customers, every article and troubleshooting solution published on our website has been strictly tested and practiced. Our editors love researching and using computers and testing software, and are willing to help computer users with their problems