
Written byCoco LinUpdated on Sep 02, 2025
Recover Unsaved/Lost/Deleted InDesign Files on Mac
Approved byGerhard Chou
Before we start: Donemax Data Recovery for Mac is an excellent tool to recover unsaved/deleted/lost InDesign or other files in different data loss scenarios. Within a few steps, the software can quickly and effectively get back the deleted or lost files.
PAGE CONTENT:
Adobe InDesign is a powerful tool widely used by designers, publishers, and marketing professionals to create high-quality layouts for print and digital media. Whether working on magazines, brochures, or e-Books, losing an InDesign file can be frustrating and time-consuming. File loss can occur due to unexpected crashes, accidental deletions, or system failures, leading to potential setbacks in deadlines and productivity.

If you've lost an InDesign file on your Mac, do not get frustrated. There are multiple ways to recover unsaved, lost, or deleted files using InDesign's built-in features, macOS recovery options, and third-party data recovery tools. In this guide, we'll walk you through effective InDesign file recovery methods and preventative measures to ensure your work is always safe.
Basic Reasons for InDesign File Loss
Prior exploring recovery methods, it is necessary to understand the primary causes of InDesign file loss:
- Software Crashes: InDesign may crash unexpectedly due to software bugs, low RAM, or compatibility issues, leading to unsaved work being lost.
- Unintentional Closure: Closing InDesign without saving changes can result in losing hours of work.
- File Corruption: InDesign files may become corrupted due to power failures, faulty plugins, or incomplete saves.
- Accidental Deletion: Users may unintentionally delete files and later realize their importance.
- Emptying the Trash: If you delete an InDesign file and then empty the Trash, it becomes more challenging to recover.
- macOS Updates or System Issues: Sometimes, macOS updates or system malfunctions can cause data loss by corrupting files or resetting system settings.
Fortunately, InDesign and macOS provide several recovery options to help retrieve your lost files.
Methods to Recover Unsaved InDesign Files
If you forgot to save your InDesign file before a crash or accidental closure, there are two primary ways to recover it:
1. Recover from InDesign Auto-Recovery
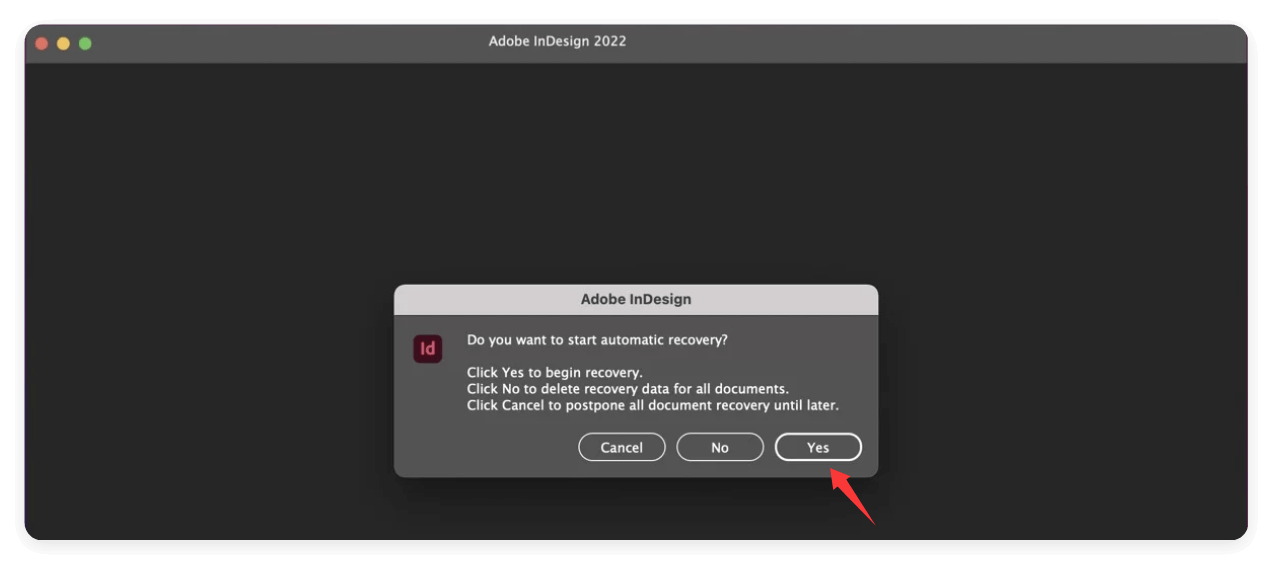
Adobe InDesign has an Auto-Recovery feature that helps restore unsaved files after an unexpected crash. This feature automatically saves a temporary version of your file at regular intervals.
Steps to Recover from Auto-Recovery:
Step 1. If InDesign crashes, relaunching the application may prompt it to open the last auto-recovered file.
Step 2. If the file does not open automatically, locate it manually:
- Open Finder and navigate to:
~/Library/Caches/Adobe InDesign/Version [Your Version]/InDesign Recovery/
- Look for your unsaved file (it may have a .idlk or .indd extension).
- Move the file to another location and try opening it in InDesign.
Step 3. Once recovered, save the file properly to avoid future loss.
2. Check Temporary Files on Mac
If the Auto-Recovery method doesn't work, you can check macOS temporary files, as InDesign may have saved a temporary copy.
Steps to Find Temporary Files:
- Open Terminal and type:
open $TMPDIR
This will open the Temporary Folder.
- Look for folders related to Adobe InDesign and check for unsaved files.
- If you find a file with a .tmp extension, rename it to .indd and try opening it in InDesign.
If these methods don't work, you'll need to explore recovery options for deleted files.
Methods to Recover Deleted InDesign Files
1. Restore from Mac Trash
If you recently deleted an InDesign file, the first place to check is the Mac Trash.
Steps to Restore from Trash:
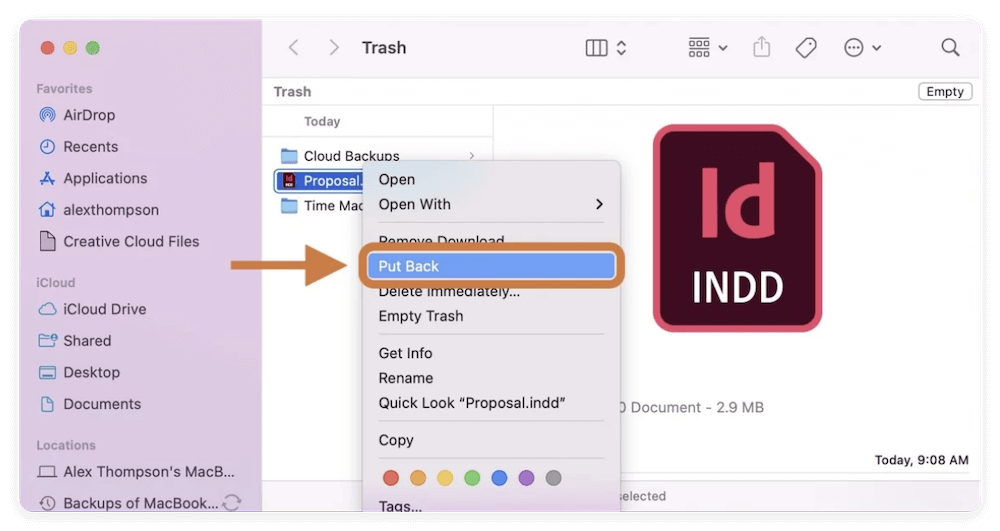
- Open Trash from the Dock.
- Look for the InDesign file that was erased.
- To return the file to its original location, right-click on it and choose Put Back.
If you emptied the Trash, proceed to the next method.
2. Use Time Machine Backup (If Enabled)
macOS has a built-in backup feature called Time Machine that automatically backs up your files if enabled.
Steps to Restore InDesign Files from Time Machine:
- Attach the backup drive for your time machine.
- Open the original folder containing the file.
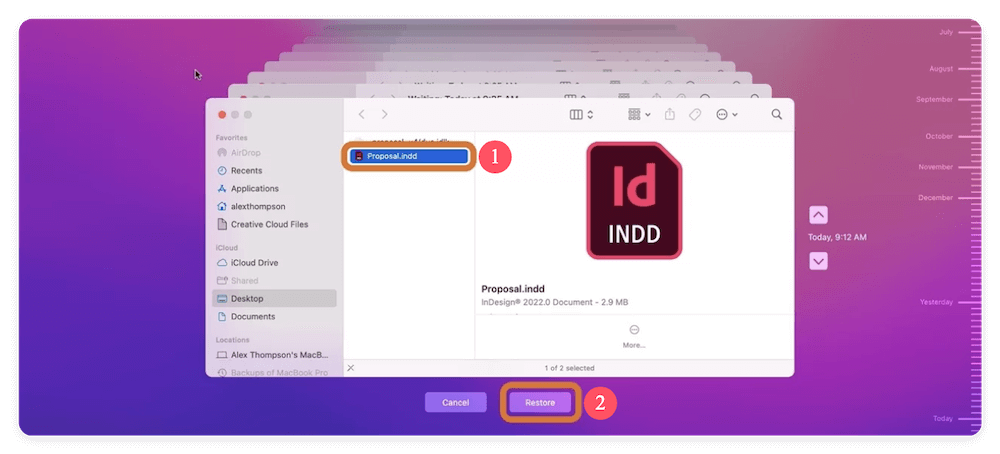
- Choose Browse Time Machine Backups after clicking the Time Machine symbol in the navigation bar.
- Look through backups to locate the InDesign file that was erased.
- Click Restore after selecting the file.
If you don't use Time Machine, you can check cloud storage services.
3. Restore from Cloud Storage (Adobe Creative Cloud, Google Drive, Dropbox, etc.)
If you store InDesign files in Adobe Creative Cloud, Google Drive, OneDrive, or Dropbox, you might be able to recover previous versions.
Steps to Restore from Adobe Creative Cloud:
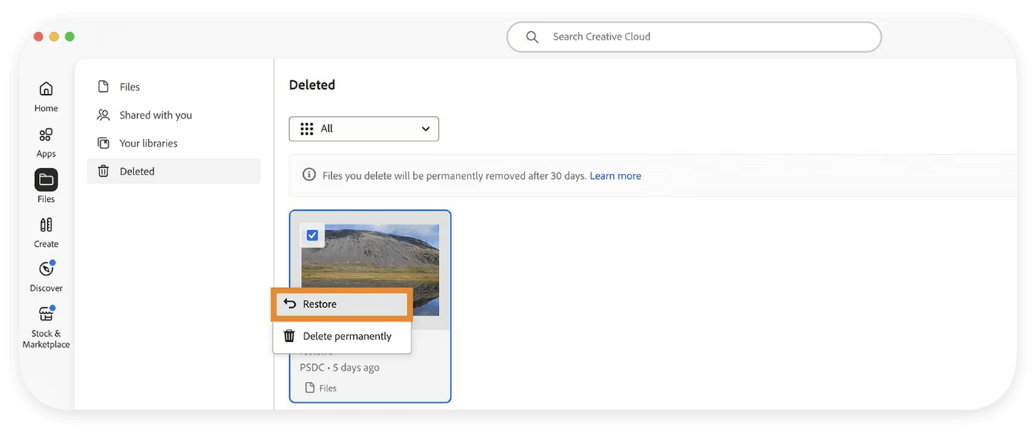
- Log into Adobe Creative Cloud and go to the Files section.
- Check the Deleted files.
- Select your file and restore it.
For Google Drive or Dropbox, check the Trash or Version History for previous versions of your file.
Using Data Recovery Software for InDesign File Recovery
If none of the above methods work, data recovery software can help recover lost InDesign files on Mac. To recover data effectively, it's necessary to check and choose a reliable and professional recovery software. Here we recommend Donemax Data Recovery for Mac.
Steps to Recover Deleted InDesign Files with Data Recovery Software:
- Launch the software and select the drive where the file was stored.
![recover unsaved/deleted/lost InDesign files on Mac]()
- Start scanning for lost files by clicking on the Scan button.
![recover unsaved/deleted/lost InDesign files on Mac]()
- Look for InDesign files (.indd) in the scan results. Select and recover the desired files to a safe location.
![recover unsaved/deleted/lost InDesign files on Mac]()


These tools can retrieve permanently deleted files even after emptying the Trash.
Preventative Measures to Avoid InDesign File Loss
1. Enable Auto-Save and Backup Features in InDesign
Adobe InDesign does not have a built-in auto-save feature like Adobe Photoshop, but it does have an Auto-Recovery system that temporarily saves unsaved files in case of a crash. However, this feature is not a substitute for manually saving your work.
To avoid losing progress:
- Save Regularly: Press Command + S frequently while working.
- Use Save As: Before making major edits, save a duplicate file to prevent overwriting important content.
- Use Versioning: Instead of saving over the same file, create versions (e.g., "Project_v1.indd", "Project_v2.indd") to keep track of changes.
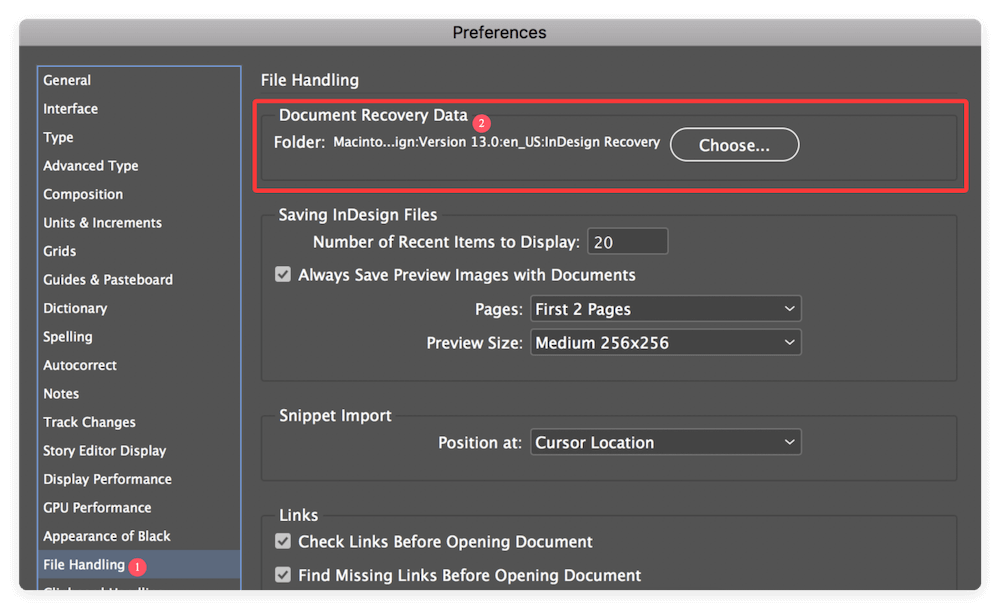
Enabling InDesign File Recovery (Auto-Recovery Feature)
While Auto-Recovery is built-in, you can check its functionality by verifying where InDesign saves temporary recovery files:
- Go to InDesign Preferences (InDesign > Preferences > File Handling).
- Ensure the location for "Document Recovery Data" is valid.
2. Use Time Machine or Cloud-Based Backup Solutions
Regular backups are essential for preventing file loss due to accidental deletion, corruption, or hardware failure.
Using Time Machine for Automatic Backups
macOS comes with Time Machine, a built-in backup system that automatically saves versions of your files.
To enable Time Machine:
- Attach a hard disk externally.
- From System Settings > General, select Time Machine.
- Click Add Backup Disk and choose your external drive.
- Enable to configure the auto backup options.
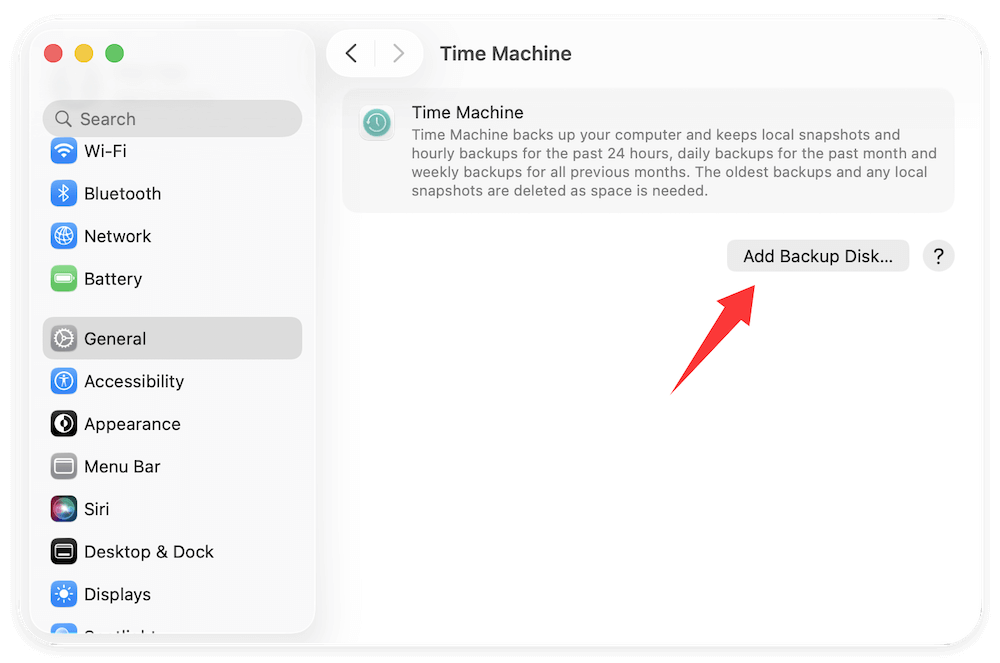
Time Machine will now create hourly backups, allowing you to restore previous versions of your InDesign files.
Cloud Backup Solutions for InDesign Files
For added security, use cloud storage services that provide file versioning:
- Adobe Creative Cloud (stores InDesign files online with version history).
- Google Drive (includes "Version History" to restore older versions).
- Dropbox (offers file recovery for deleted or overwritten files).
- OneDrive (provides automatic syncing and backup).
💡 Tip: Enable auto-sync in your cloud service to ensure your files are backed up in real time.
3. Keep Software and macOS Updated
Many file corruption and software crash issues occur due to outdated software. Keeping Adobe InDesign and macOS updated ensures compatibility and stability.
Update InDesign:
Open the Creative Cloud app > Go to Apps > Click Update next to InDesign.
Update macOS:
Go to System Settings > General > Software Update and install available updates.
💡 Tip: Before updating macOS, back up your files to prevent any issues with software compatibility.
4. Use External Hard Drives or NAS for Extra Backup
For large projects, external storage solutions provide an additional safety net.
- External Hard Drives: Use a USB-C SSD or HDD for manual backups.
- Network-Attached Storage (NAS): If you work in a team, NAS devices allow centralized storage and remote access.
To ensure your files are safe, schedule weekly or daily backups to your external drive.
5. Utilize Version Control Systems (For Teams and Large Projects)
For professionals working on complex projects or collaborating in teams, version control systems help prevent accidental overwrites or lost edits.
Tools for Version Control in Design Work:
- Adobe Creative Cloud Libraries (syncs files with access control).
- Figma or Sketch (alternative tools with auto-save and version history).
- Git for Design Files (using platforms like Abstract for version tracking).
By maintaining multiple versions of your project files, you can revert to previous states if needed.
6. Protect Against File Corruption
Corrupt files can render your InDesign project inaccessible. Prevent this by:
- Avoiding abrupt shutdowns – Always close InDesign properly before shutting down your Mac.
- Limiting third-party plugins – Some plugins may introduce instability. Only install trusted add-ons.
- Using SSDs instead of HDDs – SSDs have lower failure rates and reduce the chances of file corruption.
💡 Tip: If an InDesign file gets corrupted, try opening it on another Mac or extracting data using IDML Export (File > Export > InDesign Markup IDML).
Conclusion
Losing an InDesign file can be frustrating, but recovery is often possible using Auto-Recovery, temporary files, Mac Trash, Time Machine, cloud storage, or data recovery software. By following these recovery methods and implementing preventative strategies, you can safeguard your InDesign projects and ensure that valuable work is never lost again.
Regularly backing up your files, enabling cloud storage, and using proper saving habits will protect your data in the long run. If you ever find yourself in a situation where an InDesign file is lost, follow this guide step-by-step to recover your work efficiently.
Donemax Data Recovery for Mac
Donemax Data Recovery for Mac is one of the best Mac data recovery software. It is easy-to-use and can help in recovering deleted, formatted, inaccessible or lost data from Mac HDD/SSD, external disk, USB drive, SD card, camera or other storage devices.
Related Articles
- Sep 25, 2025Best 5 Mac Data Recovery Software: Recover Lost Files Quickly and Safely
- Jan 21, 2025How to Recover Data From FileVault Hard Drive on Mac?
- Sep 15, 2025How to Recover Lost Data from CF Card on Mac?
- Oct 09, 2025How to Recover Erased Data on macOS Tahoe 26?
- Sep 01, 2025How to Recover Deleted Safari Histories on Mac?
- May 22, 2025[6 Methods] How to Recover Deleted Pictures Folder on Mac?

Contributing Writer
Coco Lin
Coco has been a writer and a chief programmer at Donemax software since 2018. Over 10 years of experience of writing troubleshooting articles in the software industry, she is passionate about programming and loves to providing solutions to Windows and Mac users. Also she enjoys music and palying tennis in her free time.

Editor in chief
Gerhard Chou
In order to effectively solve the problems for our customers, every article and troubleshooting solution published on our website has been strictly tested and practiced. Our editors love researching and using computers and testing software, and are willing to help computer users with their problems