Before we start: If no backups available and you cannot find the lost Photoshop files with other methods, you can use the professional tool Donemax Data Recovery to get back the missing files easily.
PAGE CONTENT:
- Method 1. Check Photoshop Files in AutoSave
- Method 2. Recover Lost Photoshop Files from Recent Files
- Method 3. Restore Photoshop Files from Temporary Files
- Method 4. Recover Lost Photoshop Files with Time Machine Backup
- Method 5. Check Trash for Deleted Photoshop Files
- Method 6. Recover Lost Photoshop Files Using Data Recovery Tool
- Preventing Future Photoshop Data Loss
Losing a Photoshop file on your Mac can be a frustrating and stressful experience, especially if you've spent hours working on a project. Whether it was accidentally deleted, lost due to a system crash, or simply not saved properly, there are multiple ways to recover your file. Fortunately, macOS and Photoshop provide various recovery options, ranging from built-in features like AutoSave and Time Machine to external recovery tools.
In this detailed guide, we'll cover step-by-step instructions on how to recover lost Photoshop files on a Mac. By following these methods, you can increase your chances of retrieving your work and preventing future losses.

Method 1. Check Photoshop Files in AutoSave
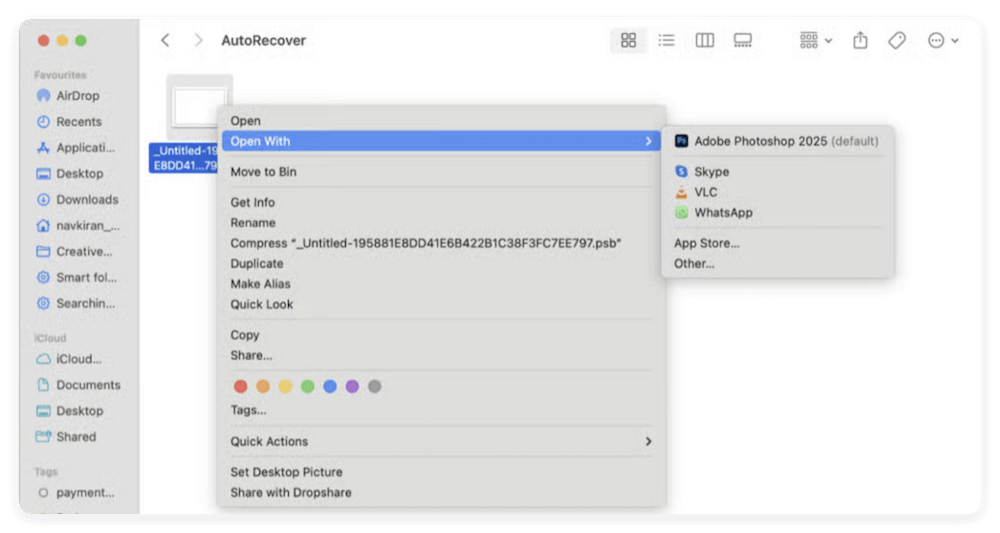
Photoshop has an AutoSave feature that automatically saves a backup of your work at regular intervals. This can be a lifesaver if Photoshop crashes before you manually save your file.
How to Check for AutoRecovered Photoshop Files
Follow these steps to locate your AutoRecovered Photoshop files:
- Open Finder.
- Select Go to Folder by clicking on Go in the top menu.
- Type the below path and press Enter:
~/Library/Application Support/Adobe/Adobe Photoshop [your version]/AutoRecover/
![recover lost Photoshop files on Mac]()
- If an AutoRecovered file exists, you will see a .psb or .psd file with a name similar to your project.
- Open the file in Photoshop and save it properly.
![recover lost Photoshop files on Mac]()
💡 Note: AutoSave must be enabled in Photoshop for this feature to work. To check if it's enabled:
- Go to Photoshop > Preferences > File Handling
- Ensure Auto Save Recovery Information Every [X] Minutes is checked.
Method 2. Recover Lost Photoshop Files from Recent Files
If you didn't manually save your Photoshop project but had it open before closing Photoshop, you might be able to recover it from Recent Files.
How to Check Recent Files in Photoshop
- Open Adobe Photoshop.
- Click on File in the menu bar.
- Select Open Recent from the drop-down menu.
- Look for your lost file and open it.
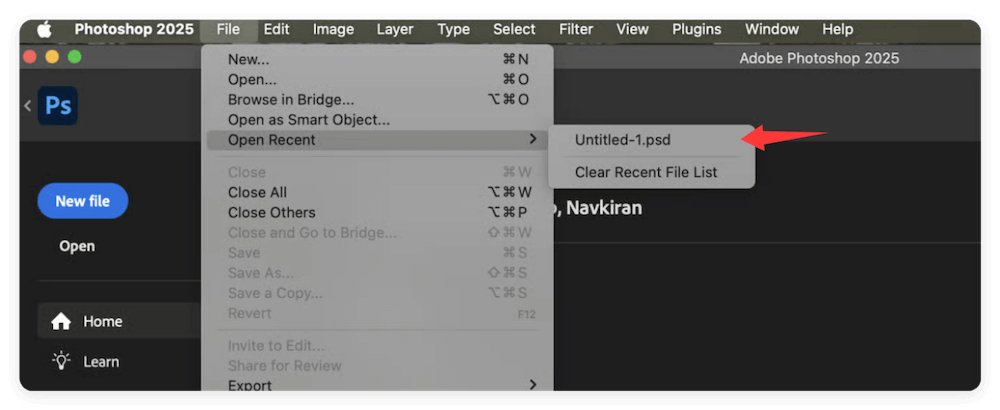
If the file opens, immediately save it properly to prevent further loss.
Method 3. Restore Photoshop Files from Temporary Files
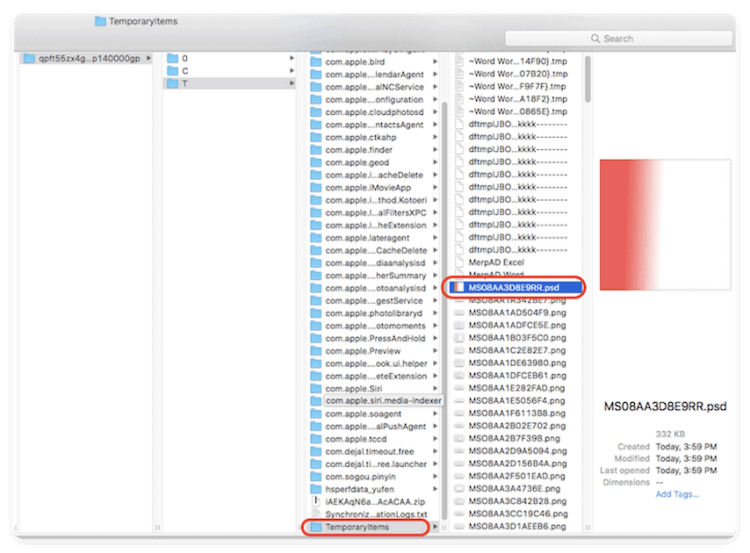
macOS stores temporary data from active applications, including Photoshop. These temp files may help you recover unsaved Photoshop projects.
How to Find Photoshop Temporary Files on Mac
- Open Terminal from Utilities via Applications.
- Type the below command and press Enter:
open $TMPDIR
- This opens the temporary files directory. Look for folders with Adobe Photoshop in their name.
- Inside these folders, check for files with .psb or .psd extensions.
- Copy the file to another location, then rename it with a .psd extension if needed.
- Open the file in Photoshop and save it properly.
Method 4. Recover Lost Photoshop Files with Time Machine Backup
If you've been using Time Machine, you can restore a previous version of your Photoshop file.
How to Restore Photoshop Files Using Time Machine
- If your Time Machine backup drive is an external disk, connect it.
- Locate the folder where the Photoshop file was last stored by opening Finder.
- Choose Browse Time Machine Backups after clicking on the Time Machine symbol in the menu bar.
- To return to a time when the file was accessible, use the timeline on the right.
- Select the file and click Restore.
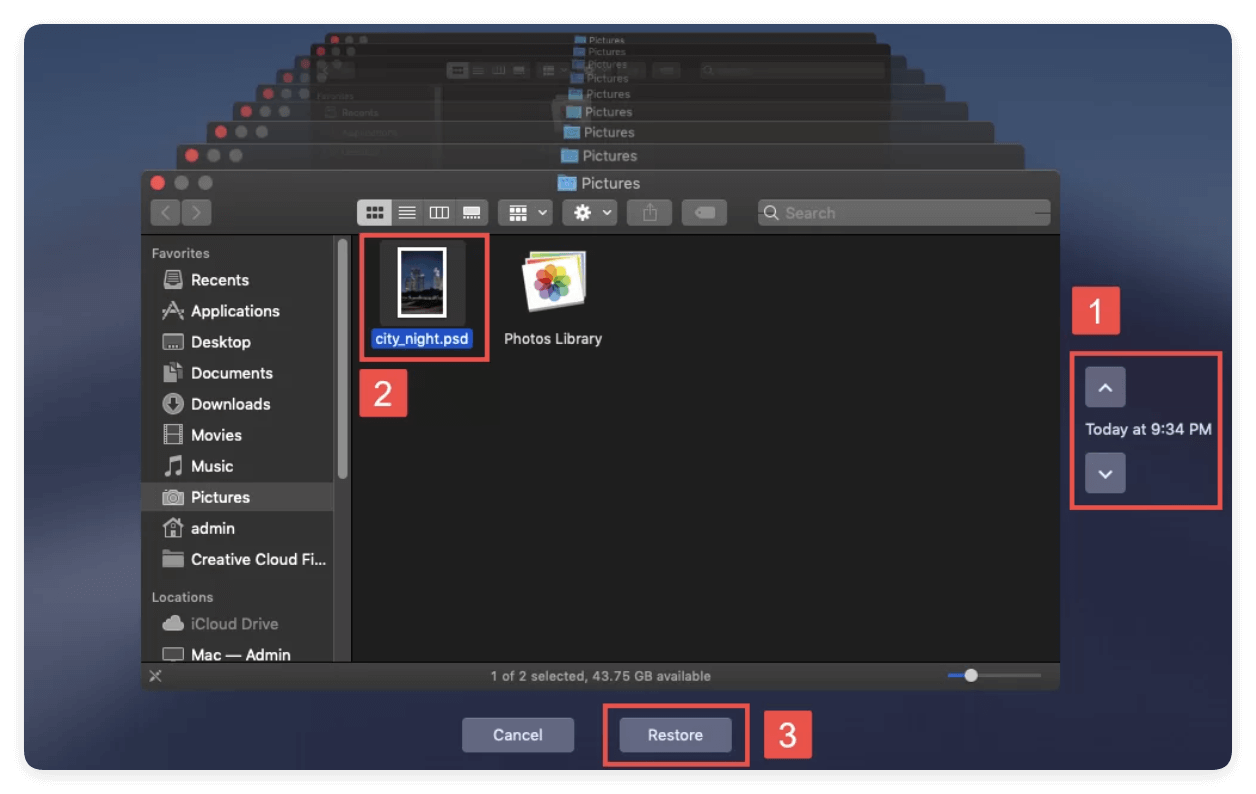
Your Photoshop file should now be recovered to its original location.
Method 5. Check Trash for Deleted Photoshop Files
Sometimes, files get deleted by mistake but still remain in the Trash until permanently erased.
How to Recover Deleted Photoshop Files from Trash
- Open Trash from the Dock.
- Look for your Photoshop file.
- Choose Put Back from the menu when you right-click on the file.
- The original folder containing the file will be restored.
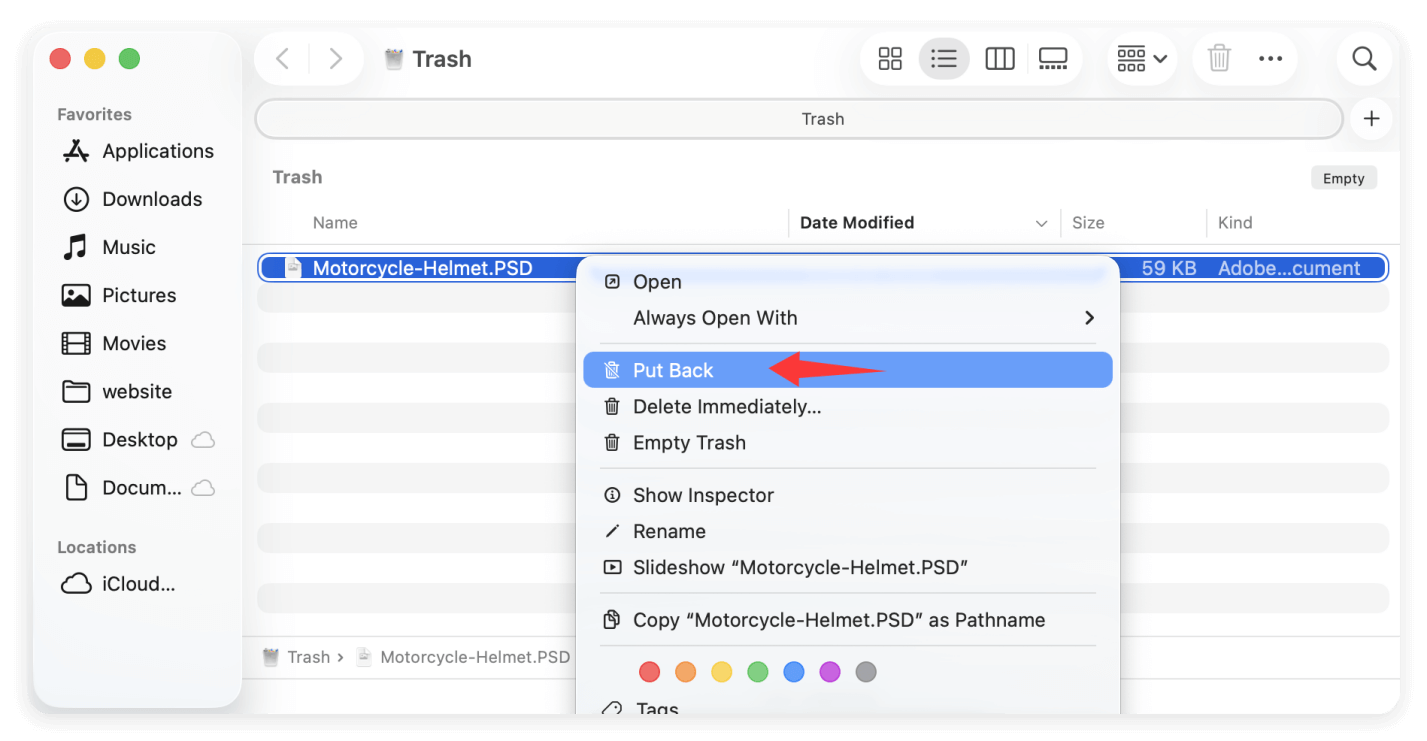
If you've emptied the Trash, try a data recovery tool (see the next section).
Method 6. Recover Lost Photoshop Files Using Data Recovery Tool
If none of the above methods work, third-party Mac data recovery tools can help retrieve lost Photoshop files. These tools scan your Mac's storage for deleted or lost files.
Best Data Recovery Tools for Photoshop File Recovery on Mac
Features:
- Supports macOS file system recovery, including HFS+, APFS, and exFAT.
- Recovers files lost due to crashes, accidental deletion, and even formatting.
- Allows previewing Photoshop files before restoring them.
Disk Drill
Features:
- Recovers .psd and .psb files, as well as other document formats.
- Works with both internal Mac drives and external storage devices.
- Free version allows scanning and previewing recoverable files before purchase.
- Includes additional disk protection features.
Stellar Data Recovery
Features:
- Can recover large Photoshop files, including .psd and .psb.
- Works with both internal and external drives.
- Deep scan mode helps find files even after formatting.
How to Use Mac Data Recovery Software for Photoshop Files:
Here we will use Donemax Data Recovery as an example and show you how to recover deleted or lost Photoshop files on Mac:
Step 1. Download and install Donemax Data Recovery on your Mac. Select the drive where your Photoshop file was stored.

Step 2. Click Scan and wait for results. The software will deeply scan the drive and search for any possible files, including the lost Photoshop files.

Step 3. Locate and preview the files after the scan process is completed. Choose the Photoshop file and click Recover.

When to Use a Data Recovery Tool?
- You emptied the Trash and need to restore deleted files.
- The file was lost due to a macOS crash, power failure, or accidental formatting.
- No AutoSave or Time Machine backup exists.
- The file was stored on an external device, like a USB drive or SD card, and got deleted.
Limitations of Data Recovery Software
If the file has been overwritten by new data, recovery might not be possible.
- Free versions usually have limitations (e.g., file size restrictions).
- Recovery success depends on how soon you act after file loss.
If software recovery doesn't work, you may need to consult a professional data recovery service. However, for most cases, using one of the above tools should help you get back your lost Photoshop files.
Preventing Future Photoshop Data Loss
To avoid the stress of losing Photoshop files, follow these best practices:
1. Enable AutoSave in Photoshop
AutoSave is one of the most important features in Photoshop that can help prevent data loss. When enabled, it automatically saves a copy of your work at regular intervals, reducing the risk of losing files due to crashes or system failures.
How to Enable AutoSave in Photoshop
- Open Photoshop.
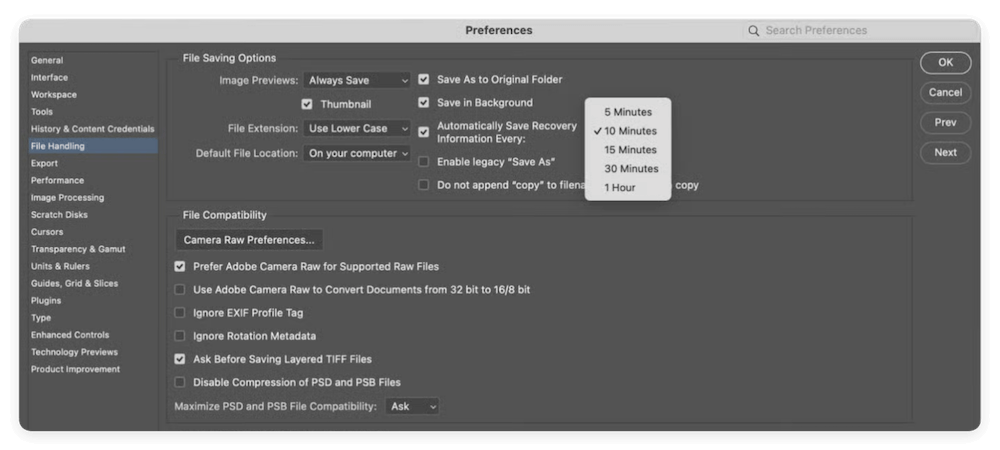
- Click on Photoshop in the top menu bar and select Preferences > File Handling.
- In the File Saving Options section, look for Automatically Save Recovery Information Every.
- Check the box to enable AutoSave.
- Set the time interval to 5 or 10 minutes for frequent backups.
- Click OK to save the changes.
2. Use Cloud Storage for Automatic Backup
Using cloud storage ensures that your files are always backed up, even if your Mac crashes or gets lost. Many cloud services also support version history, allowing you to restore previous versions of a Photoshop file if needed.
Best Cloud Storage Options for Photoshop Files
- Adobe Creative Cloud – Integrated with Photoshop and automatically syncs files.
- Google Drive – Offers 15GB of free storage with easy file sharing options.
- Dropbox – Provides automatic backup and file versioning.
- OneDrive – Best for users in the Microsoft ecosystem.
- iCloud Drive – Works seamlessly on macOS and supports file recovery.
How to Enable Auto Backup in Adobe Creative Cloud
- Open the Creative Cloud Desktop app.
- Click on the Cloud icon in the top right corner.
- Enable Creative Cloud File Syncing to automatically upload your Photoshop files to the cloud.
- Open Finder, go to Creative Cloud Files, and ensure your .psd files are stored there.

3. Create Manual Backups on External Storage
While cloud storage is great, having a local backup on an external hard drive or SSD ensures you have offline access to your files.
How to Manually Back Up Photoshop Files
- Attach an SSD or external hard drive to your Mac.
- Go to the location of your Photoshop file in Finder.
- Copy the file to the external drive.
- Repeat this process regularly (e.g., weekly or after major edits).
4. Enable Time Machine for Automatic Backups
Time Machine is macOS's built-in backup feature that can restore lost Photoshop files. It continuously backs up your Mac and allows you to go back to earlier versions of files.
5. Save Multiple Versions of Your Photoshop Files
Instead of overwriting the same file every time, consider saving multiple versions. This allows you to revert to earlier versions in case of file corruption or unwanted changes.
How to Save Multiple Versions in Photoshop
- Save your file using descriptive names (e.g., Project_V1.psd, Project_V2.psd).
- Use File > Save As… instead of overwriting the original file.
- For major edits, create a duplicate before making changes.
6. Use Photoshop's "Save in Background" Feature
Another useful feature in Photoshop is Save in Background, which prevents interruptions when saving large files. If Photoshop crashes while saving, the background save process helps protect the file from corruption.
How to Enable "Save in Background" in Photoshop
- Open Photoshop.
- Go to Preferences > File Handling.
- Check the box for Save in Background.
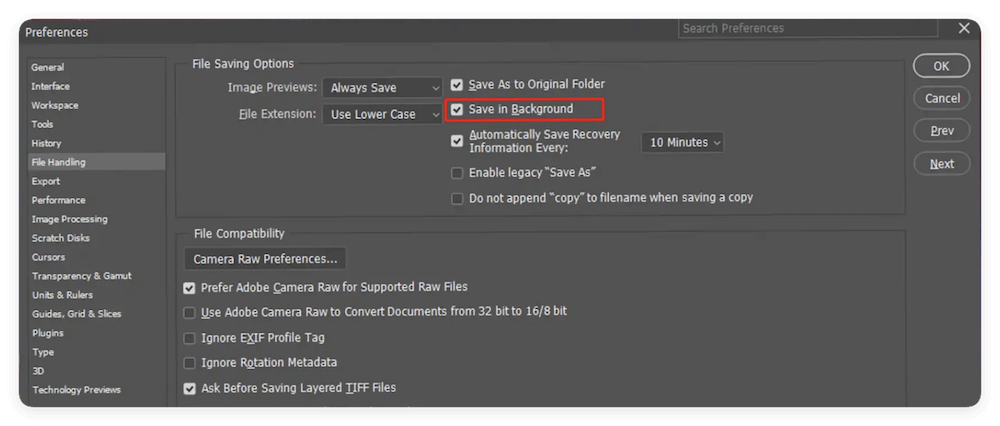
This ensures that even if Photoshop freezes during the save process, your file won't get corrupted.
7. Avoid Working Directly from External Drives or Network Locations
Working on Photoshop files stored on external drives or network locations (e.g., NAS, Google Drive) can lead to data loss due to slow write speeds and connection issues.
Best Practice:
- Always copy the file to your Mac's internal drive, edit it locally, and then move it back to the external or network drive after saving.
- This prevents file corruption caused by unexpected disconnections.
8. Regularly Update Photoshop and macOS
Outdated software may contain bugs that cause crashes and data loss. Keeping Photoshop and macOS updated ensures you have the latest bug fixes and security patches.
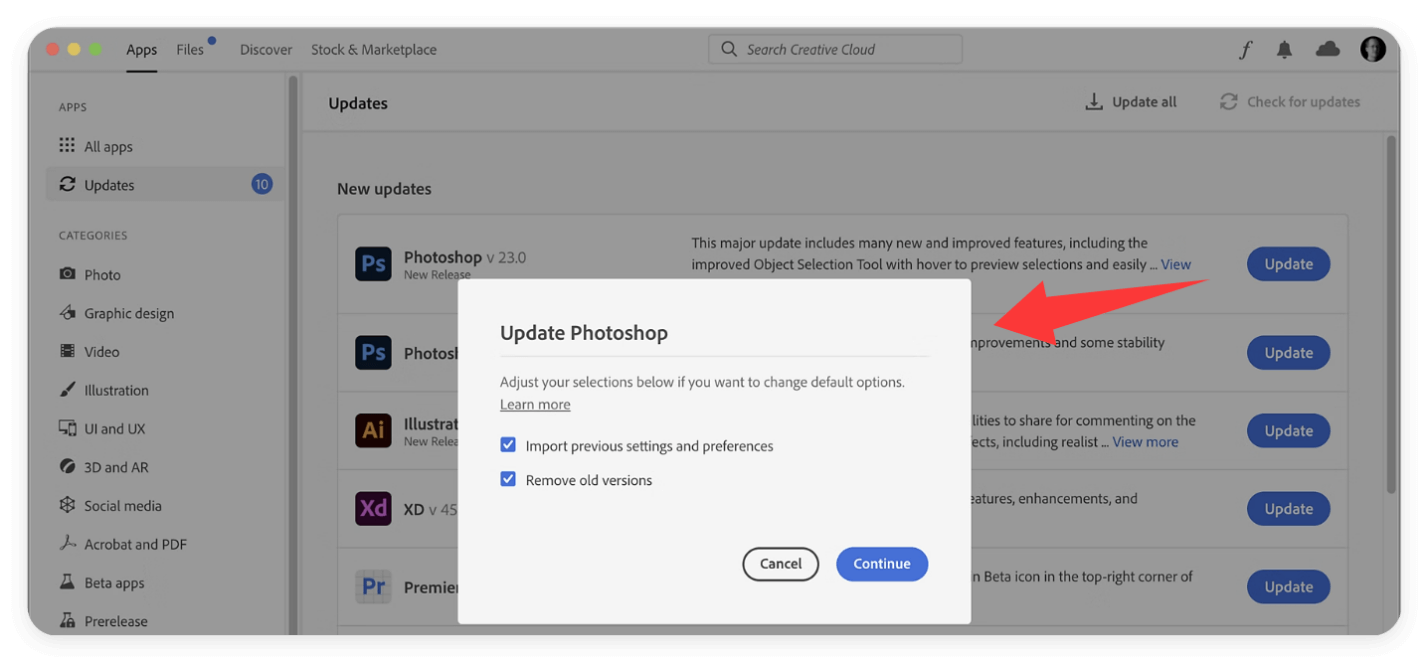
How to Update Photoshop
- Open the Adobe Creative Cloud app.
- Click Updates on the left sidebar.
- Find Photoshop and click Update.
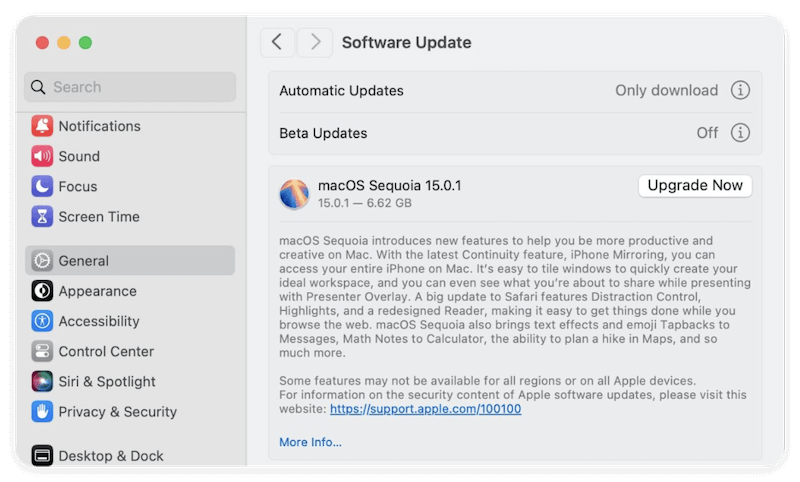
How to Update macOS
- Open System Settings > General > Software Update.
- If an update is available, click Update Now (or Upgrade Now).
Conclusion
Losing a Photoshop file on Mac can be frustrating, but there are multiple ways to recover it. From checking AutoSave and temporary files to restoring backups via Time Machine and using data recovery software, you have several options to retrieve lost work.
To prevent future losses, always enable AutoSave, use cloud backups, and maintain manual backups. By following these best practices, you can protect your Photoshop projects and minimize the risk of losing valuable work.
If you've lost a Photoshop file, try the methods listed above in order. With patience and the right approach, you're likely to recover your project successfully!


Donemax Data Recovery for Mac
Donemax Data Recovery for Mac is one of the best Mac data recovery software. It is easy-to-use and can help in recovering deleted, formatted, inaccessible or lost data from Mac HDD/SSD, external disk, USB drive, SD card, camera or other storage devices.
Related Articles
- Jun 06, 2023Top 6 Best Recuva Alternatives for Mac in 2025
- Feb 29, 2024SDHC Card Recovery on Mac: Completely Recover Deleted/Formatted Data
- Nov 27, 2025How to Unformat USB Flash Drive on Mac?
- Nov 28, 2025How to Fix Not Showing Up USB Flash Drive on Mac?
- Sep 25, 2025Photos Disappeared after macOS Tahoe Update: How to Recover?
- Nov 13, 2024How to Recover Lost Data from Apple M4 Chip Mac [4 Methods]

Christina
Christina is the senior editor of Donemax software who has worked in the company for 4+ years. She mainly writes the guides and solutions about data erasure, data transferring, data recovery and disk cloning to help users get the most out of their Windows and Mac. She likes to travel, enjoy country music and play games in her spare time.

Gerhard Chou
In order to effectively solve the problems for our customers, every article and troubleshooting solution published on our website has been strictly tested and practiced. Our editors love researching and using computers and testing software, and are willing to help computer users with their problems

