
Written byMariaUpdated on May 13, 2025
[5 Methods] How to Recover Overwritten Files on Mac?
Approved byGerhard Chou
Before we start: Is it possible to recover overwritten files on Mac? Yes, you can restore these files via Time Machine backups or iCloud drive. If you don't have a backup, you can use Mac data recovery software to deeply scan the Mac's internal disk and recover overwritten or replaced files.
PAGE CONTENT:
Accidentally overwriting a file on your Mac can feel like a disaster, especially when the original document contained important data, irreplaceable work, or sensitive content. Whether you've mistakenly saved over an existing document, auto-synced to the cloud, or lost a file during edits, there's hope. This comprehensive guide will explore all the practical methods to recover overwritten files on Mac, highlight the limitations of recovery, and share best practices to prevent future overwrites.
What Happens When You Overwrite a File?
Overwriting a file means that a new file has been saved with the same name and location as an existing one, replacing the original content. In macOS, when this happens, the old file data is marked as free space in the file system and may be partially or fully recoverable - but only until it's overwritten again by other data.
The key to successful recovery lies in acting fast. The more you use your Mac after the overwrite, the more likely it is that the original file's data will be lost permanently.
Can You Recover Overwritten Files on Mac?
The possibility of recovery depends on several factors:
- Time passed since the file was overwritten
- Whether you use Time Machine or other backup systems
- The type of file and app used
- Whether the file was synced with cloud services like iCloud, Dropbox, or OneDrive
If backups or versioning are enabled, chances are high you can recover your data. If not, third-party recovery tools or macOS system features may still help.
Best 5 Methods to Recover Overwritten Files on Mac
Method 1: Restore from Time Machine Backup
Time Machine is macOS's built-in backup feature that automatically saves hourly, daily, and weekly snapshots of your files, allowing you to recover old versions of overwritten documents.
Steps to Use Time Machine:
- If your Time Machine drive is external, connect it.
- Open the folder containing the file.
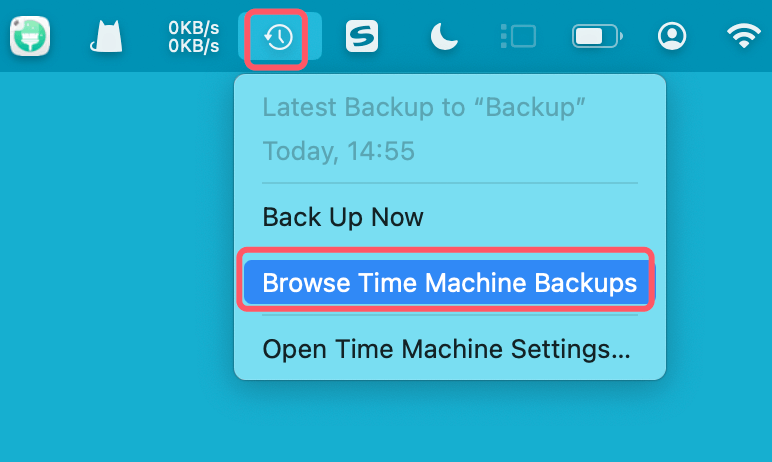
- Select Enter Time Machine or Browser Time Machine Backups (for macOS Ventura or later) after clicking the Time Machine symbol in the navigation bar.
![recover overwritten files on Mac]()
- To go back to a time before the file was overwritten, use the timeline on the right.
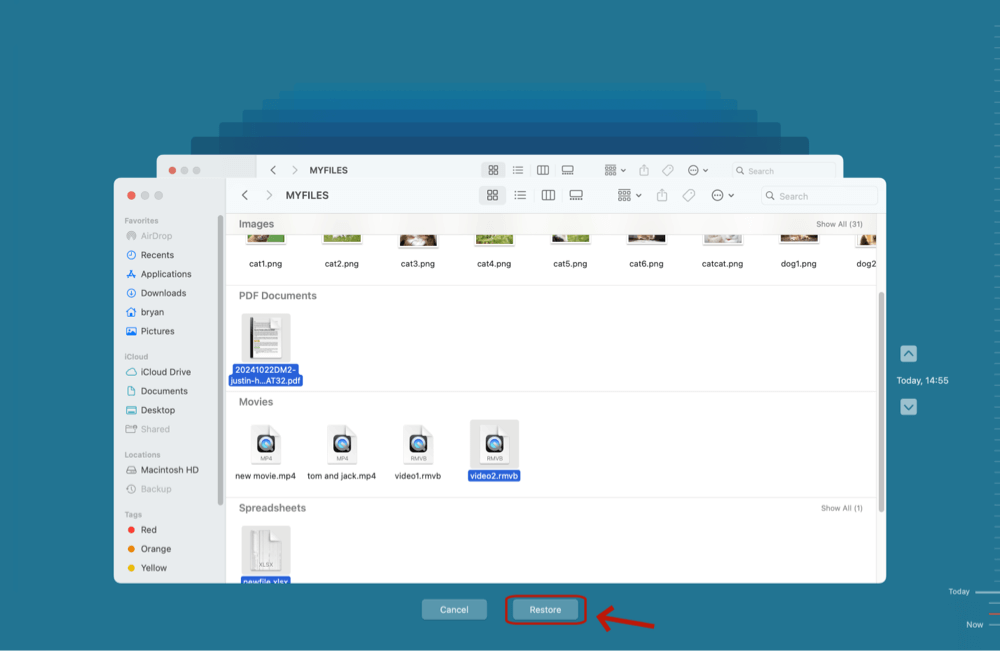
- Select the file you want to recover and click Restore.
![recover overwritten files on Mac]()
If Time Machine was active before the file was overwritten, this method almost always works.
Method 2: Recover from iCloud or Cloud Storage Services
If you use iCloud Drive or other cloud services (Dropbox, OneDrive, Google Drive), these often store previous versions of files, or at least let you recover deleted ones.
iCloud Drive:
- Go to iCloud.com and log in.
- Navigate to iCloud Drive.
- Click on the file, then look for a "Recover Versions" option (depending on the app used).
- If the file was deleted, open Settings > Advanced > Restore Files.
Dropbox:
- Log into dropbox.com.
- Right-click the overwritten file and select Version History.
- Choose an earlier version and click Restore.
Google Drive:
- Open the file in Google Docs, Sheets, or Slides.
- Go to File > Version history > See version history.
- Click on the older version you want and restore it.
Method 3: Use Mac’s Built-in File Versioning
Many macOS applications include built-in versioning. Apps like Pages, Numbers, TextEdit, and Preview keep multiple versions of documents automatically.
To Restore a Previous Version:
- Open the file using the original application.
- Go to File > Revert To > Browse All Versions.
- Time Machine-like interface opens.
- Scroll through older versions and click Restore.
💡 Note: This only works for apps that support versioning and files that were opened and edited using those apps.
Method 4: Use Data Recovery Software to Recover Overwritten Files on Mac
When Time Machine or cloud-based backups aren't available, third-party data recovery software becomes your most viable option to recover overwritten files on your Mac. These tools are specifically designed to dig into the low-level structures of your storage device, scan for fragments of lost or overwritten files, and piece them back together - even when the operating system no longer lists them.
Why Data Recovery Software Works ?
macOS, like most operating systems, doesn't immediately erase a file's content when it's overwritten. Instead, it marks the original file's storage space as available for reuse. Until that space is actually used by new files, recovery software can sometimes retrieve the original file content by accessing the raw data sectors of your drive.
However, it's important to understand that:
- The sooner you act, the better the recovery chances.
- Using the same drive for installing recovery software or saving new files could permanently destroy the overwritten data.
That's why you should install recovery tools on a different volume, such as an external USB drive.
Steps to Recover Overwritten Files on Mac
Donemax Data Recovery for Mac is one of the best Mac data recovery software. It supports to securely and completely recover overwritten files from any hard drive or device.
Step 1. Download and install Donemax Data Recovery for Mac on your Mac.
Step 2. Open Donemax Data Recovery for Mac, then select the drive where the files are overwritten to start data recovery.

Step 3. Click on Scan button to deeply scan the drive and find all recoverable files.

Step 4. Once the scan is completed, you can preview all recoverable files. Then select the overwritten files, click on Recover button to save them.

Tips for Successful Recovery
- Stop using the affected drive immediately. The more you write to it, the less chance you have of recovering overwritten files.
- Avoid recovery software that requires installation on the same disk as the lost file.
- Scan both the original file location and the macOS Trash directory, if the file was involved in a deletion before overwrite.
- Always preview the file before recovery to ensure it is intact and not corrupted.
Limitations of Software-Based Recovery
- Not all overwritten files are recoverable. If the storage space has already been reused by another file or system process, recovery becomes nearly impossible.
- Files overwritten multiple times or over long periods are less likely to be recovered.
- Encrypted drives or SSDs with TRIM enabled pose additional challenges, as data may be actively and permanently erased as soon as it's marked for deletion.
Method 5: Restore from External Backup or Clone
If you've used tools like Donemax Disk Clone to create bootable or mirrored backups, you may be able to restore the previous version of a file from one of those backups.
How to Restore:
- Connect your backup drive.
- Use Finder to navigate to the backup folder.
- Locate the previous version of the file and copy it back to your Mac.
- If using a backup app interface, follow its restore procedure.
These third-party solutions often retain file structures, which makes manual recovery easier.
What to Avoid After Overwriting a File?
To maximize the chance of recovery, avoid the following:
- Writing new data to the drive where the file was overwritten.
- Installing new software on the same disk.
- Restarting or shutting down the system unnecessarily.
- Saving new files to the same directory.
- Running disk cleanup tools or defragmenters.
Every new write operation risks overwriting the deleted file’s remnants.
Tips to Prevent Future Overwrites
1. Use "Save As" Instead of "Save"
Get into the habit of creating new versions manually by selecting File > Save As instead of overwriting the original document.
2. Enable Time Machine
Ensure Time Machine is set up and running. Even saving once a day can prevent major data losses.
3. Leverage Version History
Use apps that support versioning and regularly check their saved versions before saving major edits.
4. Store Files in Cloud Services with History
Dropbox, OneDrive, and Google Drive automatically maintain version history for up to 30 days (or more on premium plans).
5. Label File Versions Clearly
Use consistent naming conventions like:
- report_v1.docx
- report_v2.docx
This helps you avoid overwriting the wrong version.
6. Use File Recovery Tools Proactively
Install reputable file recovery software in advance. Some offer real-time protection that flags potentially dangerous overwrites.
Conclusion
Overwriting a file on a Mac can be distressing, but it doesn't always mean your data is gone forever. With macOS's built-in tools like Time Machine, versioning support, and the help of cloud backups or third-party software, recovery is often possible - especially if you act quickly and avoid using the affected disk.
If you didn't have a backup, using recovery software is your best bet. Just remember: the best defense is a solid backup strategy. Configure Time Machine, use cloud services, and always think twice before hitting "Save."
Donemax Data Recovery for Mac
Donemax Data Recovery for Mac is one of the best Mac data recovery software. It is easy-to-use and can help in recovering deleted, formatted, inaccessible or lost data from Mac HDD/SSD, external disk, USB drive, SD card, camera or other storage devices.
Related Articles
- Aug 10, 2025Recover Lost Data from SanDisk G-DRIVE on Mac – Complete Guide
- Dec 24, 2025How to Recover Lost Data on Apple M2 Chip Mac?
- May 26, 2026Recover Deleted Files from A18 Pro MacBook Neo: Step-by-Step Guide
- Sep 04, 2025Recover Deleted or Unsaved PowerPoint Files on Mac
- Nov 04, 2024How to Recover Lost Data After Factory Reset a Mac?
- Feb 22, 2024How to Recover Lost Data from External Hard Drive, USB Drive, SD Card on macOS Sonoma?

Contributing Writer
Maria
Maria is one of the senior writers & editors of Donemax who lives and works in Sydney, Australia. She loves PC, Mac and Internet Technology. She has 6 years of writing articles about data recovery on PC/Mac, disk cloning solution, data eraser and computer OS optimization, etc. She is also interested in testing various software and digital products.

Editor in chief
Gerhard Chou
In order to effectively solve the problems for our customers, every article and troubleshooting solution published on our website has been strictly tested and practiced. Our editors love researching and using computers and testing software, and are willing to help computer users with their problems