
Written byCoco LinUpdated on Apr 22, 2025
TestDisk Deleted / Lost Partition Recovery on Mac
Approved byGerhard Chou
Before we start: TestDisk is a command-line style and effective data recovery tool for partition and data recovery. If you want an easy tool with normal UI, you can download and try Donemax Data Recovery for Mac. The software can also recover data from deleted/lost partition and recover lost data in any other cases.
PAGE CONTENT:
Losing a partition on your Mac can be a frustrating experience, especially if it holds critical files or data that haven't been backed up. Whether it's due to accidental deletion, corruption, or hardware failure, partition loss can result in the loss of valuable information. Fortunately, tools like TestDisk can help recover lost or deleted partitions, making it an invaluable solution for Mac users facing data loss.
In this article, we'll guide you through the process of recovering lost or deleted partitions on your Mac using TestDisk, a powerful, open-source data recovery tool. By the end, you'll be equipped with the knowledge to recover lost partitions and safely restore your data.
Understanding TestDisk
What is TestDisk?
TestDisk is an open-source data recovery tool designed to help users recover lost partitions, repair boot sectors, and rebuild partition tables. Originally developed to help with lost partitions and corrupted boot sectors on DOS and Linux systems, TestDisk now supports many different file systems and operating systems, including macOS.
It is capable of recovering lost or damaged partitions by scanning and restoring partition tables, even when the partition structure is entirely lost. The tool's open-source nature makes it highly accessible, and its effectiveness in recovering partitions, even in complex cases, has earned it a reputation as a go-to solution for data recovery.
How TestDisk Works
TestDisk operates by scanning the storage device for any lost or missing partitions. The tool analyzes the disk for partition table information and then attempts to reconstruct partitions based on existing data remnants. TestDisk also supports file system repair, which helps in situations where the file system has been corrupted but the underlying partition remains intact.
TestDisk supports a wide range of file systems, including FAT, NTFS, ext2/3/4, HFS+, and APFS, which are commonly used on macOS. This flexibility makes it a powerful solution for users recovering lost data on Mac machines.
Why Choose TestDisk for Mac Partition Recovery?
When it comes to macOS, TestDisk is a preferred choice for partition recovery because it directly supports macOS file systems, including HFS+ (Mac OS Extended) and APFS (Apple File System). While macOS users can explore other recovery tools, TestDisk stands out due to its reliability, compatibility with older and newer macOS versions, and ability to handle complex recovery scenarios.
Moreover, TestDisk doesn't require expensive licenses or subscriptions, which makes it an ideal choice for users looking for a free yet robust solution.
Preparing for Partition Recovery on Mac
Before attempting to recover a lost or deleted partition on your Mac, it's crucial to prepare properly to avoid further complications or data loss. Here are some essential preparation steps:
Precautions Before Recovery
- Stop using the affected disk: If you continue to write new data to the affected disk after partition loss, you run the risk of overwriting the lost data. This significantly reduces the chances of recovery. Therefore, it's critical to halt any activity on the disk.
- Backup available data: If there's any data still accessible on your disk, make sure to back it up before proceeding with partition recovery.
Required Tools and Setup
- TestDisk: Download the latest version of TestDisk from the official website (https://www.cgsecurity.org/).
- External storage: Prepare an external drive or storage device where you can save the recovered partition or data.
- Terminal knowledge: TestDisk is a command-line tool, so you'll need to be comfortable using the Terminal app on your Mac.
Once you have these tools ready, you can move forward with the recovery process.
Step-by-Step Guide to Using TestDisk for Lost Partition Recovery on Mac
Step 1: Launching TestDisk on macOS
After downloading the TestDisk archive, extract it to a folder. Open Terminal and navigate to the TestDisk folder.
Run TestDisk by typing sudo ./testdisk and pressing Enter. You may need to enter your administrator password to continue.
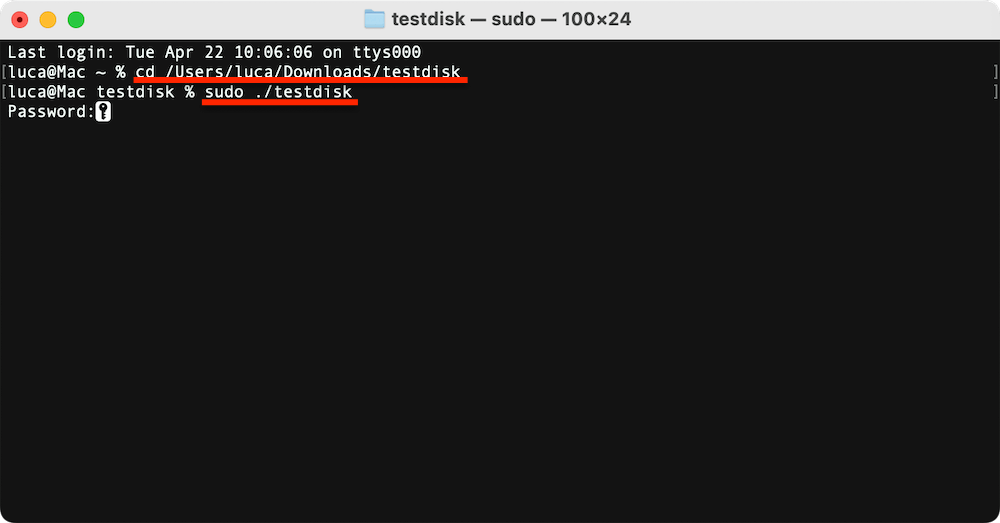
TestDisk will open in the Terminal with its text-based interface. It will prompt you with options to select the disk and recovery actions.
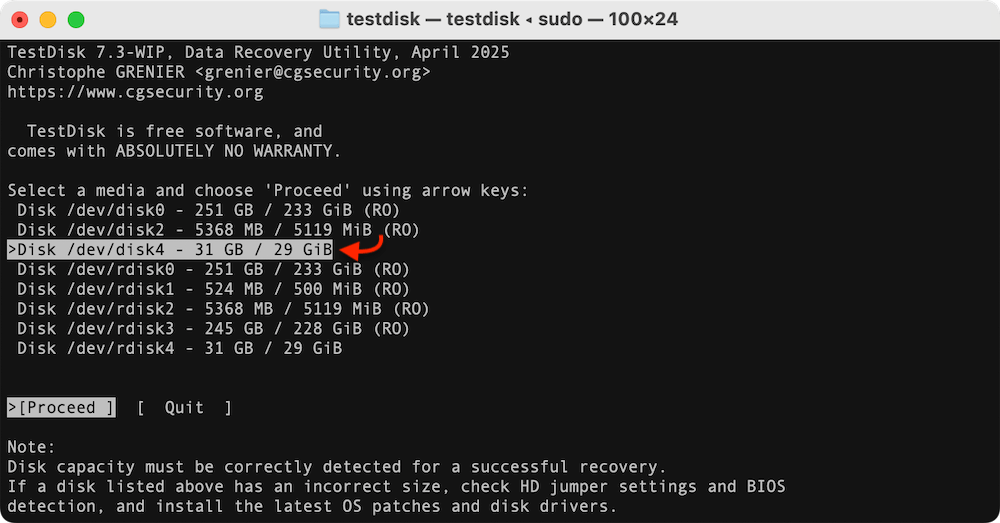
Step 2: Selecting the Disk for Recovery
TestDisk will display a list of available drives. You will need to select the correct disk where the partition was lost. It's important to carefully identify the disk—usually, it will be something like /dev/disk1, /dev/disk2, etc. Once you've selected the correct disk, press Enter to continue.
Step 3: Analyzing the Disk for Lost Partitions
TestDisk will begin by performing a "Quick Search" to locate any deleted partitions. This can take a few minutes, depending on the size of the disk.
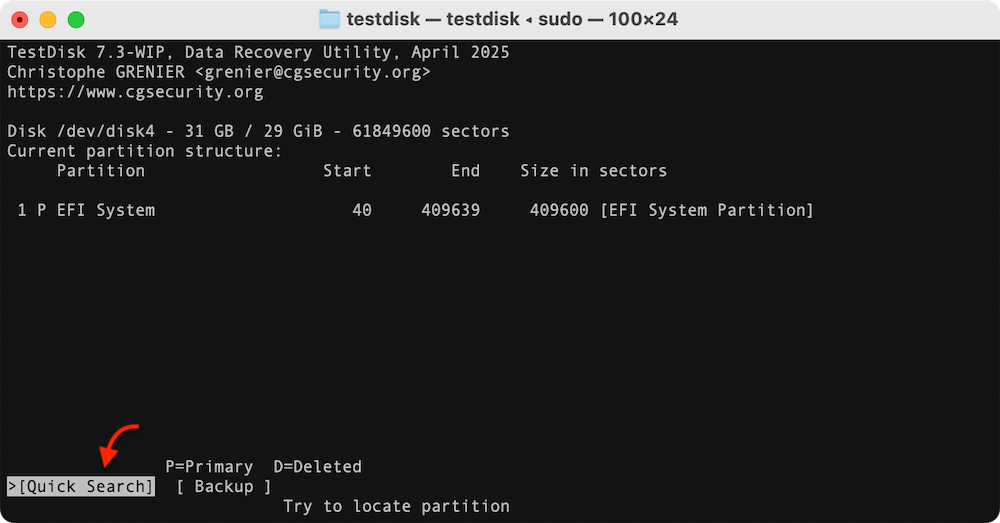
If the quick search doesn't find your lost partition, you can initiate a "Deeper Search," which scans the disk more thoroughly. This process takes longer but is more likely to uncover partitions that weren't detected initially.
Once the search is complete, TestDisk will display a list of detected partitions.
Step 4: Recovering the Lost Partition
From the list of detected partitions, use the arrow keys to highlight the partition you wish to recover. Typically, you'll look for a partition marked as deleted or missing.
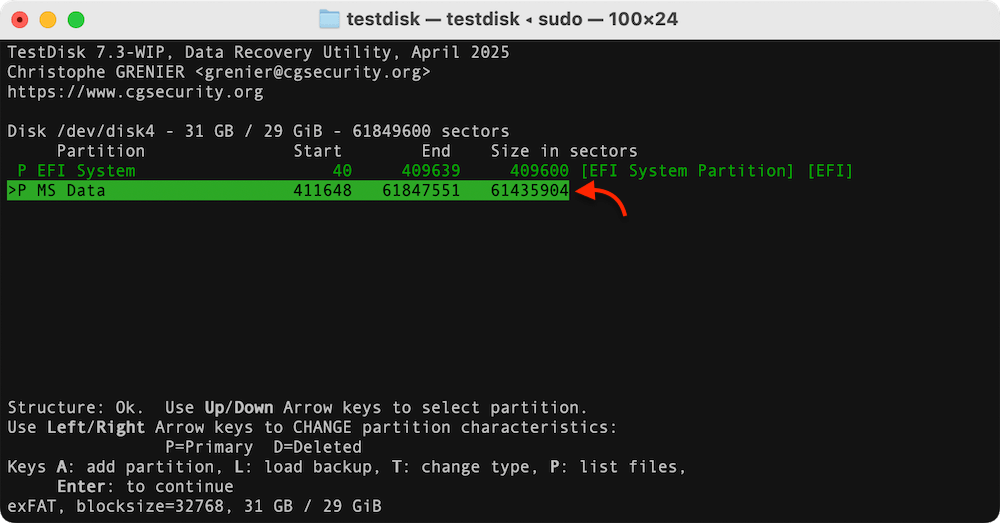
You may need to specify the partition type. TestDisk automatically detects the partition type (e.g., HFS+ for macOS), but if it doesn't, you can manually select it.
After selecting the partition, choose to Write the partition to the disk. TestDisk will then attempt to restore the partition table. Confirm this action when prompted.
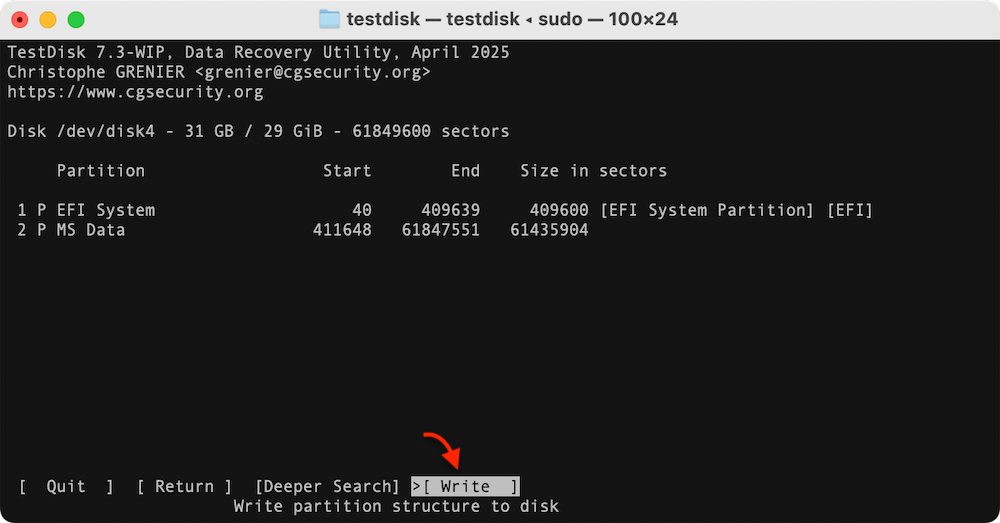
After the partition has been written, reboot your Mac. The recovered partition should now be accessible in Finder, and you should be able to mount and access it as usual.
Step 5: Verifying the Recovered Partition
Once your Mac has rebooted, check whether the partition has been successfully recovered. Open Finder and see if the partition appears. If it does, try accessing the files within it to ensure everything is intact.
Step 6: Saving Recovered Data
After recovering the partition, it's important to transfer any critical data to a safe location. If you need to move a significant amount of data, consider using an external hard drive or cloud backup service to secure the files.
Additional Tips and Advanced Recovery Techniques
Handling Multiple Partition Loss
TestDisk can recover multiple lost partitions on the same disk. If you've lost several partitions, you can repeat the recovery process for each partition individually. Always ensure you select the correct partition each time, as recovery involves making permanent changes to the disk structure.
Using TestDisk with APFS and HFS+ File Systems
macOS uses APFS and HFS+ file systems, and TestDisk is equipped to handle both. However, if you're dealing with APFS partitions, it's important to note that some older versions of TestDisk may not fully support APFS. In such cases, updating TestDisk or considering alternatives may be necessary.
Rebuilding Boot Sectors and Fixing Partition Tables
TestDisk can also help in situations where the partition table is completely corrupted. By choosing the "Rebuild Boot Sector" option, TestDisk can attempt to restore the partition structure to a functional state.
Common Errors and Troubleshooting
TestDisk Errors During Recovery
Some common issues during recovery include:
- Unable to find partitions: If TestDisk fails to find partitions, try performing a deeper search.
- Partition recovery fails: Ensure you're selecting the correct partition type. Sometimes, manually specifying the partition type may help.
Data Overwritten or Corrupted
If data has been overwritten or severely corrupted, recovery becomes much more challenging. In such cases, it may be worth seeking professional recovery services or trying alternative software designed for severely damaged disks.
TestDisk Alternative for Mac
While TestDisk is highly effective, it's hard to use for many users due to the command-line style interface. If you are not familiar with commands and want an easy and user-friendly software, there are several alternatives that might suit your needs, such as Donemax Data Recovery for Mac.
Donemax Data Recovery for Mac
- Effectively recover data from deleted/lost partition on Mac.
- Data recovery for hard drive, SSD, USB flash drive, SD card, etc.
- Easy-to-use and 100% safe data recovery software.
Donemax Data Recovery is known for its intuitive interface and excellent recovery capabilities.It's a user-friendly recovery tool that supports macOS and offers both free and paid versions. The software also offers advanced features like file preview before recovery.
The software offers different features, and might be easier for users who prefer a graphical interface over TestDisk's command-line approach.
Here are the steps to recover lost/deleted partition data with Donemax Data Recovery on Mac:
Step 1. After downloading and installing the software on Mac, run it from launchpad. Select the disk where you deleted or lost partition.

Step 2. Click the Scan button and then the software will start to search for the deleted/lost partition and find the lost files. It will take a while depending on the size of the disk, just wait patiently.

Step 3. After the scan is completed, you can then locate the wanted files and preview them to confirm if they are recoverable. At last, select all the wanted files and save them to another drive.

Preventing Partition Loss in the Future
Importance of Regular Backups
Regular backups are essential to preventing data loss. macOS offers Time Machine, a built-in backup solution that automatically creates incremental backups of your files and partitions. You can also consider third-party backup solutions like Donemax Disk Clone for disk cloning or Backblaze for cloud backups.
Using Disk Management Tools
macOS includes Disk Utility, a powerful tool for managing disks and partitions. You can use it to check the health of your partitions and perform basic repairs to prevent future issues.
Regular System Maintenance
Routine maintenance, such as software updates and disk checks, helps ensure your Mac's file system remains stable. Always keep your system up-to-date and regularly verify the health of your drives.
Conclusion
TestDisk is a robust and powerful tool for recovering lost or deleted partitions on a Mac. Its open-source nature, support for macOS file systems, and effective recovery mechanisms make it an ideal solution for users facing data loss. By following the steps outlined in this guide, you can safely recover lost partitions, restore your data, and prevent future issues. Always remember to back up your data regularly and use reliable partition management practices to avoid loss in the future.
Donemax Data Recovery for Mac
Donemax Data Recovery for Mac is one of the best Mac data recovery software. It is easy-to-use and can help in recovering deleted, formatted, inaccessible or lost data from Mac HDD/SSD, external disk, USB drive, SD card, camera or other storage devices.
Related Articles
- Sep 03, 2025How to Recover Deleted Chrome Bookmarks on Mac?
- Apr 22, 2026How to Recover Lost Data on MacBook?
- May 26, 2026Recover Deleted Files from A18 Pro MacBook Neo: Step-by-Step Guide
- Feb 05, 2025How to Unformat an SD Card on Mac?
- Jun 06, 2025What Is an ICNS File and How to Recover Deleted ICNS Files?
- Feb 22, 2024How to Recover Lost Data from External Hard Drive, USB Drive, SD Card on macOS Sonoma?

Contributing Writer
Coco Lin
Coco has been a writer and a chief programmer at Donemax software since 2018. Over 10 years of experience of writing troubleshooting articles in the software industry, she is passionate about programming and loves to providing solutions to Windows and Mac users. Also she enjoys music and palying tennis in her free time.

Editor in chief
Gerhard Chou
In order to effectively solve the problems for our customers, every article and troubleshooting solution published on our website has been strictly tested and practiced. Our editors love researching and using computers and testing software, and are willing to help computer users with their problems