
Written byMariaUpdated on Jun 16, 2023
How to Clone Mac Hard Drive to External SSD? 2 Methods to Try
Approved byGerhard Chou
Before we start: There are 2 ways to clone a hard drive on Mac if you want to copy your Mac to an external SSD. You can choose to clone Mac with Disk Utility or a reliable disk cloning software - Donemax Disk Clone for Mac.
Quick Navigation:
Why should I clone my Mac hard drive to an SSD?
Clone your Mac hard drive to an SSD for a variety of reasons. Traditional hard drives can't keep up with the speed of SSDs, which can accelerate your computer's overall performance. Unlike HDDs, they are more dependable and won't lose data if the hardware breaks. Enhancing your computer's performance via cloning a hard disk to an SSD is highly recommended. Naturally, cloning a Mac to an external SSD can also be used as a data backup to recover crucial files in the event that your machine is damaged and allows you to back to normal work immediately.
You might need to clone your Mac system to SSD for further operations if you want to try out a Mac beta, boot your Mac system from an external SSD or swap out the startup disk in your Mac machine. In this article, we'll go through in more detail how to clone a Mac to an SSD.
How do I connect an SSD to my Mac computer?
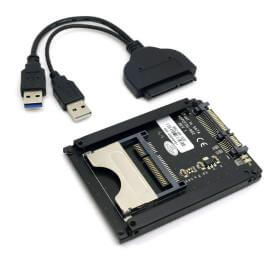
There are several interfaces available when we purchase an SSD, some of which being USB and Type-c. These interfaces are simple to use and may be connected directly to our computer. As well as some SSDs are SATA, M.2, PCI-E, and other types, so we can't just plug them into our Mac. How do I connect the SSD to the Mac and copy the system to it?
Step 1. To connect SSDs with SATA, M.2, PCI-E, or other types to Mac, we need to purchase a corresponding adapter or disk tray for this type of interface.
Step 2. It's likely that the SSD's present file format won't work with your Mac when you attach it.
Step 3. Select the SSD in Disk Utility.
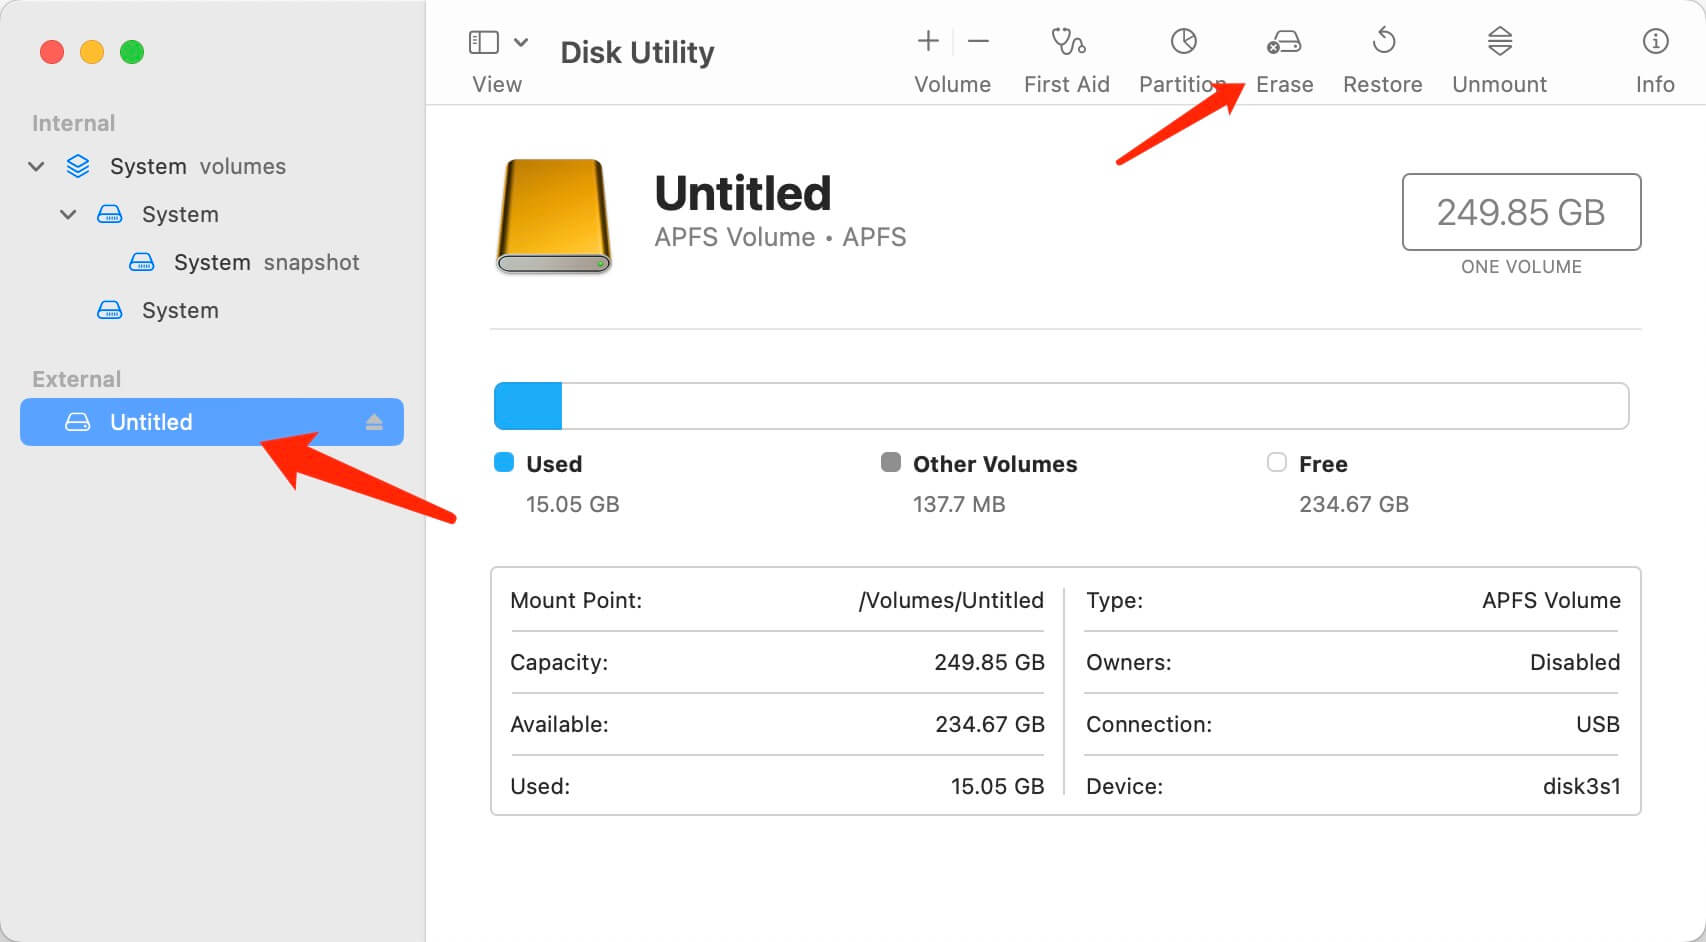
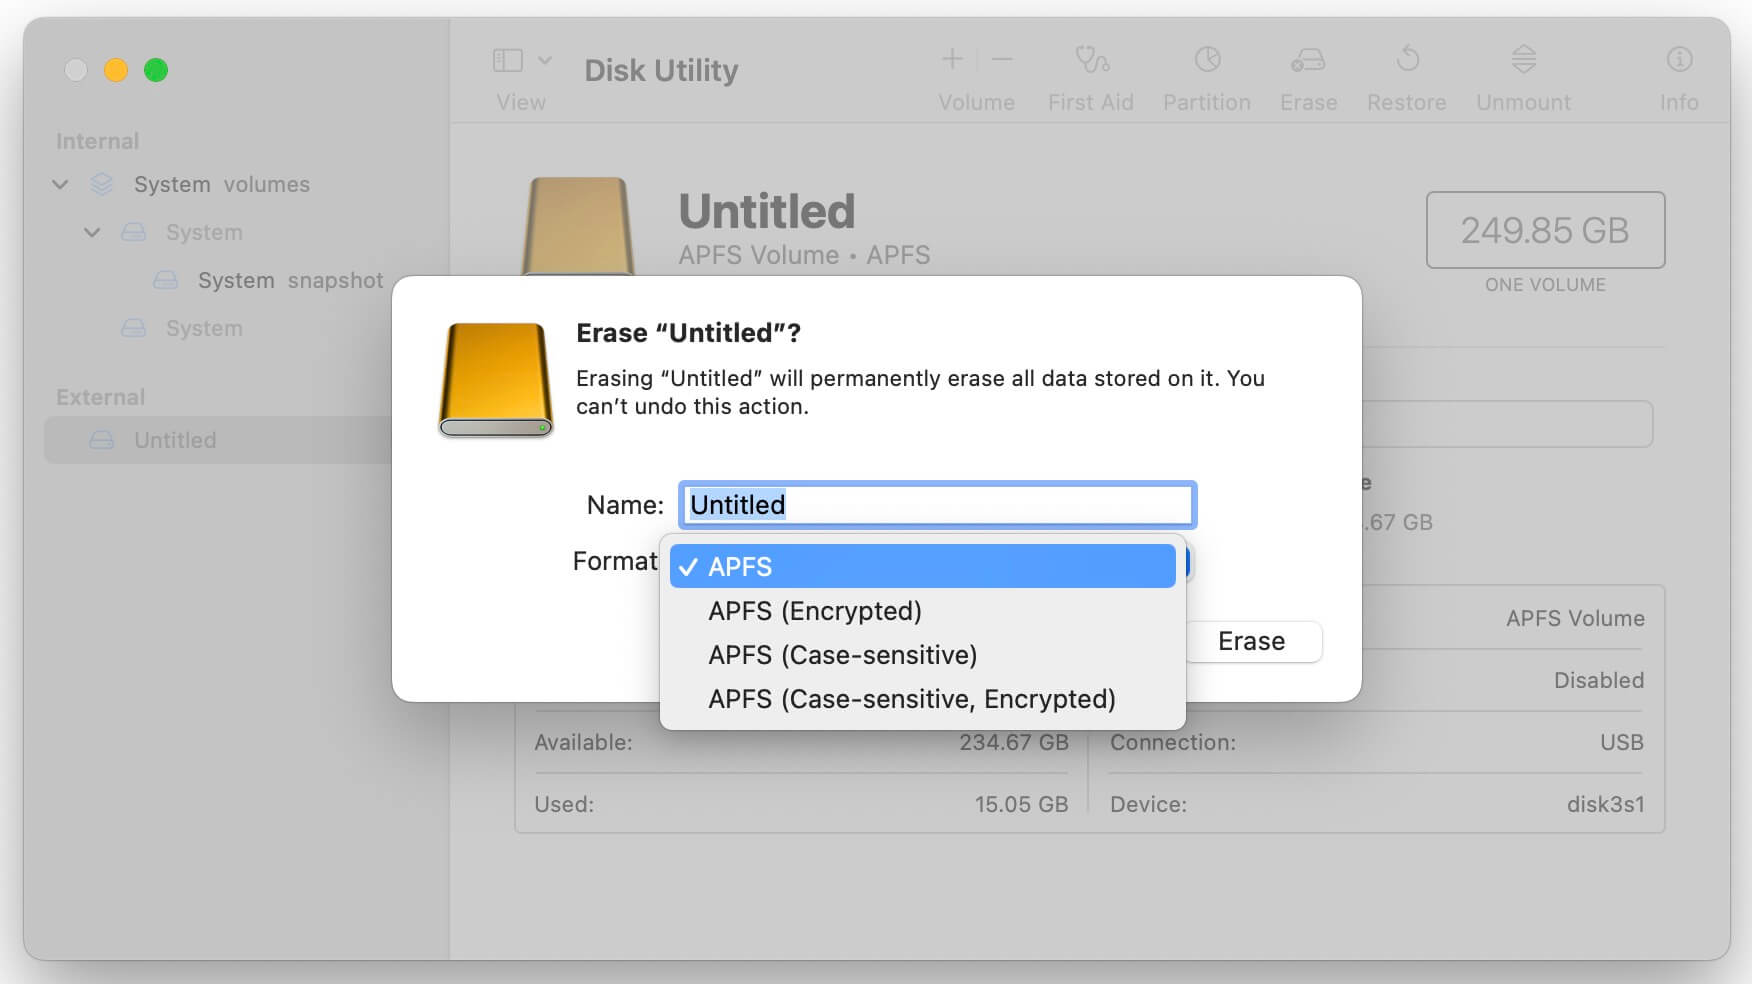
Step 4. Choose the necessary file system in the pop-up box after clicking the Erase button. (APFS file system is recommended).
Step 5. Click the Erase button. And then your SSD on Mac is ready to use.
Two Methods to Clone a Mac to an SSD
We will outline 2 ways below to help you clone your Mac system and data to an external SSD hard disk if you desire to do so.
Method 1: Use Mac disk cloning software to copy hard drive to an SSD
With a Mac disk cloning software, you may quickly make a copy of your Mac hard drive. Choosing a different Mac cloning programs and methods might be challenging. When selecting a disk cloning software for Mac, the following factors should be taken into account:
Practicality: It should be successfully cloning all the data on the startup disk with outstanding disk copying performance and ensures you to boot from the cloned external SSD. Or allow you to clone a single volume if needed.
Ease of use: Using decent cloning software is simple even if you’re a Mac newbie. The most important requirements are a straightforward user interface and a helpful instruction that will take you step by step through the cloning procedure.
Compatibility: To ensure success, choosing cloning software with strong compatibility, a broad range of systems to flip, and a variety of hard drive kinds such as HDD, SSD, SD card is essential.
Choose the Mac disk cloning app that best meets your needs based on these capabilities. Donemax Disk Clone for Mac is suggested here. It is a professional disk cloning tool that can straightly clone a Mac hard drive to an SSD. Donemax Disk Clone for Mac offers an easy-to-use UI and clear instructions. It is not restricted by the type of hard drive and works with the most recent macOS 13 Ventura.
Now, install Donemax Disk Clone for Mac on your Mac and follow the steps below to clone mac hard drive to SSD.
Step 1. Connect an external SSD to your Mac and launch Donemax Disk Clone for Mac. Make sure the external hard drive has enough disk space to save all the data on the source disk.
Step 2. Choose OS Clone and select the SSD as the destination drive. It will help you clone Mac startup disk to the external SSD and make it be bootable.

Step 3. Click on Clone Now button to securely clone all data including your macOS, settings, apps, documents, apps to the SSD drive.
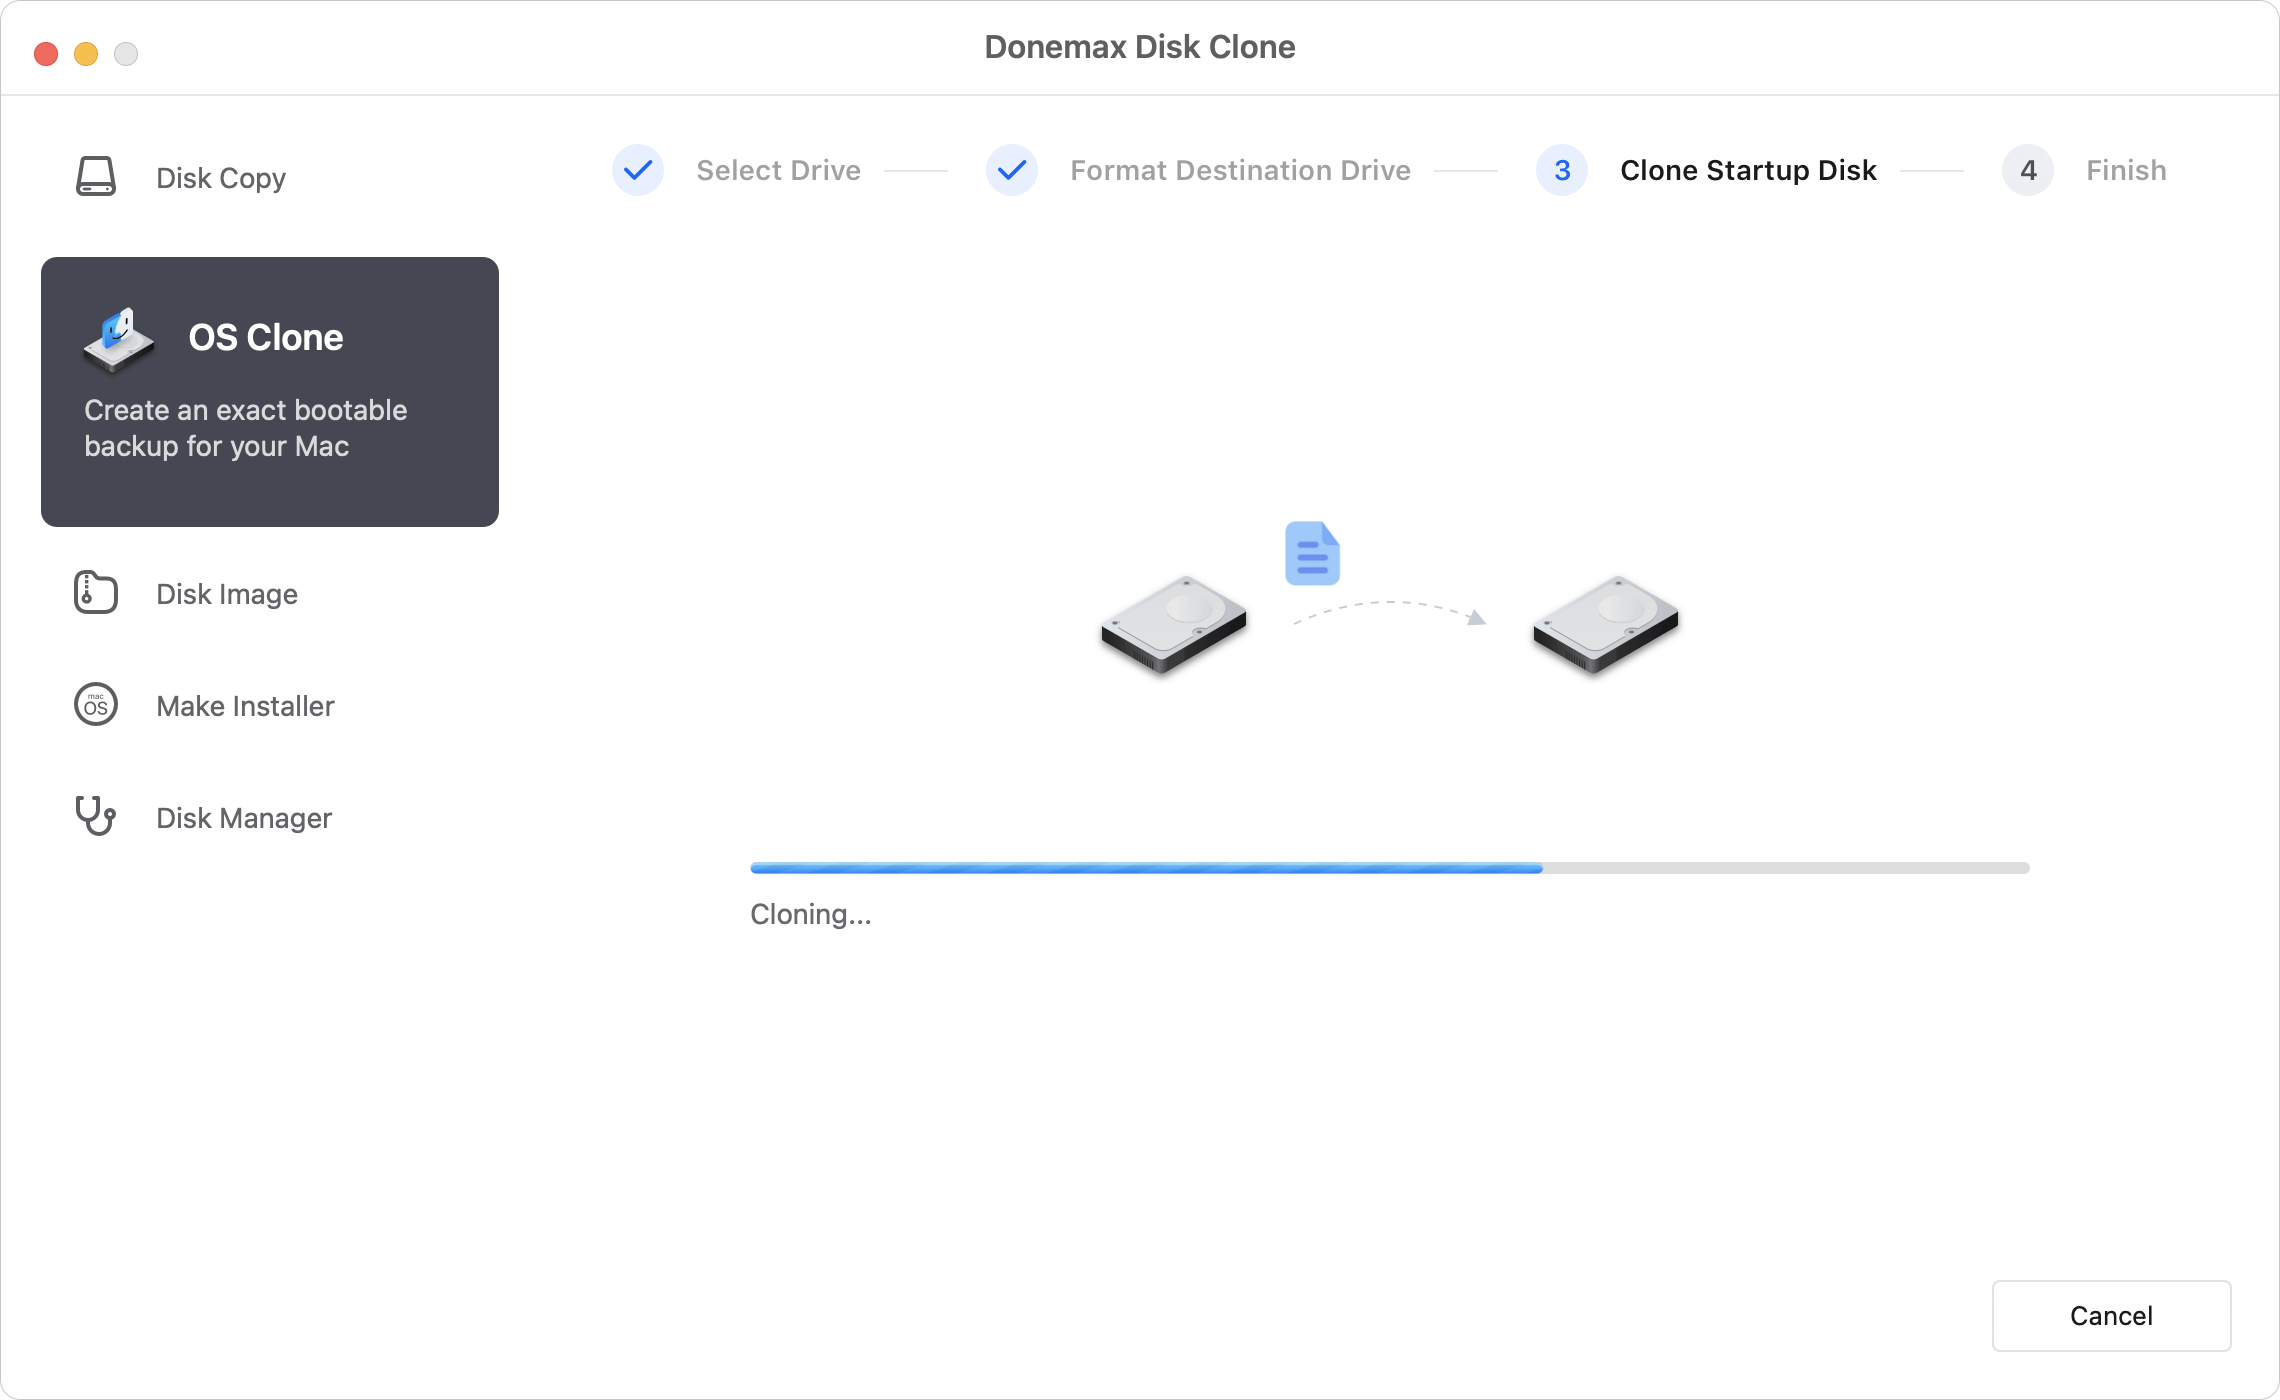
Step 4. Once the process gets finished, you can check the cloned data on the SSD and you can use the SSD as a bootable disk.

The method described above copies the Mac system disk to an SSD. If you only need to fully backup or copy your data only without the macOS, you can perform this task using the "Disk Copy" or "Disk Image" tool in Donemax Disk Clone for Mac. Selective cloning allows you to filter out data that you don't need to backup, which significantly reduces backup time and space requirements.
Method 2: Use Disk Utility to clone mac hard drive to SSD
You can copy your Mac system or hard drive to other hard drives using the free Disk Utility that comes with Mac systems. On Mac operating system, the act of copying data from one hard drive to another is known as "recovery", that is, restoring one hard disk to another hard drive. The steps are to clone a non-system drive on Mac to SSD as follows:
- Open Disk Utility on your Mac.
- Select "Restore" on the top of the Disk Utility window.
![Click Restore to clone Mac hard drive]()
- Select your Mac's hard drive as the Source.
- Select your external SSD as the target.
- Click Recover to save the contents of the duplicated drive on the target SSD
How to restore my macOS using a clone?
When our system has issues or crashes, the system we backed up is important. Instead of dealing with the trouble, we can just restore the present device using the system that was previously backed up:
- Connect your external SSD with the clone on your Mac.
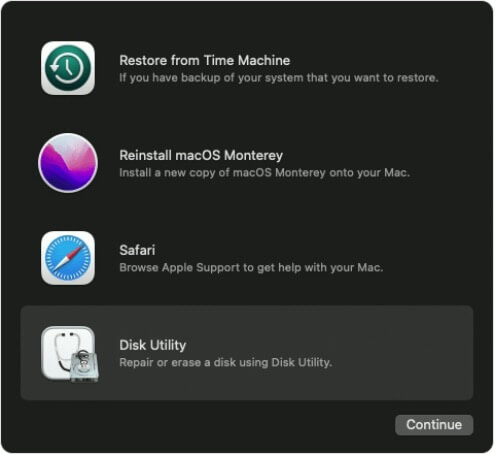
- Restart your Mac, press Command+R keys to launch macOS Recovery Mode.
- Choose Disk Utility and then Click Continue.
![Select Disk Utility in macOS Recovery Mode]()
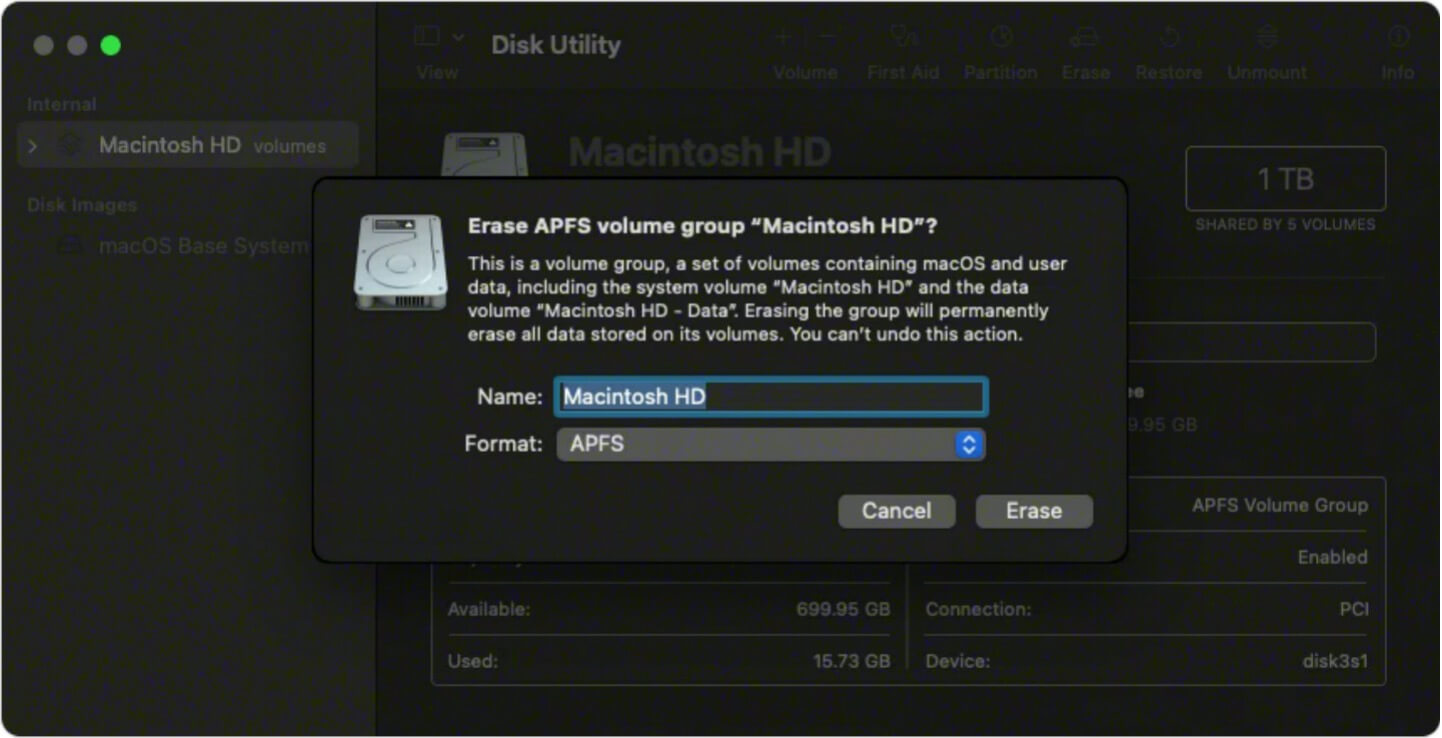
- Click the Erase tab after selecting the Macintosh HD disk.
![Select Erase in macOS Recovery Mode]()
- Choose APFS or Mac OS Extensions (Journaled) from the drop-down menu of Format.
- Click Erase and it will take a few minutes to clear up.
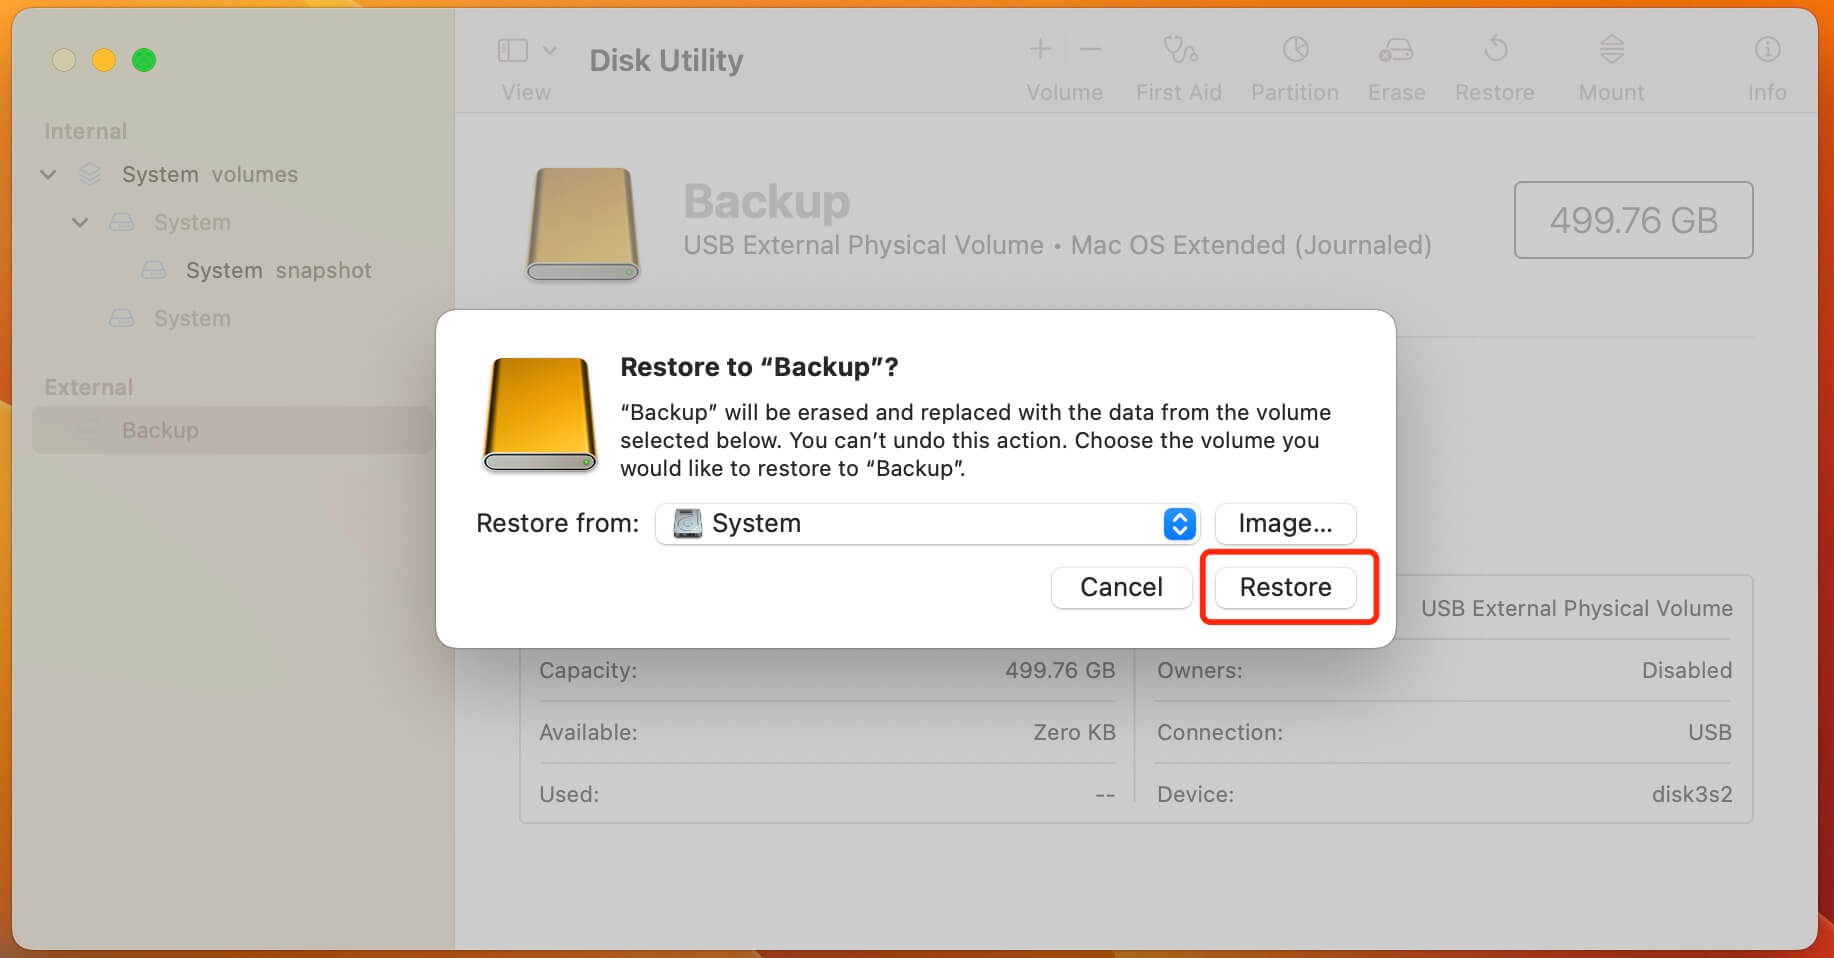
- Click Restore tab on the top of the Disk Utility window.
- Select your external drive as the source to restore from.
- Select your Mac's hard drive as the destination to Restore to and click Restore.
- After restoring, restart your computer. And then your Mac is restored successfully.
How do I choose the right file system for my Mac external SSD?
What is a file system on Mac? File system is an organizing tool used to handle the storing and retrieving of files and directories on a Mac computer storage device. It provides a trustworthy system to guarantee data security and integrity and defines how files and directories are arranged and accessed on a storage device. Files, directories, file permissions, file attributes, and space allocation tables are often included in file systems. Different operating systems employ several file systems, such as APFS, HFS+ on Mac, Linux's EXT4 and Windows' NTFS, FAT32, etc.
What file system should I pick for my Mac SSD drive?
APFS file system is the primary file system for macOS High Sierra 10.13 and later. The performance and stability of APFS are better, and it allows snapshots, space sharing, and stronger encryption.
HFS+ (Mac OS Extended) file system is used if you are using an earlier version of macOS. However, you can use the Disk Utility that comes with macOS to convert your disk to APFS if it is already formatted as HFS+.
exFAT file system, a cross-platform file system that enables seamless file sharing between macOS and Windows, and is widely used among SD card and camera if you need to share your drive between macOS and Windows.
In other words, your version of macOS and usage should guide your file system selection of the external SSD. You can examine the official documentation or get help from a professional if you are unsure about which file system to use.
Conclusion
Cloning a Mac hard drive is not a difficulty thing to do with a right solution. Free Disk Utility can be used to copy a Mac hard drive to an SSD, but this method is more complex and requires more expertise. The safety of your vital data is guaranteed by Donemax Disk Clone for Mac, which makes it simple to carry out any disk cloning operation you desire and create disk images. All operations carried out by Donemax Disk Clone for Mac do not destroy the original data.
FAQs about cloning Mac hard drive to SSD
- Download and install Donemax Disk Clone for Mac.
- Connect your SSD drive into your Mac.
- Open Donemax Disk Clone for Mac.
- Switch to 'OS Clone'.
- Select the SSD as the destination drive.
- Click the 'Clone Now' button and wait for the cloning to complete.
Take it easy, the data will not be lost during cloning. When the source data is copied, the Mac will simply mirror an exact copy of the data and usage environment on the new SSD. Of course, using more user-friendly professional third-party disk cloning software such as Donemax Disk Clone for Mac is recommended if you are unsure how to use the system disk tools in order to prevent accidentally losing crucial data.
Your Mac's hard drive can be copied to other disks, external hard disks, or USB devices. The only thing to confirm is that the capacity of the target disk is larger than the used size of your cloned disk.
There are two popular methods to cloning macOS to another drive:
- Use a reputable third-party disk copy program, such as Donemax Disk Clone for Mac, which has an easy-to-use interface, convenient operation, and excellent compatibility and functionality.
- You can also use the Mac's built-in Disk Utility, which will walk you through the process of moving files, settings, and applications to a new disk.
Of course, cloning HDD to SSD is very easy on Mac! All you need is a professional Mac cloning software. It is recommended to use Donemax Disk Clone for Mac. It is highly compatible, not only compatible with various versions of the system (including the latest macOS Ventura), but also perfectly compatible with various disks.
Related Articles
- Jul 17, 2025Best Mac Cloning Software for Disk Replacement and Backup
- Jul 30, 2025Clone or Back Up Mac Data to Seagate External Hard Drive
- Aug 07, 2025Best Alternative to SuperDuper! for Mac
- May 08, 2025Download, Create and Use macOS Ventura ISO File
- Oct 24, 2025How to Clone Disk on M5 Chip Mac: Step-by-Step Guide
- Jun 16, 2026How to Create Installer for macOS 27 Golden Gate: Step-by-Step Guide

Contributing Writer
Maria
Maria is one of the senior writers & editors of Donemax who lives and works in Sydney, Australia. She loves PC, Mac and Internet Technology. She has 6 years of writing articles about data recovery on PC/Mac, disk cloning solution, data eraser and computer OS optimization, etc. She is also interested in testing various software and digital products.

Editor in chief
Gerhard Chou
In order to effectively solve the problems for our customers, every article and troubleshooting solution published on our website has been strictly tested and practiced. Our editors love researching and using computers and testing software, and are willing to help computer users with their problems