
Written byCoco LinUpdated on Jul 09, 2025
How to Use Time Machine on macOS Tahoe 26?
Approved byGerhard Chou
Before we start: Time Machine is a reliable and built-in backup tool for macOS. However, several third-party tools can also help you back up macOS. For example, Donemax Disk Clone for Mac is a reliable disk cloning tool. The software can create full and bootable clone copy for macOS Tahoe 26.
PAGE CONTENT:
Backing up your Mac has never been more important, especially as operating systems grow more advanced and our data becomes increasingly valuable. With macOS Tahoe 26, Apple continues to provide users with Time Machine, a reliable, built-in backup solution designed to protect your files and system from unexpected data loss, hardware failure, or accidental deletions.
In this comprehensive guide, you'll learn how to use Time Machine on macOS Tahoe 26, including setup instructions, how to restore files, perform full system recovery, and troubleshoot common problems. Whether you're a new Mac user or upgrading to Tahoe 26, this article will help you keep your data safe.
What is Time Machine?
Time Machine is Apple's native backup software integrated into macOS, designed to provide automatic, incremental backups of your system and personal files. Introduced in 2007, Time Machine remains one of the easiest backup solutions for Mac users.
Unlike manual copying of files, Time Machine automatically backs up your entire system, including applications, settings, documents, photos, and even system files. Its versioned backup system allows you to go "back in time" and restore files from previous states, making it invaluable for recovering from data loss, system failures, or accidental edits.
Key Benefits of Using Time Machine
✦ Automatic Backups: Runs hourly, daily, and weekly without manual intervention.
✦ Versioned Recovery: Access previous versions of files or entire system snapshots.
✦ Full System Restore: Restore your Mac completely in case of disk failure or system corruption.
✦ Seamless Integration: Works natively within macOS with minimal setup required.
New Features in Time Machine for macOS Tahoe 26 (If Applicable)
While Apple's official documentation highlights incremental improvements in macOS Tahoe 26, Time Machine remains largely familiar to longtime users. However, possible enhancements include:
- Faster Backup Speeds: Improved APFS snapshot handling.
- Streamlined Interface: Refreshed UI aligning with Tahoe 26's new system design.
- Enhanced Network Backup Support: Better compatibility with modern NAS devices using SMB3.
Always consult Apple's release notes for the most current details on new features.
System Requirements for Using Time Machine on macOS Tahoe 26
Before setting up Time Machine, ensure you meet the system and hardware requirements:
1. Compatible Mac Devices
Time Machine is supported on all Macs capable of running macOS Tahoe 26. Typically, this includes:
- MacBook Air (2020 or newer)
- MacBook Pro (2020 or newer)
- iMac (2021 or newer)
- Mac Studio
- Mac mini (M1 or newer)
2. External Storage Options
To use Time Machine, you need an external storage device with sufficient capacity. Supported devices include:
- External Hard Drives (HDDs) via USB-C, Thunderbolt, or USB-A
- External Solid-State Drives (SSDs) for faster backups
- Network Attached Storage (NAS) that supports Time Machine over SMB
- Apple Time Capsule (legacy devices, still compatible but discontinued)
Recommended Storage Size: Your backup disk should be at least twice the size of your Mac's internal storage to allow for multiple backup snapshots.
How to Set Up Time Machine on macOS Tahoe 26
Setting up Time Machine is straightforward. Follow these steps:
Step 1: Connect Your Backup Drive
Plug in your external storage device. Your Mac may automatically prompt you to use it for Time Machine backups.
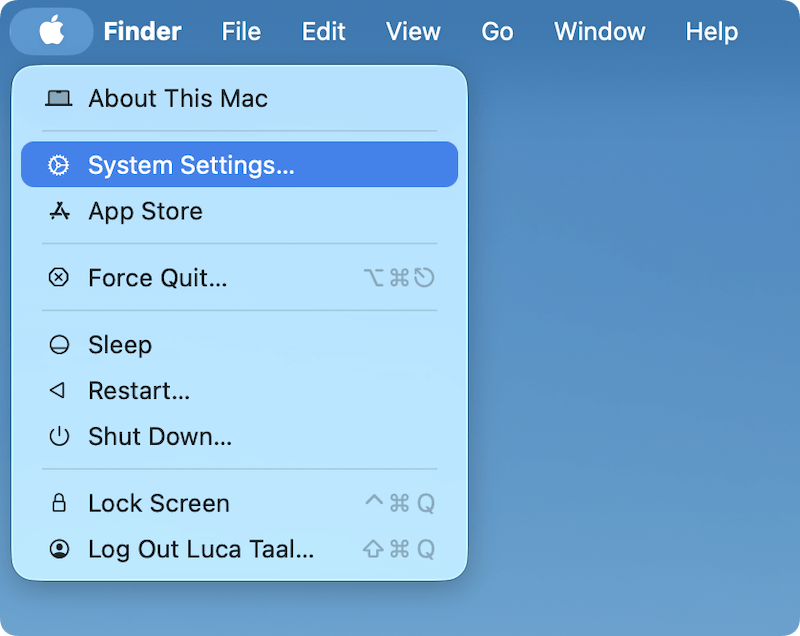
Step 2: Access Time Machine Preferences
- Click the Apple menu in the top-left corner and select System Settings.
![use Time Machine on macOS Tahoe 26]()
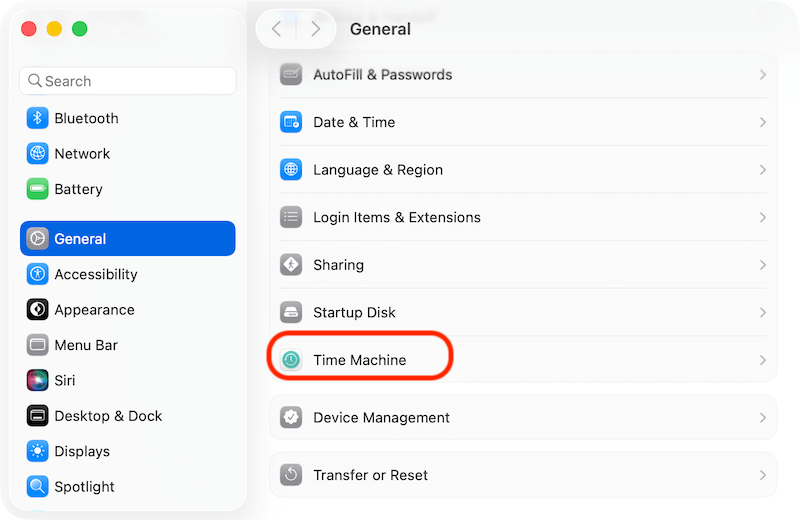
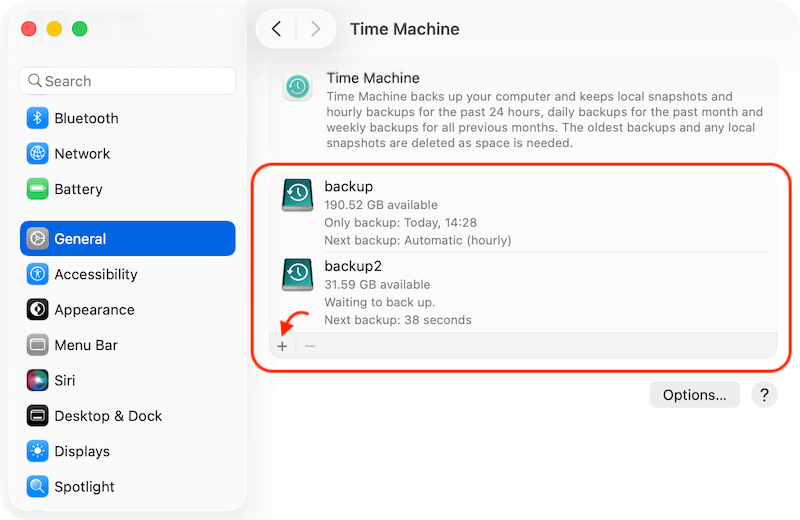
- Click General. Scroll down and click Time Machine.
![use Time Machine on macOS Tahoe 26]()
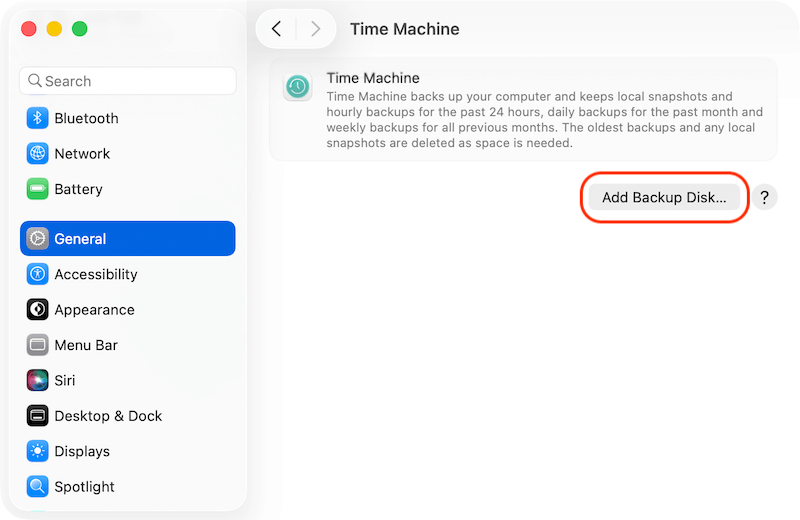
Step 3: Select Backup Disk
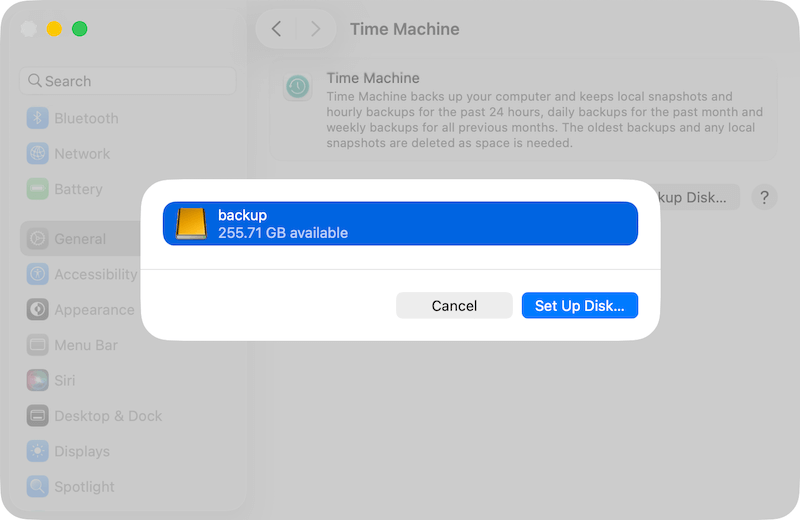
- Click Add Backup Disk.
![use Time Machine on macOS Tahoe 26]()
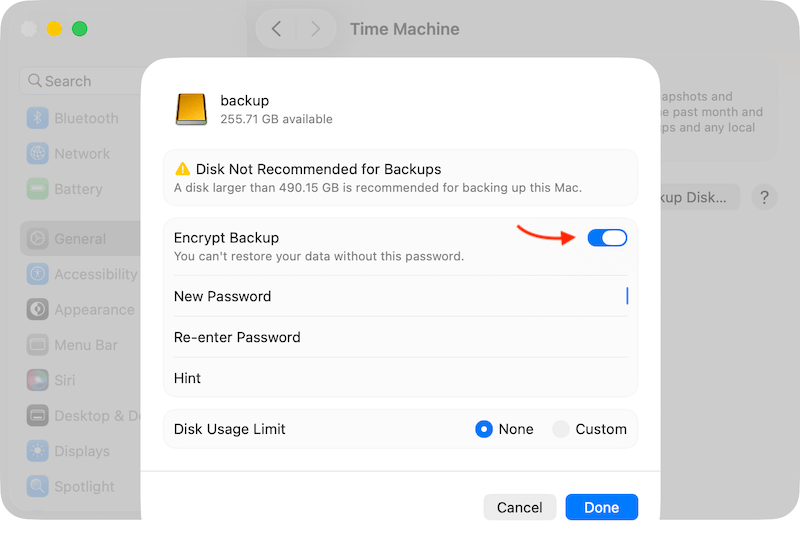
- Choose your external storage device from the list and click Set Up Disk.
![use Time Machine on macOS Tahoe 26]()
- Optional: Check Encrypt Backups for added security.
![use Time Machine on macOS Tahoe 26]()
Step 4: Enable Automatic Backups
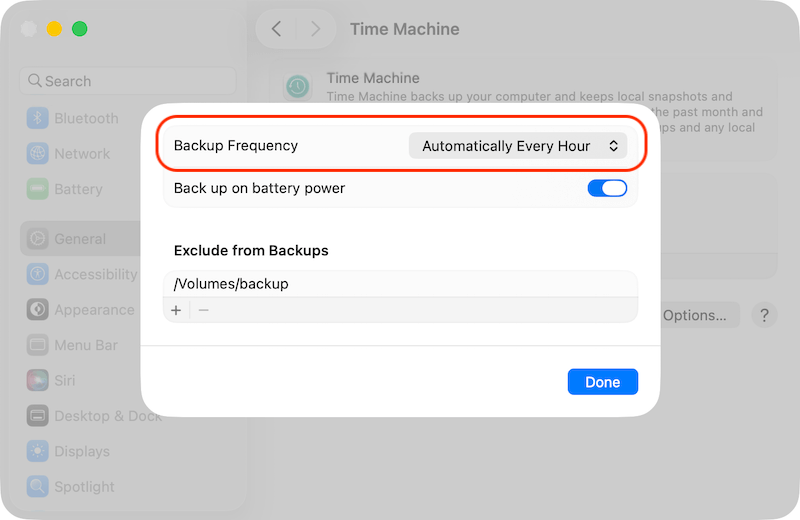
Click Options button and select a Backup Frequency to enable automatic backups. Time Machine will begin preparing your initial backup, which may take some time depending on the amount of data.
Configuring Time Machine Preferences
After setup, you can customize Time Machine settings for optimal use:
Excluding Files or Folders
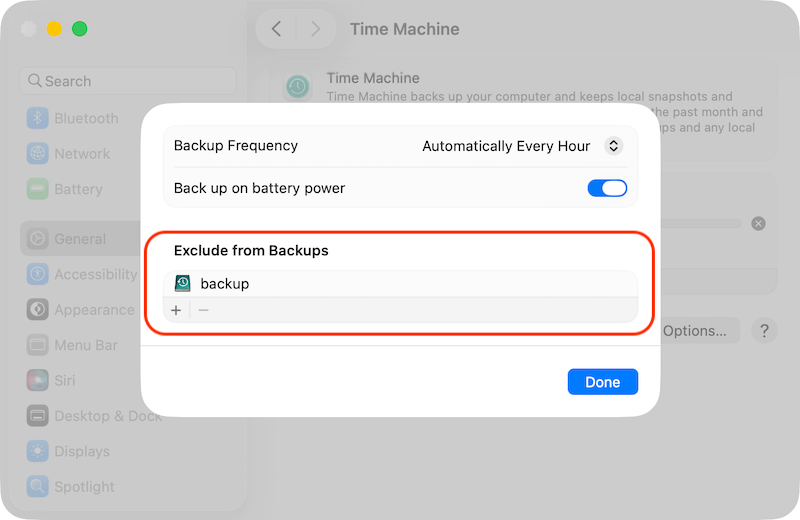
- In Time Machine settings, click Options.
- Use the + button to exclude specific files or folders you don't want backed up (e.g., large media files).
Using Multiple Backup Disks
Time Machine on macOS Tahoe 26 supports multiple backup disks. You can add additional drives and Time Machine will rotate backups across them, providing redundancy.
How to Restore Files with Time Machine
Time Machine makes it easy to recover accidentally deleted or modified files:
Step-by-Step File Recovery
- Connect your Time Machine backup drive (if not already connected).
- Open the folder where the lost file existed.
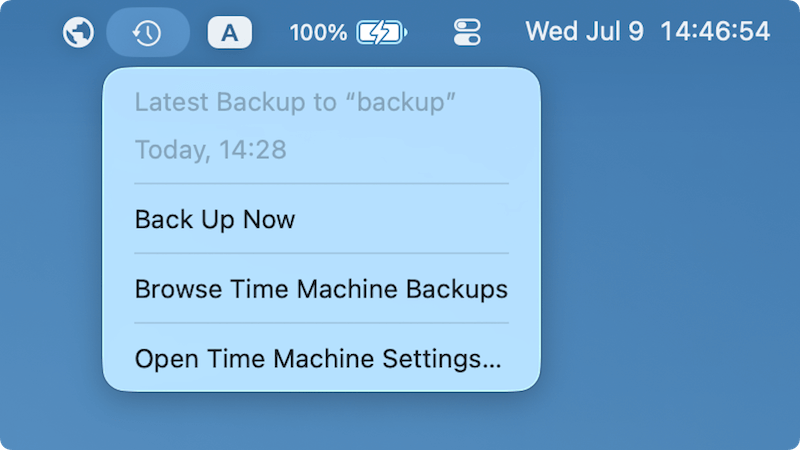
- Click the Time Machine icon in the menu bar and select Browse Time Machine Backups.
![use Time Machine on macOS Tahoe 26]()
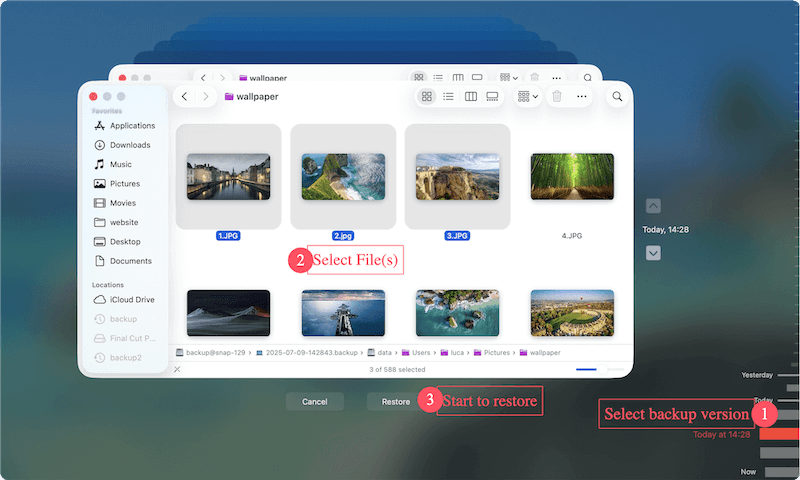
- Use the timeline or arrows to navigate through previous backups.
- Locate the file or folder you want to restore.
- Click Restore to recover the item to its original location.
![use Time Machine on macOS Tahoe 26]()
You can also use Spotlight Search within Time Machine to quickly find specific files across backups.
How to Perform a Full System Restore
A full system restore is often necessary when your Mac experiences major issues such as hard drive failure, severe software corruption, or you've purchased a new Mac and want to transfer your existing system exactly as it was.
Time Machine simplifies this process by enabling you to restore your entire system, including macOS, apps, personal files, system preferences, and settings — all in one operation.
When to Perform a Full System Restore
- Your Mac won't boot due to software failure or disk corruption.
- You replaced your internal storage (SSD or HDD).
- You purchased a new Mac and want to migrate your system from an older device.
- You're experiencing major performance issues that require a clean restore.
- You need to revert to a previous system state after a problematic software update.
Using Time Machine with macOS Recovery
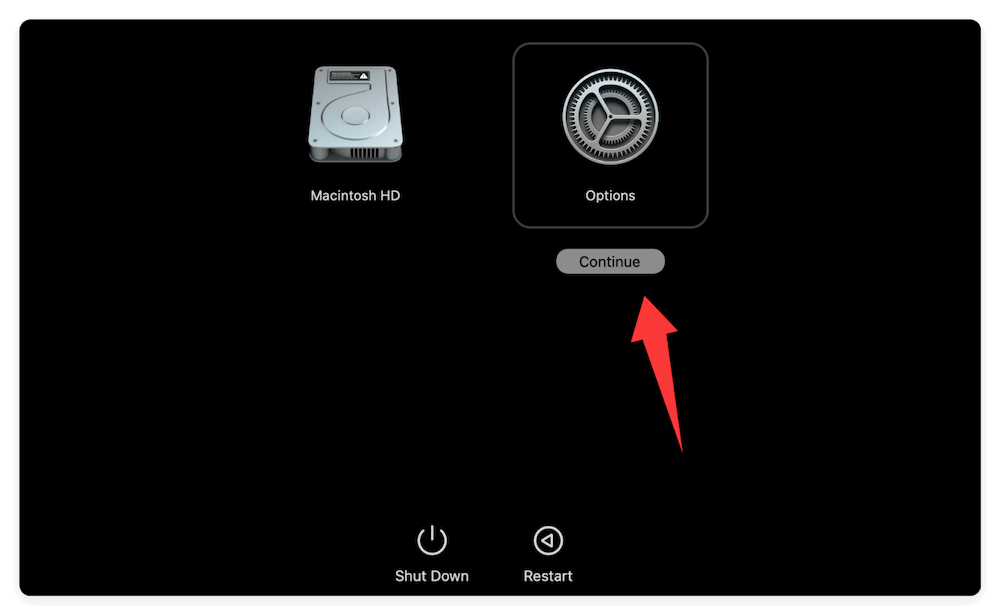
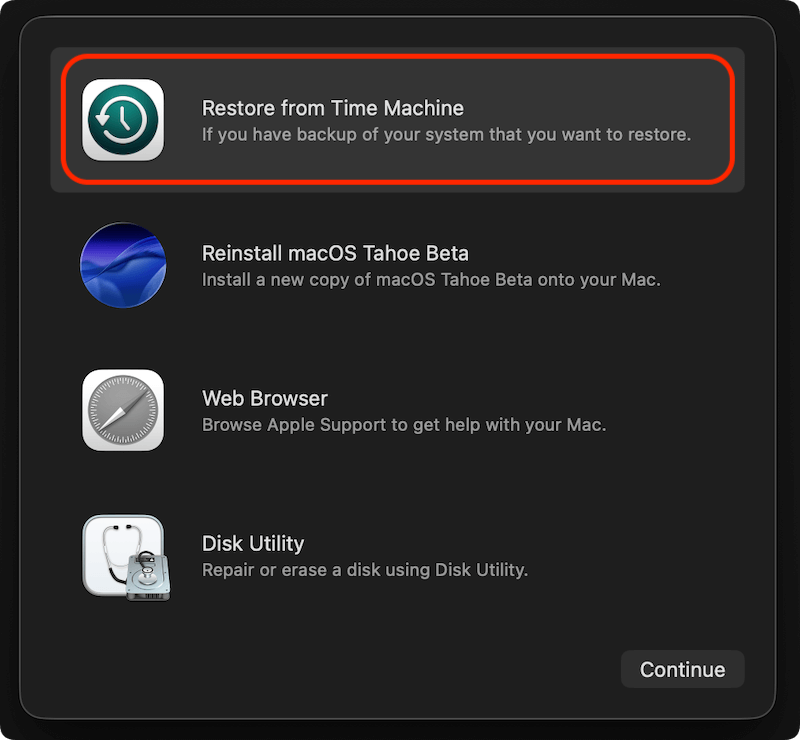
- Restart your Mac and hold Power button during boot to enter macOS Recovery Mode. Select Options and click Continue.
![use Time Machine on macOS Tahoe 26]()
- Select Restore from Time Machine Backup.
![use Time Machine on macOS Tahoe 26]()
- Connect your Time Machine drive.
- Follow the prompts to select a backup and restore your system.
Restoring from Time Machine reinstalls macOS, applications, files, and settings, returning your system to the backup's state.
Post-Restoration Checklist
After completing the system restore:
- Verify critical files, documents, and applications are present.
- Check that your user account and settings are intact.
- Reconnect any external devices or peripherals.
- Install any recent updates that occurred after your last backup.
- Run system diagnostics if the restore was performed due to hardware failure.
Additional Tips for Full System Restore
- Network Speed Considerations: If restoring from a Time Machine backup over a network (e.g., from a NAS), use a wired Ethernet connection for faster and more reliable transfers.
- Drive Encryption: If your backup is encrypted, you will be prompted to enter your encryption password during the restoration process.
- Data Migration to New Macs: Apple's Setup Assistant will also offer to restore from a Time Machine backup when setting up a brand-new Mac, streamlining the migration process.
What If Time Machine Backup Is Not Recognized?
If your Time Machine backup disk doesn't appear during restoration:
- Double-check connections or try different ports.
- Use Disk Utility in macOS Recovery to verify the disk is mounted and in good health.
- Ensure the disk format is compatible (APFS or Mac OS Extended).
- For NAS backups, verify your Mac has proper network access.
Troubleshooting Time Machine on macOS Tahoe 26
Time Machine is reliable, but occasional issues may arise. Here are some Common Problems and Fixes:
1. Time Machine Not Recognizing Backup Disk
- Ensure the disk is formatted as APFS or Mac OS Extended (Journaled).
- Check cable connections or try another port.
- Verify the disk appears in Disk Utility.
2. Backups Failing or Stalling
- Check available space on the backup disk.
- Restart your Mac and retry.
- Run First Aid in Disk Utility to repair disk errors.
3. Insufficient Storage Errors
- Delete older backups manually using Time Machine.
- Upgrade to a larger backup drive.
- Exclude unnecessary files from future backups.
4. Backup Verification Fails
- Replace the backup disk if corruption is detected.
- Reformat the disk and start a new backup cycle.
Checking Backup Logs
Advanced users can view backup logs in Console.app under /var/log/system.log for detailed diagnostics.
Best Practices for Time Machine Backups
To ensure your data stays protected:
- Regularly Verify Backups: Confirm Time Machine runs hourly by checking the menu bar icon.
- Keep the Backup Disk Connected: Especially important for desktop Macs or when working from home.
- Rotate Backup Drives: Maintain backups on multiple drives for redundancy.
- Store Backups Securely: Use encrypted backups and store drives in safe locations.
- Replace Aging Drives: HDDs degrade over time; replace every 3–5 years to avoid failures.
- Test Restore Process: Occasionally restore test files to confirm your backups are functioning properly.
Alternative Solution to Time Machine on macOS Tahoe26
Though Time Machine is enough to back up macOS Tahoe 26 in most cases, you may still need other backup methods. Cloning macOS is another popular method to back up macOS.
Cloning macOS will make the backup simple. Also, it's fast to boot from a cloned drive to get Mac working immediately. You can save time without the restoring process. Besides, it's fast to update startup disk with a new one by cloning the old one.
To make sure the cloned macOS Tahoe 26 is bootable, it's necessary to use a reliable Mac disk cloning software. Donemax Disk Clone for Mac can do the job. It makes the macOS disk cloning easy and stable.
Donemax Disk Clone for Mac
- Create 1-to-1 and exact copy of your macOS Tahoe 26 disk.
- Make full and bootable disk clone backup for macOS Tahoe.
- Safe and easy-to-use disk cloning software for Mac.
Download and install the software on your Mac. Then you can follow the steps to make a bootable clone for macOS Tahoe 26.
Step 1. Start Donemax Disk Clone for Mac and change to OS Clone mode. The startup disk of macOS Tahoe 26 will be selected as source by default.
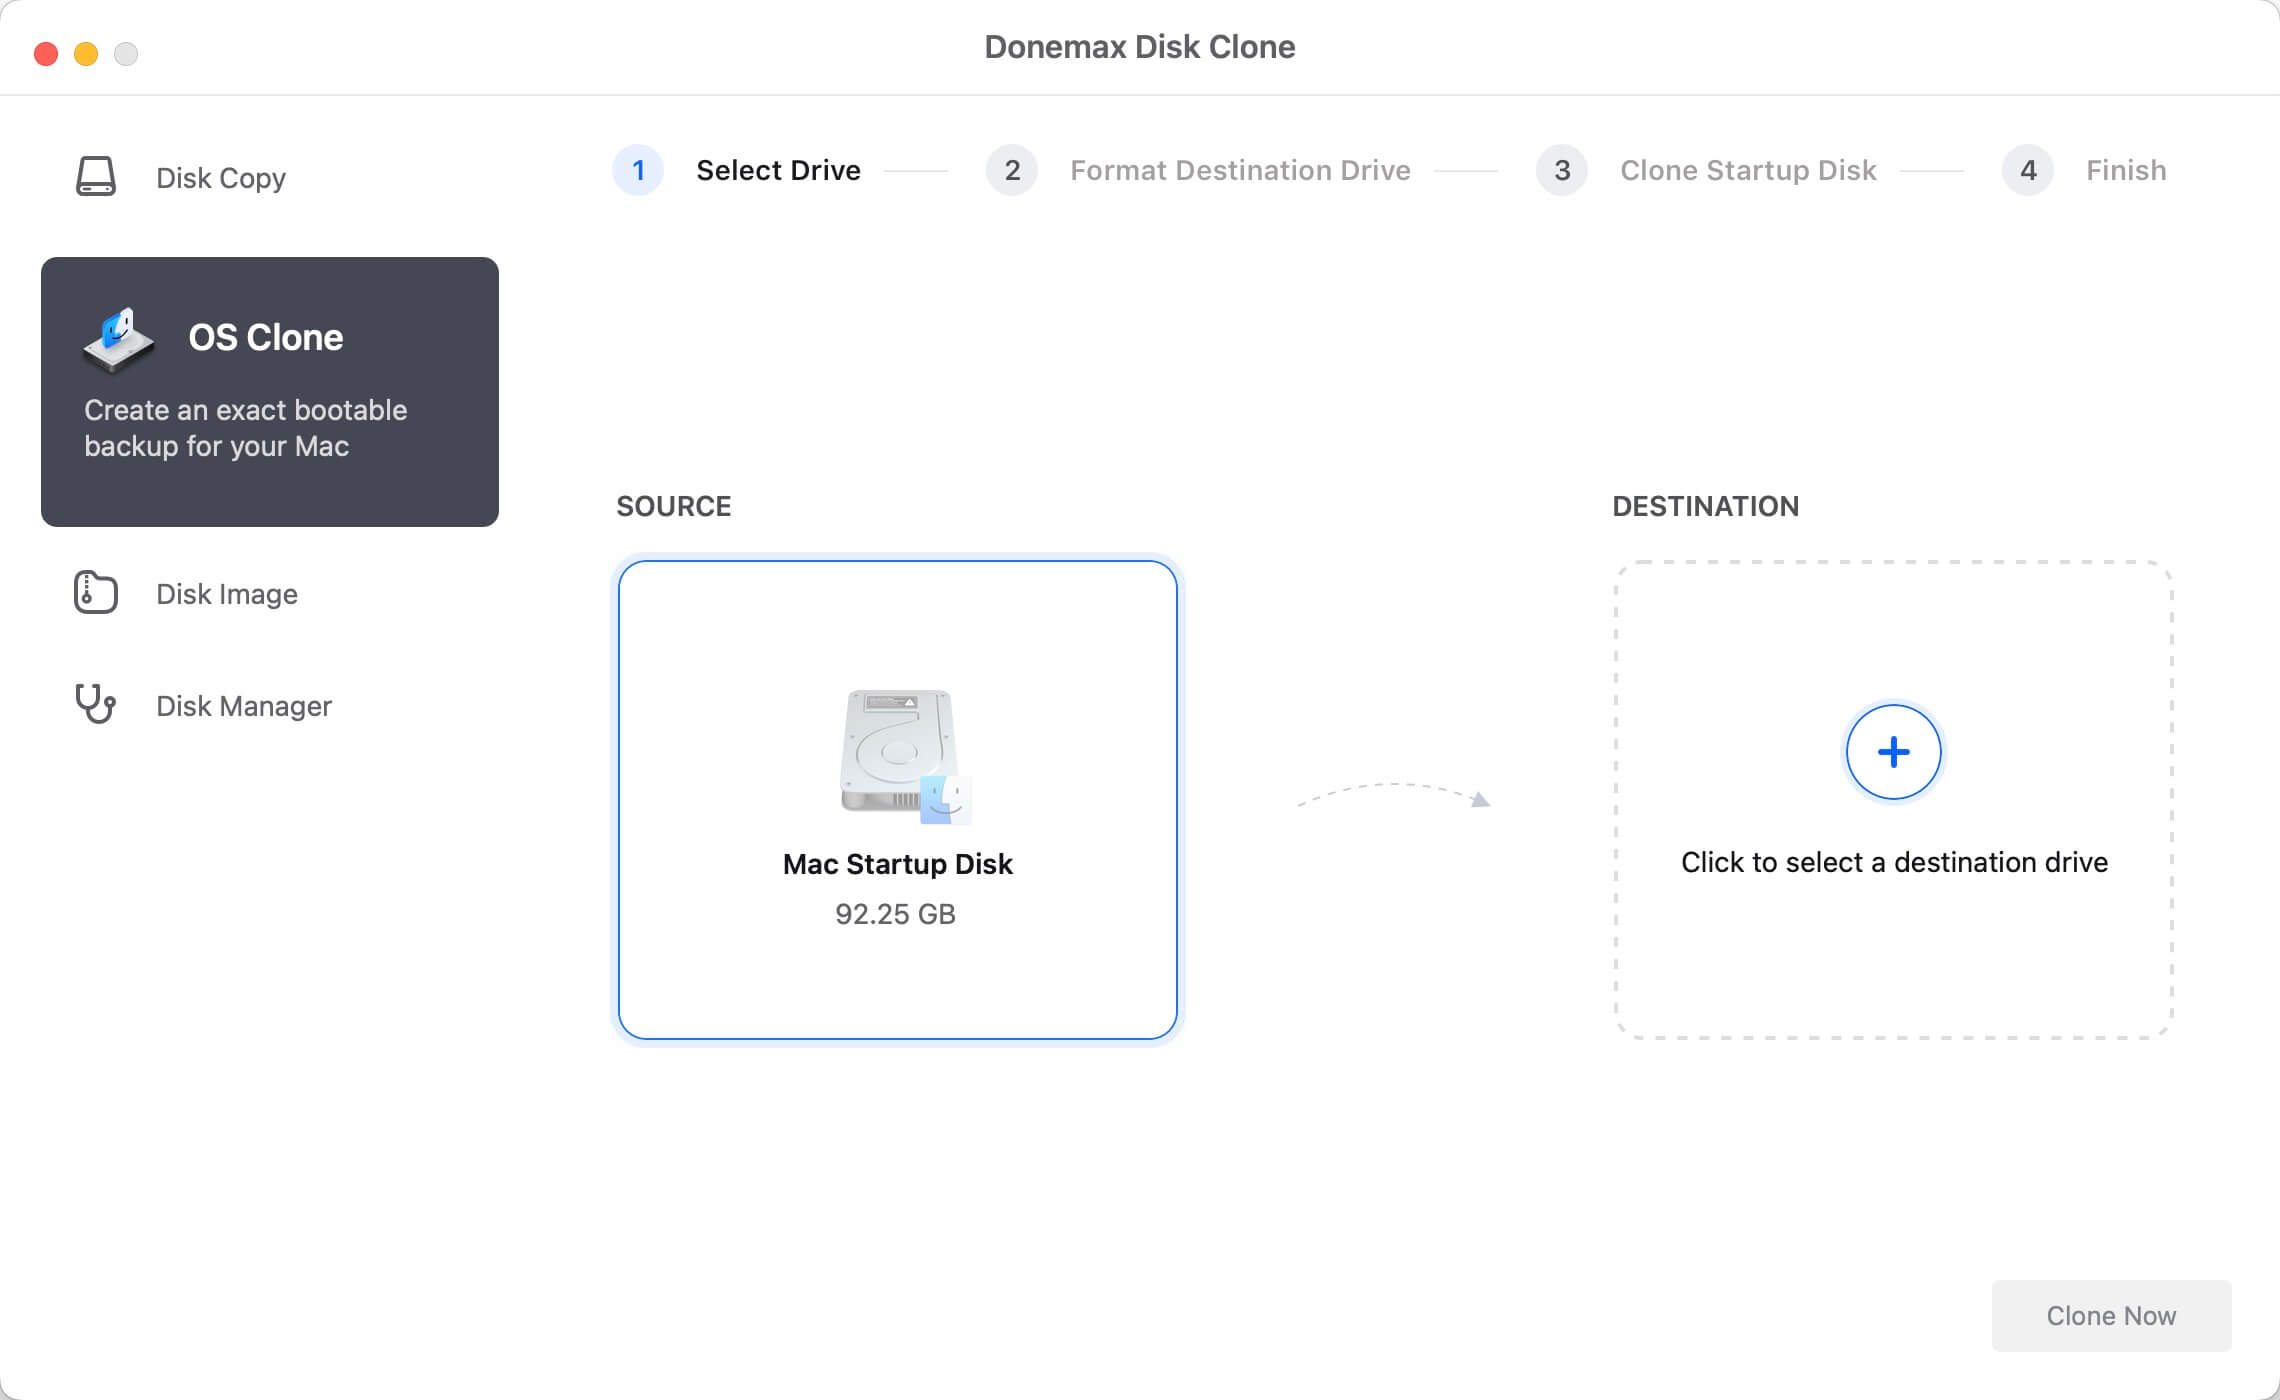
Step 2. Select an empty disk as destination. Check and ensure there is enough space on the destination disk.

Step 3. Click Clone Now button to start the disk cloning process. It make take a while depending on how much data on the disk.
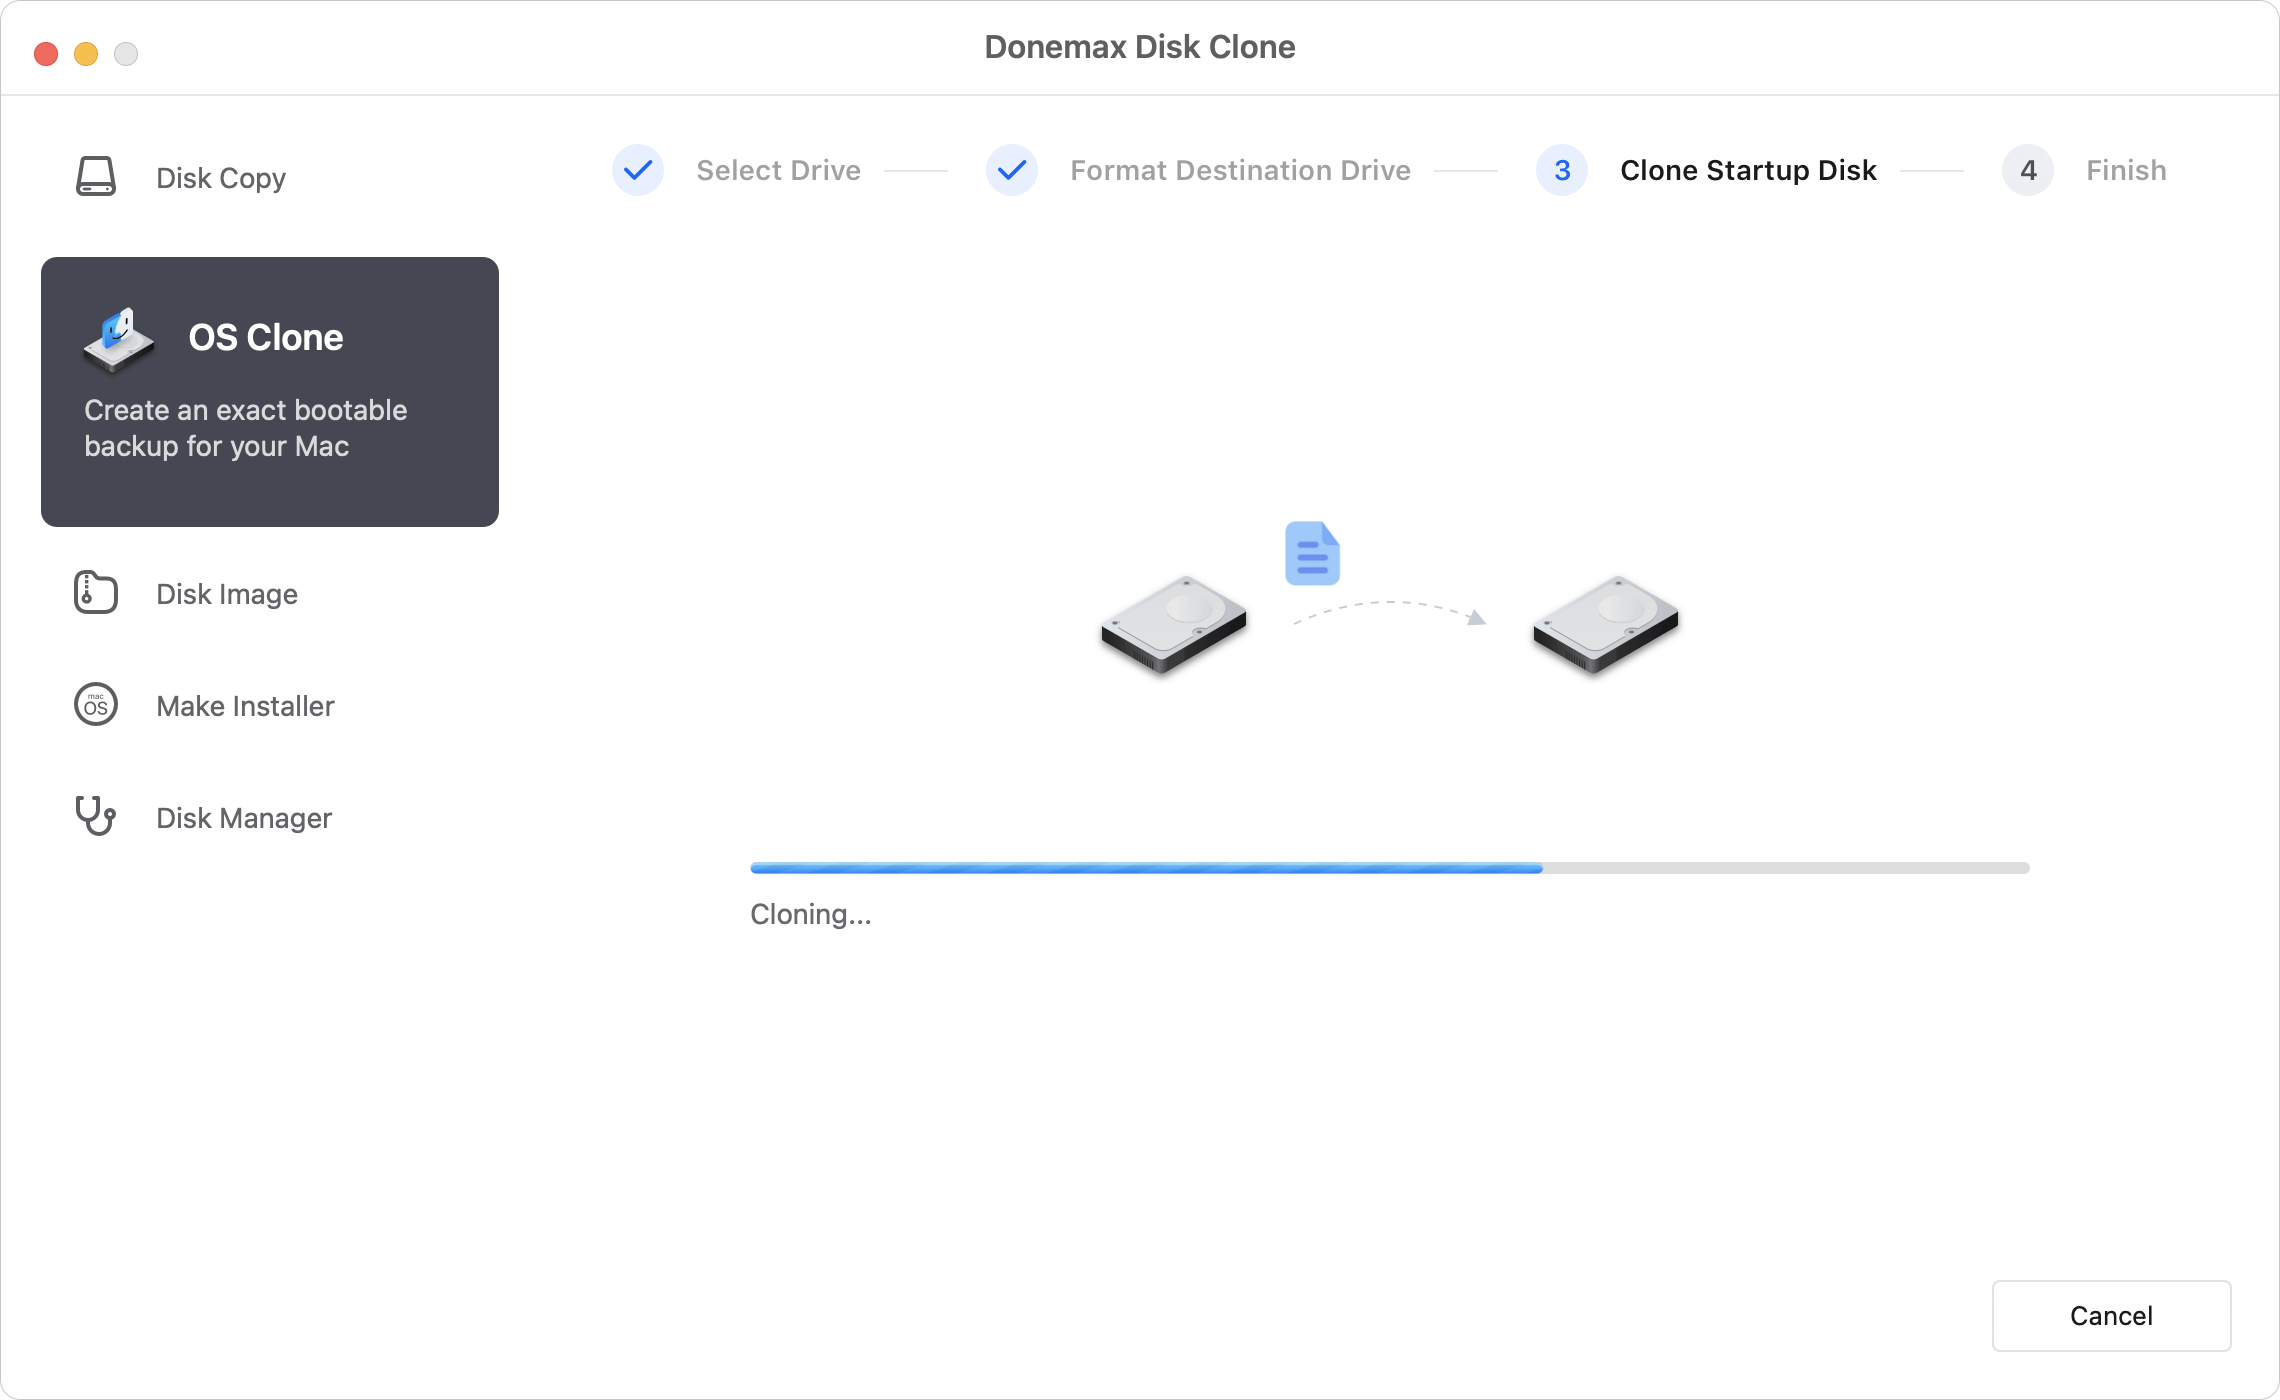
Once the disk cloning process is complete, all the macOS system data, applications, settings and personal data is cloned to the destination disk. You can check the data and test if it's bootable.
Conclusion
Time Machine on macOS Tahoe 26 continues to be one of the most effective backup solutions for Mac users. Its automatic, incremental backups ensure you can recover files, undo accidental deletions, or restore your system entirely with ease.
By setting up Time Machine, configuring preferences, and following best practices, you can safeguard your files against hardware failures, data corruption, or unforeseen disasters.
Don't wait for a data loss incident — set up Time Machine or use third-party tool, like Donemax Disk Clone for Mac, to enjoy peace of mind knowing your data is protected.
Donemax Disk Clone for Mac
An award-winning disk cloning program to help Mac users clone HDD/SSD/external device. It also can create full bootable clone backup for Macs.
Related Articles
- Nov 25, 2024Steps to Create Bootable Clone for macOS Big Sur [100% Working]
- Jan 22, 2026How to Clone Disk on Mac OS X 10.11 El Capitan?
- Mar 11, 2024How to Clone Mac Hard Drive to Samsung Portable SSD X5?
- Sep 23, 2025Top 10 Disk Cloning Software for Mac - macOS Tahoe Supported
- Jun 11, 2026Donemax Disk Clone for Mac - Best Clone Software for M5 Chip Mac
- May 23, 2023Clone APFS Disk Volume on Mac with Two Methods

Contributing Writer
Coco Lin
Coco has been a writer and a chief programmer at Donemax software since 2018. Over 10 years of experience of writing troubleshooting articles in the software industry, she is passionate about programming and loves to providing solutions to Windows and Mac users. Also she enjoys music and palying tennis in her free time.

Editor in chief
Gerhard Chou
In order to effectively solve the problems for our customers, every article and troubleshooting solution published on our website has been strictly tested and practiced. Our editors love researching and using computers and testing software, and are willing to help computer users with their problems