Written byStevenUpdated on Jul 20, 2025
How to Install and Uninstall OneDrive on Mac (Step-by-Step Guide)
Approved byGerhard Chou
PAGE CONTENT:
OneDrive is Microsoft's cloud storage service, offering seamless file syncing across devices. For Mac users, it's a practical solution to back up documents, photos, and work files, especially when collaborating with Windows users or Office 365 subscribers. While macOS has its own iCloud Drive, OneDrive is often used in enterprise environments, schools, or by users with multi-platform needs.
Whether you're installing OneDrive for the first time or looking to remove it cleanly from your Mac, this guide will walk you through every step - including hidden files and troubleshooting.

How to Install OneDrive on Mac?
Installing OneDrive on macOS is straightforward. Microsoft offers both a direct download and a Mac App Store version. Below is how to install it properly.
Step 1. Download OneDrive
You can download OneDrive in two ways:
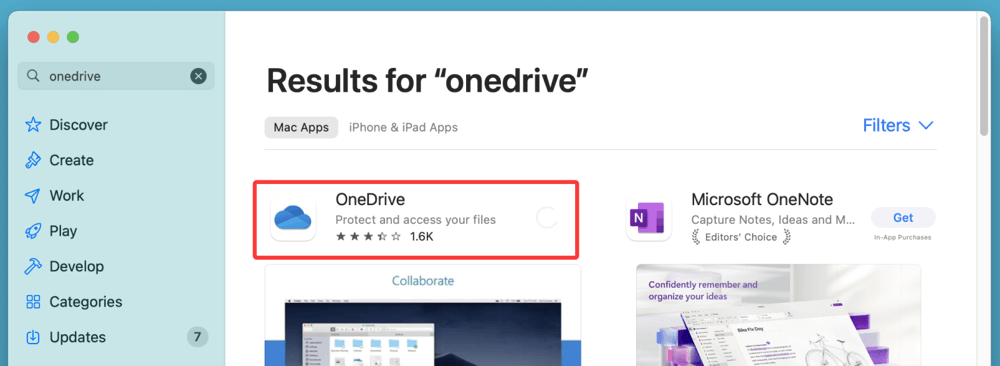
- Via the Mac App Store
Simply open the App Store, search for OneDrive, and click Get > Install.
![uninstall OneDrive on Mac]()
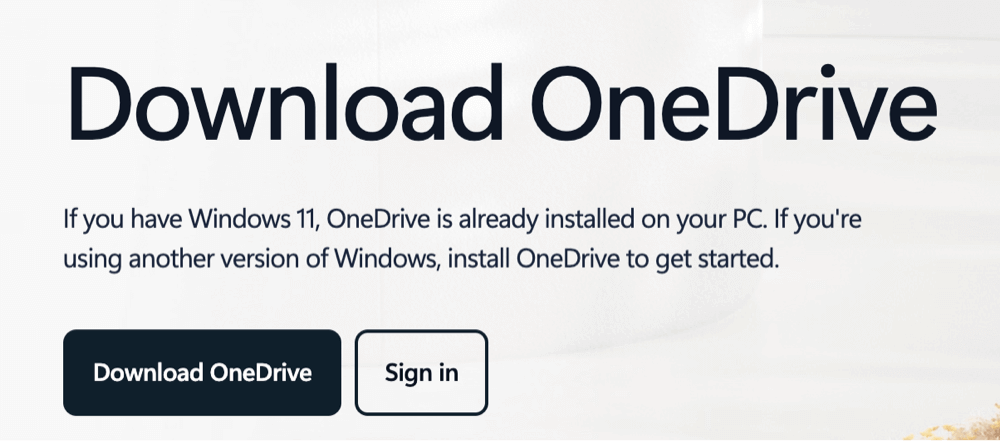
- Via Microsoft's Official Website
Visit the website and download the .pkg installer file for macOS.
![uninstall OneDrive on Mac]()
System Requirements (as of macOS Sonoma):
- macOS 12.0 (Monterey) or later
- 4 GB RAM minimum
- Internet connection
Step 2. Install the Application
If you downloaded OneDrive via the App Store, it installs automatically. For manual installation:
- Double-click the downloaded .pkg file.
- Follow the on-screen instructions to complete setup.
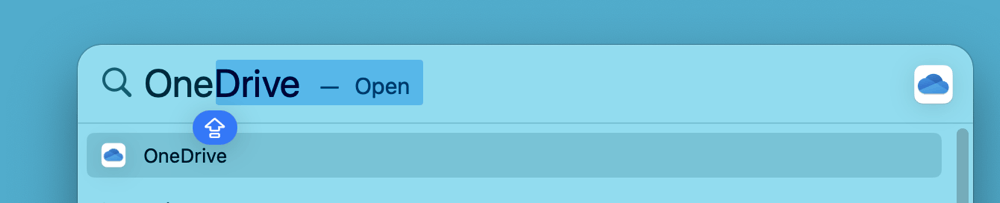
- Once installed, find OneDrive in Applications or via Spotlight Search (Command + Space, then type "OneDrive").
![uninstall OneDrive on Mac]()
Step 3. Sign In and Set Up
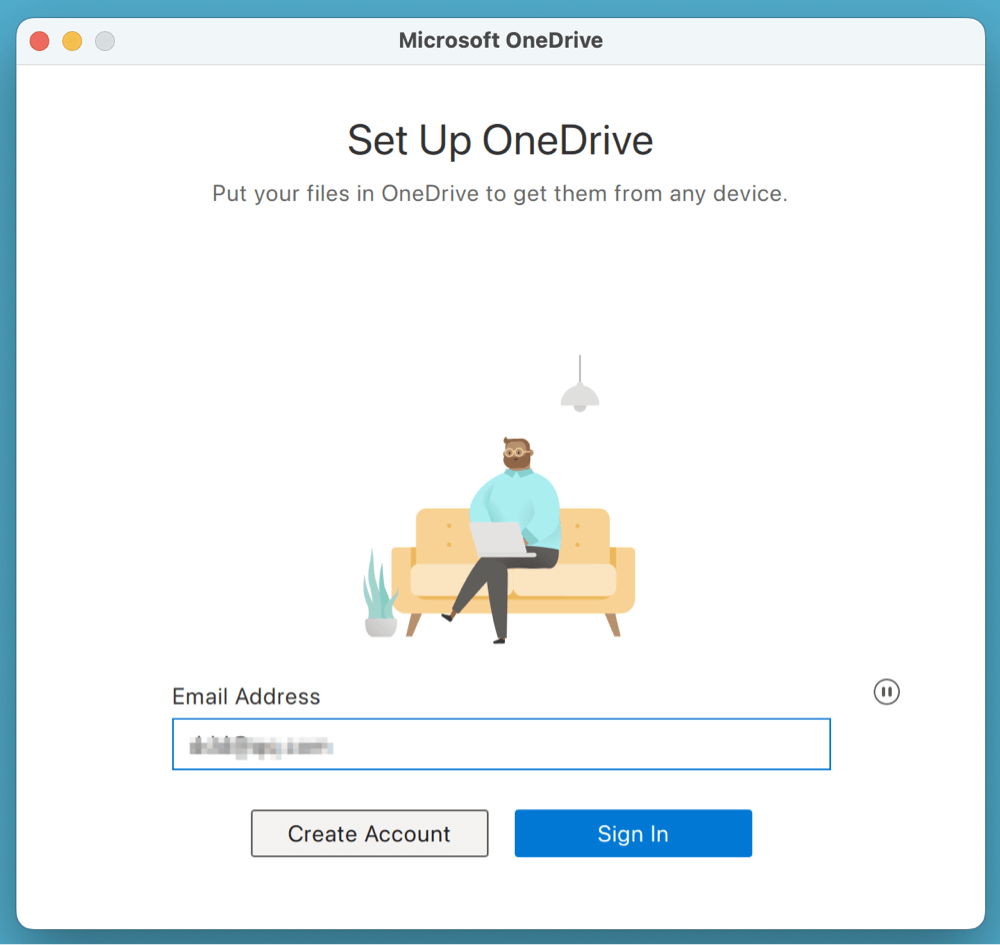
After launching OneDrive for the first time:
- Enter your Microsoft account email and sign in.
![uninstall OneDrive on Mac]()
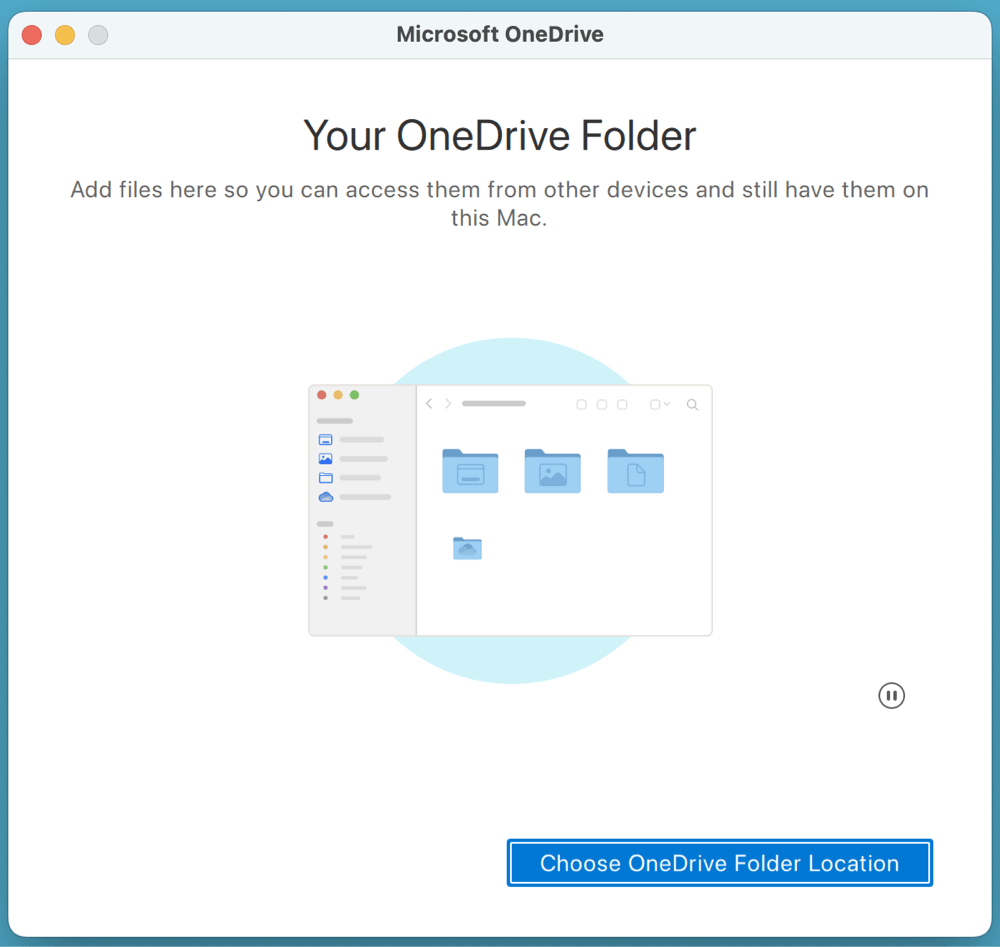
- Choose the folders you want to sync.
![uninstall OneDrive on Mac]()
- Pick your OneDrive folder location - default is your user folder (~/OneDrive).
- Complete the guided setup and start syncing files.
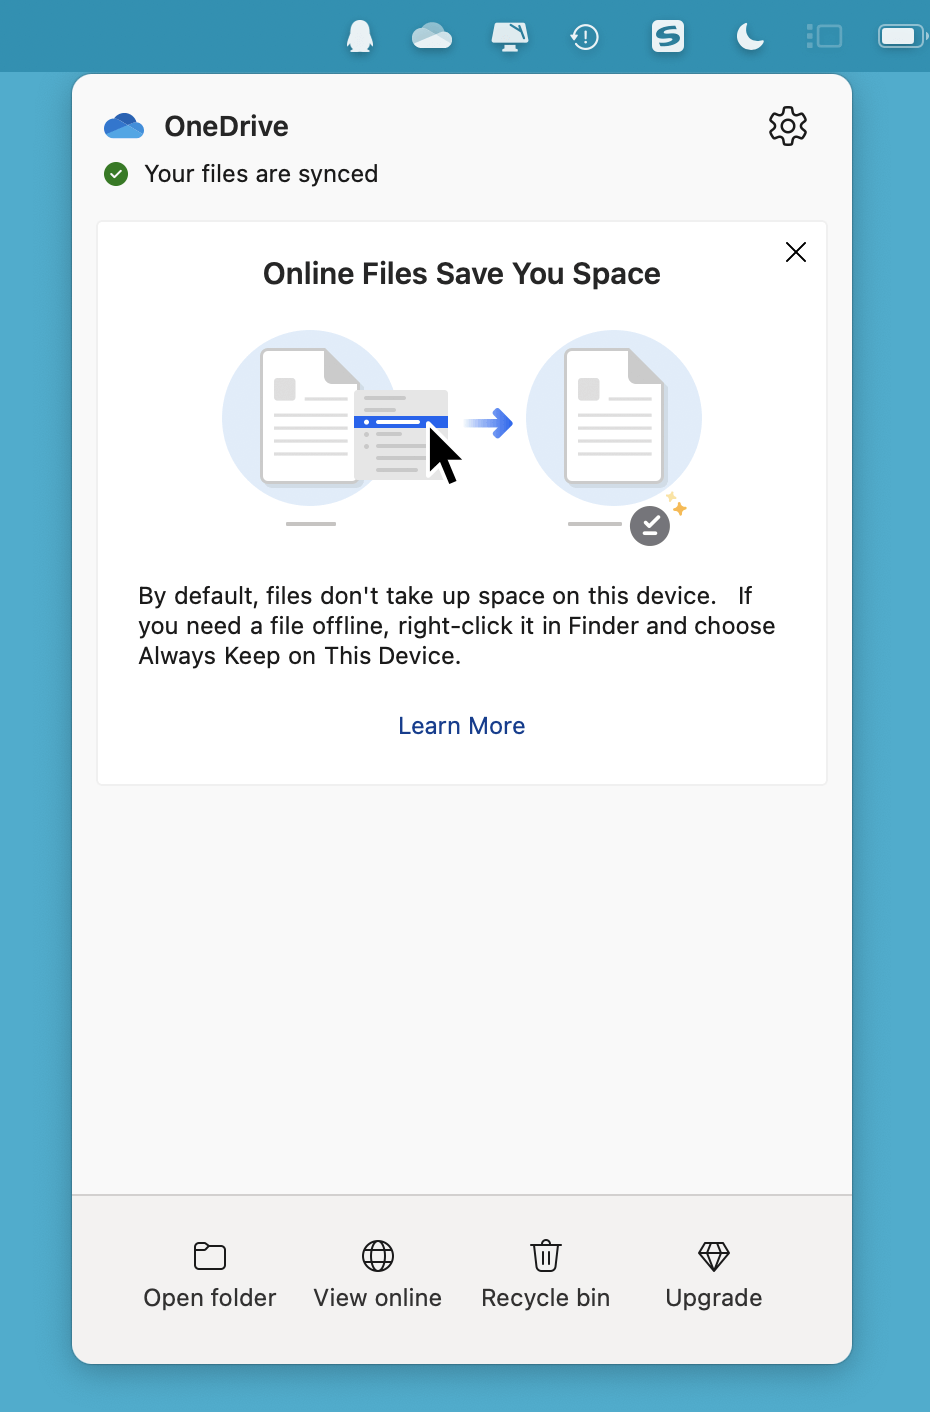
You'll now see the OneDrive icon in the top menu bar. Clicking this shows sync status, settings, and quick access options.
Step 4. Configure Sync Preferences
Once set up, it's important to configure OneDrive settings:
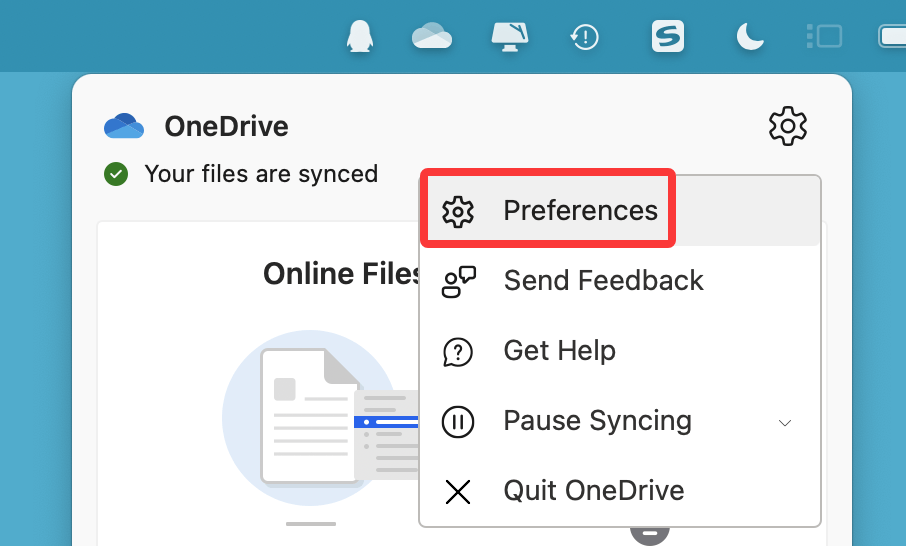
- Click the cloud icon in the menu bar.
- Go to Preferences.
![uninstall OneDrive on Mac]()
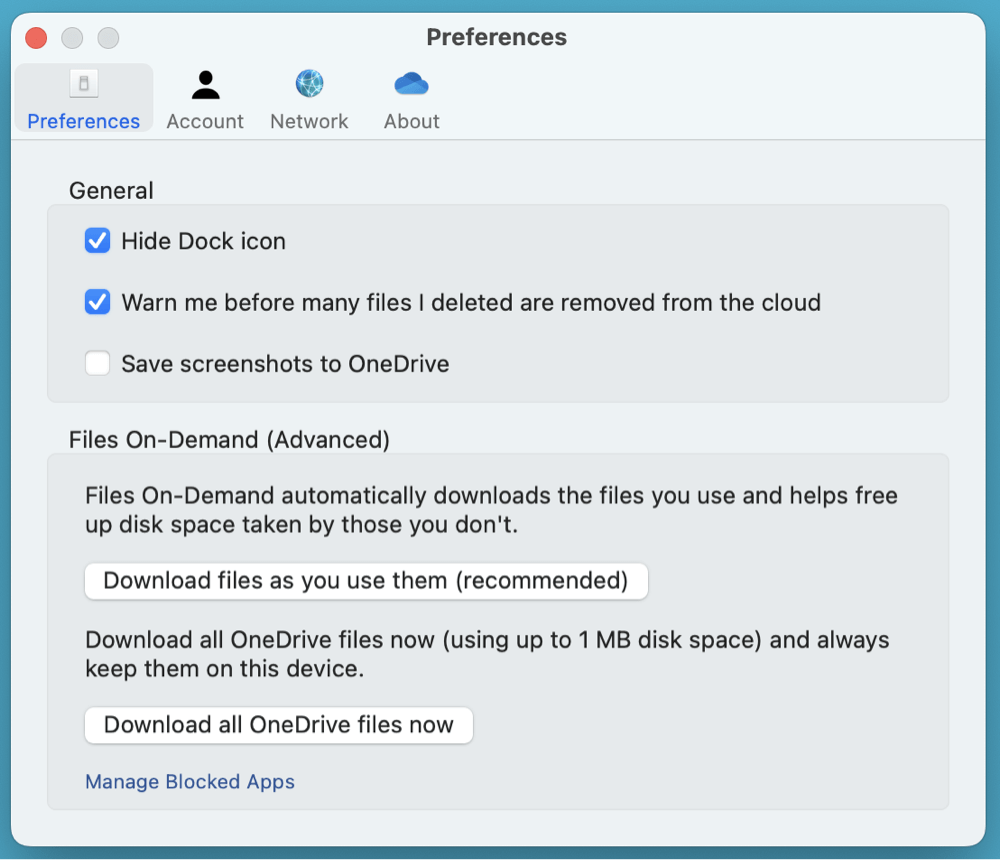
- Customize:
- Account tab – Add or remove accounts.
- Backup – Choose whether to back up Desktop, Documents, and Pictures.
- Network – Set bandwidth limits.
- Office – Turn on or off Office integration.
![uninstall OneDrive on Mac]()
Files can now be accessed from Finder with OneDrive integration, appearing as a folder with cloud icons for each file's sync status.
How to Uninstall OneDrive on Mac?
There may come a time when you want to uninstall OneDrive on Mac - whether to troubleshoot, free up space, or switch to another cloud provider. Uninstalling OneDrive completely requires more than just deleting the app.
Step 1. Quit OneDrive First
Before uninstalling, ensure OneDrive is not running.
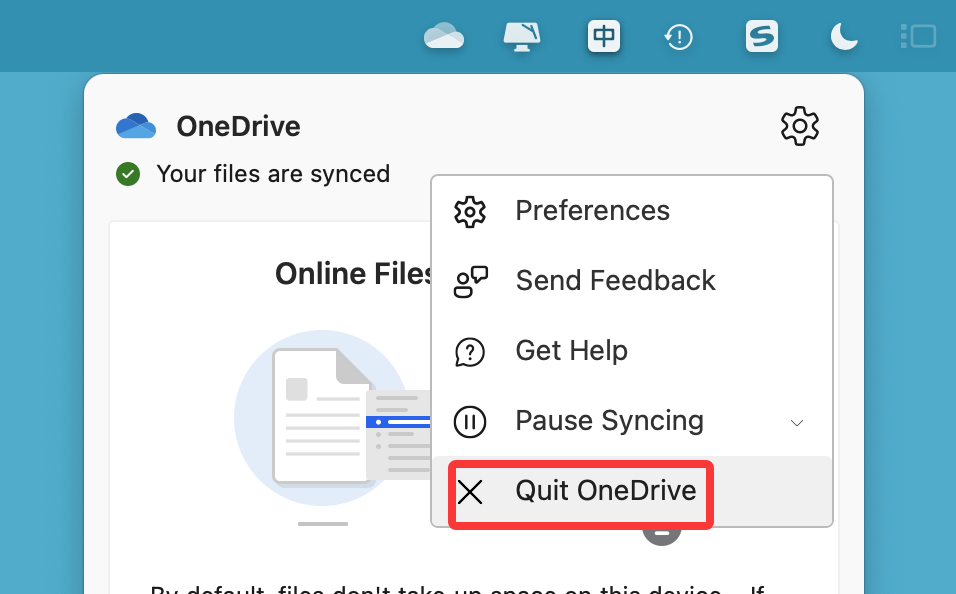
- Click the OneDrive icon in the menu bar.
- Click the gear icon > Quit OneDrive.
![uninstall OneDrive on Mac]()
- Confirm quitting.
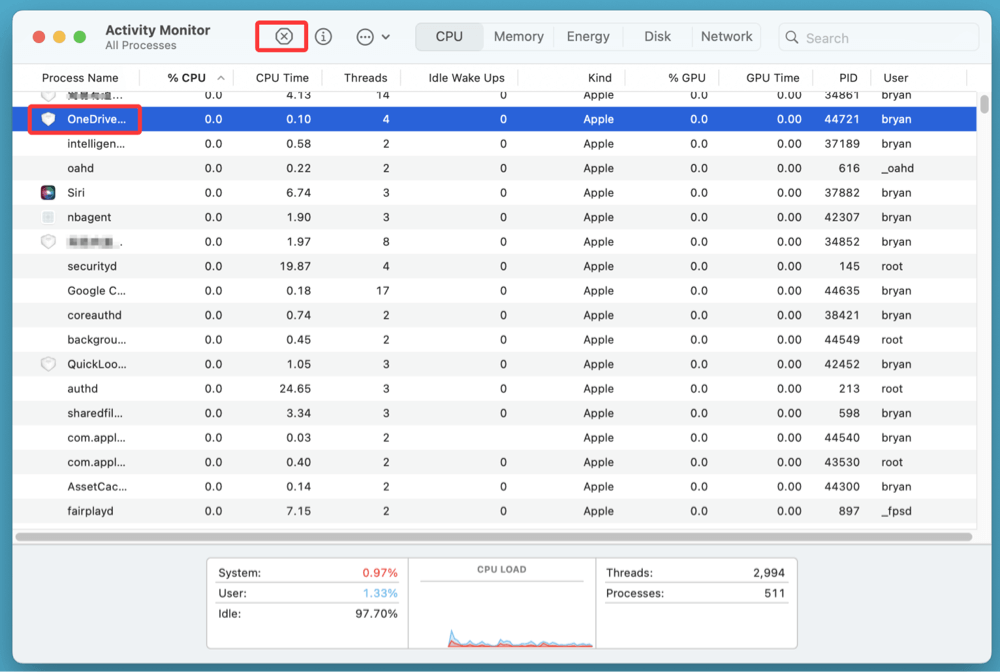
If the icon doesn't appear, open Activity Monitor and search for OneDrive, then force-quit the process.
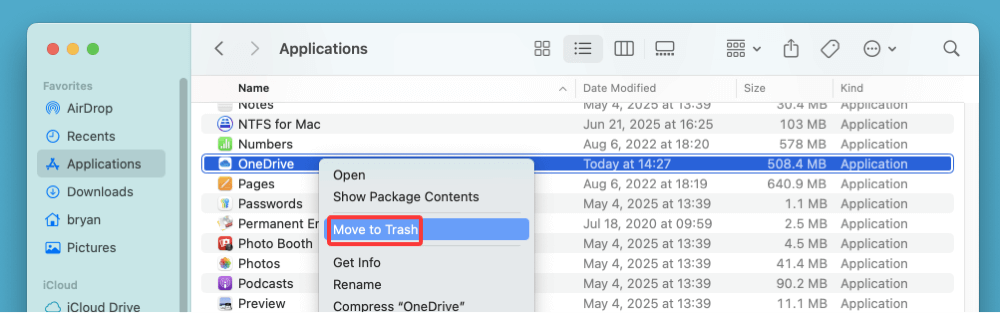
Step 2. Delete the OneDrive Application
You can remove the app itself by:
- Going to Applications folder.
- Locating OneDrive.app.
- Right-click and choose Move to Trash.
![uninstall OneDrive on Mac]()
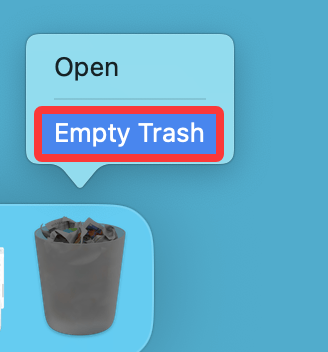
- Empty the Trash (optional, but recommended).
![uninstall OneDrive on Mac]()
Alternatively, use Launchpad:
- Press and hold the OneDrive icon until it jiggles.
- Click the (x) button to delete (only for App Store version).
Step 3. Remove OneDrive Leftover Files
Even after deleting the OneDrive app from your Mac, it leaves behind configuration files, logs, and cache folders. These files don't take up a lot of space individually but can cause issues if you reinstall OneDrive later, such as sync conflicts, repeated login requests, or duplicate folder structures.
Removing these leftover files ensures a clean uninstall and helps prevent future compatibility problems.
Step-by-Step Instructions to Remove OneDrive Support Files:
- Open Finder
- On your Mac, click on the Finder icon in your Dock.
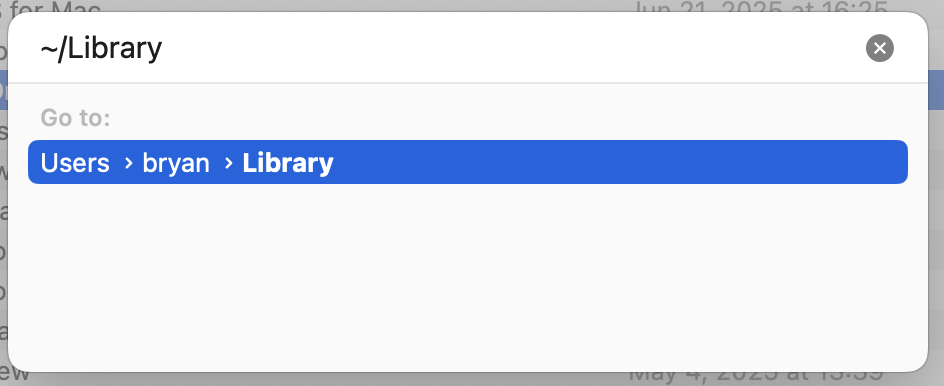
- Access Hidden Library Folder
- Press Command + Shift + G to open the "Go to Folder" window.
- Type ~/Library and press Enter.
![uninstall OneDrive on Mac]()
- This opens the user-level Library folder where app preferences and caches are stored.
- Manually Locate and Delete OneDrive Folders
Go to and delete the following folders and files:
| Folder/File Path | Purpose |
|---|---|
| ~/Library/Containers/com.microsoft.OneDrive | Sandbox container for app preferences |
| ~/Library/Application Support/OneDrive | Stores sync configurations and logs |
| ~/Library/Preferences/com.microsoft.OneDrive.plist | Preference settings (e.g., login, folder settings) |
| ~/Library/Caches/com.microsoft.OneDrive | Cached icons, metadata |
| ~/Library/Group Containers/UBF8T346G9.OneDriveSyncClientSuite | Shared data used by Microsoft 365 apps |
| ~/Library/Logs/OneDrive | Log files used for diagnostics and error tracking |
To delete each folder:
- Right-click the folder and choose Move to Trash.
- Empty the Trash once all folders are removed.
Important Tips:
- Be Cautious: Do not delete folders outside of the specified list. Some folders in ~/Library are vital to your macOS system and other applications.
- Verify Folder Names: Microsoft may update folder names in future OneDrive versions. If you're unsure, search for "OneDrive" in ~/Library and check folder contents before deletion.
- Admin Rights: Some folders may require administrative privileges to delete. If prompted, enter your Mac password.
💡 Note: If you've deleted important files by mistake, you can use Mac data recovery software - such as Donemax Data Recovery for Mac to recover the deleted files even the trash bin is emptied.
Alternative: Use a Third-Party Uninstaller
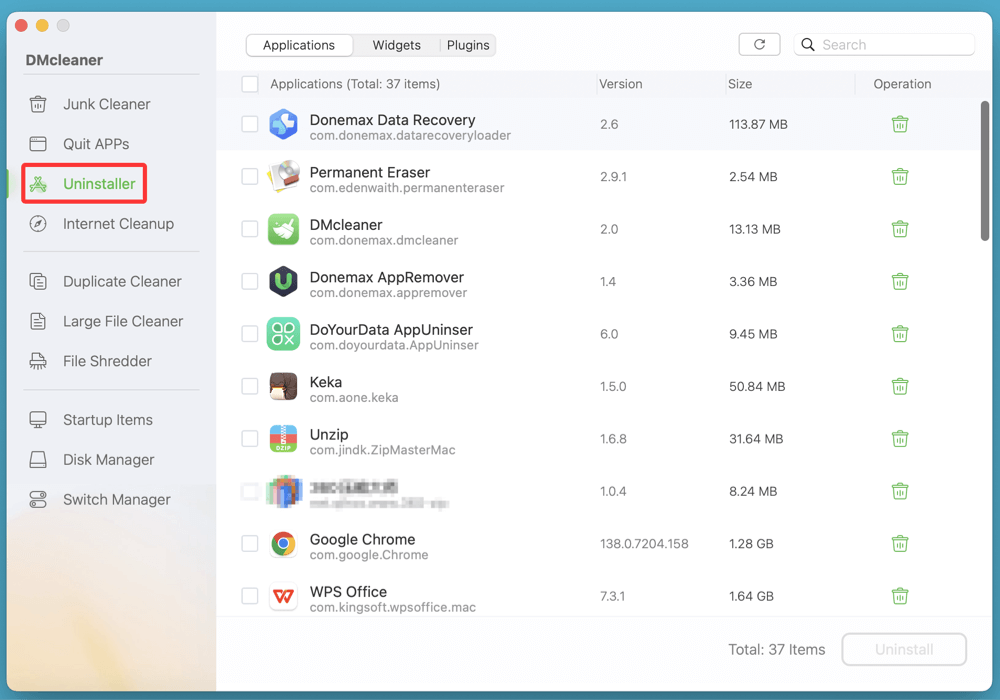
If you're uncomfortable manually deleting system files, consider using a uninstaller app like DMcleaner for Mac:
- Download and install DMcleaner for Mac, run it from Launchpad after installation.
- Open DMcleaner for Mac, choose Uninstaller.
![uninstall OneDrive on Mac]()
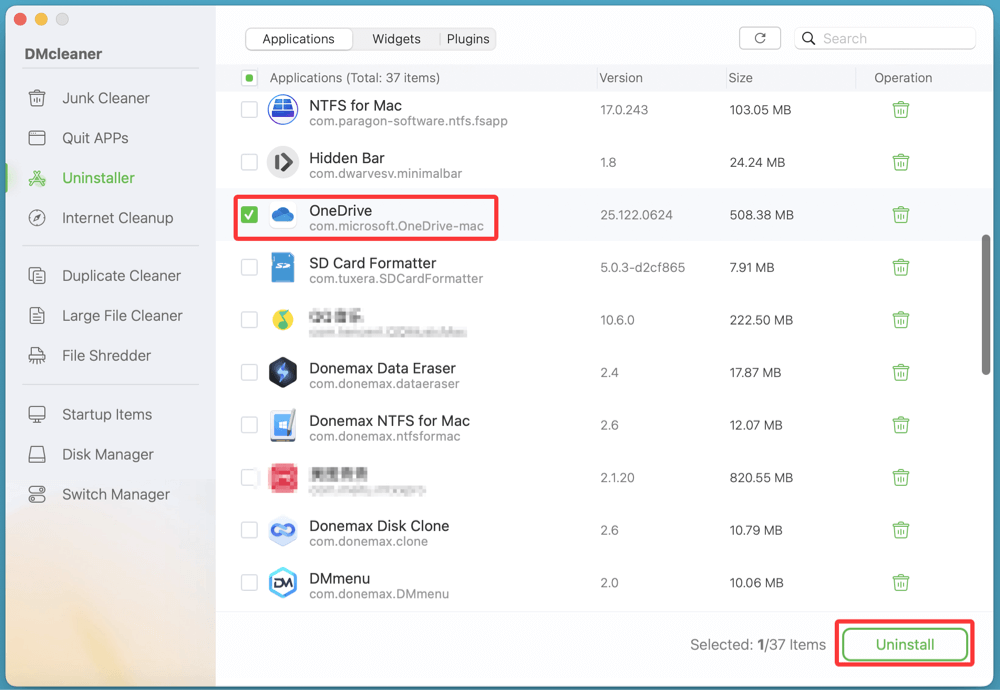
- Find and select OneDrive, click on Uninstall button.
![uninstall OneDrive on Mac]()
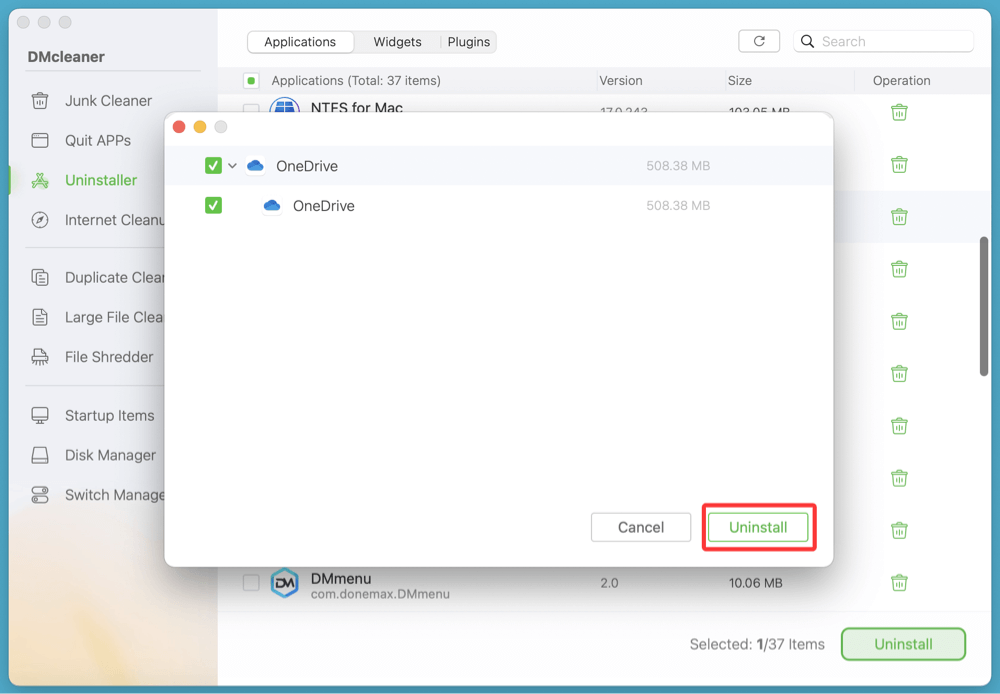
- Preview the app and related files that will be uninstalled. Click on Uninstall button again to completely remove the OneDrive app from your Mac.
![uninstall OneDrive on Mac]()
Final Check
Once done, you can verify the cleanup:
- Reboot your Mac.
- Use Spotlight (Command + Space) to search for "OneDrive."
- If no app or folders appear, the uninstallation was successful.
Step 4. Disconnect Your Microsoft Account (Optional)
If you're uninstalling OneDrive for security or account cleanup:
- Visit https://account.microsoft.com.
- Go to Devices and remove your Mac if listed.
- Change your password if you're concerned about unauthorized access.
OneDrive on Mac Common Issues and Troubleshooting
Sometimes, OneDrive may not install properly, won't sync, or fails to uninstall fully. Here are some solutions to common problems.
1. OneDrive Won't Install or Launch
- Ensure you're on a supported macOS version.
- Remove any old OneDrive installations before reinstalling.
- Check for Gatekeeper settings (System Settings > Privacy & Security > Allow apps from trusted sources).
- Reboot your Mac and retry the installation.
2. Sync Errors
Typical errors include:
- Cannot connect to server
- Files aren't syncing
Solutions:
- Check your internet connection.
- Re-sign into OneDrive.
- Go to Preferences > Account > Unlink and relink your account.
- Ensure the file name doesn't exceed 400 characters and doesn't use restricted characters like *, :, or ?.
3. Files Not Updating in Finder
If Finder doesn't show current files:
- Relaunch OneDrive.
- Restart Finder: Press Command + Option + Esc, choose Finder, click Relaunch.
- Verify that Finder integration is enabled under Preferences.
4. Can't Delete OneDrive Leftovers
- Use Terminal to remove stubborn files:
sudo rm -rf ~/Library/Containers/com.microsoft.OneDrive
- Use a third-party uninstaller like DMcleaner for Mac.
Tips for Managing Cloud Storage on Mac
While OneDrive is reliable, it's not the only cloud service available to Mac users. Consider these tips for managing cloud storage efficiently:
1. Choose the Right Cloud Storage
- iCloud Drive – Deeply integrated with macOS. Great for Apple ecosystem users.
- Google Drive – 15GB free storage, good for Google Docs and Gmail users.
- Dropbox – Known for simplicity and file sharing features.
Each has pros and cons. Choose based on what ecosystem you already use.
2. Manage Local Space with Files On-Demand
OneDrive supports Files On-Demand, which lets you see all files without downloading them. You save space by keeping large files online only.
To enable it:
- Go to OneDrive Preferences > Sync & Backup > Files On-Demand
- Toggle on "Save space and download files as you use them"
3. Back Up Important Folders
OneDrive can back up macOS folders like Desktop, Documents, and Pictures.
Steps:
- Go to Preferences > Backup.
- Click Manage Backup.
- Choose the folders to back up.
This ensures your Mac is protected from local drive failures or theft.
Conclusion
Installing and uninstalling OneDrive on a Mac is a simple process when you know the right steps. With growing dependence on cloud storage, OneDrive offers robust syncing and backup features for users who operate across platforms or collaborate in Microsoft environments. However, if you decide to uninstall OneDrive, removing all associated files is essential to prevent clutter or potential sync conflicts.
Whether you're setting it up for work or removing it in favor of another cloud solution, this guide gives you the complete picture - from installation to uninstallation and everything in between.
DMcleaner for Mac
Donemax DMcleaner for Mac is an award-winning Mac cleanup & maintenance application. It offers 10+ tools to help Mac users clean up junk data on Mac, uninstall unwanted apps & delete leftovers, shred files, delete duplicate files, free up disk space, speed up slow Mac, etc. It is also a smart switch manager for Mac, a powerful disk manager for Mac.
Related Articles
- Jun 30, 20263 Easy Ways to Open & Extract RAR Files on macOS (2026 Guide)
- Jun 10, 2026Where Is the Power Button on a Mac? (All Models)
- Oct 16, 2024How to Add or Remove Icons from Dock on Mac?
- Jul 03, 2026Safely Remove a Mac User Account Without Losing Your Data
- Mar 30, 20265 Ways to Format or Wipe a USB Drive on Mac
- Jul 04, 2025Create a Bootable USB Installer for macOS Mojave

Contributing Writer
Steven
Steven has been a senior writer & editor of Donemax software since 2020. He's a super nerd and can't imagine the life without a computer. Over 6 years of experience of writing technical solutions and software tesing, he is passionate about providing solutions and tips for Windows and Mac users.

Editor in chief
Gerhard Chou
In order to effectively solve the problems for our customers, every article and troubleshooting solution published on our website has been strictly tested and practiced. Our editors love researching and using computers and testing software, and are willing to help computer users with their problems