
Written byChristinaUpdated on May 11, 2026
Your Ultimate Guide to Finding the Best FAT32 Formatter for Mac
Approved byGerhard Chou
Before we start: There are some solutions to format a disk to FAT32 on Mac. You can use Disk Utility, Terminal or other tools to format the drive. Before you sell or donate a disk, it's highly suggested to wipe the data permanently from the disk with Donemax Data Eraser for Mac.
PAGE CONTENT:
Choosing the right file system is critical for ensuring compatibility, performance, and ease of use. Modern options like APFS and ExFAT are popular, but FAT32 is still a strong choice. It works well with many operating systems and devices. However, formatting a disk to FAT32 on macOS can be surprisingly challenging because native limitations.
If you're looking for a FAT32 formatter for Mac, you've likely noticed that macOS makes it easy for small drives but a bit tricky for larger ones. In this guide, we’ll walk you through the best FAT32 disk formatting tools for Mac so you can get your hardware working perfectly.
Why Do You Still Need FAT32 in 2026?
It's a fair question. FAT32, or File Allocation Table 32 was introduced decades ago, yet it refuses to retire. Why? Because it works everywhere. Whether you are using Windows, macOS, Linux, a PlayStation, or a digital camera, they all recognize FAT32.
Key Features of FAT32:
- File Size Limitations: FAT32 supports individual file sizes of up to 4GB. So it's a significant drawback for modern users handling large files.
- Partition Size Limits: The maximum partition size for FAT32 is 2TB, making it less suitable for larger storage devices.
- Universal Compatibility: FAT32 works seamlessly with Windows, macOS, Linux, gaming consoles, and legacy hardware, ensuring wide usability.
Advantages and disadvantages of FAT32:
Advantages
- Cross-Platform Compatibility: FAT32 is one of the most versatile file systems, recognized by virtually all operating systems.
- Stability: Its simplicity makes it less prone to corruption on smaller drives.
- Ease of Use: FAT32 is perfect for portable storage devices like USB drives or SD cards.
disadvantages
- Limited File Size: The disability to handle files larger than 4GB can be a significant constraint.
- Lack of Modern Features: FAT32 does not have modern features like journaling or advanced permissions. Newer file systems such as NTFS and APFS include these features.
- Aging Technology: Its architecture is outdated compared to more robust options available today.
Even with these limitations, FAT32 is still crucially important. Older hardware and certain devices need it. This makes it a key tool for many users.
3 Methods to Format Drive to FAT32 on macOS
Formatting a disk to FAT32 on a Mac requires understanding the tools and techniques that macOS offers. The process may seem complicated because of some limits in macOS's built-in tools. However, there are several effective methods to help you get the result you want.
Below, we will explore three common ways to format a disk to FAT32 on a Mac. First, we can use Disk Utility for smaller drives. Second, we can use Terminal for larger drives. Lastly, we can try third-party tools for an easier experience.
Method 1. Using Disk Utility for Smaller Drives
Disk Utility is macOS's built-in utility for disk management, including formatting, partitioning, and repair. A powerful tool for users who need to format smaller disks to FAT32 exists.
Disk Utility has a key limitation. It only supports FAT32, referred to as MS-DOS (FAT) in the tool. This support is available for disks that are 32GB or smaller. For drives larger than this, users will need to explore alternative options.
Steps to Format a Drive to FAT32 Using Disk Utility (32GB or Smaller):
- Connect Your Drive: Insert the external drive, USB stick, or SD card into your Mac.
- Open Disk Utility: There are multiple ways to access Disk Utility:
- Use Spotlight by pressing Command + Space, typing "Disk Utility," and hitting Enter.
- Otherwise, go to Applications > Utilities > Disk Utility.
- Select the Drive: In the left sidebar of Disk Utility, you will see a list of all connected drives. Find the external device you want to format. Make sure to select the correct drive, as formatting will erase all data on it.
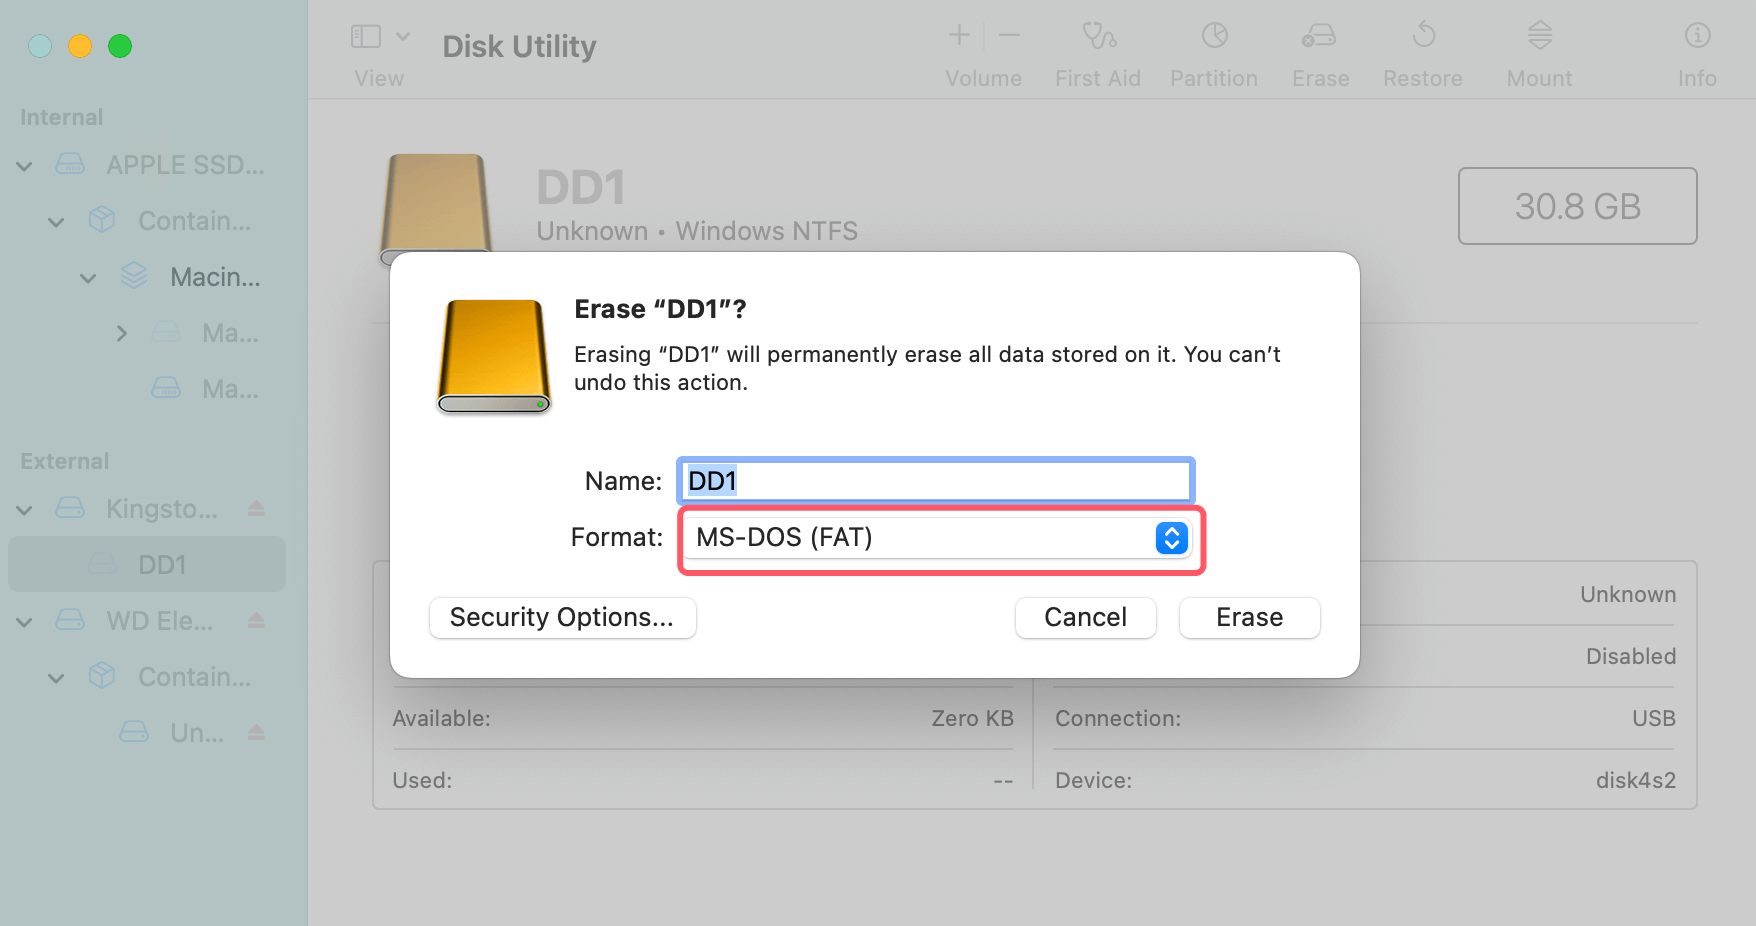
- Erase the Drive:Click on the Erase tab located at the top of the window.
![formatting a disk to FAT32 on macOS]()
- In the Format dropdown menu, select MS-DOS (FAT), which is the label for FAT32 in macOS.
![formatting a disk to FAT32 on macOS]()
- Enter a name for the drive in the Name field.
- Erase the Drive:Click on the Erase tab located at the top of the window.
- Erase and Format: Click the Erase button to begin the formatting process. Disk Utility will then format the drive to FAT32. This process typically takes a few moments, depending on the size and type of the drive.
- Finish: Once the process completes, you can eject the drive and use it with compatible devices.

Limitations of Using Disk Utility:
- File Size Limitation: If the drive is larger than 32GB, Disk Utility will not allow you to format it to FAT32. The option will either be not available or default to exFAT or another file system.
- Advanced Options: Disk Utility is good for simple tasks. However, it does not have some advanced features. Power users may want more control when managing partitions or creating specific file systems.
Method 2. Using Terminal for Larger Drives
For those comfortable with command-line operations, macOS Terminal is a powerful tool for formatting drives. It allows users to bypass some of the restrictions of Disk Utility.
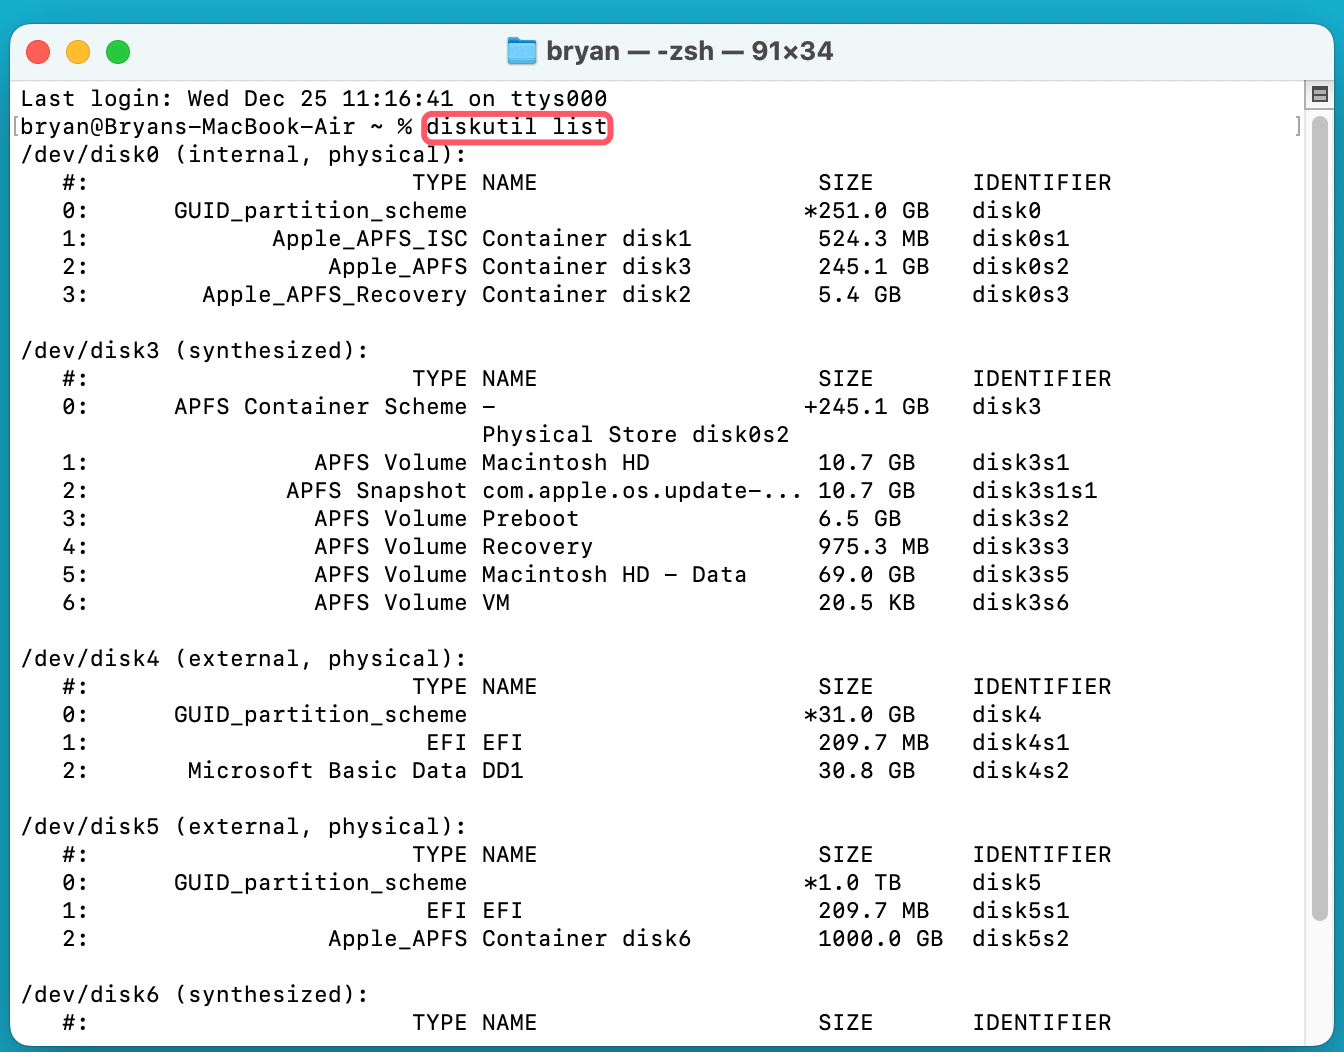
- Connect your drive and open Terminal (Applications > Utilities > Terminal).
- Type diskutil list and press Enter to display all connected drives. Note the identifier for your drive (e.g., disk5).
![formatting a disk to FAT32 on macOS]()
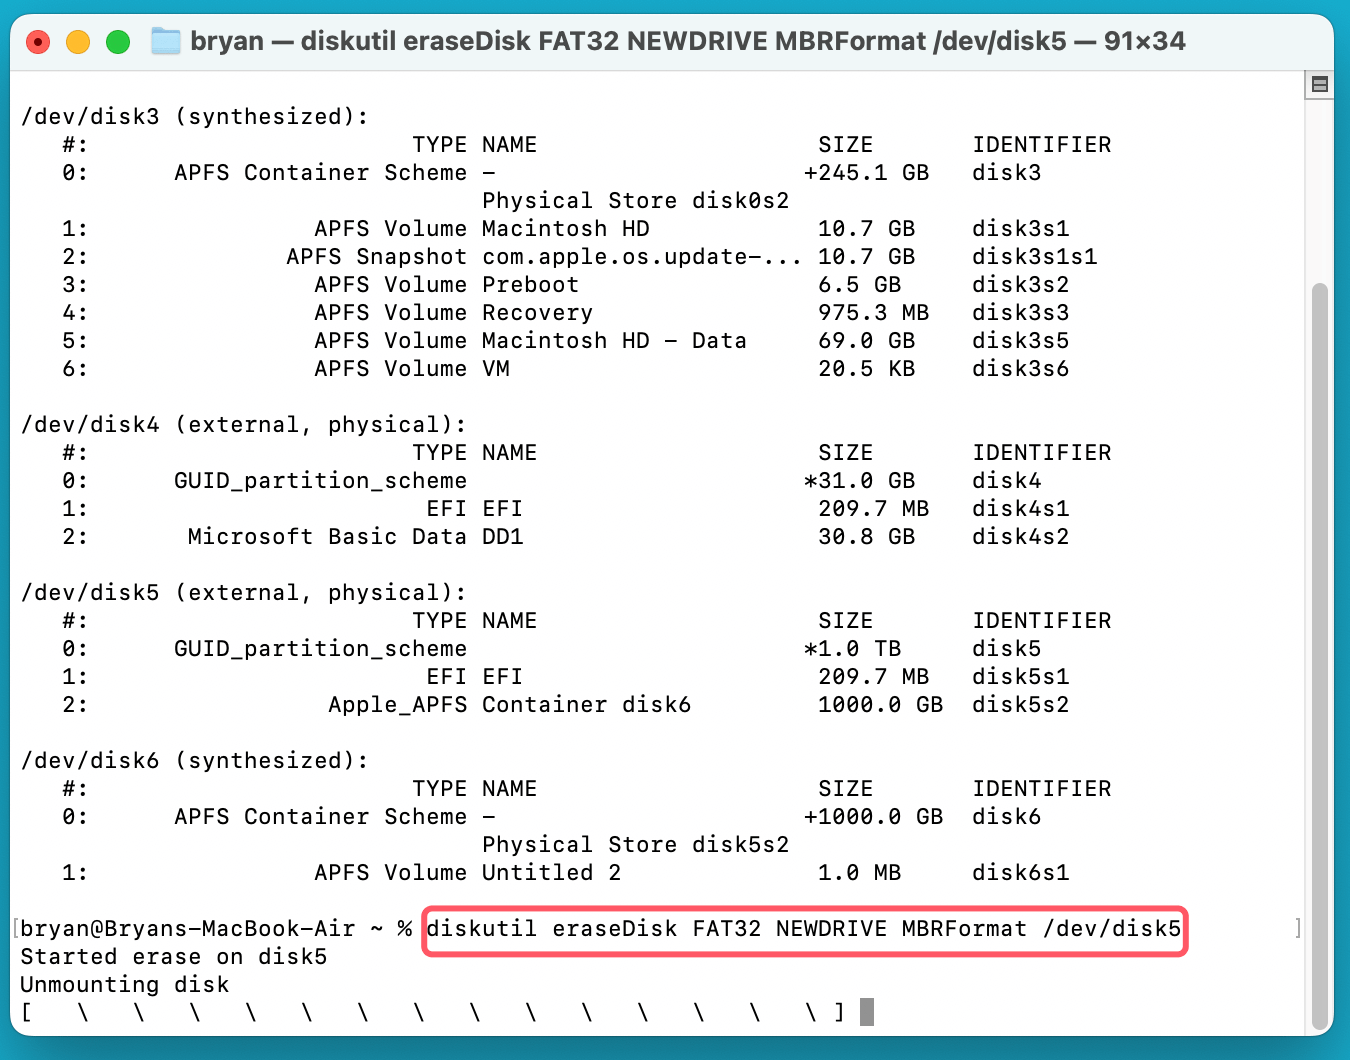
- Use the following command to format the drive:
diskutil eraseDisk FAT32 DiskName MBRFormat /dev/disk5
- Replace DiskName with your desired drive name and disk5 with your drive's identifier.
![formatting a disk to FAT32 on macOS]()
- Press Enter and wait for the formatting process to complete.
Tips for Success:
- Double-check the disk identifier to avoid formatting the wrong drive.
- Ensure you back up all important data, as formatting erases everything.
Method 3. Using Third-Party Tools
Third-party tools offer a user-friendly alternative for those who find Disk Utility or Terminal too complex. These tools often provide additional features and can handle larger drives with ease.
Recommended FAT32 Formatter Tools for Mac:
- Donemax NTFS for Mac: Securely and easily format a RAW drive or APFS/NTFS/ExFAT/HFS drive to FAT32 on Mac.
- Donemax DMmenu for Mac: Swiftly reformat a USB drive or SD card to FAT32 on a Mac.
- Paragon Partition Manager: Known for its robust features and Mac compatibility.
- GParted (via Bootable USB): This tool is a perfect tool for experienced users, open-source.
Steps (Generic):
- Download and install the tool of your choice.
- Connect your drive and launch the application.
- Select the drive, choose FAT32 as the format type, and start the formatting process.
Considerations:
- Some tools require payment for advanced features.
- Always download software from reputable sources to avoid malware risks.
Important: Don't Lose Your Data!
Before formatting a drive to FAT32, ensure to check if there is important data on the drive. After formatting a drive, all data on the drive will be removed.
If you lost data by formatting a drive to FAT32, you can use Mac data recovery software. One option is Donemax Data Recovery for Mac. This software can help you recover your lost data.

How to Recover Lost Data from An Formatted Disk on Mac?
Donemax Data Recovery for Mac is effective to recover data from formatted disk on macOS.
Tips for Successful FAT32 Formatting
To ensure a smooth formatting process, follow these best practices:
- Backup Data: Formatting erases all data on the drive, so ensure you have a backup of any important files.
- Verify Device Compatibility: Confirm that the device you'll use the drive with supports FAT32.
- Double-check the settings: Make sure you select the correct file system and drive initially.
- Use Reliable Tools: If using third-party software, choose reputable applications with positive reviews.
Troubleshooting Common Issues
Even with proper tools and steps, users may encounter challenges during FAT32 formatting. Here's how to address common problems:
Formatting Fails:
- Check that you securely attach and mount the drive.
- Use Terminal or third-party tools as alternatives to Disk Utility.
File Size Errors:
- If files larger than 4GB are needed, consider ExFAT instead of FAT32.
Incorrect Drive Selection:
- Carefully verify the drive identifier in Terminal or third-party tools to avoid accidental data loss.
Wipe FAT32 Drive on Mac Before Selling or Donating?
Data erasure program can help you securely and permanently erase all data from the FAT32 drive. Before you sell, donate, or throw away the old drive, use a data erasure program. Donemax Data Eraser for Mac can help you format and wipe the drive.
Step 1. Download and install the reliable data erasure program - Donemax Data Eraser for Mac.
Donemax Data Eraser for Mac
- Format hard drive and wipe data permanently.
- Simple steps to wipe data and avoid data recovery.
- 100% safe and easy to use.
Step 2. Open Donemax Data Eraser for Mac, choose Erase Hard Drive mode, then select the target drive, click on Erase Now button.
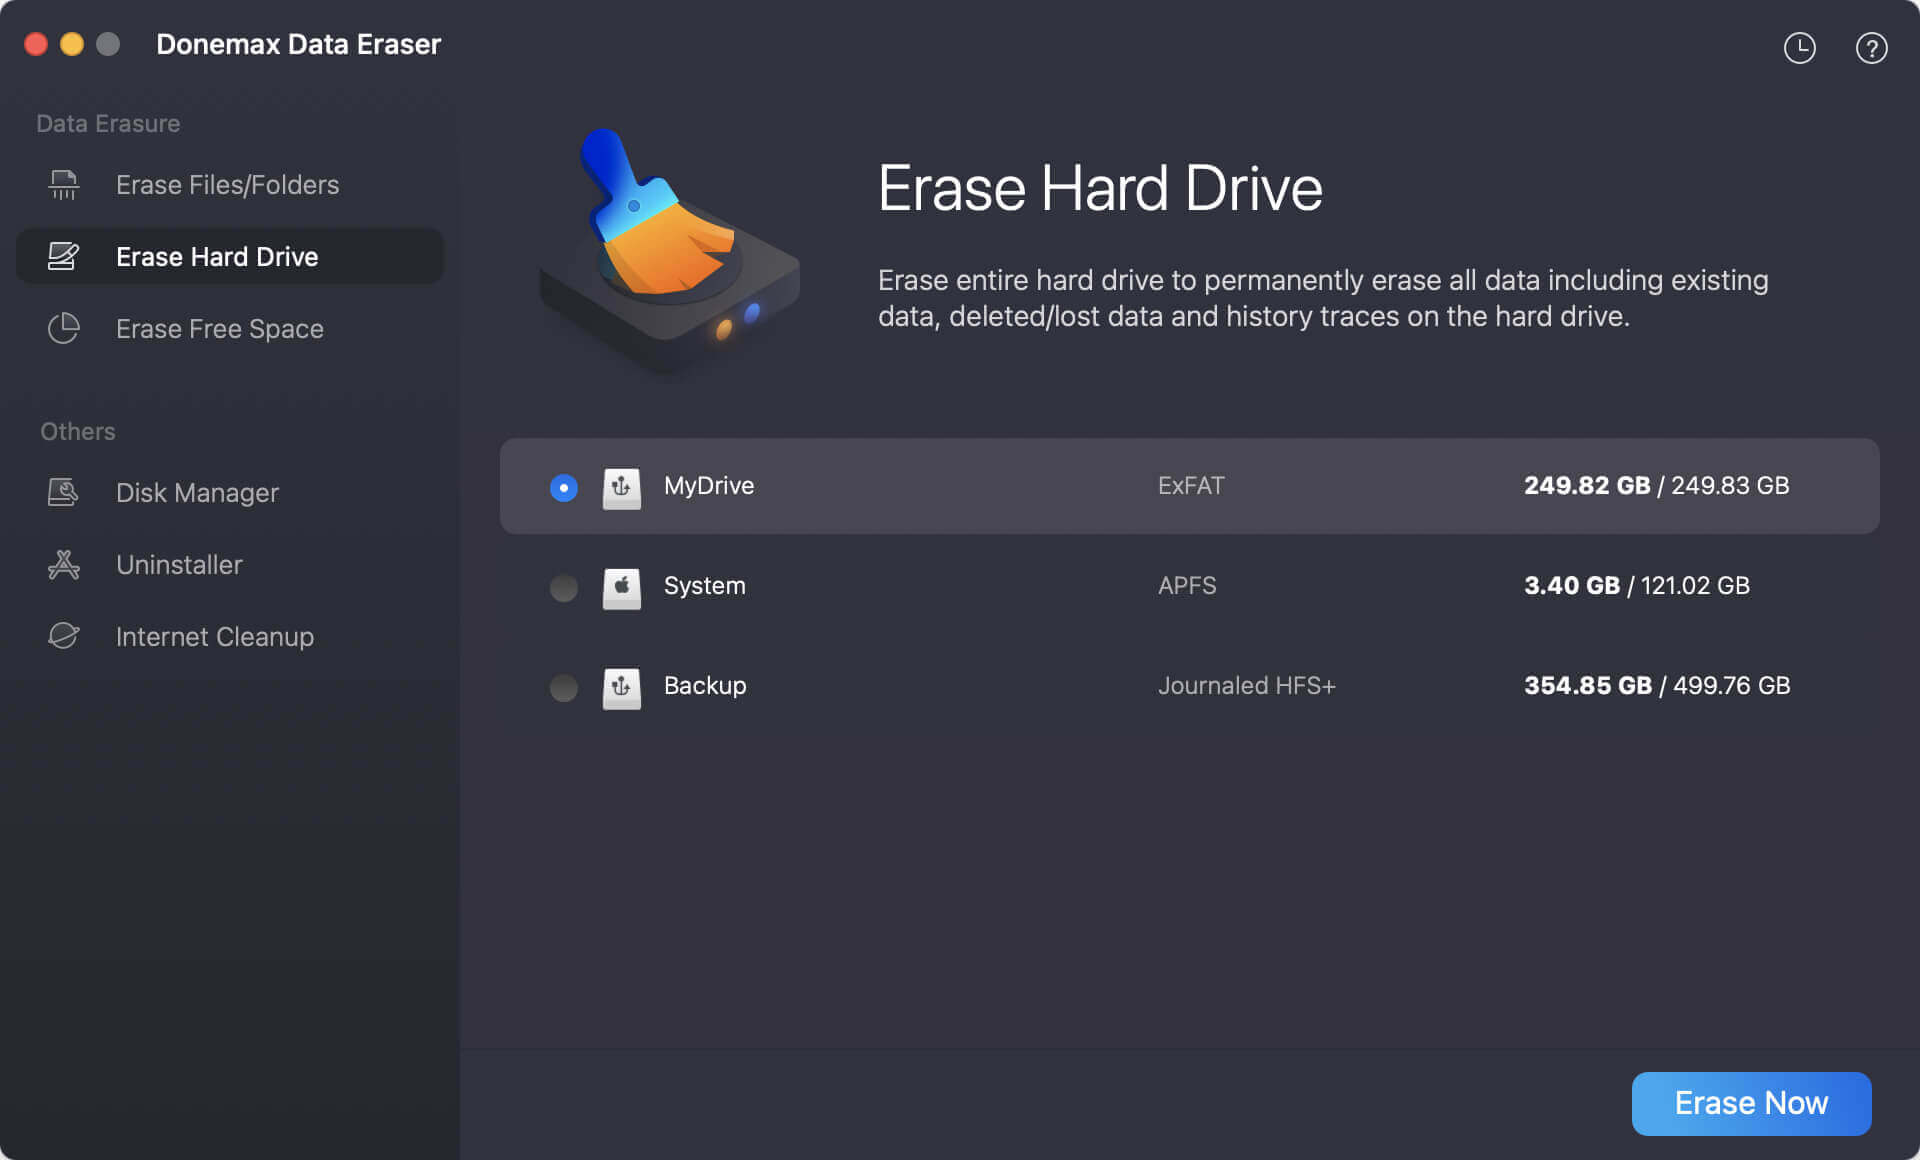
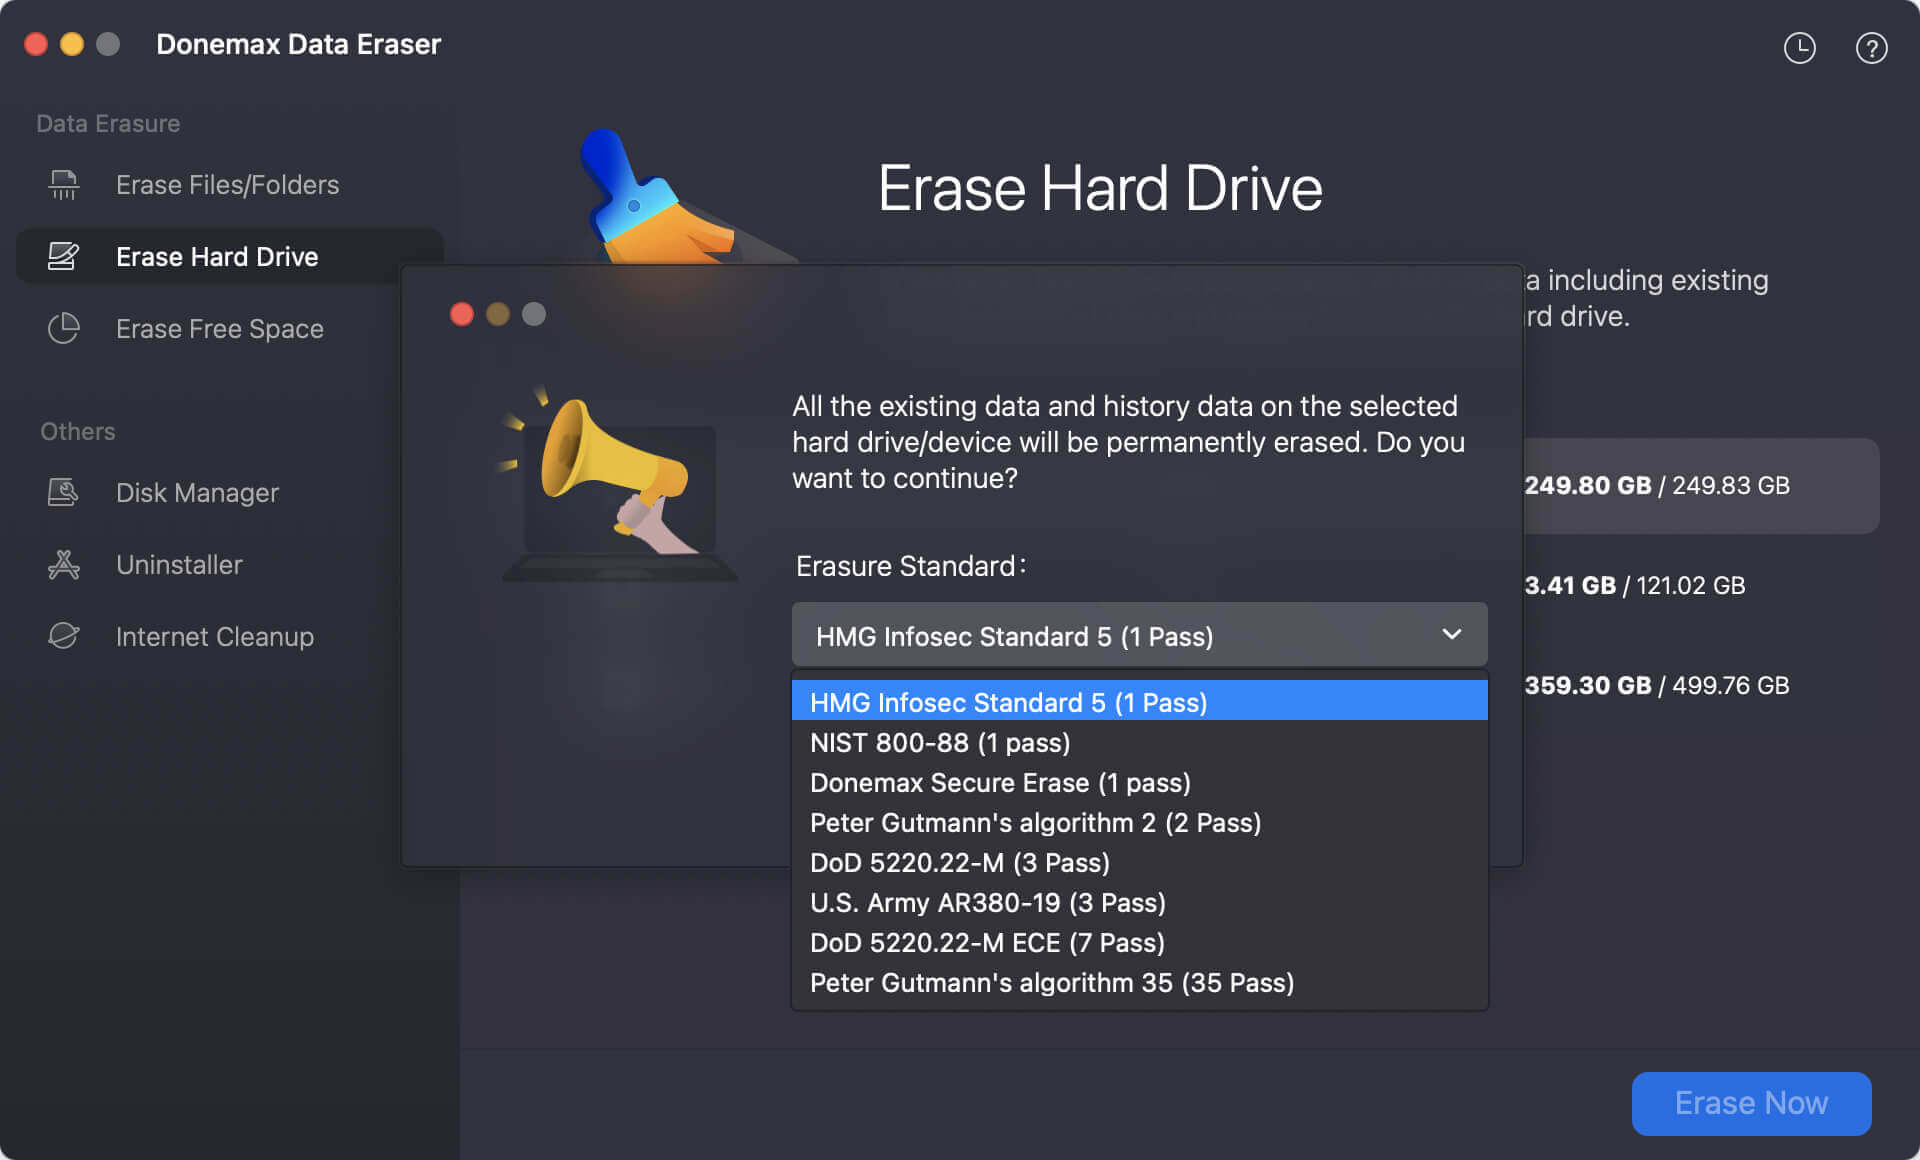
Step 3. Then you need to select a data erasure standard to wipe data permanently from the selected drive.
Step 4. At last, confirm to start the data wiping process. The tool will securely and permanently wipe all data from the drive.
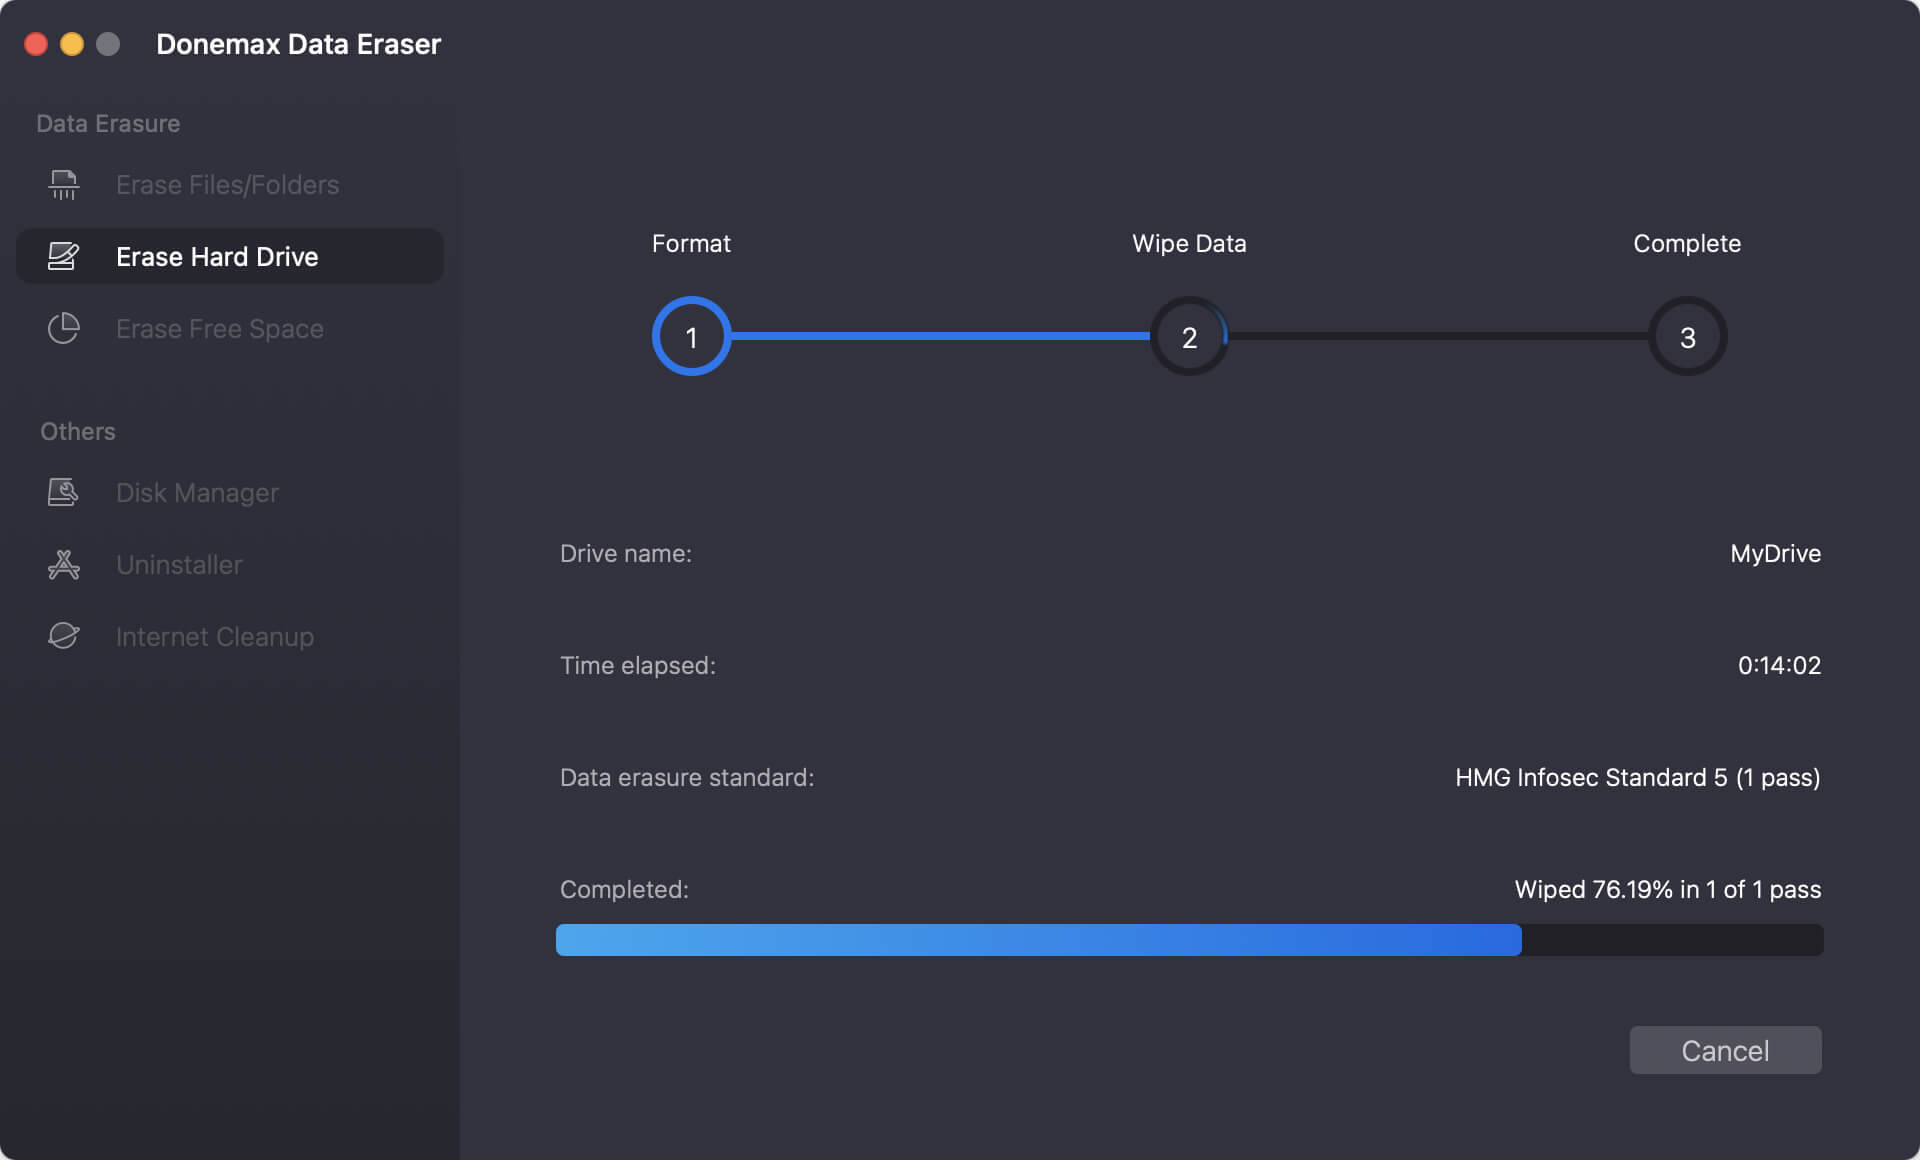
Once the process finishes, you lose all data stored on the drive for good, and no method can recover it.
FAQs about FAT32 Formatters for macOS
For drives under 32GB, Disk Utility is the best built-in tool. For larger drives or users who want a simpler experience, third-party utilities like Donemax are highly recommended.
Apple calls FAT32 "MS-DOS (FAT)". If you see that option, you are formatting to FAT32. If it's missing, it’s usually because your drive is too large for the standard interface to handle.
Yes. Formatting clears the "table of contents" of your drive, making the data inaccessible. Always back up your photos and videos before using any FAT32 disk formatting tool for Mac.
Yes, but you usually cannot do it through the standard Disk Utility "Erase" button. You will need to use Terminal or a professional third-party formatter.
Only if you need to use the drive with very old devices (like a PlayStation 3 or an old car head unit). For everything else, ExFAT is superior because it doesn't have the 4GB file size limit.
Conclusion
FAT32 remains a vital file system for many users despite its age and limitations. Its universal compatibility makes it good for scenarios where other file systems fall short.
Finding a FAT32 formatter for Mac doesn't have to be a headache. Whether you use the built-in Disk Utility for a quick fix or a professional tool for a large external drive, you now have the knowledge to get it done. Just remember: Check your backups twice, format once!
Donemax Data Eraser for Mac
100% safe and powerful Mac data erasure program. It offers certified data erasure standards including U.S. Army AR380-19, DoD 5220.22-M ECE helps securely and permanently erase data from Mac HDDs, SSDs, and external storage devices. This makes data recovery impossible.
Related Articles
- Mar 30, 2026Turn Off iPhone Mirroring on Mac: 4 Easy Methods
- Apr 07, 2026How to Format External HDD/SSD on Mac: APFS, ExFAT, or NTFS?
- Apr 07, 2025[6 Fixes] Fix Macintosh HD Greyed Out in Disk Utility: Step-by-Step Guide
- Apr 22, 2026How to Resolve 2003F Mac Error – 8 Fixes
- May 12, 2025Purple/Blue/Pink/Black/Green Lines on Mac Screen: Why & Fixes
- Feb 22, 2025Memory Card Not Working on Mac? Fix It Without Losing Data

Contributing Writer
Christina
Christina is the senior editor of Donemax software who has worked in the company for 4+ years. She mainly writes the guides and solutions about data erasure, data transferring, data recovery and disk cloning to help users get the most out of their Windows and Mac. She likes to travel, enjoy country music and play games in her spare time.

Editor in chief
Gerhard Chou
In order to effectively solve the problems for our customers, every article and troubleshooting solution published on our website has been strictly tested and practiced. Our editors love researching and using computers and testing software, and are willing to help computer users with their problems