
Written byChristinaUpdated on Sep 24, 2026

Before we start: How to extract data from USB flash drive on macOS 27 Golden Gate? Donemax Data Recovery for Mac is the best choice. The software is fully compatible with latest macOS and can effective recover data from USB flash drive and other storage devices.
PAGE CONTENT:
Upgrading your Mac to macOS 27 Golden Gate brings slick interface updates, faster performance, and upgraded security features. However, major macOS updates often introduce unexpected compatibility bugs for external storage devices.
If you plugged in your thumb drive only to find that your USB flash drive is not working on macOS 27 Golden Gate, you are not alone. Many Mac users report USB drives failing to mount, showing up as read-only, or not appearing in Finder or on the Desktop at all after upgrading.
Don't panic—your files are likely safe. In this troubleshooting guide, we will break down why this issue happens on macOS 27 Golden Gate and provide step-by-step solutions to fix your drive and recover missing files from USB drive using Donemax Data Recovery for Mac.
To fix the issue effectively, it helps to understand what is causing your Mac to ignore or lock your USB drive:
Before trying complex steps, complete these simple checks:
macOS 27 Golden Gate includes enhanced security measures that require approval before connecting external accessories. If permission was accidentally blocked, your USB drive won't respond.
Step 1: Click the Apple menu in the top-left corner and select System Settings.
Step 2: Scroll down the left menu and click Privacy & Security.
Step 3: Scroll to the Security section and locate 'Allow accessories to connect'.
Step 4: Set the option to 'Ask for New Accessories' or 'Automatically When Unlocked'.
Step 5: Unplug your USB flash drive, wait 5 seconds, re-insert it, and click 'Allow' when the pop-up appears.
Sometimes the drive is connected and working fine, but Finder is configured to hide external hard drives from your desktop and sidebar.
Step 1: Click on the Finder icon on your Dock.
Step 2: Click Finder in the top menu bar and select Settings.
Step 3: Under the General tab, make sure 'External disks' is checked.
Step 4: Switch to the Sidebar tab and ensure 'External disks' is checked under the Locations category.
Step 5: Check your Desktop and Finder sidebar to see if your USB flash drive is now visible.
If the USB flash drive is recognized by your Mac hardware but fails to mount automatically, you can manually force it to mount using Disk Utility.
Step 1: Press Command + Spacebar to open Spotlight Search, type 'Disk Utility', and press Enter.
Step 2: Look for your USB flash drive in the left sidebar list.
Step 3: If the drive partition appears grayed out, select it and click the 'Mount' button on the top toolbar.
If your USB flash drive suffered logical corruption during the macOS 27 Golden Gate update, running First Aid can repair the underlying disk permissions and directory errors.
Step 1: Open Disk Utility from Applications > Utilities.
Step 2: Select your unmountable USB drive partition from the sidebar.
Step 3: Click the 'First Aid' button in the top menu bar and click 'Run'.
Step 4: Wait for macOS to scan and fix disk errors. Once finished, click 'Done' and check if the drive opens.
If your USB flash drive is formatted with the Windows NTFS file system, macOS 27 Golden Gate will not allow you to save, edit, or delete files on the drive. If the NTFS driver fails entirely, the drive may not mount at all.
To fix NTFS USB drives on macOS 27 Golden Gate, you can use Donemax NTFS for Mac. This lightweight utility grants full read-write access to NTFS drives on macOS without requiring reformatting or data loss.
When an external disk is improperly ejected, macOS may run a background process named 'fsck' (File System Consistency Check) to scan the drive. While fsck is running, the drive will not mount.
Step 1: Open Terminal from Applications > Utilities.
Step 2: Type 'sudo pkill -f fsck' and press Enter.
Step 3: Enter your Mac admin password when prompted and press Enter.
Step 4: Unplug your USB drive and reconnect it to see if it mounts immediately.
If First Aid fails and your USB flash drive is severely corrupted, formatting it to ExFAT or APFS will make it usable again on macOS 27 Golden Gate.
Warning: Formatting erases all existing data on the flash drive! If you have valuable files stored on the drive, perform data recovery first using Solution 8 before formatting.
Step 1: Open Disk Utility and select your USB flash drive.
Step 2: Click the 'Erase' button in the top toolbar.
Step 3: Choose a name for your drive and set the Format to ExFAT (for cross-platform Mac & Windows use) or APFS (for Mac-only use).
Step 4: Set Scheme to 'GUID Partition Map' and click 'Erase'.
If your USB flash drive is corrupted, asks to be initialized, or needs to be formatted, you must recover your essential files first. Donemax Data Recovery for Mac is a powerful, user-friendly software designed to recover lost, deleted, or unmountable data from USB drives on macOS 27 Golden Gate.
Step 1: Download & Connect - Download and install Donemax Data Recovery for Mac on your computer. Plug in your problem USB drive.
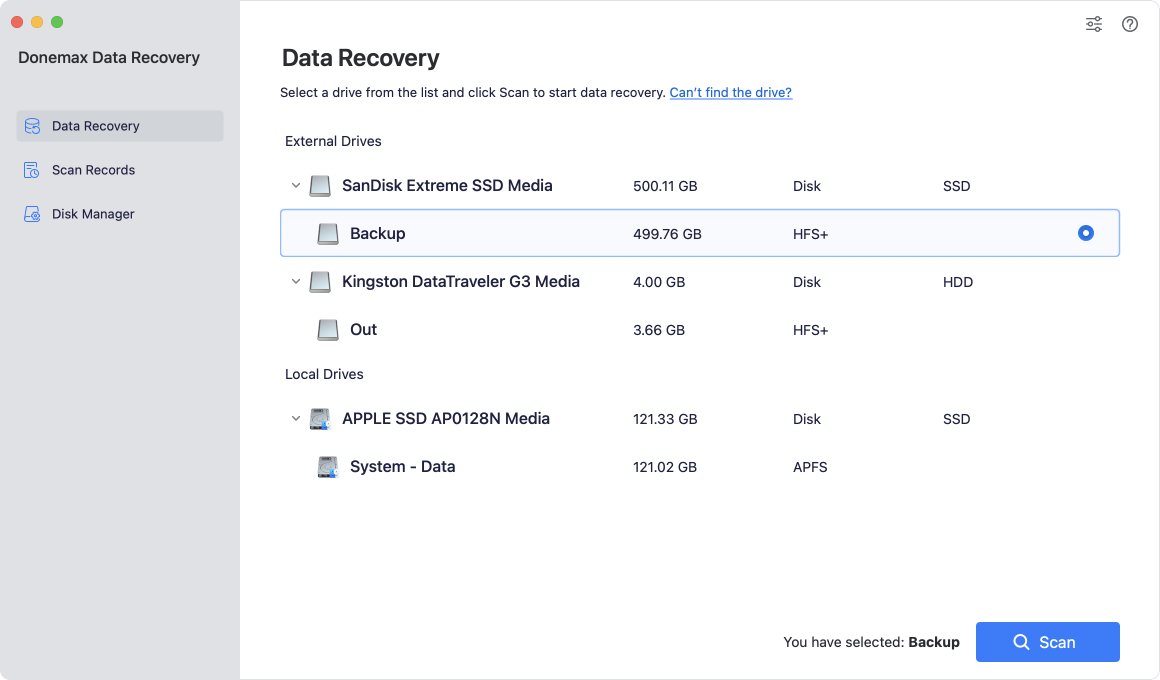
Step 2: Select & Scan Drive - Launch Donemax Data Recovery, select your USB flash drive from the drive list, and click the 'Scan' button.
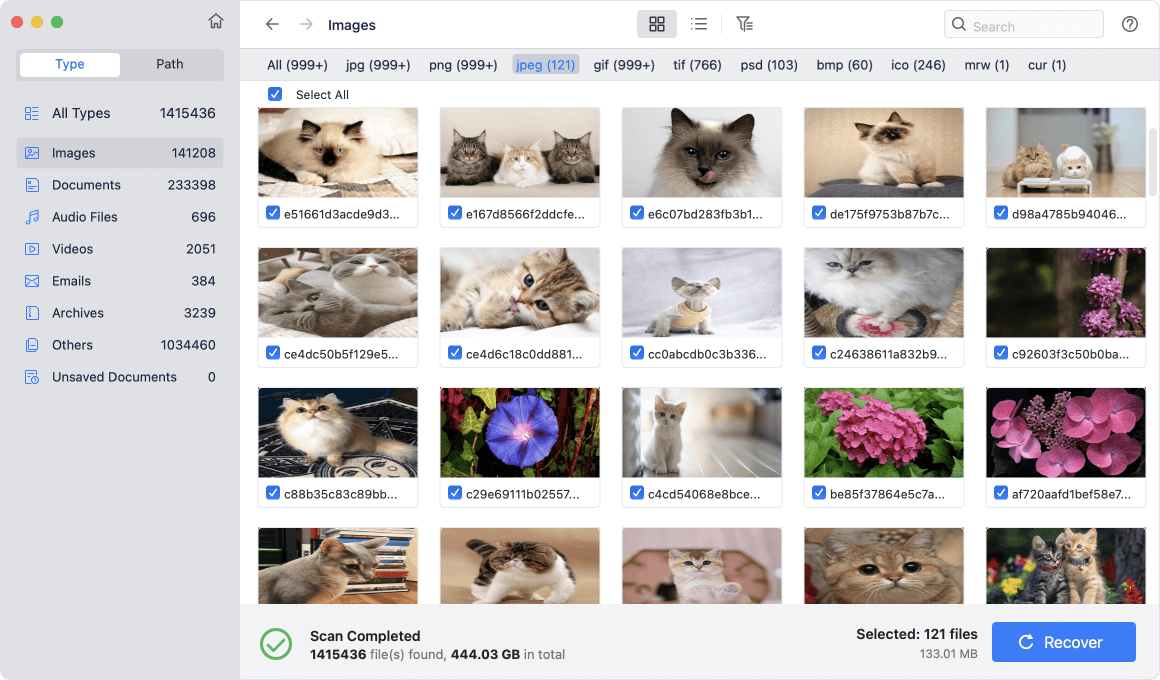
Step 3: Preview & Recover - Browse the found files after the scan completes. Select the files you want to save and click 'Recover' to export them to your Mac internal drive.
Dealing with a USB flash drive is not working on macOS 27 Golden Gate issue can be frustrating, but it is usually simple to fix. By checking USB accessory permissions, adjusting Finder display settings, or running First Aid, you can get your flash drive working smoothly again.
If your drive is corrupted or requires formatting, always remember to recover your valuable files first using Donemax Data Recovery for Mac. With these steps, your data stays protected while your external storage gets back on track!
Donemax Data Recovery for Mac
Donemax Data Recovery for Mac is one of the best Mac data recovery software. It is easy-to-use and can help in recovering deleted, formatted, inaccessible or lost data from Mac HDD/SSD, external disk, USB drive, SD card, camera or other storage devices.
Christina
Christina is the senior editor of Donemax software who has worked in the company for 4+ years. She mainly writes the guides and solutions about data erasure, data transferring, data recovery and disk cloning to help users get the most out of their Windows and Mac. She likes to travel, enjoy country music and play games in her spare time.
Gerhard Chou
In order to effectively solve the problems for our customers, every article and troubleshooting solution published on our website has been strictly tested and practiced. Our editors love researching and using computers and testing software, and are willing to help computer users with their problems