Written byCharlesUpdated on Sep 04, 2026

Before we start: NTFS drive is read-only on Mac by default. If you want to keep the data on the NTFS drive and make the drive writable on Mac, Donemax NTFS for Mac can help you. This tool can safely and quickly make the NTFS drive writable on Mac with on-click.
PAGE CONTENT:
Connecting an external hard drive to your Mac should be as simple as plug-and-play. However, if you plug a Windows-formatted NTFS drive into your new MacBook Neo and nothing appears on your desktop, in Finder, or under your locations sidebar, it can be extremely frustrating.
You might worry that your important photos, work projects, or backup files are gone forever. The good news is that your data is usually completely safe. This issue is very common when using Windows-formatted storage drives on Apple hardware running the latest macOS software.
In this guide, we will explore why your NTFS drive is not showing up on your MacBook Neo and walk you through step-by-step solutions to fix the problem quickly and safely. Whether it is a simple display preference setting or a file system mounting glitch, we have got you covered.
Before jumping into the fixes, it helps to understand what causes this issue on your MacBook Neo. Here are the most common reasons:
Follow these step-by-step methods in order to resolve the issue and get your external NTFS drive working smoothly on your MacBook Neo.
Hardware issues are the simplest and most frequent reason external drives fail to appear. Start by verifying your physical setup:
Step 1: Unplug the NTFS drive from your MacBook Neo and firmly plug it back into the USB-C or Thunderbolt port.
Step 2: If you are using a USB hub or multi-port adapter, try plugging the drive directly into the MacBook Neo USB-C port.
Step 3: Inspect your USB cable for signs of wear. Swap the cable or test the drive on another port if available.
Step 4: For large external desktop hard drives, make sure the external power supply is plugged securely into a wall outlet.
If your MacBook Neo detects the NTFS drive at the system level but does not display it on your desktop or in Finder sidebars, your Finder visibility settings might be turned off.
Step 1: Click anywhere on your desktop to activate Finder, or click the Finder icon in your Dock.
Step 2: In the top menu bar, click Finder and select Settings (or Preferences on older macOS versions).
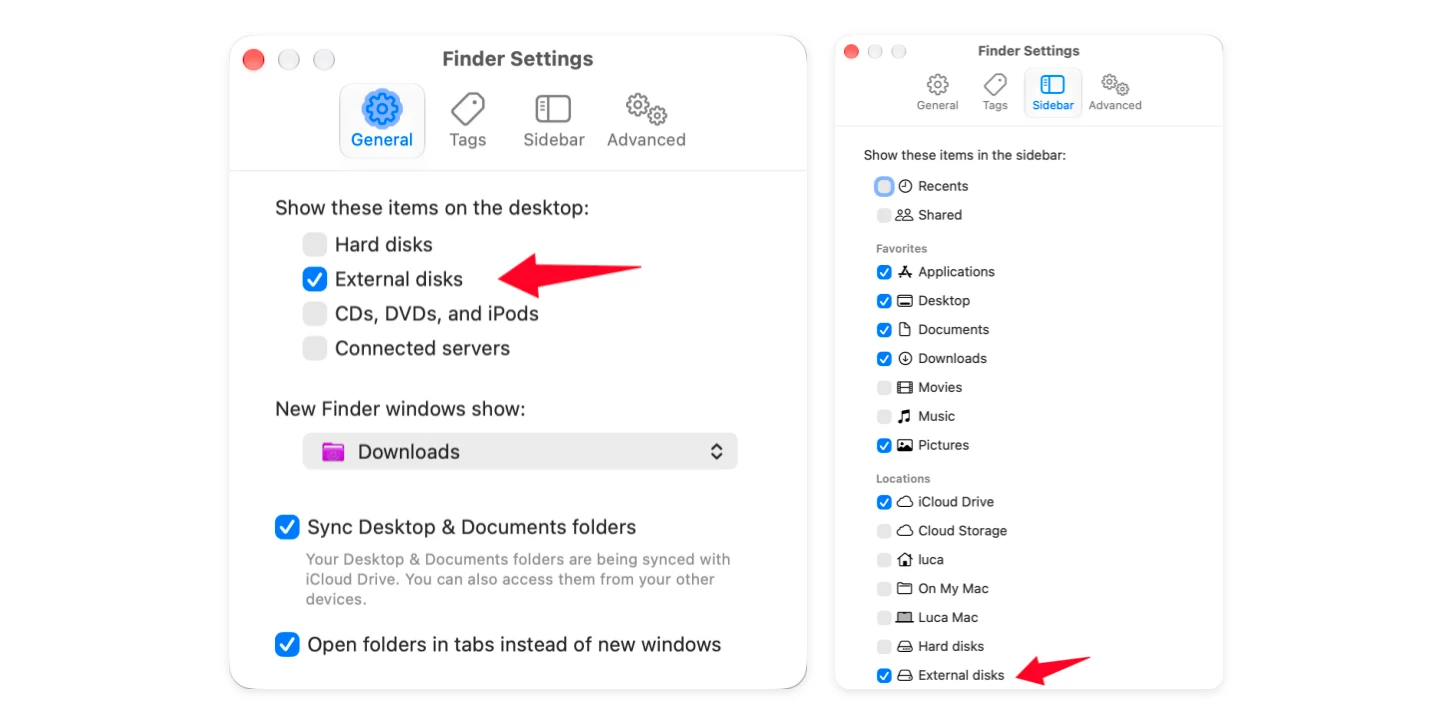
Step 3: Click the General tab at the top. Under 'Show these items on the desktop', check the box next to External disks.
Step 4: Switch to the Sidebar tab at the top. Under 'Locations', ensure the box next to External disks is checked.
Step 5: Close Settings and check whether your NTFS drive icon appears on your desktop or in the Finder sidebar.
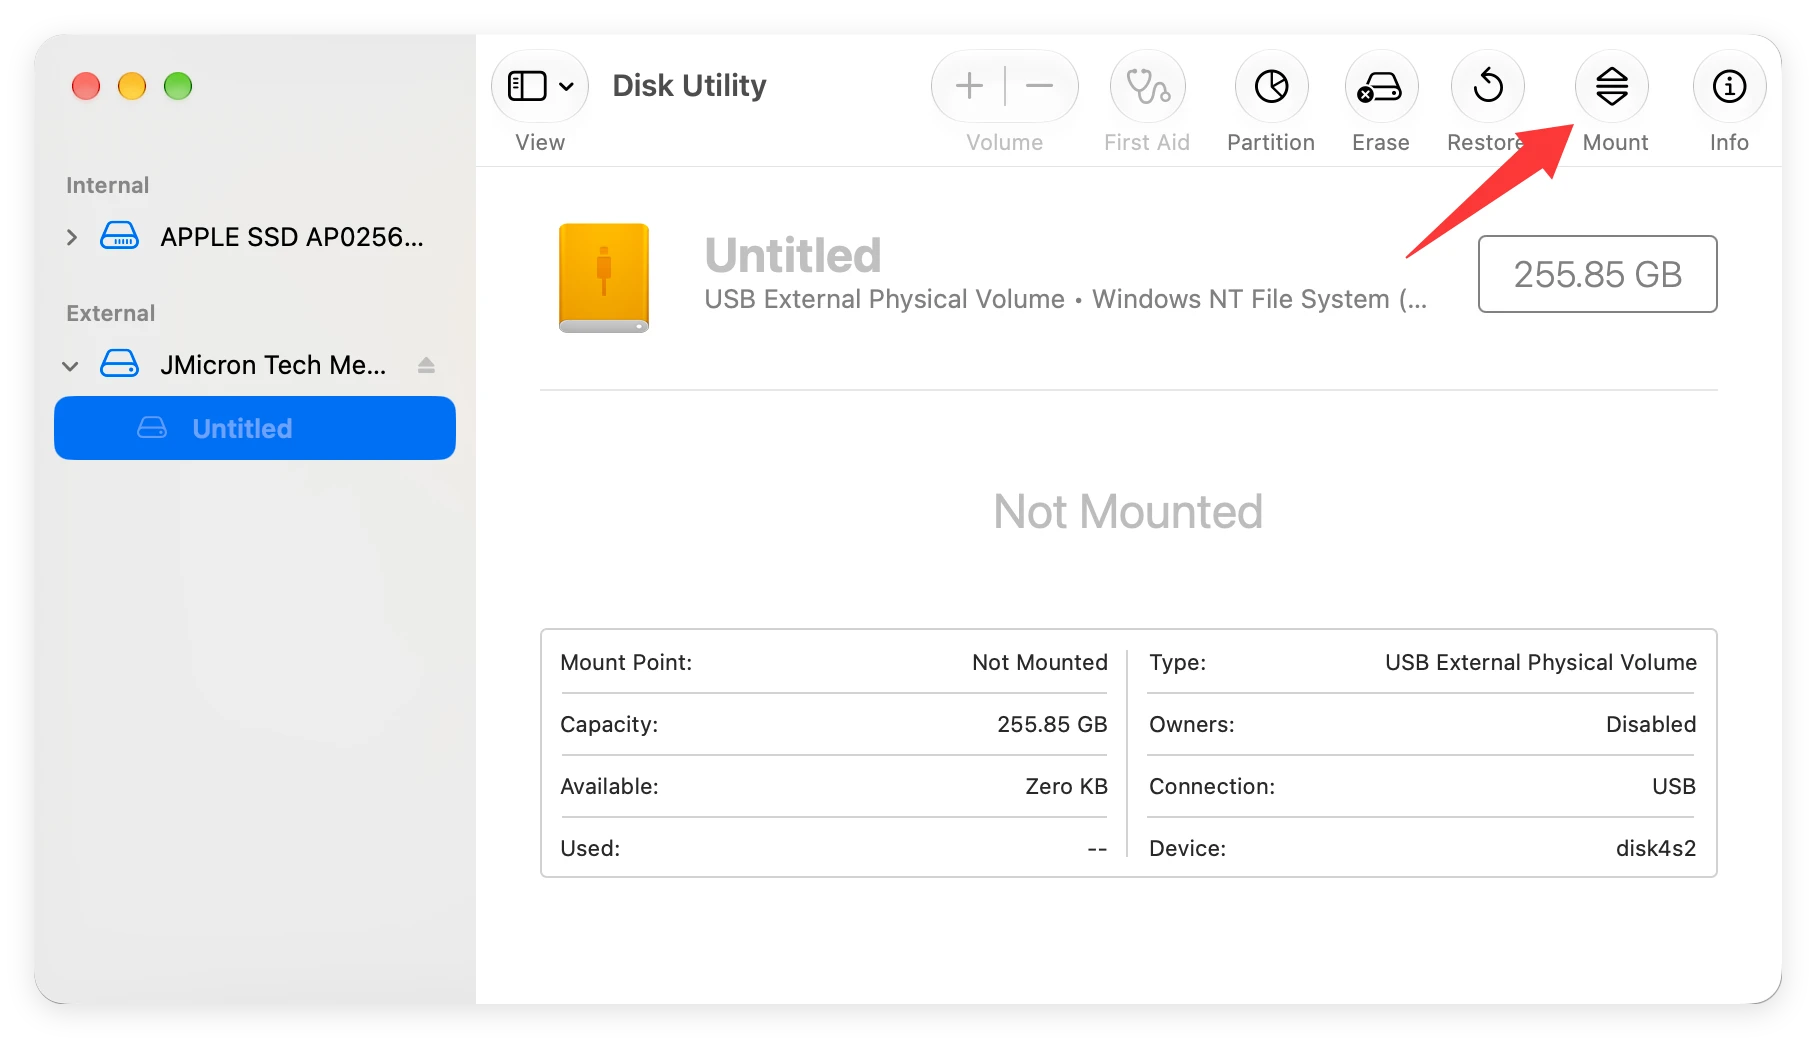
Disk Utility is Apple's built-in disk management tool. It allows you to see all connected drives, even if Finder hides them.
Step 1: Press Command + Spacebar to open Spotlight Search, type Disk Utility, and press Enter.
Step 2: Look at the left sidebar under the External section. Find your NTFS drive. If the drive volume name appears light grey, it is currently unmounted.
Step 3: Select the greyed-out NTFS volume and click the Mount button at the top toolbar.
Step 4: If successful, the volume name will turn dark, and your drive will become accessible in Finder.
Even if macOS mounts your NTFS drive, Apple's native system only gives you read-only permissions. You cannot copy new files to the drive, edit existing documents, or delete files from your MacBook Neo. Furthermore, macOS often fails to mount external NTFS drives that were improperly disconnected from Windows PCs.
The easiest, safest, and most effective solution is using Donemax NTFS for Mac. Donemax automatically fixes mounting errors and grants full read and write access to all NTFS-formatted external drives on your MacBook Neo.
Why Choose Donemax NTFS for Mac?
How to Fix and Mount NTFS Drive with Donemax NTFS for Mac:
Step 1: Download and install Donemax NTFS for Mac on your MacBook Neo.
Step 2: Connect your external NTFS hard drive or flash drive to your MacBook Neo using a compatible USB cable.
Step 3: Launch Donemax NTFS for Mac. The software will automatically detect connected NTFS drives. Select your drive from the list and click Enable Writable to grant instant full read/write access.
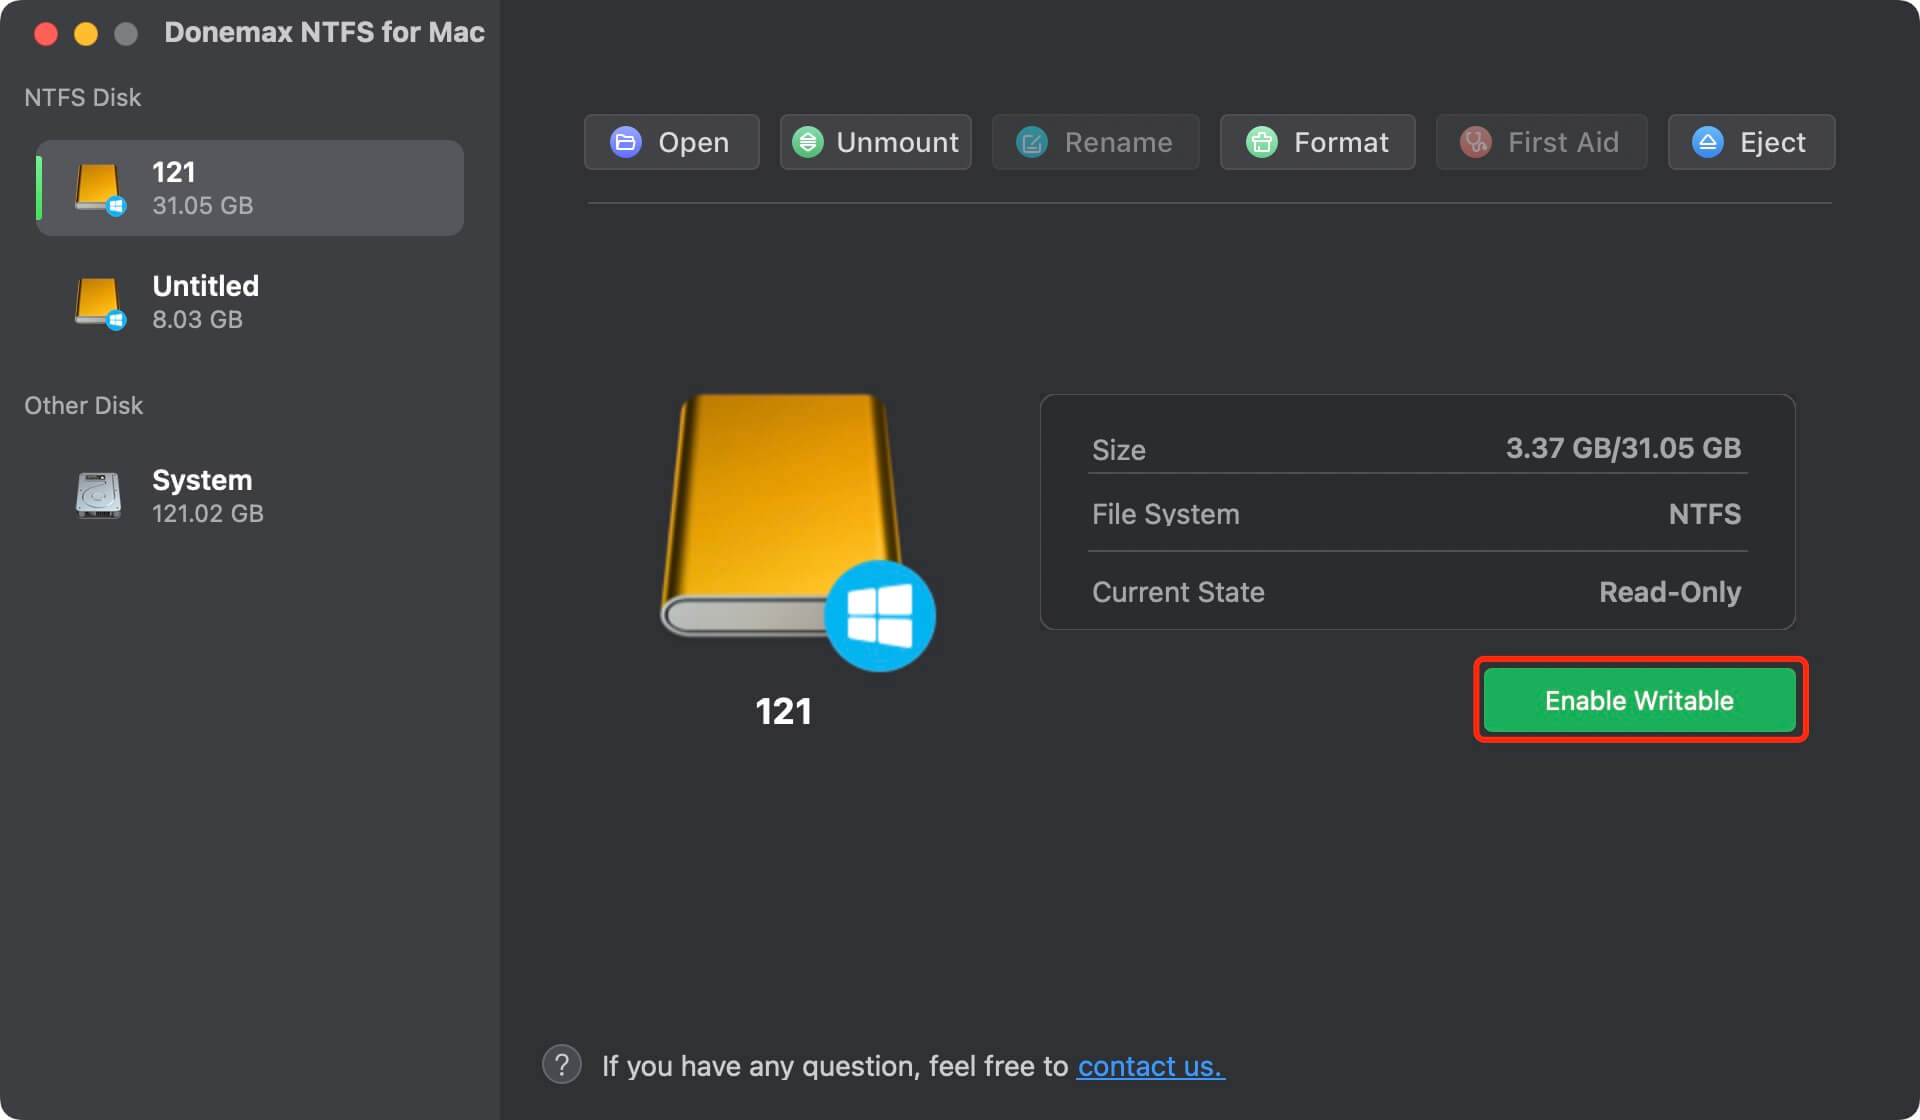
Step 4: If the drive is unmounted, simply click the Mount button within Donemax NTFS for Mac. Your drive will open immediately, allowing you to copy, edit, transfer, and delete files seamlessly.
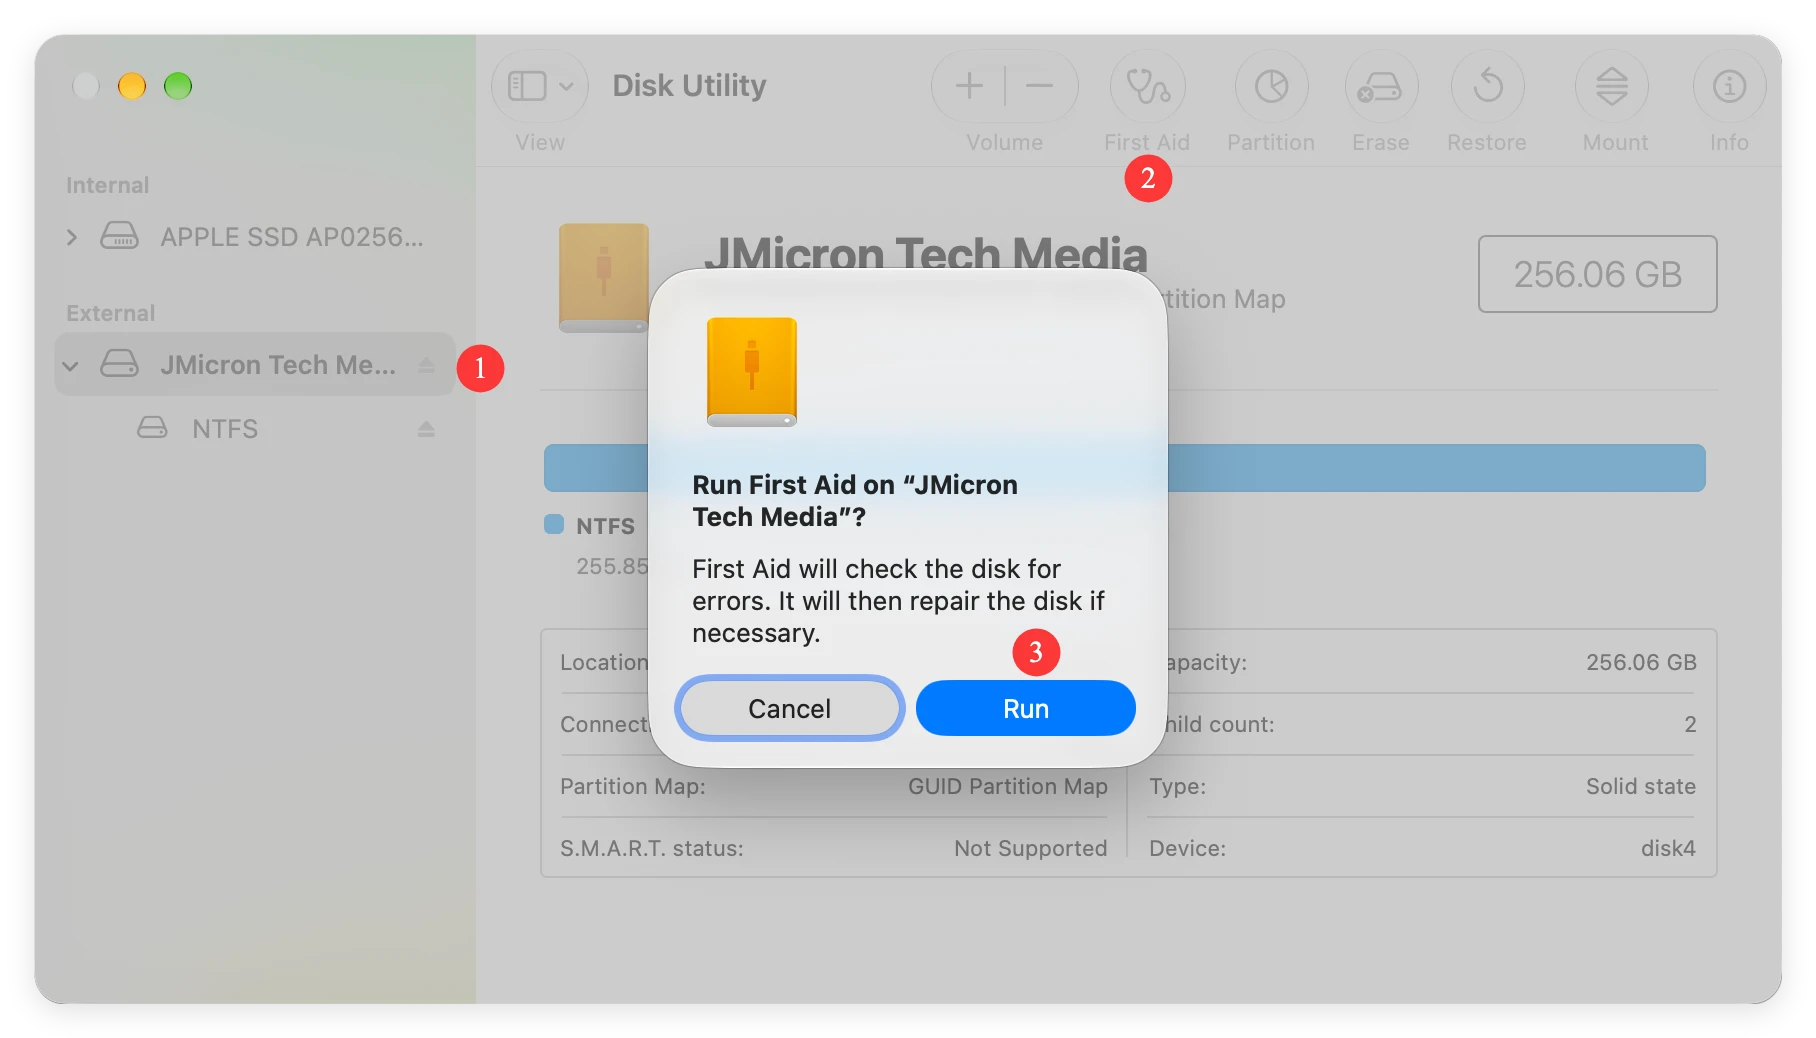
If your NTFS drive appears in Disk Utility but refuses to mount even after trying third-party software, the file system might be damaged or corrupted.
Option A: Repair Drive with First Aid
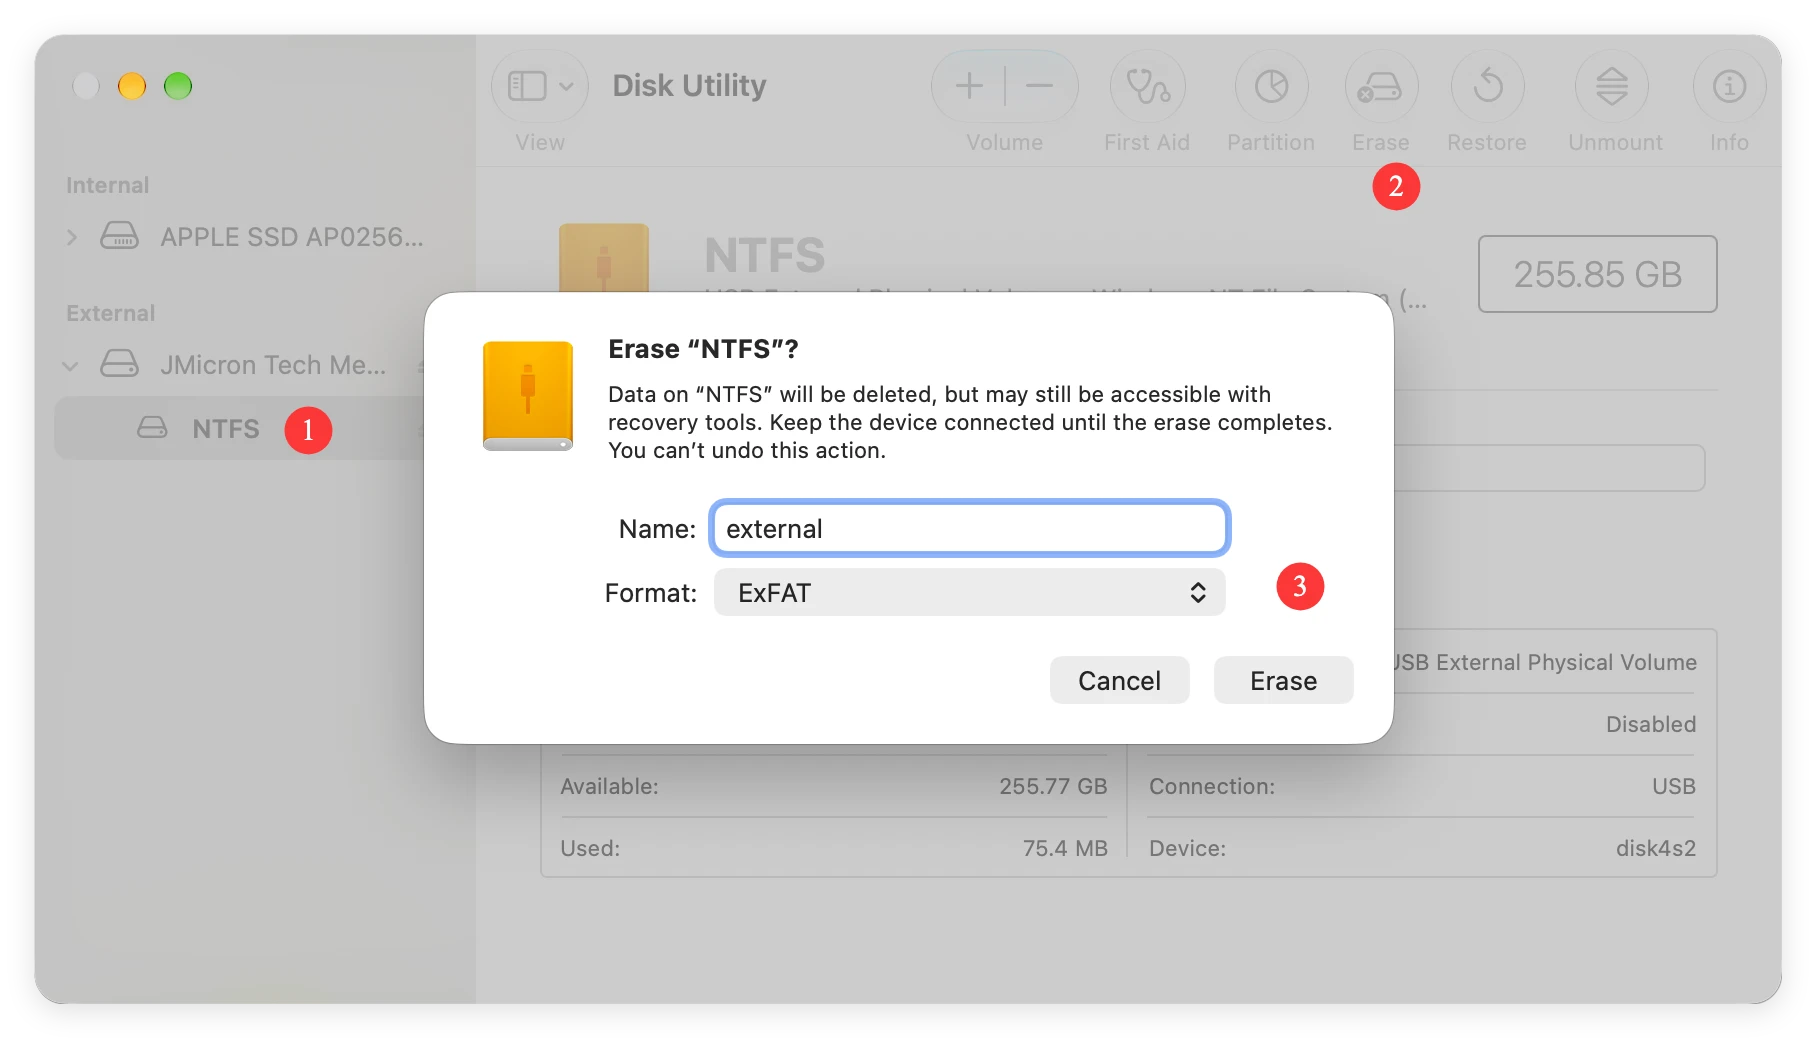
Option B: Reformat the Drive (Data Loss Warning)
If First Aid fails and the drive cannot be repaired, reformatting is the final option to make the drive usable again. Note that reformatting erases all stored data.
Having an external NTFS drive not show up on your MacBook Neo can interrupt your workflow, but it is almost always fixable. By checking physical connections, adjusting Finder settings, and utilizing Disk Utility, you can resolve basic visibility bugs.
For a hassle-free experience with guaranteed full read and write access, Donemax NTFS for Mac is the ultimate solution. It automatically mounts your external NTFS drives, fixes unmounting errors, and allows you to transfer files between Windows and Mac effortlessly.
Charles
Charles, who lives in Sydney, Australia, is an editor & writer of Donemax Team. He is good at writing articles related with Apple Mac computers, Windows operating systems, data recovery, data erasure, disk clone and data backup, etc. He loves reading and playing tennis in his spare time and is interested in testing new digital devices such as mobile phones, Macs, HDDs, SSDs, digital cameras, etc.
Gerhard Chou
In order to effectively solve the problems for our customers, every article and troubleshooting solution published on our website has been strictly tested and practiced. Our editors love researching and using computers and testing software, and are willing to help computer users with their problems