
Written byLucienUpdated on Jun 12, 2025
How to Format and Unformat An NTFS Hard Drive on Mac?
Approved byGerhard Chou
Before we start: How to use NTFS drive on Mac? The first thought might be converting NTFS to another macOS-compatible file system. However, it will remove all the files from the drive after formatting it. With Donemax NTFS for Mac, you can easily get full read-write access to NTFS drives on macOS.
PAGE CONTENT:
When trying to use NTFS drives on Mac, you may want to format it first. Why do you need to format NTFS hard drive on Mac? Because Windows NTFS file system is not compatible with macOS and you can't write data to it or edit/modify files stored on it. You should format it to APFS, ExFAT, FAT32 or Mac OS Extended before using it on Mac. Some methods will be introduced to format NTFS drive on Mac in this article.
However, formatting a hard drive defines or redefines a file system database and prepares it for data storage. It deletes hard drive file system database data. Therefore, the formatted drive loses data and files immediately.
If you formatted an NTFS drive wrongly and lost data, stop adding data to the drive. It can help avoid further damaged to the lost data. The guide will show you how to get back the formatted data easily.
Should you want to preserve the NTFS file system and data with full read-write access to the drive on macOS, then you will need to use professional third-party NTFS for Mac tools, such as Donemax NTFS for Mac.
How to Format An NTFS Hard Drive on Mac?
A lot of reliable methods can help in formatting NTFS hard drives on Mac. Here are two excellent ones:
Method 1. Use Disk Utility to format NTFS drive on Mac
Step 1. Connect the NTFS hard drive to your Mac via USB port/USB Hub.
Step 2. Go to Launchpad and open Disk Utility.
Step 3. Click View and select Show All Devices.
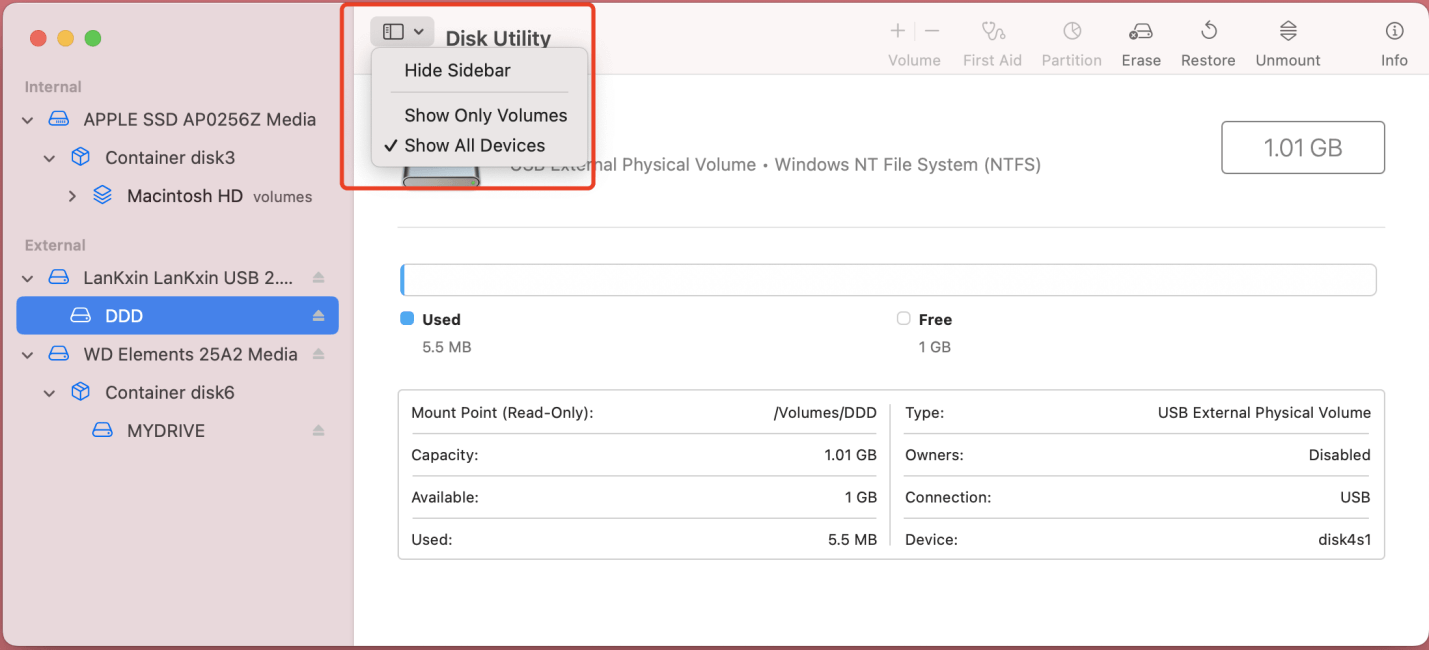
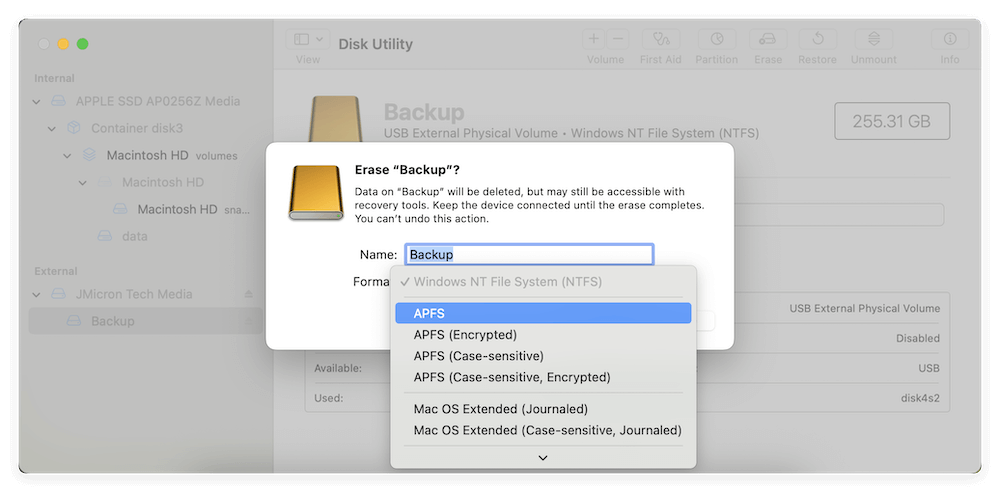
Step 4. Find and select the NTFS hard drive. Click Erase.
Step 5. Give it a name, and then select a file system for it.
- APFS/Mac OS Extended: Mac file system, not compatible with Windows OS.
- FAT32/ExFAT: Compatible with both Windows and Mac OS.
Step 7. Click Erase again, then when it is completed, click on Done button.
💡 Note: Please note that all original data stored on the NTFS hard drive will be erased once you click on Erase button. You'd better make a backup before you erase the NTFS drive.
Method 2. Format and wipe NTFS drive on Mac using data eraser
Before you sell or donate an NTFS hard drive, you'd better permanently wipe all your private data from it to prevent potential data recovery. Data Eraser software can help you securely and quickly format and wipe NTFS hard drive on Mac. Please note that once the NTFS hard drive is wiped by Data Eraser, all data stored on it is gone forever, can't be recovered by any data recovery software. You should back up the drive before wiping it.
Follow the guide below to format and wipe NTFS hard drive on Mac:
Step 1. Download and install Donemax Data Eraser for Mac and then open it from Launchpad.
Step 2. Connect the NTFS hard drive to your Mac, it will be quickly recognized by Donemax Data Eraser for Mac.
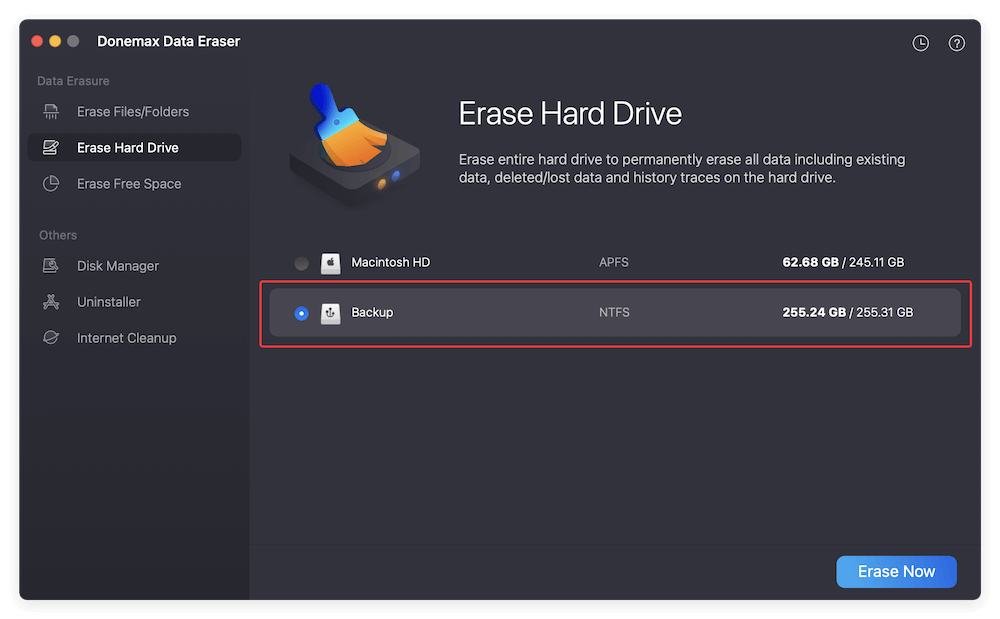
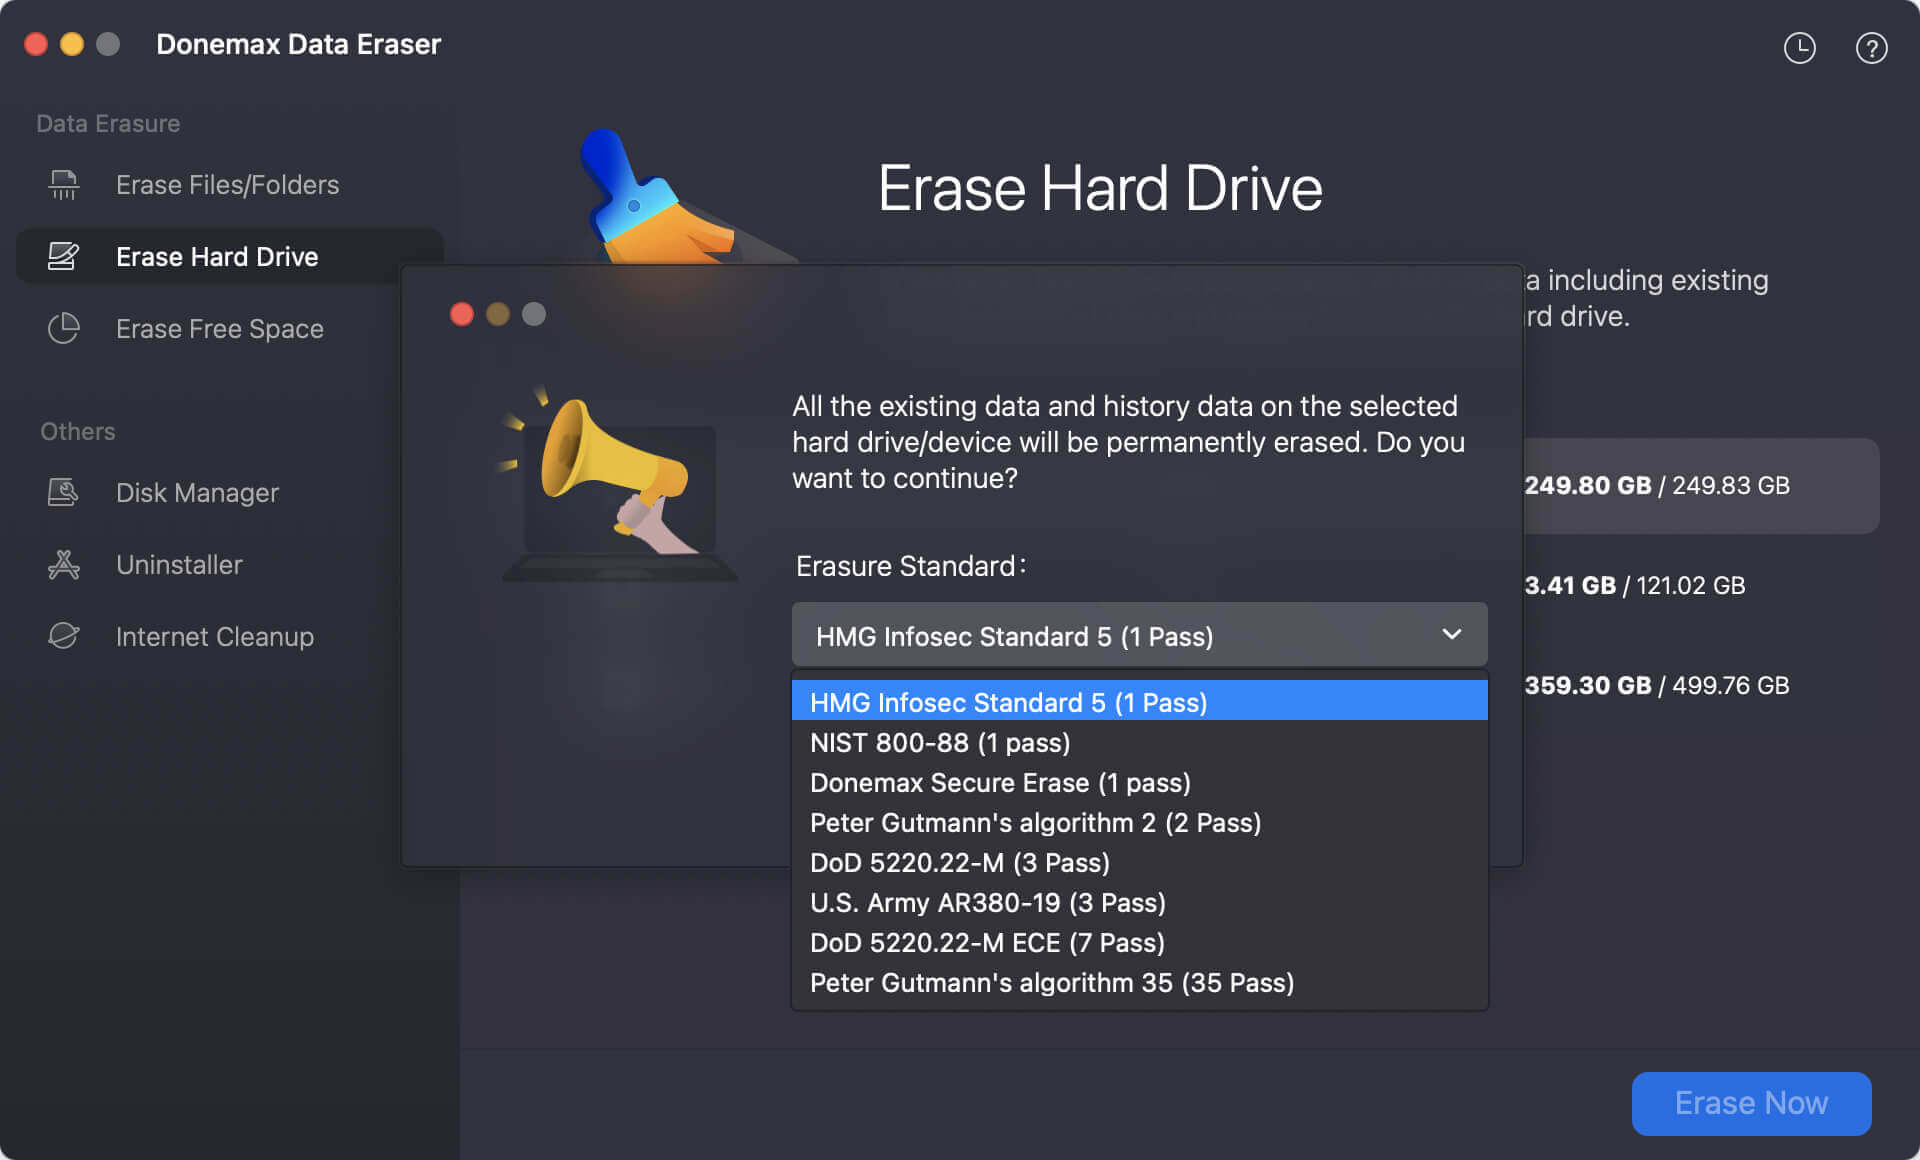
Step 3. Choose data erasure mode - Erase Hard Drive, and then select the NTFS hard drive. Click on Erase Now button.
Step 4. At this step, you need to select a data erasure standard to wipe data. You can choose any option among the international data wiping algorithms to securely wipe data from the NTFS drive on Mac.
Step 5. At last, start the data wiping directly. It will take some time to wipe the entire NTFS hard drive.
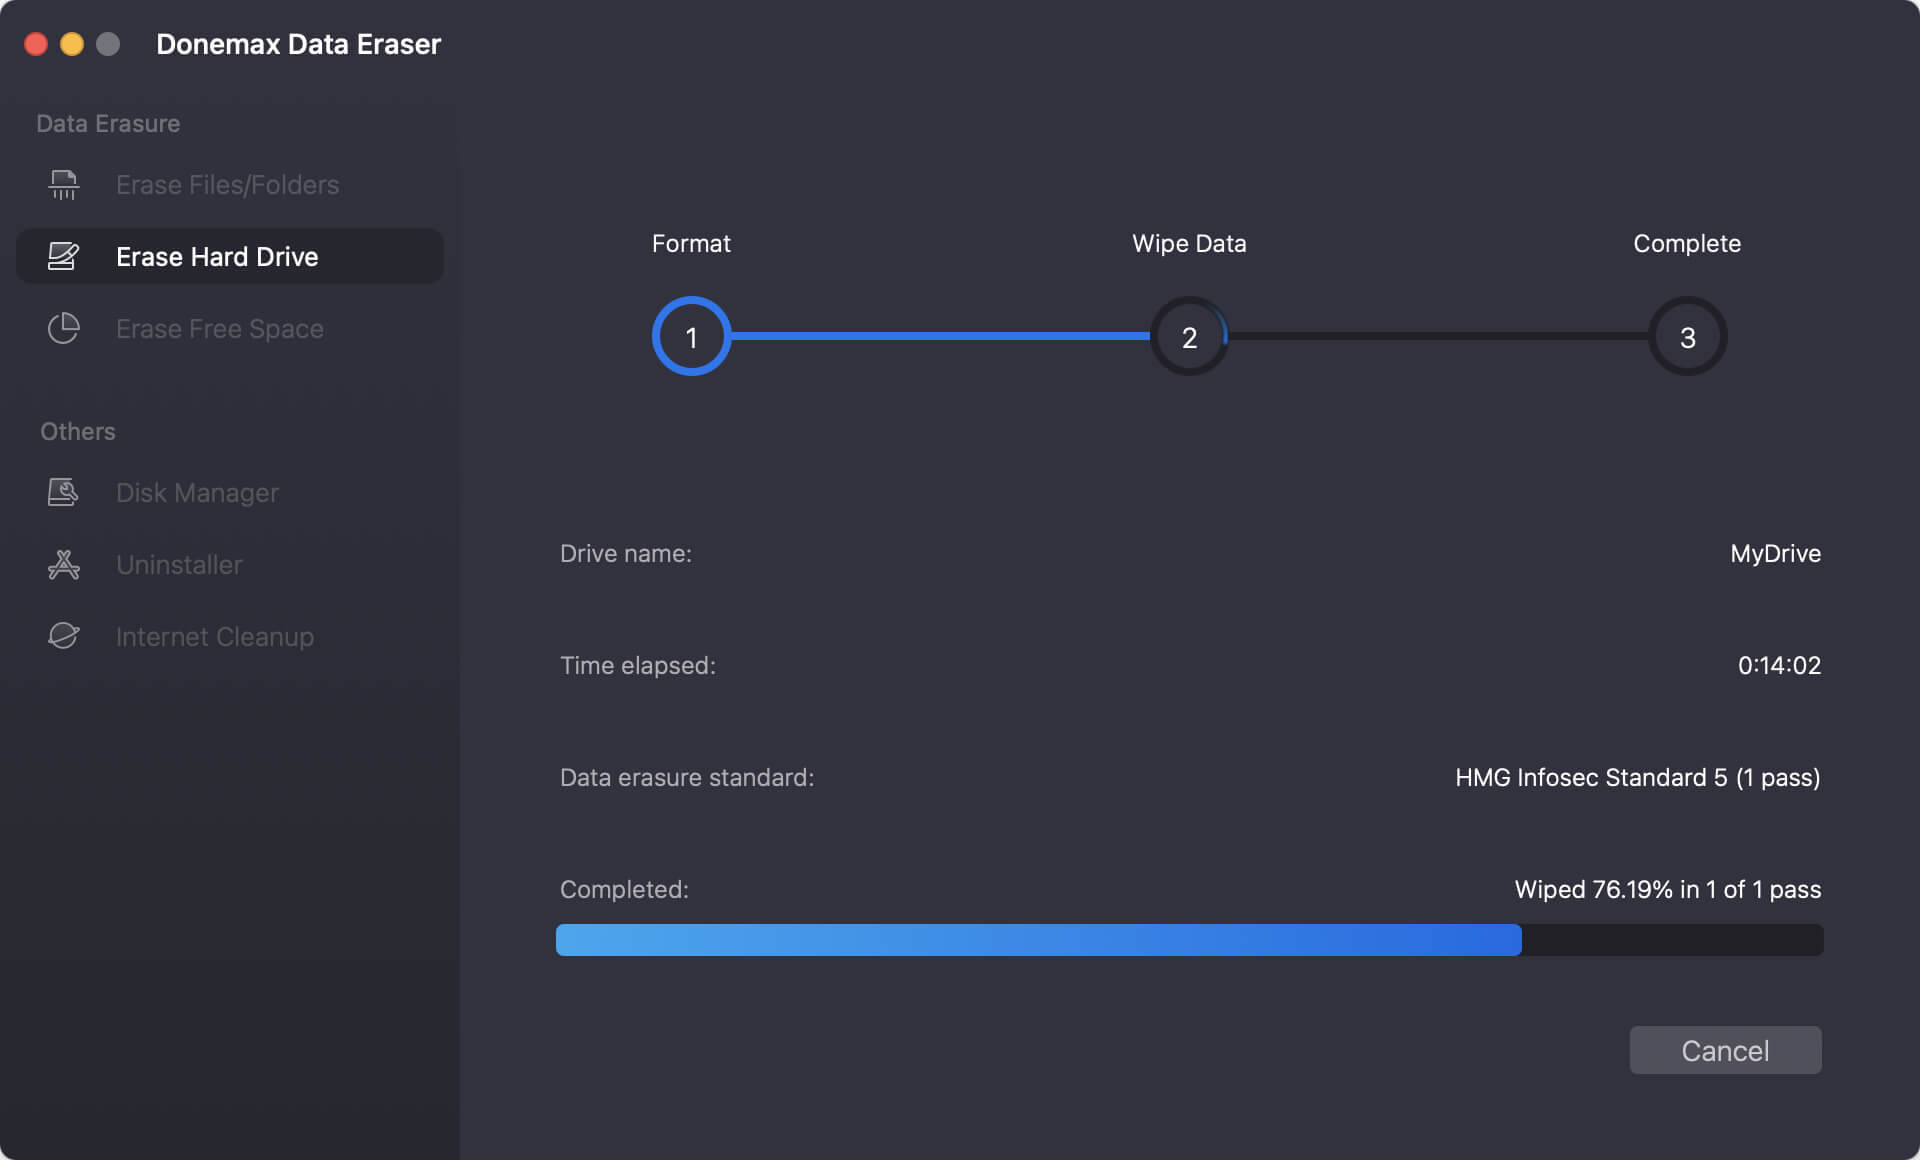
Once the process gets finished, all data stored on the NTFS hard drive is erased permanently, can't be recovered by any method. You can then resell, donamte or dispose the NTFS drive with peace of mind.
How to Use NTFS Hard Drive on Mac without Formatting It?
If there are important files on the NTFS drive or you may just need to use the NTFS drive on Mac temporarily, you won't want to format the drive directly on Mac. Is there any solutions to make NTFS drive fully writable on Mac? Yes, Donemax NTFS for Mac software can help you enable writable for NTFS drives on Mac. You don't need to format the NTFS hard drive and can use it as a local hard drive on Mac without any limitation.
Donemax NTFS for Mac
- Enable full read-write access to NTFS on macOS.
- Support macOS Tahoe 26 and latest Apple silicon Macs.
- Reliable and easy-to-use Microsoft NTFS drivers for Mac.
This NTFS for Mac driver is 100% safe software and allows you to quickly get the full read-write access to the NFTS hard drives on your Mac. Follow the steps below to enable full writable access to NTFS with the NTFS for Mac software:
Step 1. Download and install the NTFS for Mac tool on your Mac machine. Open Donemax NTFS for Mac from lanuchpad.
Step 2. Connect your NTFS hard drive to Mac and the software will detect it immediately. Select the NTFS hard drive.
Step 3. Click on Enable Writable button. Then the NTFS hard drive will be fully writable on Mac.

How to Unformat NTFS Hard Drive on Mac?
As mentioned above, the formatted data on the NTFS hard drive is not lost forever. With right Mac data recovery software, you or anyone else are able to recover lost data from the formatted NTFS hard drive.
If you have deleted critical documents or formatted an NTFS hard drive, Donemax Data Recovery for Mac can help you get the lost files back. This comprehensive data recovery tool is able to recover lost data from local SSD, external hard drive, USB flash drive, memory card, digital camera, etc. NTFS, EXFAT, FAT, APFS, HFS...are fully supported.
It uses deep scan technology to recover data from formatted NTFS hard drive on Mac. It means Donemax Data Recovery for Mac can scan the hard drive sector by sector and find every recoverable file.
In just three easy steps, you can unformat an NTFS hard drive to retrieve all of the previously stored data with the help of Donemax Data Recovery for Mac. Data on the disk is not completely removed while formatting a partition/disk.
Data that has been formatted remains on a disk until it is overwritten. At this point, it can no longer be recovered without the assistance of a specialist data recovery service. To prevent overwriting data, unmount the NTFS hard drive when you realize you've lost important data.
After installing Donemax Data Recovery for Mac, just mount the NTFS drive again, then start data recovery as soon as possible. Here are the simple steps:
Step 1. Open Donemax Data Recovery for Mac and select the formatted NTFS hard drive to start data recovery.

Step 2. Click on Scan button. It will deeply scan the formatted drive and find all recoverable files.

Step 3. After a deep scan, all recoverable data is displayed. After deciding which files to be restored, you can select them. Then click on Recover button to save them. Ensure to save the recovered data to another hard drive.

Suppose you have lost data on an NTFS drive that formatted by Windows, Disk Management, Mac Disk Utility, or another disk formatting program, you can recover it by following the instructions above.
FAQs About NTFS Hard Drive on Mac
Connect the NTFS hard drive on your Mac and open disk utility. Select the NTFS hard drive and click Erase. If you want to use it on both Windows and Mac, just select ExFAT as the file system and click on Erase button again.
In NTFS, you can choose from 14 distinct permissions. They decide what a user who can access a given file or folder can do with that access. To facilitate the process of assigning permissions, they have been categorized. All 14 permissions are made available to the user after basic full power is granted. If you require finer-grained control over who may access what data, you can do so by giving different people different permissions.
Yes, download and install NTFS for Mac software on your Mac, and then open it, select the NTFS hard drive, click Enable Writable. After this, you can write data to NTFS hard drive without any limitation.
This hard drive may gets damaged or crashed, click on First Aid in Disk Utility to repair it. Then check it again to see if it can mount on your Mac.
Stop using the NTFS hard drive after formatting, then follow the steps below to recover all lost files from it:
- Download and install Donemax Data Recovery for Mac, open it.
- Select the formatted NTFS hard drive.
- Click on Scan button.
- Preview and recover lost files.
- Donemax Data Recovery for Mac
- DiskDrill
- Wondershare Recoverit
- EaseUS Data Recovery Wizard
- Stellar Data Recovery
Conclusion:
NTFS drives are not writable by default on Mac. If you want to use the drives fully on Mac, the common method is to format the drives with the files systems compatible with macOS. For example, you can format the NTFS drives to APFS, HFS+, or exFAT formats.
Any data stored on an NTFS hard drive volume will be deleted after formatting. Regularly backing up data to an external USB storage, network drive, or the cloud can protect you against irretrievable data loss caused by accidental formatting and other mistakes.
If the backup is old or unavailable, utilize Donemax Data Recovery. Recovering data from a formatted NTFS hard drive is a breeze with the help of Donemax Data Recovery. The software can also restore information from damaged or erased hard drive partitions.
If you want to use the NTFS drive fully with read-write access on Mac, there is an ideal solution. You can add the Windows NTFS driver for Mac to accomplish the task. Donemax NTFS for Mac is such a NTFS driver for Mac which can enable writable permission for NTFS drives on Mac.
Donemax NTFS for Mac
An easy-to-use NTFS for Mac tool to help you enable writable for NTFS drives on Mac so that you can read-write NTFS drives on Mac without any limitation. It also can help you mount, format, repair, rename, open drive on your Mac.
Related Articles
- Jun 23, 2025What Is NTFS for Mac? How to Use NTFS for Mac?
- Jun 28, 20252025 Paragon NTFS for Mac Review and Better Alternative
- Jul 06, 2023External Hard Drive Not Mounting on Mac, How to Fix It?
- Nov 19, 2024How to Use NTFS Drive on macOS Catalina?
- Jan 17, 2025How to Delete Files from NTFS Drive on Mac?
- Jun 20, 2025How to Format an SD Card to NTFS on Mac?

Contributing Writer
Lucien
Lucien is a writer and a chief programmer of Donemax software who has worked in the company for 5+ years. He has written much of the content on the site and devotes to providing troubleshooting and solution for Windows and Mac users including disk cloning, data recovery, migration, eraser, error fixes.

Editor in chief
Gerhard Chou
In order to effectively solve the problems for our customers, every article and troubleshooting solution published on our website has been strictly tested and practiced. Our editors love researching and using computers and testing software, and are willing to help computer users with their problems