
Written byMariaUpdated on Sep 22, 2025
NTFS for Mac Not Working on macOS Tahoe: Causes, Fixes, and Alternatives
Approved byGerhard Chou
Before we start: If your NTFS for Mac tool is not working after upgrading to macOS Tahoe, you can try the alternative software Donemax NTFS for Mac. The software is fully compatible with macOS Tahoe and Apple Silicon Macs.
PAGE CONTENT:
Apple's macOS is known for its seamless ecosystem, security, and performance. However, when it comes to working with NTFS (New Technology File System) drives, Mac users often run into a frustrating limitation: macOS can read NTFS drives but cannot write to them by default. This limitation makes third-party NTFS for Mac software essential for those who need full read-and-write access to Windows-formatted storage devices.
With the release of macOS Tahoe, many users have reported that their NTFS for Mac software stopped functioning properly. Some applications fail to mount drives, others crash unexpectedly, and in many cases, NTFS drives are stuck in read-only mode. If you are facing these issues, you're not alone.
This article explains why NTFS for Mac not working on macOS Tahoe, explores possible causes, and provides step-by-step solutions. We'll also cover alternative methods for accessing NTFS drives and tips to prevent similar issues in the future.
Understanding the Problem with NTFS for Mac Not Working
Before diving into fixes, it's important to understand the root of the issue.
What NTFS for Mac Software Does?
Since macOS has no built-in NTFS write support, software like Donemax NTFS for Mac, Tuxera NTFS for Mac, and other software bridges the gap. These tools install drivers that enable seamless read-and-write operations on NTFS drives, making it possible to share data between Windows and Mac systems without reformatting.
Symptoms on macOS Tahoe
Users running NTFS for Mac on macOS Tahoe commonly report:
- NTFS drives mounting as read-only even with software installed.
- Drive not detected at all in Finder or Disk Utility.
- Software crashes after the latest macOS update.
- Error messages about incompatible drivers or missing extensions.
This indicates that macOS Tahoe introduced system-level changes affecting third-party NTFS drivers.
Possible Causes
Several factors can cause NTFS for Mac to malfunction on macOS Tahoe:
- Compatibility Issues – Apple frequently updates macOS with new frameworks and kernel security restrictions. If NTFS software isn't updated, compatibility breaks.
- Outdated NTFS Driver – Running an old version of NTFS for Mac software can lead to conflicts with Tahoe.
- System Integrity Protection (SIP) – macOS SIP restricts low-level system modifications, which some NTFS tools rely on.
- File System Conflicts – macOS uses APFS as its default file system. Interactions between APFS and NTFS drivers may cause instability.
- Third-Party Software Conflicts – Disk management tools, encryption apps, or antivirus software may block NTFS drivers.
Before applying fixes, run these simple checks to ensure the issue isn't with the drive itself. You can test the NTFS drive on Windows. If it works fine, the issue is with macOS or the NTFS driver.
Fixes for NTFS for Mac Not Working on macOS Tahoe
1. Update or Reinstall NTFS for Mac Software
- Visit the developer's site (e.g., Donemax, Tuxera, etc.) and download the latest version compatible with macOS Tahoe.
- Uninstall the old version completely before reinstalling.
- Restart your Mac and reconnect the NTFS drive.
Many developers release patches soon after Apple updates macOS, so this is often the simplest fix.
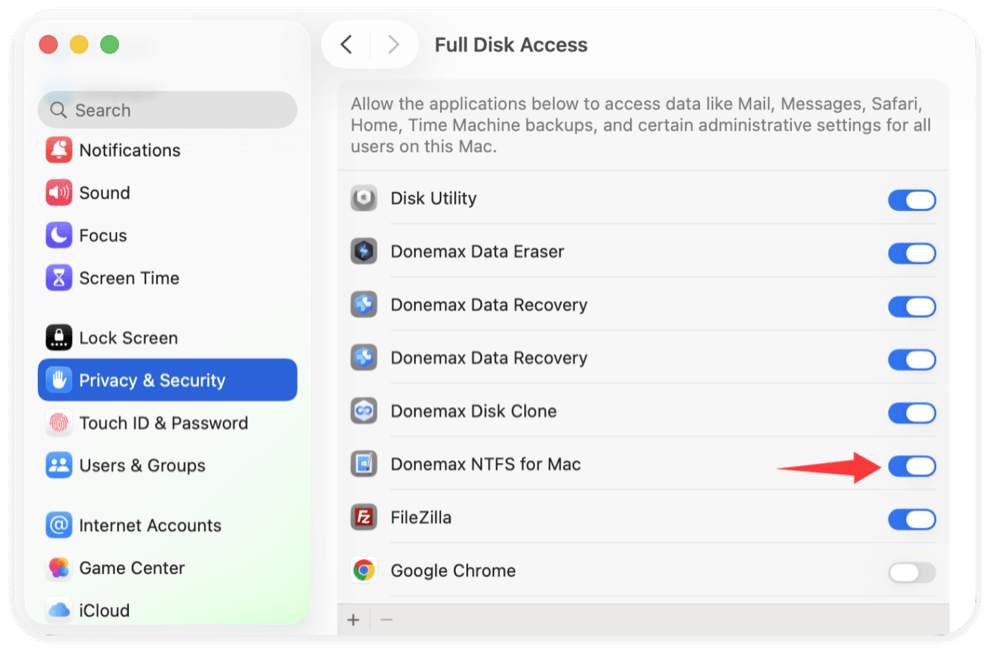
2. Grant Full Disk Access and Security Permissions
macOS Tahoe enforces stricter privacy settings that can block third-party software. To fix this:
- Go to System Settings → Privacy & Security → Full Disk Access.
- Add your NTFS software to the list.
- Allow kernel extensions when prompted in Security settings.
- Restart your Mac.
This step often resolves the issue without further intervention.
3. Disable System Integrity Protection (SIP) – With Caution
Some NTFS for Mac tools require modifications that SIP blocks. If updates don't work, you may temporarily disable SIP:
- Restart your Mac in Recovery Mode.
- Open Utilities → Terminal.
- Type:
csrutil disable
- Restart your Mac and test the NTFS drive.
Important: SIP is a core macOS security feature. Always re-enable it after troubleshooting using:
csrutil enable
4. Use Terminal Commands (Manual Mount Options)
If your NTFS for Mac software fails completely on macOS Tahoe, you can still gain limited write access to NTFS drives using built-in macOS tools and Terminal commands. This method is more technical and less convenient than third-party software, but it can be a lifesaver when you need urgent file access.
Step 1: Identify Your NTFS Drive
Every connected storage device on macOS is assigned a unique identifier. To find it:
- Open Terminal from Utilities via Applications.
- Enter the following command:
diskutil list
- Review the output. Look for a line like:
/dev/disk2s1 Microsoft Basic Data NTFS
In this example, disk2s1 is the NTFS partition identifier.
Step 2: Unmount the Drive
Before remounting with write access, you must unmount the drive:
sudo umount /dev/disk2s1
(Replace disk2s1 with your identifier.)
If the unmount command fails, make sure no files or apps are currently accessing the drive.
Step 3: Mount with Write Support
Now, mount the drive in read/write mode:
sudo mkdir /Volumes/NTFS
sudo mount -t ntfs -o rw,auto,nobrowse /dev/disk2s1 /Volumes/NTFS
- mkdir creates a new mount point named NTFS.
- mount -t ntfs tells macOS to mount the drive as NTFS.
- The rw option enables read/write mode.
- nobrowse hides the drive from Finder by default, but you can still access it.
Step 4: Access the Drive
Since Finder may not display the drive, open it manually:
- In Finder, press Command + Shift + G.
- Enter:
/Volumes/NTFS
- The NTFS drive will now open with full access.
Step 5: Make Access Easier (Optional)
If you need repeated access, create a symbolic link:
ln -s /Volumes/NTFS ~/Desktop/NTFS-Drive
This adds a shortcut to your desktop for quicker access.
Limitations of This Method
- Stability: macOS's built-in NTFS write support is unofficial and may be unstable.
- Performance: Speeds are slower compared to third-party NTFS drivers.
- Risk of Data Corruption: Apple doesn't officially support this, so unexpected errors may occur. Always back up important data before writing to NTFS drives this way.
Check for Conflicting Software
- Uninstall third-party disk management tools (e.g., DMcleaner for Mac, DaisyDisk, Drive Genius) that may interfere.
- Disable antivirus temporarily.
- Restart your Mac and reconnect the NTFS drive.
Conflicting background processes often prevent drivers from loading correctly.
5. Use Alternative Solutions
If your NTFS for Mac tool still doesn't work on macOS Tahoe, consider these alternatives:
1. Try a Different NTFS Software
First, you can use another software, such as – Known for speed, stability, lightweight and user-friendly. It can work well with the new macOS Tahoe system and is fully compatible with new Apple Silicon Macs.
The software is simple to use without installing the additional system extension. You don't need to change the system security settings in Recovery mode. Just one click, you can make NTFS drive writable on Mac. Here is how:
Step 1. Download and install Donemax NTFS for Mac on your computer. Connect the NTFS drive to the Mac and run the software.
Step 2. Check and select the NTFS drive in the software, then click Enable Writable button. The NTFS drive will become writable without limitations.

2. Use Open-Source Tools (macFUSE + NTFS-3G)
For advanced users, installing macFUSE with NTFS-3G provides free NTFS write support. While performance may not match premium tools, it's a stable workaround.
3. Reformat to exFAT
If you don't specifically need NTFS, consider reformatting your drive to exFAT, which works seamlessly on both Windows and macOS without third-party software.
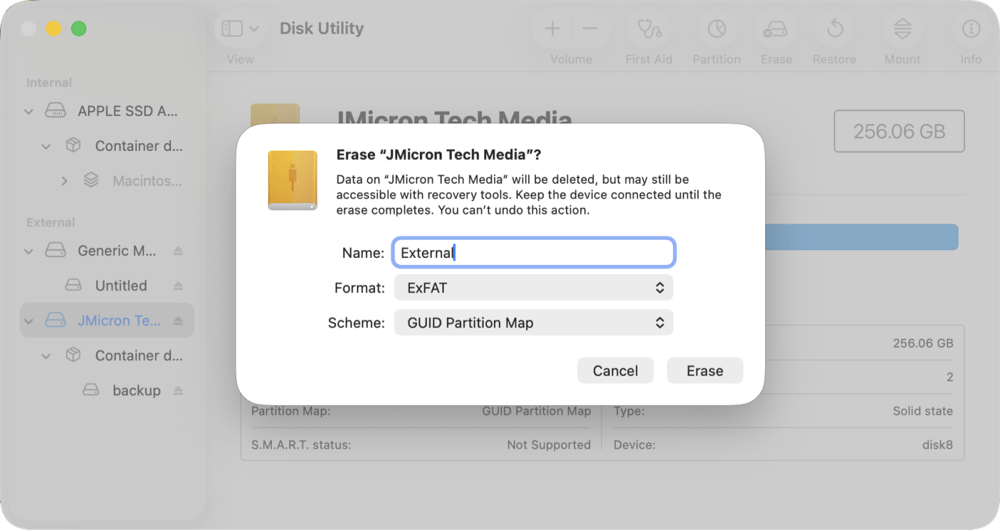
⚠️ Warning: Reformatting erases data. Backup before proceeding.
Preventing Future NTFS for Mac Software Issues
To avoid running into similar problems after future macOS updates:
- Keep NTFS software updated – Enable auto-updates if possible.
- Backup before upgrading macOS – Store important files elsewhere before moving to a new version.
- Check compatibility before updating – Visit the NTFS software developer's site to confirm support for the new macOS.
- Avoid conflicting utilities – Limit the number of third-party disk tools installed.
By taking these precautions, you can minimize disruption when Apple releases new versions of macOS.
Conclusion
The release of macOS Tahoe introduced changes that caused many NTFS for Mac applications to stop working correctly. Users often encounter issues such as read-only access, crashes, or unrecognized drives.
In most cases, the solution is straightforward: update or reinstall your NTFS for Mac software, grant security permissions, or disable SIP if necessary. For advanced users, manual mounting via Terminal or open-source tools like NTFS-3G also works.
If your NTFS tool remains incompatible, consider alternatives like Donemax, Tuxera, or switching to exFAT for cross-platform compatibility.
Ultimately, the key is to keep your NTFS software up to date and always prepare before upgrading macOS. With the right steps, you can restore full access to NTFS drives on macOS Tahoe and continue transferring files between Windows and Mac without interruption.
Related Articles
- Sep 23, 2025Top 10 NTFS for Mac Software Review & Download [macOS Tahoe, M1/M2/M3/M4 Supported]
- Jun 23, 2025What Is NTFS for Mac? How to Use NTFS for Mac?
- Apr 10, 2024Mac Won't Copy or Save Files to Seagate External Hard Drive
- Nov 20, 2024Fix NTFS Drive is Read-Only on macOS Big Sur
- Dec 12, 2024Using NTFS Drives on macOS High Sierra: Methods for Read-Write Access
- Jun 11, 2025Best 5 Paragon NTFS for Mac Alternatives: Why Choose Them?

Contributing Writer
Maria
Maria is one of the senior writers & editors of Donemax who lives and works in Sydney, Australia. She loves PC, Mac and Internet Technology. She has 6 years of writing articles about data recovery on PC/Mac, disk cloning solution, data eraser and computer OS optimization, etc. She is also interested in testing various software and digital products.

Editor in chief
Gerhard Chou
In order to effectively solve the problems for our customers, every article and troubleshooting solution published on our website has been strictly tested and practiced. Our editors love researching and using computers and testing software, and are willing to help computer users with their problems