
Written byStevenUpdated on Sep 19, 2025
Read and Write to NTFS Drives on macOS Tahoe
Approved byGerhard Chou
Before we start: With the reliable and professional software Donemax NTFS for Mac, you can fully enable NTFS read and write access on macOS Tahoe. It's easiest NTFS driver for macOS and you don't need to add additional system extension.
PAGE CONTENT:
If you have recently upgraded to macOS Tahoe, you may have noticed a frustrating limitation: your Mac can detect and read files from NTFS drives, but it will not let you modify, delete, or write new data to them. NTFS, or New Technology File System, is the default file system for Windows operating systems, making it one of the most common formats for external drives and USB sticks.
This poses a challenge for Mac users who frequently exchange data between Windows and macOS. Imagine plugging in your external hard drive filled with work documents, only to find you cannot edit or save anything on it. The reason is that Apple has long restricted write access to NTFS, offering only read-only support by default.

The good news is that there are reliable solutions to enable full NTFS read and write access on macOS Tahoe. This article will walk you through these methods, from third-party NTFS drivers to experimental Terminal commands and alternative file system formats. By the end, you'll know the safest and most efficient way to manage NTFS drives on your Mac.
Understanding NTFS Compatibility on macOS Tahoe
Apple's decision not to include write support for NTFS is both technical and strategic. NTFS is a proprietary file system developed by Microsoft, and while macOS has long offered compatibility for reading, enabling native writing would require licensing and long-term maintenance. Instead, Apple promotes its own file system, APFS (Apple File System), for Macs, and exFAT for drives that need cross-platform compatibility.
Here are the basics:
- NTFS (Windows default): Great for large files and advanced permissions, but macOS only supports reading.
- exFAT: Supported by both Windows and macOS with full read/write access, ideal for flash drives and external disks.
- APFS: Optimized for Macs but not supported by Windows without third-party drivers.
If you primarily use Windows, NTFS is unavoidable. However, if your workflow involves both Mac and Windows, you need a method to overcome the read-only limitation on macOS Tahoe.
Methods to Enable Read and Write to NTFS Drives on macOS Tahoe
Method 1. Use Third-Party NTFS Software (Recommended)
The simplest and most reliable way to enable full NTFS read/write support on macOS Tahoe is by using third-party NTFS for Mac driver. These programs work in the background to extend macOS's limited NTFS support, allowing you to edit, copy, delete, and move files just as you would on a native Mac drive.
Unlike Apple's experimental method, third-party tools are built for stability and speed, making them the go-to option for professionals, students, and everyday users who need seamless cross-platform file sharing.
Popular NTFS for Mac Tools in 2025
Top 1: Donemax NTFS for Mac
- Best for: Users who want speed and stability.
- Features:
- Full read/write support.
- Native integration into Finder.
- High performance for large file transfers.
- Automatic mounting.
- Pros: Fast, reliable, user-friendly.
- Cons: Paid, but worth it for frequent users.
Top 2: Tuxera NTFS for Mac
- Best for: Advanced users who need more control.
- Features:
- Full NTFS compatibility.
- Advanced caching for faster performance.
- Built-in disk management tools (check and repair drives).
- Pros: Extra features for power users.
- Cons: Slightly more technical.
Top 3: Mounty for NTFS (Free Option)
- Best for: Users who only occasionally need NTFS write support.
- Features:
- Basic read/write support.
- Lightweight app with minimal interface.
- Pros: No cost.
- Cons: Limited stability, slower performance, higher risk of file corruption.
Step-by-step guide (using Donemaxas an example):
- Download and install Donemax NTFS for Mac.
- Install the software on your Mac.
- Plug in your NTFS drive.
- Run the software and select the NTFS drive, click Enable Writable button.
- Copy, move, edit, and delete files as you would on any other drive.

Most premium NTFS drivers come with free trials, so you can test them before committing.
Pros
- Stable and safe.
- Fast performance.
- Seamless integration into Finder.
Cons
- Paid software.
Method 2. Enable Apple's Experimental NTFS Write Support (Not Recommended for Daily Use)
macOS includes an experimental NTFS write feature hidden in its system, but it is disabled by default. This feature can be enabled via Terminal, but Apple warns that it may cause data corruption and is not reliable for everyday use.
Steps to enable experimental NTFS write support:
- Open Terminal.
- Type the following command to identify your NTFS drive:
diskutil list
- Find your NTFS partition name (e.g., /dev/disk2s1).
- Create a mount point:
sudo mkdir /Volumes/NTFS
- Manually mount the NTFS drive with write permissions:
sudo mount -t ntfs -o rw,auto,nobrowse /dev/disk2s1 /Volumes/NTFS
- Access the drive through Finder and check if it's writable.
💡 Warning: This method is unstable. Files may become unreadable, and corruption is possible if the drive is not ejected properly. Use it only if you need a temporary and free solution.
Method 3. Reformat Drive to exFAT or APFS (Alternative Solution)
If you do not require NTFS specifically, reformatting your drive to exFAT or APFS might be a better long-term solution.
Why exFAT?
- Works seamlessly on both Windows and macOS.
- Supports large files (over 4 GB), unlike FAT32.
- Ideal for external hard drives and USB sticks.
Why APFS?
- Optimized for macOS performance.
- Supports encryption, snapshots, and faster file operations.
- Best choice if you only use the drive with Macs.
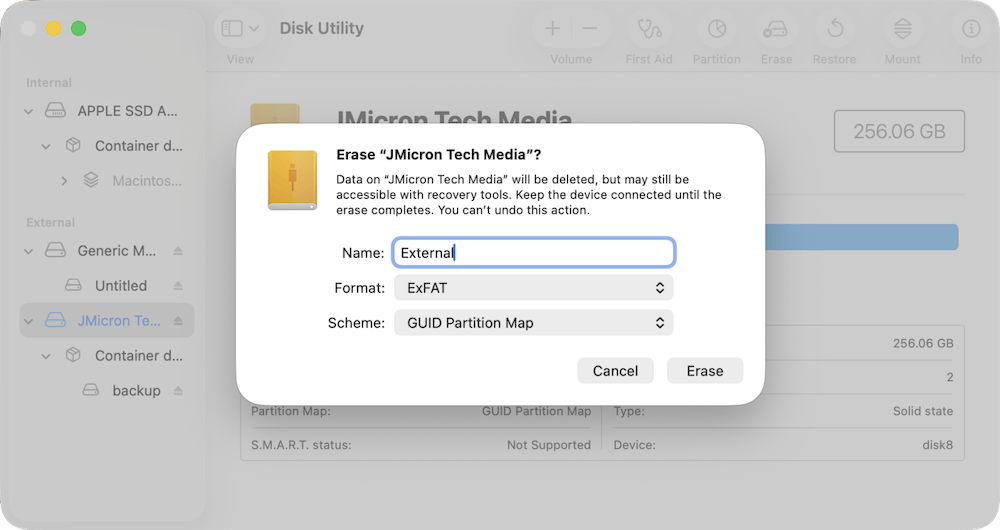
Steps to reformat a drive to exFAT:
- Back up all data on your NTFS drive.
- Open Disk Utility on your Mac.
- Select your NTFS drive and click Erase.
- Choose exFAT (or APFS if using only on Mac).
- Click Erase to reformat.
Pros
- No third-party tools needed.
- Stable and safe.
Cons
- Erases all existing data (backup required).
- Not an option if you must keep NTFS.
Troubleshooting NTFS on macOS Tahoe
Even with third-party software, issues can arise. Here are common problems and fixes:
- Drive not showing up: Check if the NTFS driver is installed and enabled. Run diskutil list in Terminal to see if macOS detects the drive.
- Drive is read-only after installing software: Reboot your Mac and reinstall the driver. Some drivers require system extension approval.
- File transfer errors: Ensure the NTFS driver is updated for macOS Tahoe compatibility.
- Slow performance: Use premium tools like Donemax or Tuxera instead of free options.
Best Practices for Using NTFS Drives on Mac
To avoid data loss or corruption, follow these best practices:
- Always eject safely – Never unplug your drive without ejecting it first.
- Update your NTFS software – Ensure compatibility with the latest macOS updates.
- Avoid mixing solutions – Do not use Apple's experimental NTFS support with third-party drivers simultaneously.
- Use exFAT when possible – If you regularly switch between Windows and Mac, exFAT is safer and universally supported.
Conclusion
By default, macOS Tahoe allows you to read NTFS drives but not write to them. Fortunately, with the help of third-party NTFS drivers, you can unlock full read and write access safely and seamlessly. While experimental Terminal methods exist, they are unreliable and risky for long-term use.
If NTFS compatibility is not essential, reformatting to exFAT or APFS may provide a more stable, cross-platform experience. Ultimately, the right method depends on your workflow:
- For safety and convenience – Use Donemax or Tuxera NTFS.
- For temporary free access – Use Apple's hidden NTFS write support (with caution).
- For cross-platform flexibility – Choose exFAT.
With these solutions, you can confidently manage NTFS drives on macOS Tahoe without limitations.
FAQs about NTFS for macOS Tahoe
No, macOS Tahoe only supports read-only NTFS access. Write support requires third-party software or experimental Terminal commands.
Yes, if you need cross-platform compatibility, exFAT is better because it supports full read/write access on both macOS and Windows.
Apple's built-in NTFS write support is experimental and unsafe for daily use. Free third-party tools may work but often lack stability.
Donemax NTFS for Mac and Tuxera NTFS for Mac remain the most reliable and widely used tools for macOS Tahoe users.
Related Articles
- Dec 23, 2024Best 5 Toshiba NTFS Driver for Mac
- Mar 12, 2025Fix Seagate Backup Plus Read-Only on Mac [4 Solutions]
- Sep 26, 2024Why Can't Format My External Hard Drive to NTFS on Mac? How to Fix It?
- Aug 15, 2023How to Use Seagate External Hard Drive on Mac without Formatting?
- Jan 06, 2025Top 6 NTFS software for mac
- Jun 23, 2025Can macOS Read NTFS Drive?

Contributing Writer
Steven
Steven has been a senior writer & editor of Donemax software since 2020. He's a super nerd and can't imagine the life without a computer. Over 6 years of experience of writing technical solutions and software tesing, he is passionate about providing solutions and tips for Windows and Mac users.

Editor in chief
Gerhard Chou
In order to effectively solve the problems for our customers, every article and troubleshooting solution published on our website has been strictly tested and practiced. Our editors love researching and using computers and testing software, and are willing to help computer users with their problems