Written byChristinaUpdated on Nov 03, 2026

Before we start: To record online Zoom/Teams meetings, interview or other things on Mac, a reliable Mac recorder software can help you capture the best image and audio. Donemax Recorder is such a tool that can help you record screen effectively on Mac.
PAGE CONTENT:
Zoom has become an indispensable tool for remote work, online education, team collaboration, and virtual events. Whether you are attending an important business conference, a university lecture, an online workshop, or an interview, saving a video recording for later review is often essential.
However, many Mac users run into a common roadblock when trying to record Zoom meeting with audio on Mac. macOS features strict, built-in security and privacy permissions designed to prevent unauthorized system audio capturing. macOS requires explicit system audio permissions or Virtual Audio Driver setup to capture internal computer sounds alongside your microphone.
Additionally, Zoom's native recording feature imposes strict restrictions: if you are a meeting participant rather than the host, you cannot record the meeting unless the host explicitly grants you permission. In this guide, we will cover everything you need to know about how to record Zoom meeting with audio on Mac seamlessly—with or without host permission.
Depending on your role in the meeting and the tools available to you, there are three main methods to capture a Zoom call on macOS:
Let's break down each method step-by-step so you can choose the best option for your workflow.
If you are hosting the Zoom meeting, or if your host has enabled recording permissions for participants, Zoom's native recording feature is a quick and straightforward option.
How to Record as a Host or Permitted Participant
Follow these simple steps to start local recording inside the Zoom app:
Step 1: Start or join your Zoom call as usual.
Step 2: Look at the bottom toolbar in the Zoom window and click the 'Record' icon.
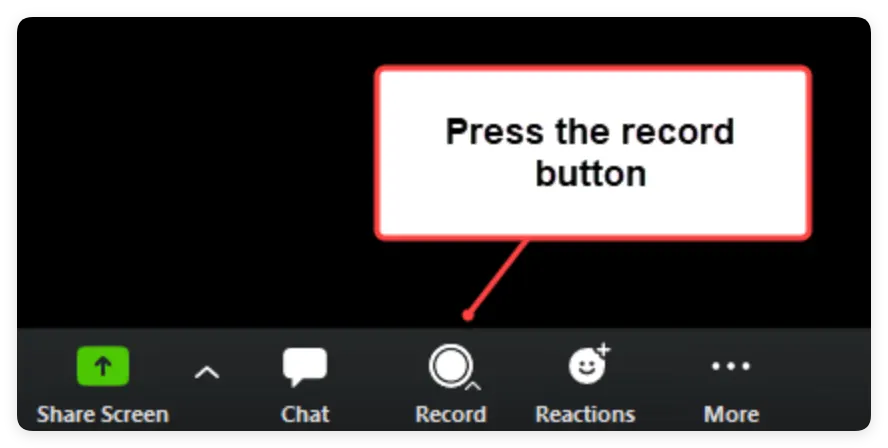
Step 3: If prompted, choose 'Record on this Computer' (or 'Record to the Cloud' if you have a paid Zoom account).
Step 4: A small 'Recording...' indicator will appear in the top-left corner of the Zoom window.
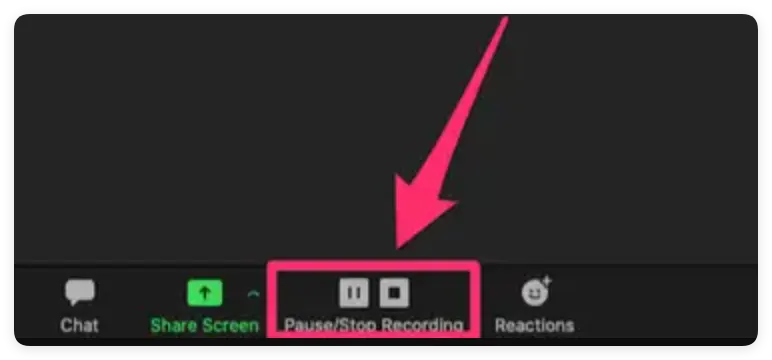
Step 5: When the meeting finishes, click the 'Stop Recording' button. Zoom will convert the recording into an MP4 video file automatically once the meeting ends.
Limitations of Native Zoom Recording
While built-in recording is convenient, it has severe limitations that make it impractical for many users:
If you don't have host permission, you can turn to macOS built-in screen capture tools like the Screenshot Toolbar (Command + Shift + 5).
While macOS native utilities can record your screen and microphone voiceover out of the box, they cannot record internal system audio (the voices of other Zoom participants coming through your speakers) by default.
To overcome this, you must install a free open-source virtual audio routing driver (such as BlackHole or Soundflower) and configure a Multi-Output Device in Audio MIDI Setup. Here is a brief overview of how to configure it:
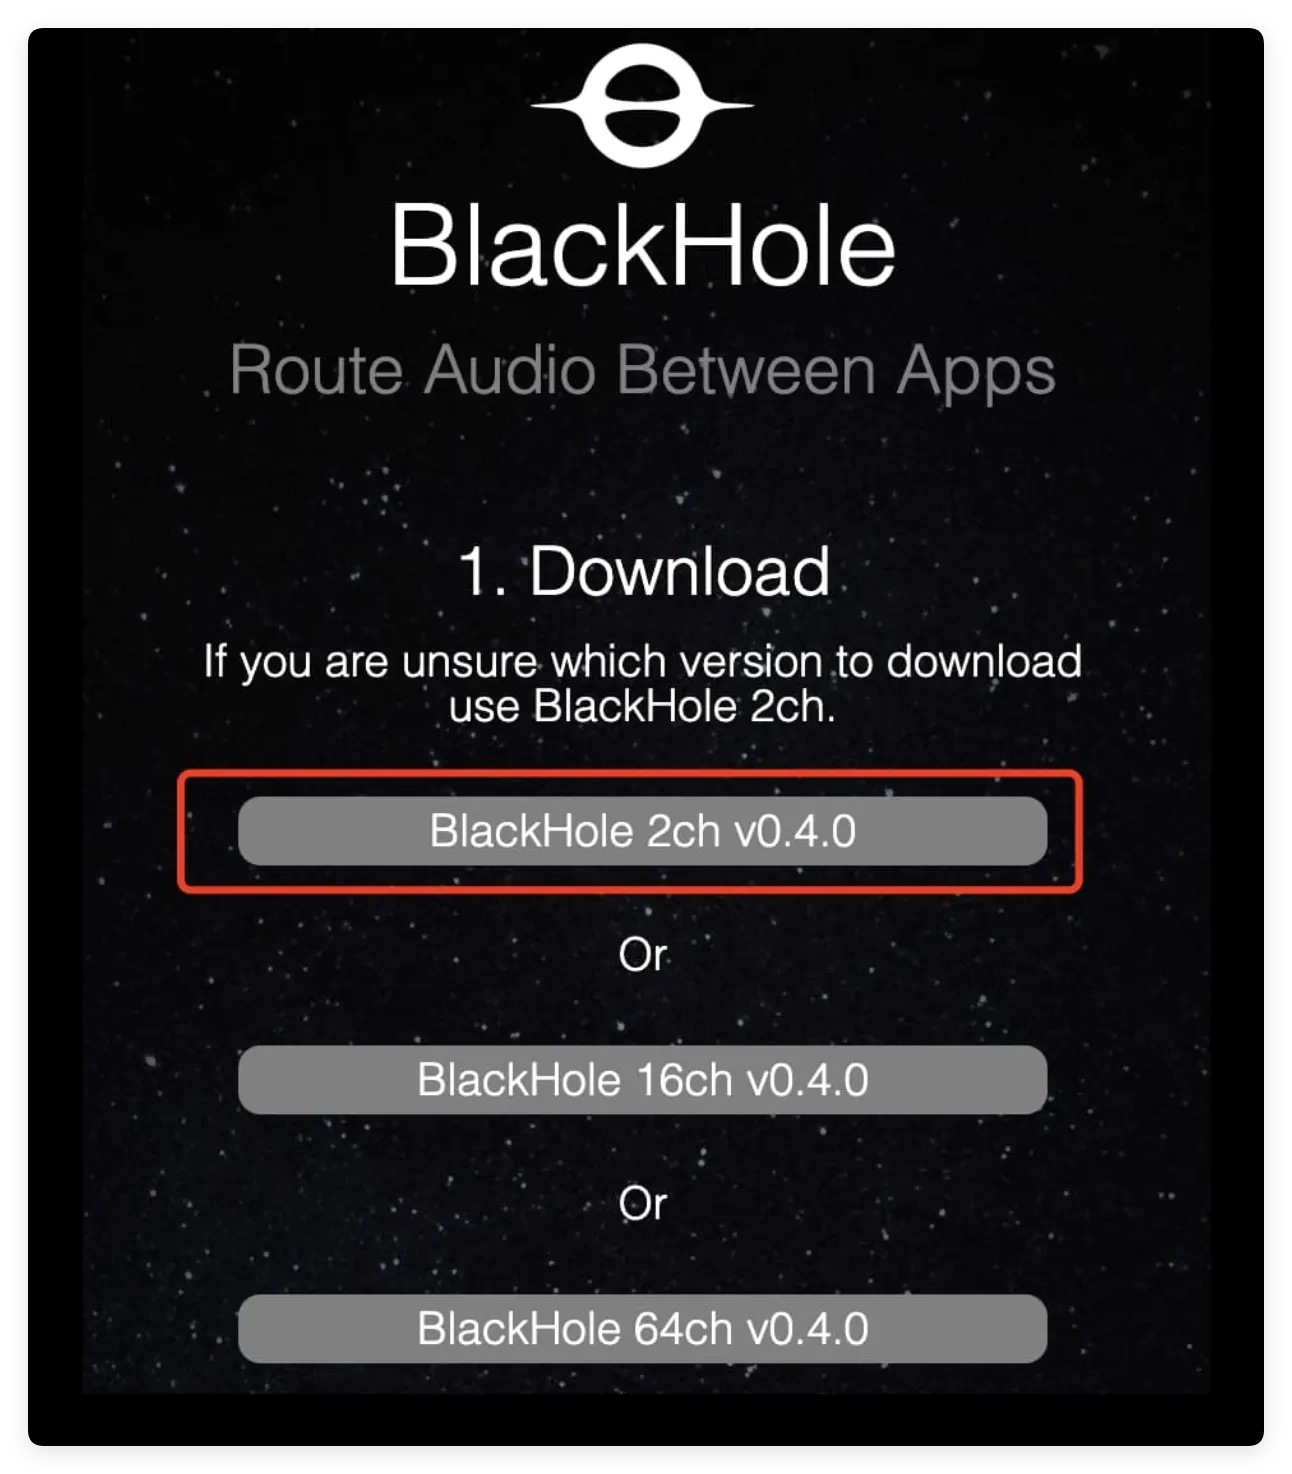
Step 1: Install Virtual Audio Driver. Download and install an open-source virtual audio driver like BlackHole 2ch on your Mac.
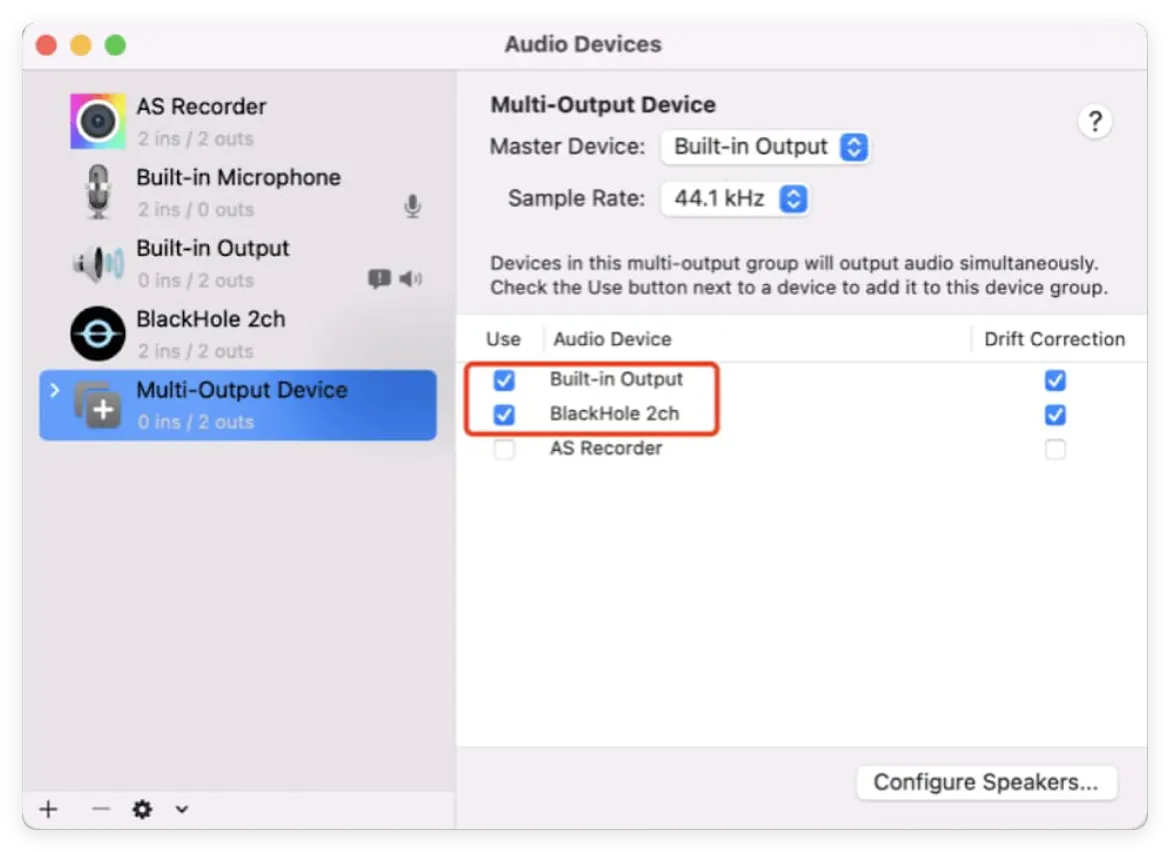
Step 2: Create Multi-Output Device. Open Applications > Utilities > Audio MIDI Setup. Click the '+' button at the bottom left and choose 'Create Multi-Output Device'. Check both your Mac Built-in Output (or headphones) and BlackHole.
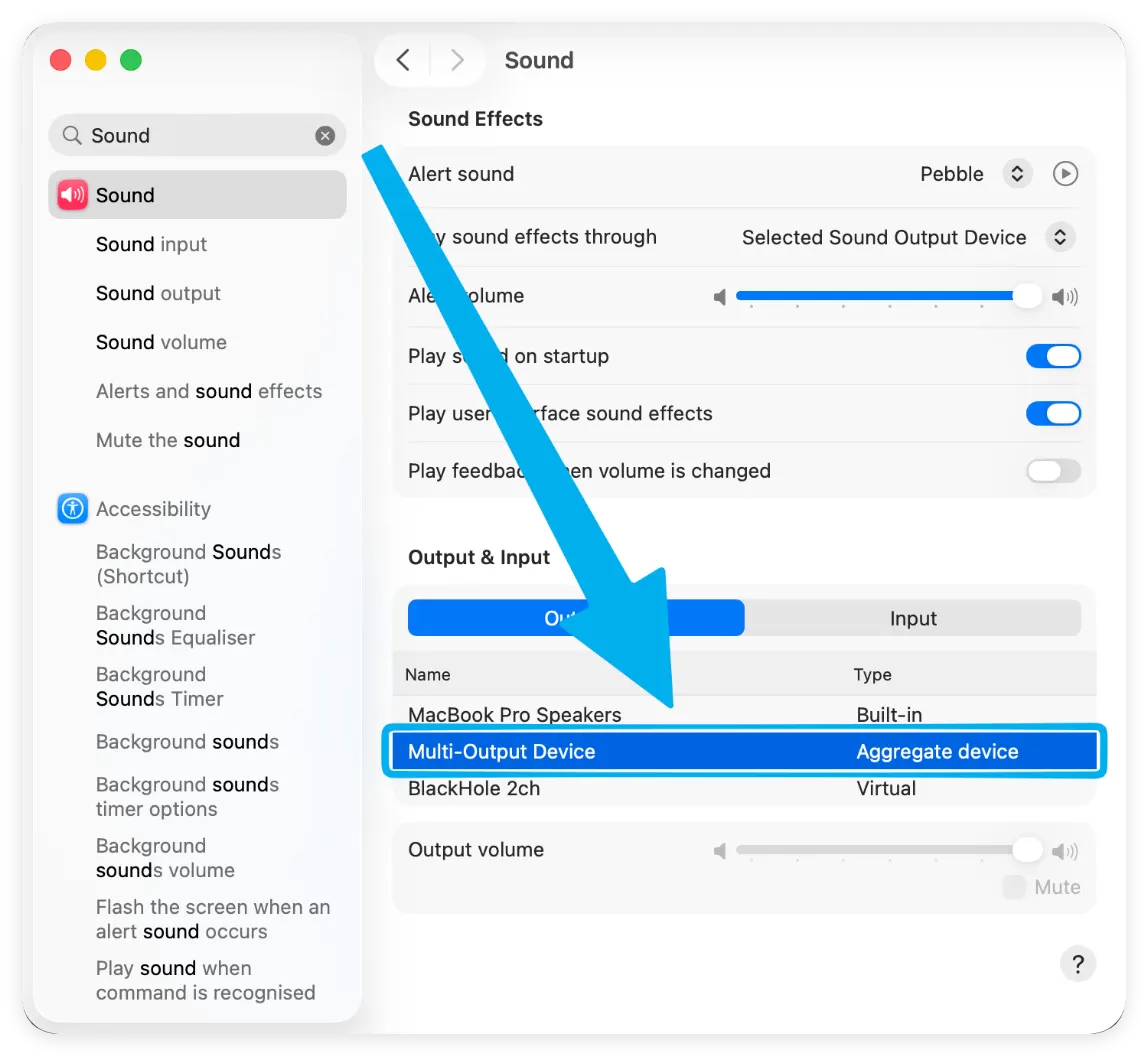
Step 3: Adjust System Audio Output. Go to System Settings > Sound > Output and select your newly created Multi-Output Device.
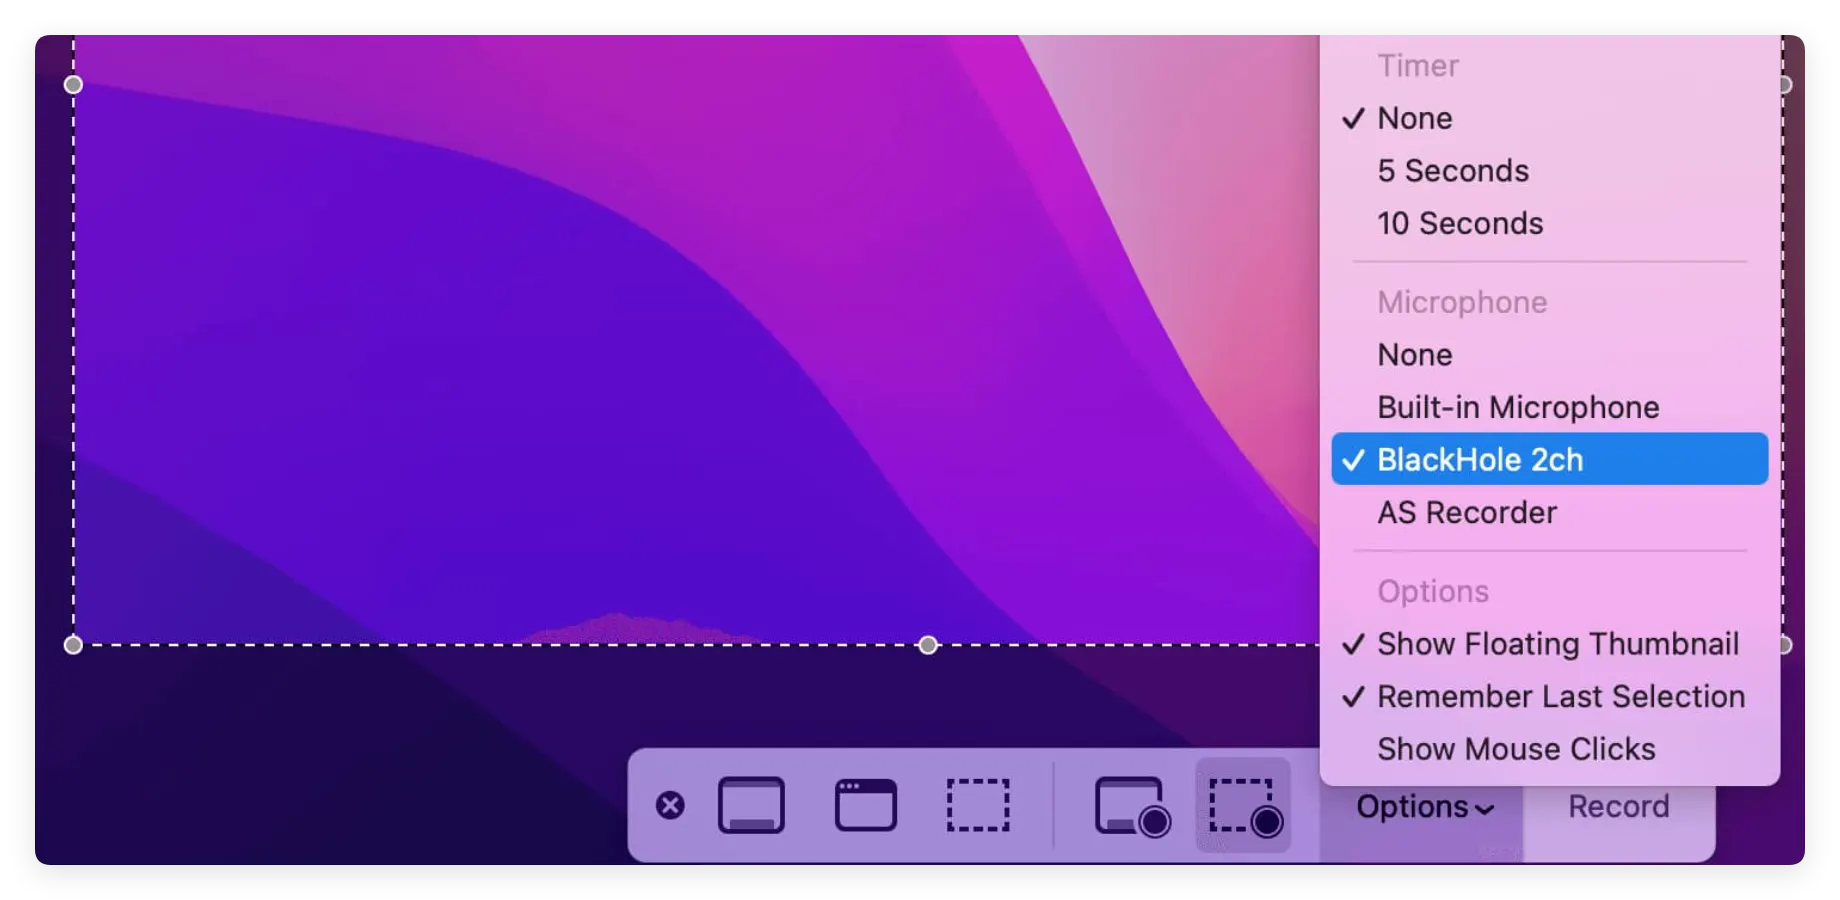
Step 4: Record via Screenshot Toolbar. Press Command + Shift + 5 to launch the Screenshot Toolbar. Click 'Options' and select BlackHole as your microphone input.
Why This Method Is Complicated for Casual Users
Configuring virtual audio drivers requires technical patience. If you disconnect your headphones or switch audio devices during a meeting, the sound output can break, causing your Mac speakers to go silent or leaving your recorded video without sound.
If you want a hassle-free way to record Zoom meeting with audio on Mac without asking host permission or configuring complex audio drivers, Donemax Recorder for Mac is the ultimate tool.
Designed specifically for macOS (including macOS Golden Gate, Tahoe, Sequoia, Sonoma, Ventura, and earlier), Donemax Recorder for Mac features built-in system audio driver integration. It captures crystal-clear 4K video, internal speaker sound, and your microphone input simultaneously in a single click.
Key Advantages of Donemax Recorder for Mac
Step-by-Step Guide: Record Zoom Meeting with Audio Using Donemax Recorder
Recording a Zoom call with complete audio on your Mac using Donemax Recorder takes less than two minutes to set up. Here is how to do it:
Step 1: Download Donemax Recorder for Mac. Open the installer package and drag the software into your Applications folder. Grant screen recording and audio accessibility permissions when prompted by macOS.
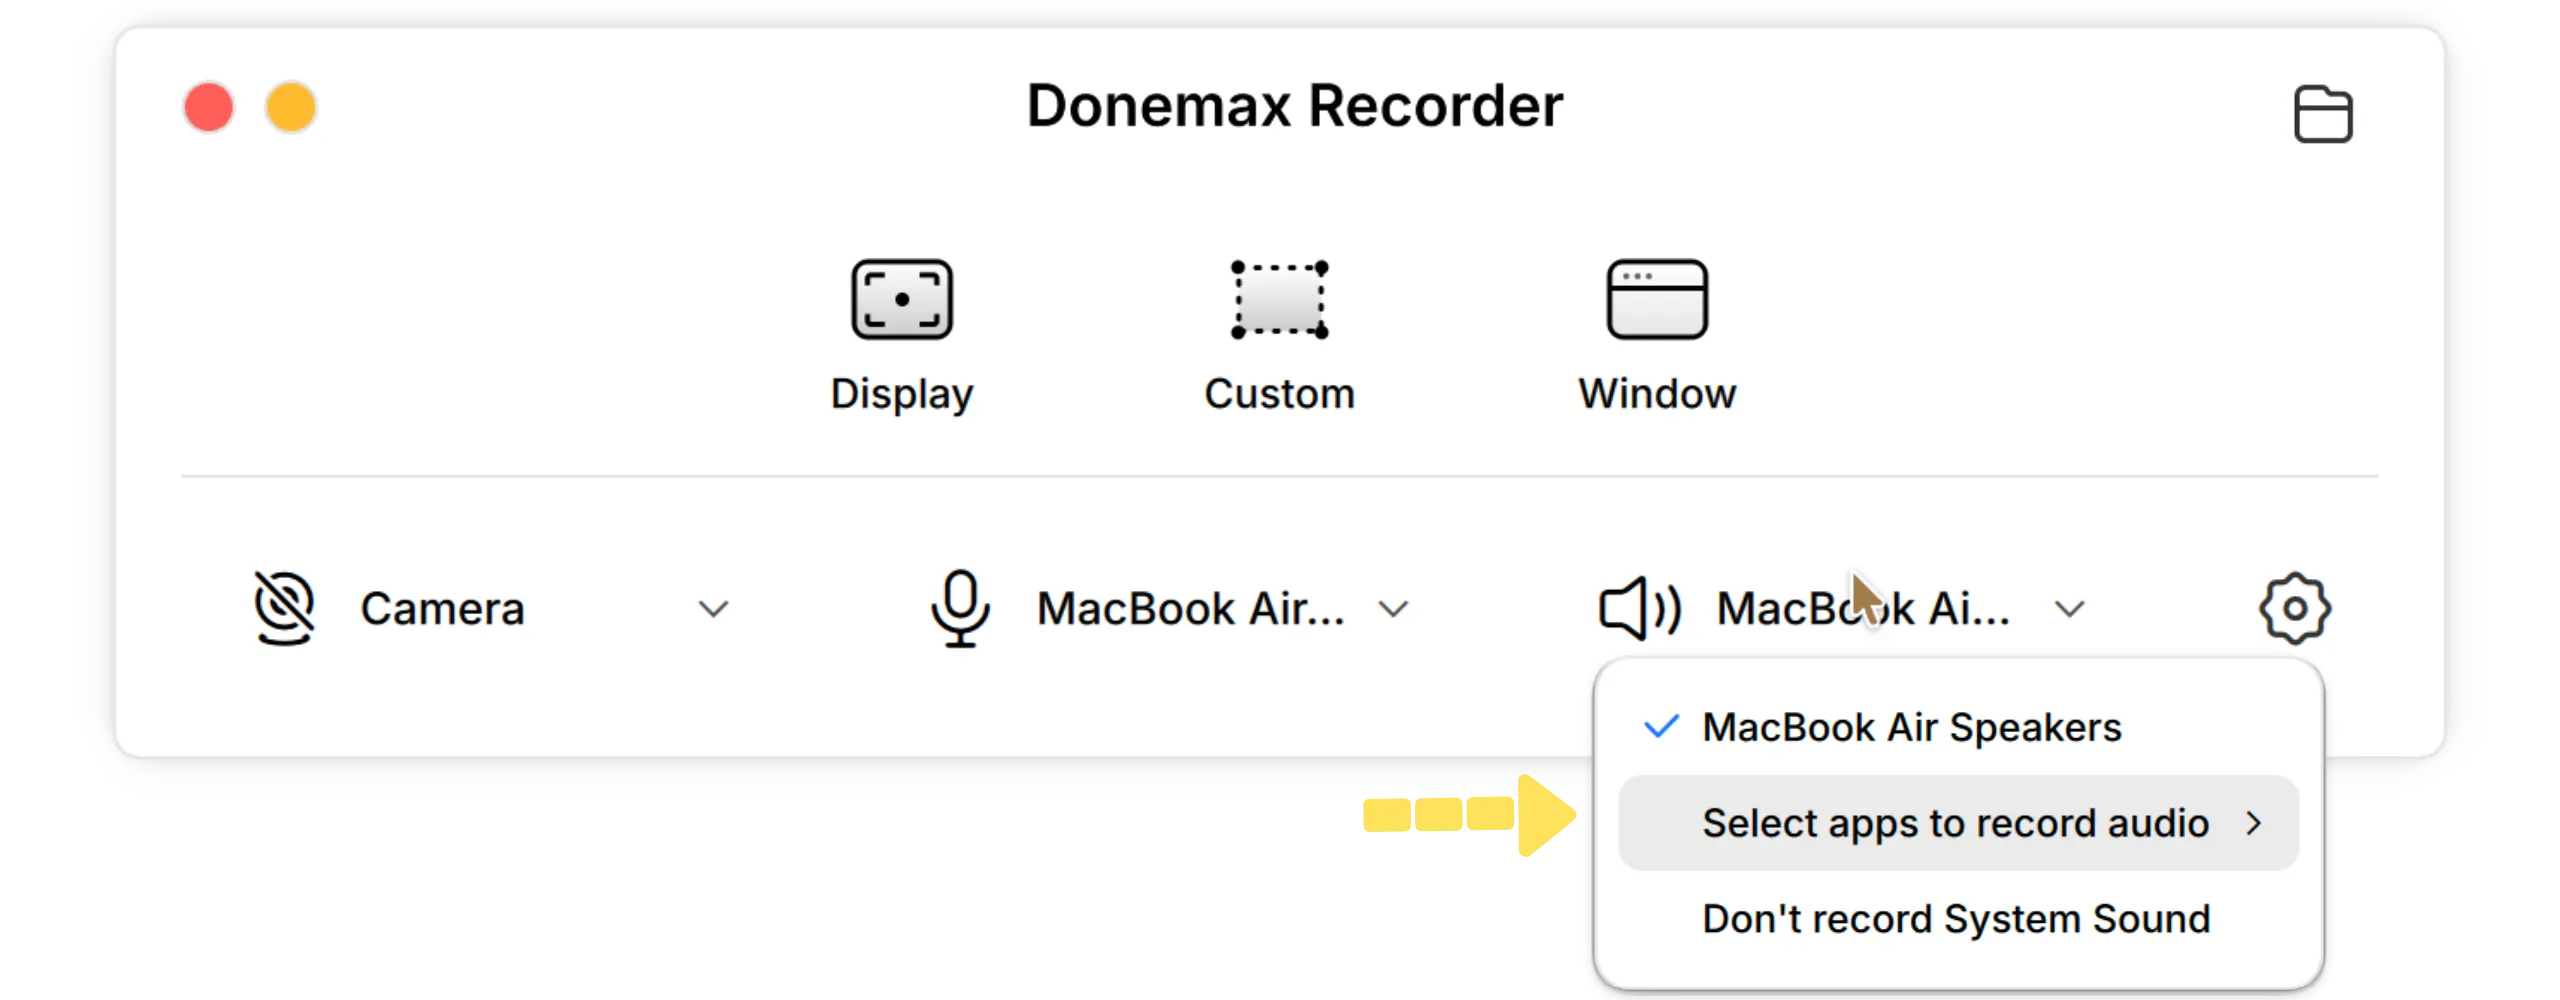
Step 2: Launch Donemax Recorder for Mac. Click the audio icon and you can select the Zoom to record the audio. Ensure 'Don't record System Sound' is NOT checked to record the voices of Zoom meeting participants. If you also want to record your own voice during the call, ensure 'Microphone' is selected. You can adjust the volume sliders for both sound sources independently. You can choose to record the 'Full Screen' or click 'Custom Region' to frame the active Zoom window.
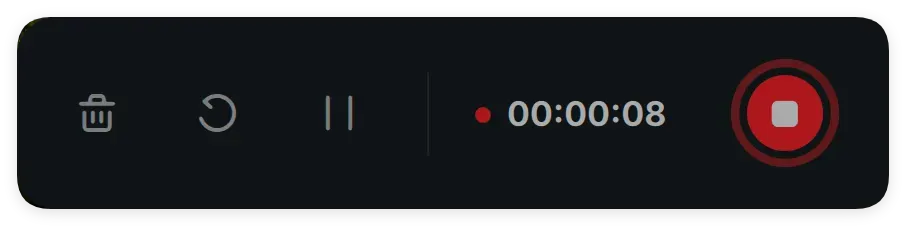
Step 3: Join your Zoom meeting. Click the red 'Start Recording' button on Donemax Recorder. A 3-second countdown will appear, and recording will begin. A floating control bar will minimize cleanly so it doesn't obstruct your view. When the Zoom meeting ends, click the 'Stop' button on the floating control toolbar or use your hotkey shortcut.
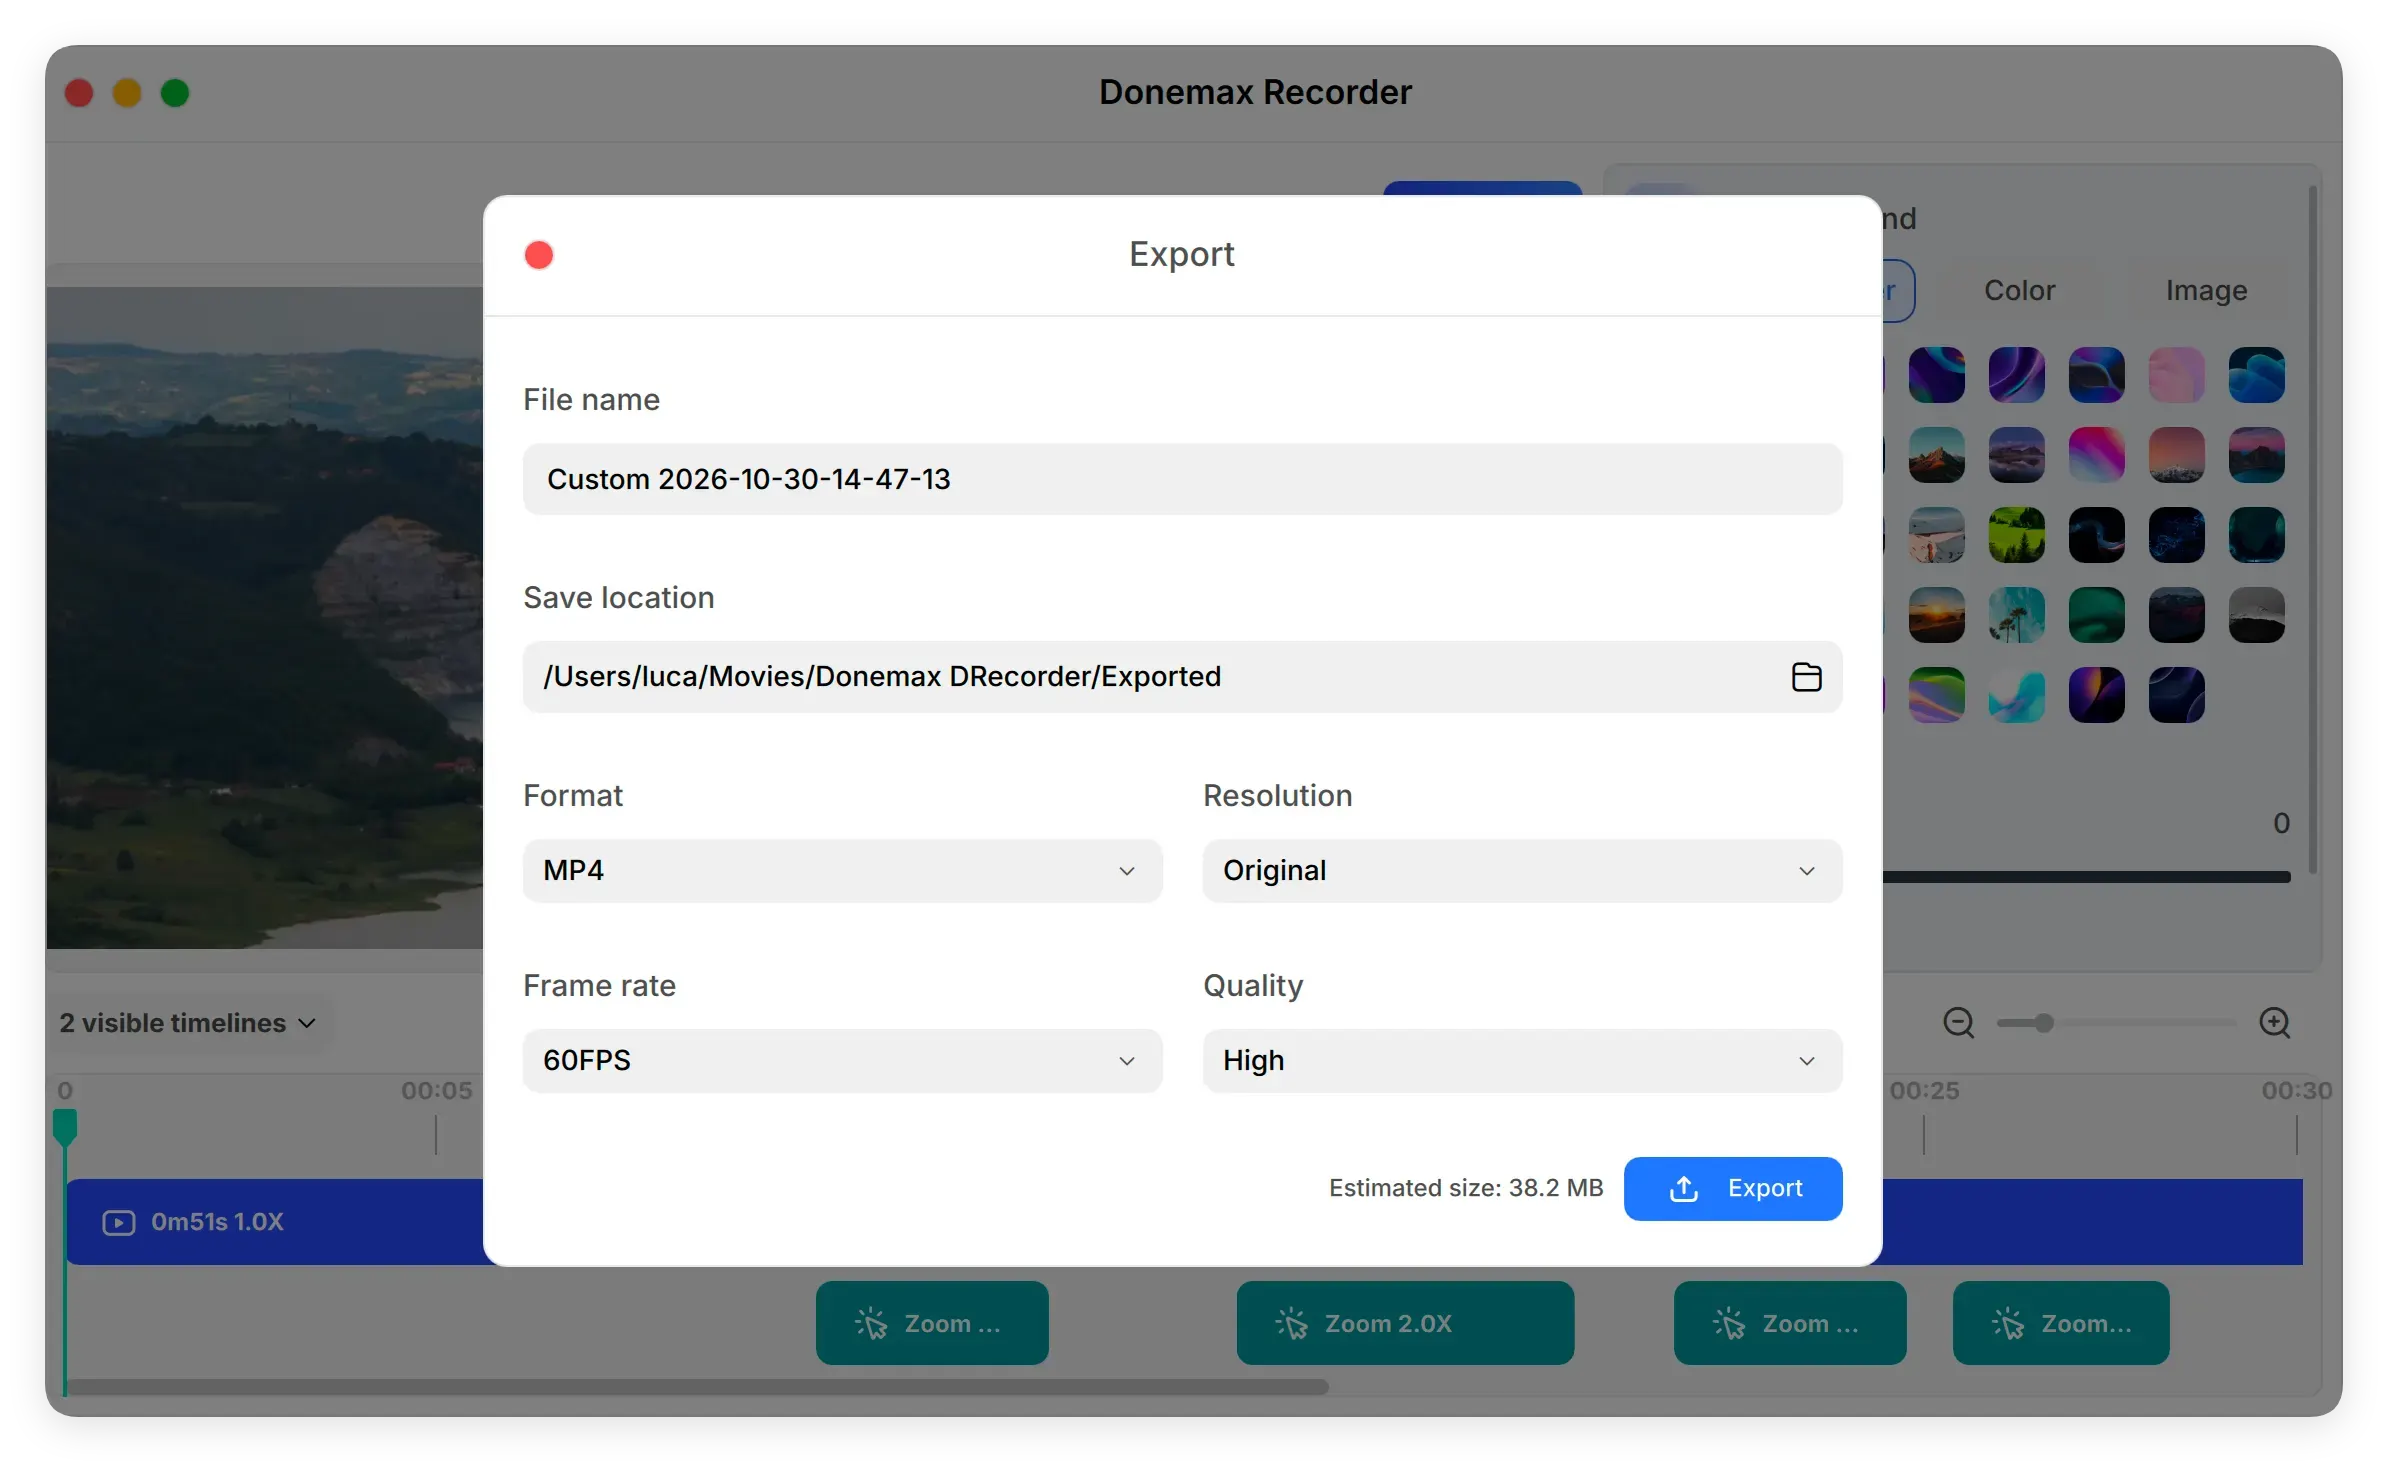
Step 4: Your recorded Zoom video will be saved automatically in high-quality format, ready for offline playback, editing, or sharing. The software offers video editing tools. You can edit and then export the recorded video.
To ensure your recorded Zoom meetings sound crisp and look professional, keep these best practices in mind:
Recording a Zoom meeting with clear video and dual-channel audio on Mac doesn't have to be complicated. While Zoom's native recording feature imposes host restrictions and macOS built-in tools require tricky virtual audio drivers, professional software offers a smooth, reliable alternative.
With Donemax Recorder for Mac, you can capture any Zoom meeting, webinar, or online class with both internal system sound and microphone voiceover in just a few clicks—no host permission required.
Ready to save your important Zoom calls effortlessly? Download Donemax Recorder for Mac and start recording high-quality Zoom meetings with audio right away!
Donemax Recorder for Mac
Donemax Recorder is an auto-zoom Mac screen recorder that automatically magnifies clicks and applies smooth cursor effects for effortless tutorial and demo creation.
Christina
Christina is the senior editor of Donemax software who has worked in the company for 4+ years. She mainly writes the guides and solutions about data erasure, data transferring, data recovery and disk cloning to help users get the most out of their Windows and Mac. She likes to travel, enjoy country music and play games in her spare time.
Gerhard Chou
In order to effectively solve the problems for our customers, every article and troubleshooting solution published on our website has been strictly tested and practiced. Our editors love researching and using computers and testing software, and are willing to help computer users with their problems