
Written byMariaUpdated on Jul 11, 2025
Fix SanDisk G-Drive Not Working on Mac Without Losing Data
Approved byGerhard Chou
Before we start: If Sandisk Professional G-Drive is not working on Mac, check the system settings and try to fix the disk issue with First Aid. If the drive is in NTFS format, you can use Donemax NTFS for Mac to make it writable on mac. At last, if the issue cannot be fixed, try to recover the important files with Donemax Data Recovery for Mac.
PAGE CONTENT:
People commonly use external drives like the SanDisk to store important data. However, having problems with them can be annoying, especially when you need to get to your files quickly. Are you suffering issues with SanDisk G-Drive on Mac?
If your SanDisk G-Drive not working on Macor the drive has read/write issues, you will experience work interruption. This article will show you useful fixing steps to help you quickly find and fix the problem.

Once you finish reading this article, you'll know how to fix your G-DRIVE and keep it from breaking down again. You can follow the solutions in this guide to get your G-DRIVE back on track!
Why Is SanDisk Professional G-Drive Not Working on Mac?
A few annoying ways that a SanDisk Professional G-Drive might not work on a Mac. The first step to fixing these problems is to understand them:
- Drive Not Recognized: If the Mac cannot see the G-DRIVE, it could be because of a broken cable. It might also be a problem with the drive's power source. Besides, software problems or old macOS versions can make the system cannot recognize the drive.
- Drive Recognized but Unmountable: While the G-DRIVE may appear in Disk Utility, mounting it may not be possible. Mostly, an issue with the drive's file system may be the cause. Sometimes, running Disk Utility's First Aid can fix these problems. But you may need to format the drive if the damage is more serious.
- Read/Write Issues: If you can mount the drive but can't read or write data, it could be permission issues. Also, almost full drive or a not compatible file system can cause the issue. Ensure the drive has enough free space and the right read/write permissions.
- Performance Issues: A failing drive, a bad power source, or overheating can lead to slow performance or random disconnections. You can discover what's wrong with these performance issues by checking the drive's health with Disk Utility or other tools.
How to Fix SanDisk Professional G-Drive Not Working on Mac?
Try these solutions to fix SanDisk Professional G-Drive not mounting, not showing up, not recognized on Mac:
Solution1: Checking USB Connections
- Check the Physical Connections: Make sure the SanDisk Professional G-DRIVE is connected to the USB or Thunderbolt port. Use a different wire or port to ensure it's not a problem with a broken one.
- Check Power Supply: If the G-DRIVE needs power from an outside source, ensure to connect it correctly and working. The drive might not work right sometimes if it doesn't have enough energy.
- Reset USB Ports: Sometimes, resetting the USB ports can fix problems with the connection. To do this, turn off your Mac and remove all its USB ports. After a few minutes, plug them back in and turn it back on.
- Use System Information: Check to see if the G-DRIVE shows up under USB or Thunderbolt in the System Report. You can get from the Apple Menu > About This Mac > System Report. It can help determine if the problem is with the device that cause Mac cannot recognize the drive.
- Try Another Computer: Connect the G-Drive to a different Mac or Windows PC to see if it works. If it works on another computer, the problem could be with the hardware or program on your Mac.
Solution 2: Enabling Visibility of External Hard Drive
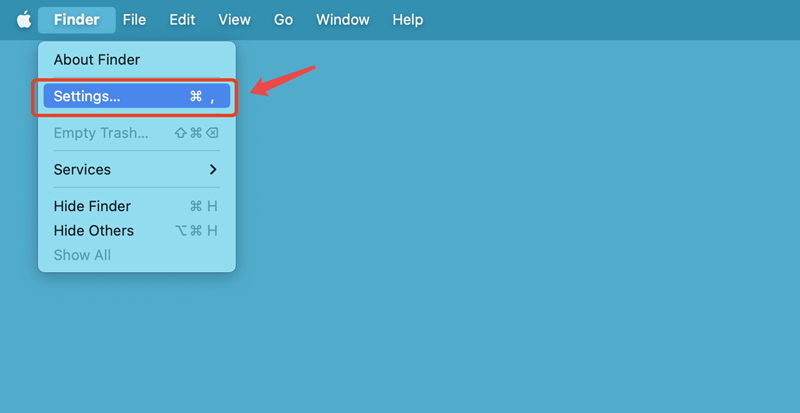
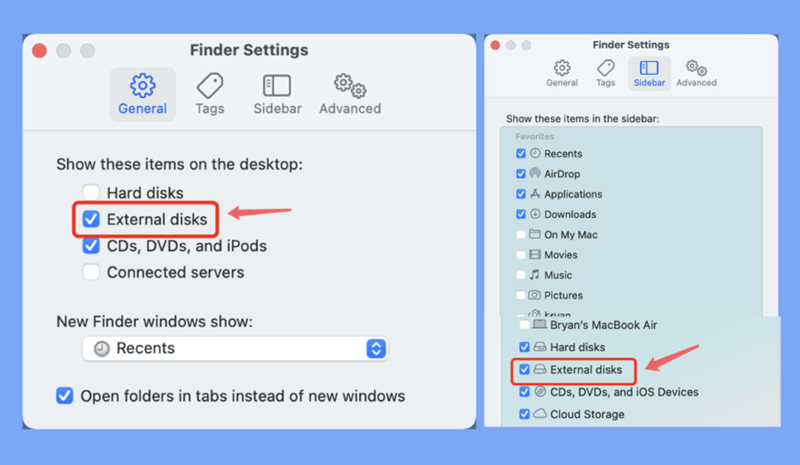
Making external disks visible in Finder allows you to access your G-Drive to manage files easily.
- To open the Finder Settings, open a Finder, click on Finder on Apple menu, choose Settings.
![Enabling Visibility of External Hard Drive]()
- Go to the Finder Settings window and click on the Sidebar and General tab.
- Select External disks. TThis setting ensures that external drives, like the SanDisk Professional G-DRIVE, appear in the Finder and desktop.
![Enabling Visibility of External Hard Drive]()
- Close the Finder Settings window and look for the G-Drive in the Finder tab. If you can't see it, try removing and reattaching the drive to see it again.
- Sometimes, restarting the Finder can also make external drives appear again. Right-click (or Ctrl-click) on the Finder icon in the Dock while holding down the Option key, and then choose Relaunch.
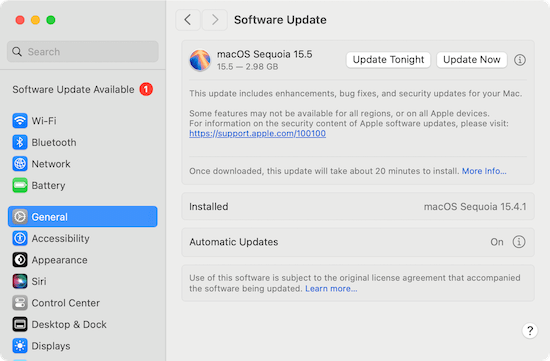
Solution 3: Updating macOS
When you update macOS, your operating system gets the newest features, changes, and fixes for compatibility issues. It can often fix problems with external drives like the G-Drive.
- Pick up the Apple menu and pick out System Settings.
- Go to General > Software Update.
- If there are changes, click the Update Now button to download and install them. Then, do what it says on the screen to finish the update.
![Updating macOS]()
- After installing macOS, you must restart your Mac to see the changes.
- After restarting your Mac, connect the SanDisk Professional G-DRIVE again. Then you can check if the update fixed the connection or compatibility problems.
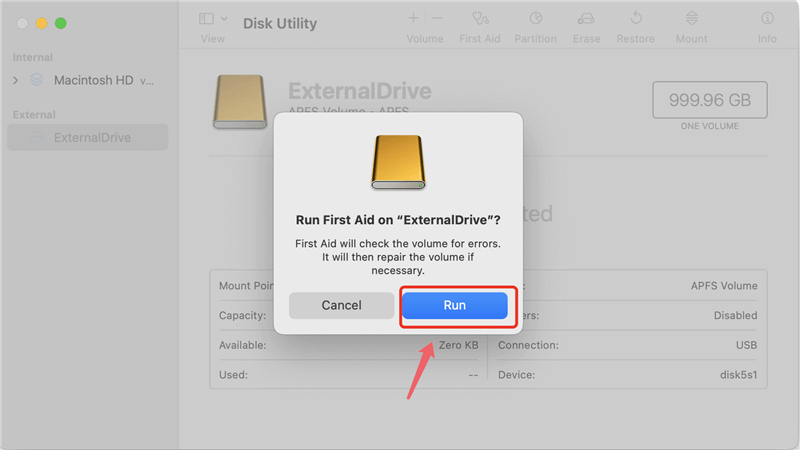
Solution 4: Repairing G-Drive Using Disk Utility
The First Aid feature of Disk Utility can find and fix common disk problems. The tool is useful for keeping your external drives, like the SanDisk Professional G-DRIVE, in good health.
- Using Disk Utility to fix an external hard drive
- Start by going to Applications > Utilities > Disk Utility.
- In Disk Utility, find the SanDisk Professional G-Drive on the left side of the screen and click on it.
- Select the First Aid button from the menu. This tool will check the drive for problems and fix them if it finds any.
![Repairing G-Drive Using Disk Utility]()
- Disk Utility will fix the disk if you follow the on-screen guide. If asked, type in your master password.
- After first aid is over, make sure the G-Drive is working properly. If the problems don't disappear, you should reset the drive (after making a backup) or get more help.
Solution 5: Using NTFS for Mac Tool
If the SanDisk Professional G-Drive uses NTFS file system, just install an NTFS for Mac tool on your Mac to make it writable.
Step 1. Download and install Donemax NTFS for Mac, then open it.
Step 2. Select the SanDisk Professional G-Drive, click on Mount button.
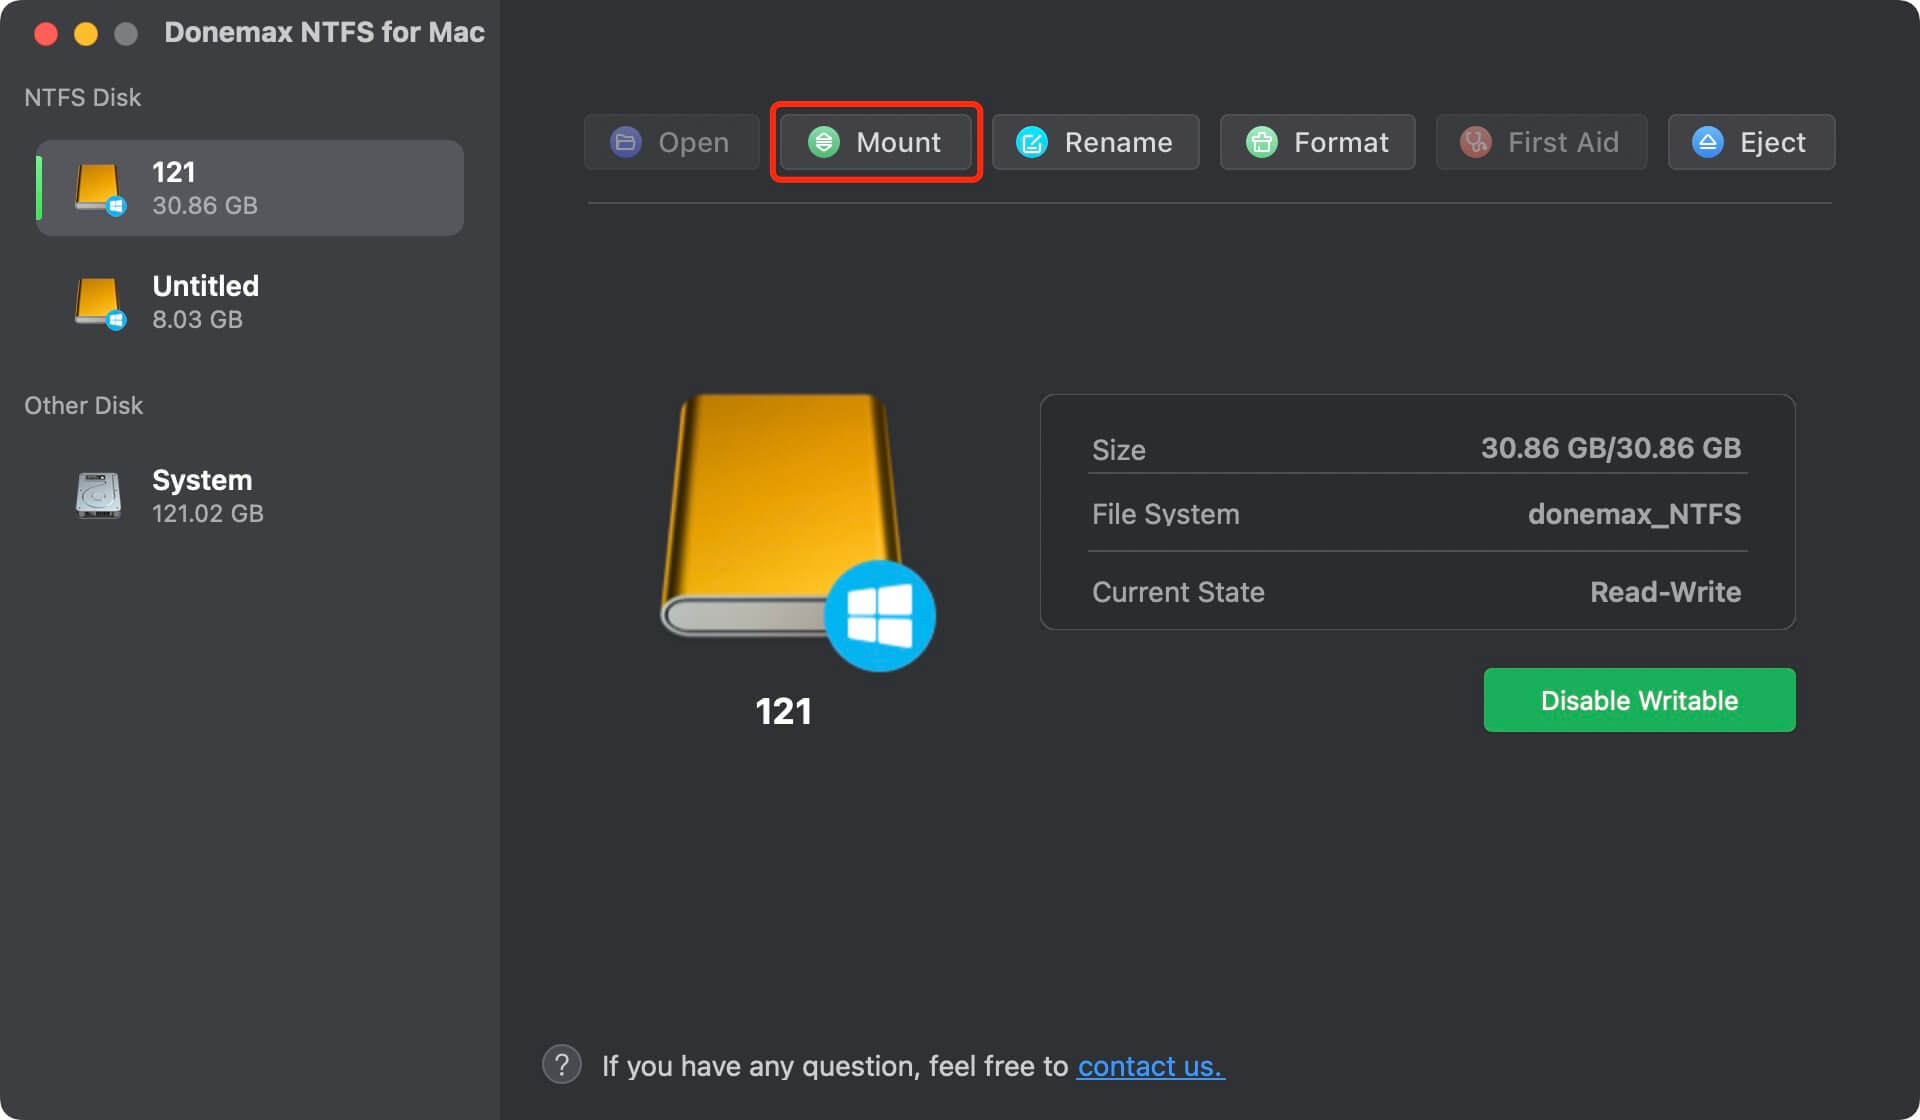
Step 3. To read-write the NTFS SanDisk Professional G-Drive on Mac, click on Enable Writable button.

How to Recover Lost Data from SanDisk Professional G-Drive on Mac?
If you have lost data by erasing your SanDisk Professional G-DRIVE, you can use a Mac data recovery app. The software can help you recover the lost data.
Step 1. Download and install Donemax Data Recovery for Mac, a reliable Mac data recovery app. TConnect SanDisk Professional G-DRIVE to your Mac and open the software.
Donemax Data Recovery for Mac
- Recover deleted/lost data from SanDisk and other external drives.
- Effective and easy-to-use data recovery tool for macOS.
- Support data recovery for videos, pictures, documents, etc.
Step 2. Check and select the SanDisk Professional G-Drive to start data recovery.

Step 3. Click on Scan button to deeply scan the SanDisk Professional G-Drive.

Step 4. Preview and recover lost files after scanning.

Conclusion:
In conclusion, to fix problems with your SanDisk Professional G-DRIVE on a Mac, check the common issues. These includes performance, visibility, and connection issues. You can often fix problems with drive recognition, read/write functionality, and speed reliability. Try the solutions like checking USB connections, ensuring drives are visible, updating macOS, and fixing drive with Disk Utility.
These steps will help you find and fix problems with your G-DRIVE. Then the drive stays a reliable way to store and view data. Before fixing or erasing your drive, back up any important data. If the problems continue, you might want professional help to get your G-DRIVE working properly again.
FAQs About Fixing SanDisk Professional G-Drive Not Working on Mac
1. SanDisk Professional G-Drive not mounting on Mac?
First, open Disk Utility, select the SanDisk Professional G-Drive and click on Mount button. If it does not working, click on First Aid button to repair the damaged SanDisk Professional G-Drive.
2. How to fix SanDisk Professional G-Drive not showing up on Mac?
- Open a Finder on your Mac.
- Click Finder on Apple menu, choose Settings.
- Open Finder Settings window, then click General and Sidebar.
- Select External disks.
- If you still cannot see the SanDisk Professional G-Drive, just open Disk Utility, run First Aid to repair it.
3. SanDisk Professional G-Drive is read-only on Mac, how to fix it?
Check if the drive is an NTFS drive. If so, just reformat it to other file system or use an NTFS for Mac tool to enable writable for the NTFS drive.
- Download and install Donemax NTFS for Mac.
- Open this NTFS for Mac tool, select the SanDisk Professional G-Drive.
- Click on Enable Writable button.
Donemax Data Recovery for Mac
Donemax Data Recovery for Mac is one of the best Mac data recovery software. The tool is easy to recover deleted, formatted or lost data. The software supports Mac HDD/SSD, external disk, USB drive, SD card, camera or other storage devices.
Related Articles
- Jan 15, 2025How to Estimate the Remaining Lifespan of Your SSD? [3 Methods]
- Nov 05, 2024Why SSD Not Working and How to Fix Common SSD Issues
- May 20, 20266 Solutions to Fix Can't Format SSD in Disk Management
- Apr 10, 2026Unreadable SSD? 6 Fast Fixes to Repair Your Drive Now
- Jun 06, 2025Sabrent Rocket SSD Not Showing Up on My Computer, Fix It Now
- Mar 31, 202510 Solutions to Fix SanDisk Extreme Portable SSD Not Recognized on Mac

Contributing Writer
Maria
Maria is one of the senior writers & editors of Donemax who lives and works in Sydney, Australia. She loves PC, Mac and Internet Technology. She has 6 years of writing articles about data recovery on PC/Mac, disk cloning solution, data eraser and computer OS optimization, etc. She is also interested in testing various software and digital products.

Editor in chief
Gerhard Chou
In order to effectively solve the problems for our customers, every article and troubleshooting solution published on our website has been strictly tested and practiced. Our editors love researching and using computers and testing software, and are willing to help computer users with their problems