
Written byChristinaUpdated on May 23, 2025
Format a USB Drive to NTFS on Windows 11 / 10 / 8 / 7
Approved byGerhard Chou
Before we start: Multiple methods are available to format USB drive to NTFS on Windows, including Disk Management, Diskpart command tool, third-party disk formatting software. However, if you want to wipe data permanently, use the professional data wiping tool Donemax Data Eraser.
PAGE CONTENT:
- What Is NTFS and Why Format to It?
- Method 1: Format USB to NTFS Using File Explorer
- Method 2: Format USB to NTFS Using Disk Management
- Method 3: Format USB to NTFS Using Command Prompt (DiskPart)
- Method 4: Format USB to NTFS Using PowerShell
- What to Do If You Can't Format USB to NTFS
- Format and Wipe NTFS Dive with Data Erasure Tool (Optional)
USB flash drives are a reliable and portable storage solution used for everything from transferring files between computers to backing up essential data. By default, many USB drives come preformatted with FAT32 or exFAT, file systems that are broadly compatible across different operating systems. However, there are situations where formatting a USB drive to NTFS (New Technology File System) is necessary—particularly when dealing with large files, requiring advanced permissions, or seeking better performance on Windows systems.
In this comprehensive article, we will guide you through the steps to format a USB drive to NTFS on Windows 11, 10, 8, and 7 using several built-in methods and tools. Whether you're a beginner or a power user, this article will help you choose the best method for your needs.
What Is NTFS and Why Format to It?
Beginning with Windows NT, the default file system for Windows operating systems is NTFS. It offers significant advantages over older formats like FAT32 and even exFAT:
- Supports larger files: FAT32 has a file size limit of 4GB. NTFS supports much larger files—up to 16 TB (on Windows versions).
- Improved security: NTFS includes file and folder permissions, encryption (EFS), and disk quotas.
- Fault tolerance and recovery: NTFS uses journaling and error logging to recover data more easily.
- Compression and symbolic links: NTFS supports features absent in FAT32/exFAT, like compression and hard links.
If you're using your USB drive exclusively with Windows machines and need these features—especially for transferring large files or using it with VMs or bootable environments—NTFS is the recommended format.
Important Notes Before Formatting to NTFS
Before proceeding, there are several critical points to keep in mind:
- All data on the drive will be deleted during formatting. Always back up important files before formatting.
- NTFS has limited compatibility. macOS and Linux systems have read-only or partial support for NTFS unless third-party NTFS for Mac drivers are used.
- The USB drive must not be write-protected. If it is, you'll need to remove write protection first.
- The drive should be healthy. If it has bad sectors or is unreadable, formatting may fail, and you may need to repair the USB disk problem. before proceeding.
Method 1: Format USB to NTFS Using File Explorer
Using File Explorer is the simplest method for formatting a USB disk on Windows.
Steps:
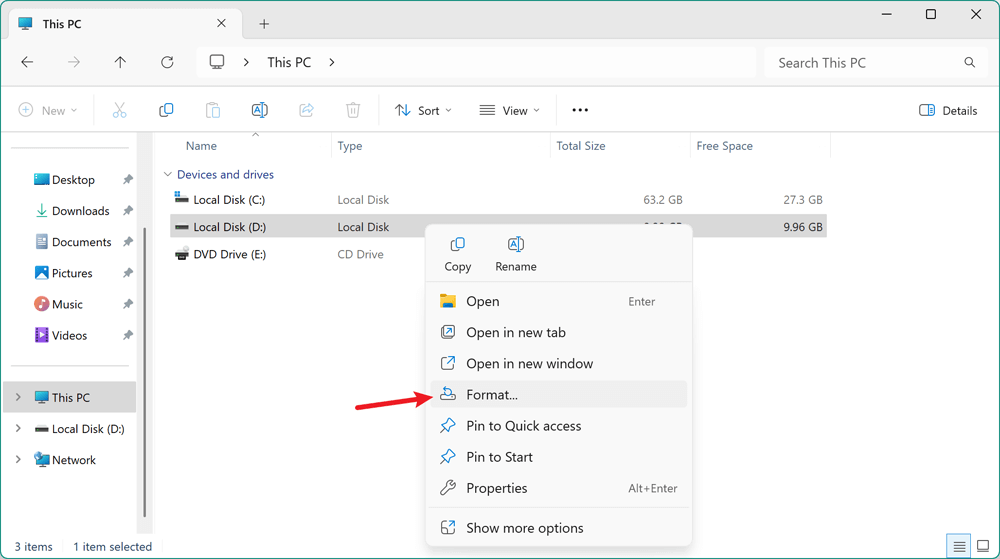
- Insert the USB drive into your PC. Locate the USB under This PC in File Explorer by pressing Win + E. Choose Format with a right-click on the USB disk.
![Insert the USB drive into your PC]()
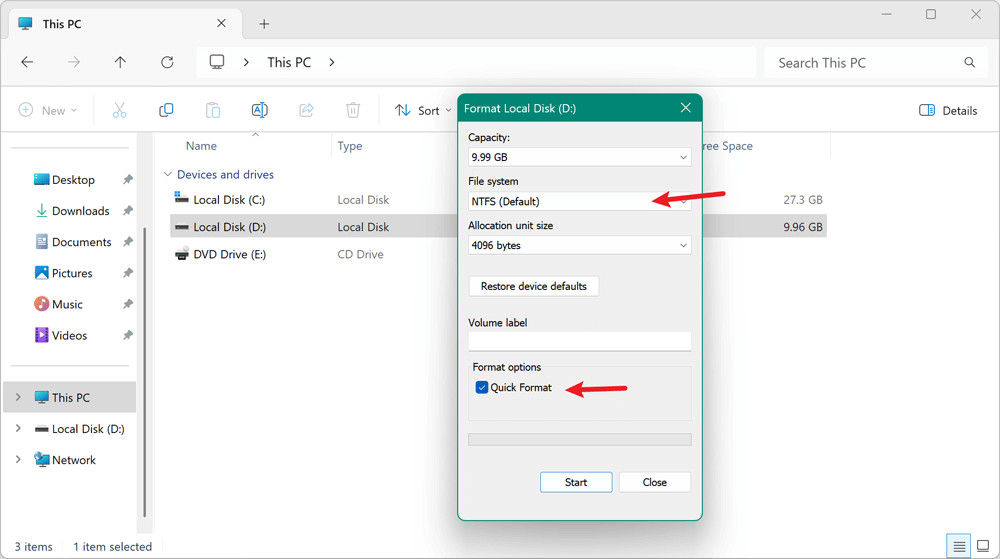
- Select the NTFS as the file system and enable Quick Format. Click Start, then OK to confirm.
![Select the NTFS as the file system and enable Quick Format]()
Works On: Windows 11, 10, 8, and 7
Best For: Quick and basic formatting needs
Method 2: Format USB to NTFS Using Disk Management
Disk Management offers more control and can help resolve partition issues.
Steps:
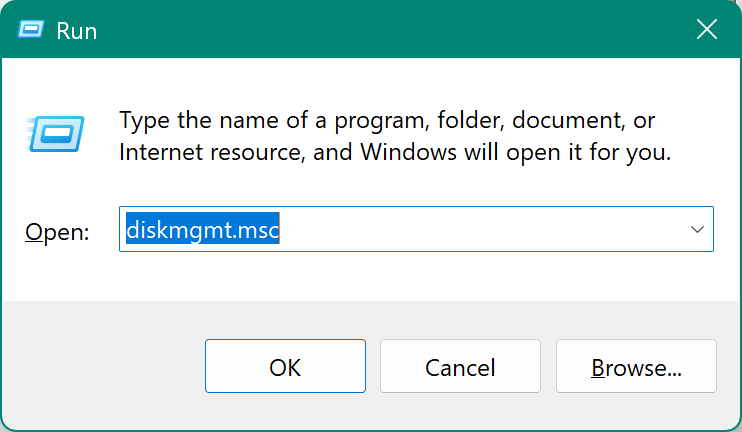
- Type diskmgmt.msc using Win + R, then hit Enter.
![Type diskmgmt.msc using Win + R]()
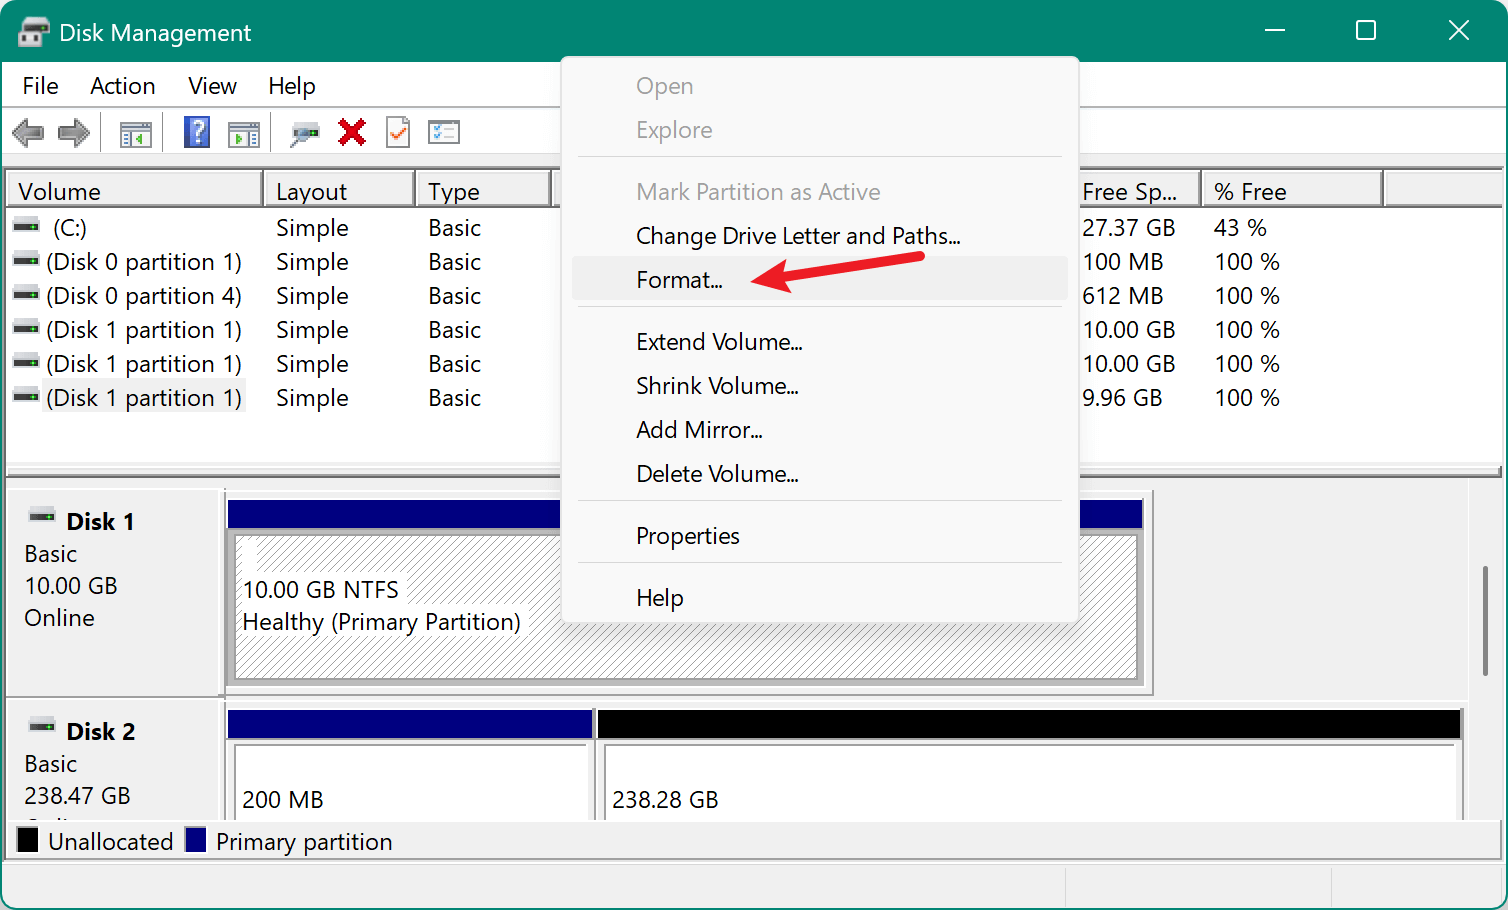
- Locate your USB drive in the bottom panel. Right-click the partition and choose Format.
![Right-click the partition and choose Format]()
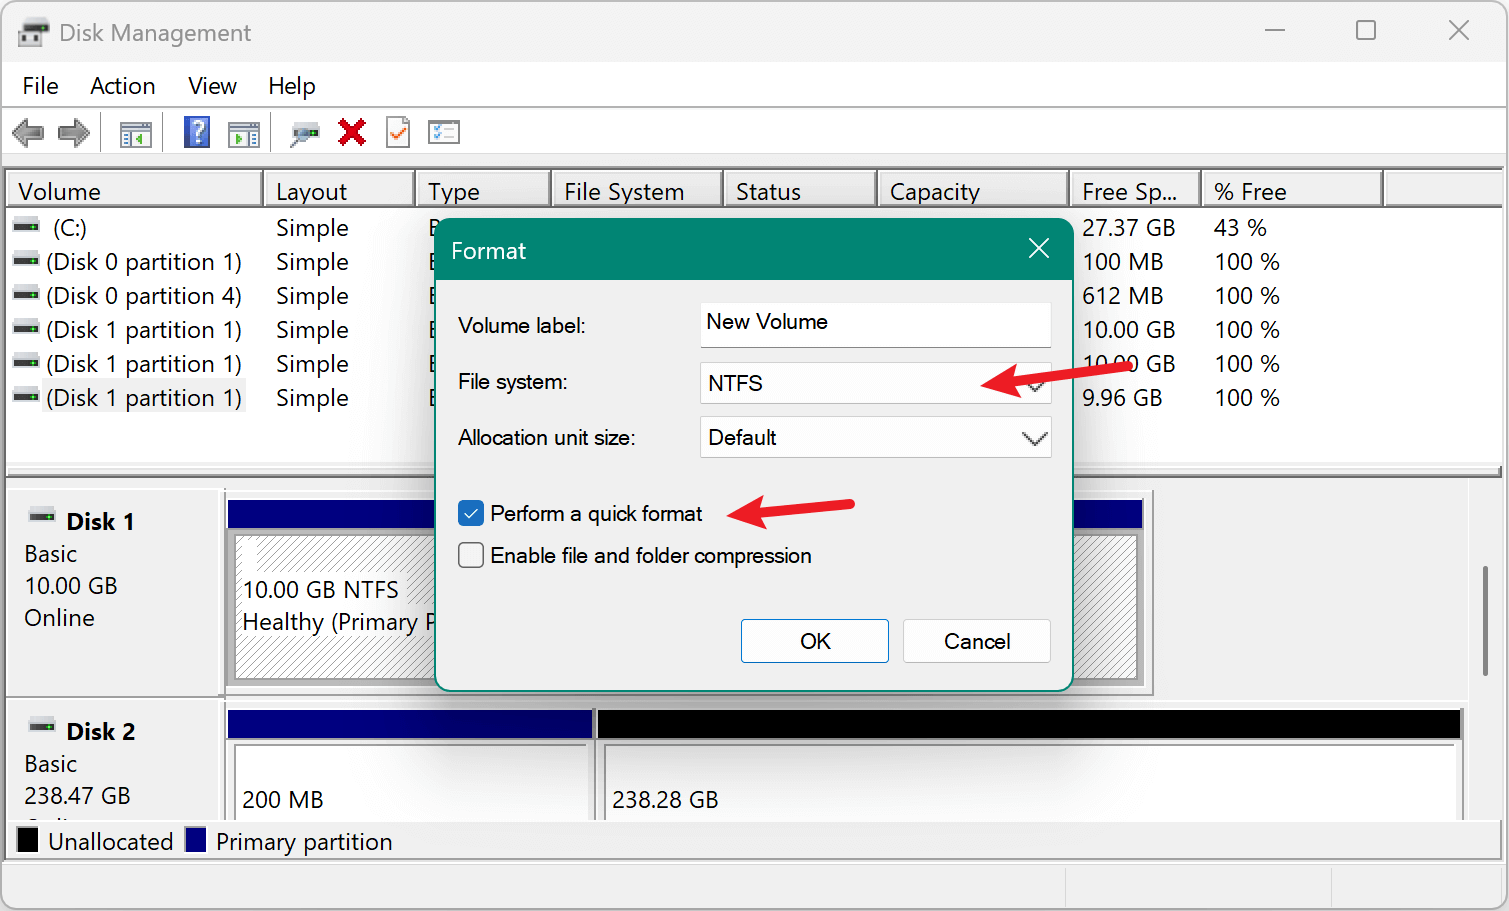
- In the dialog box:
- Select NTFS as the file system.
- Check Perform a quick format (or uncheck if a full format is needed).
- Click OK to confirm.
![Select NTFS as the file system]()
If there's no partition and the disk shows as unallocated:
- Right-click the disk, then New Simple Volume, and go through the wizard to format it as NTFS.
Works On: Windows 11, 10, 8, and 7
Best For: Handling partition issues and unallocated space
Method 3: Format USB to NTFS Using Command Prompt (DiskPart)
For advanced users, DiskPart offers full control over drives using the command line.
⚠️ Warning: Be very careful with DiskPart—it can erase the wrong disk if misused.
Steps:
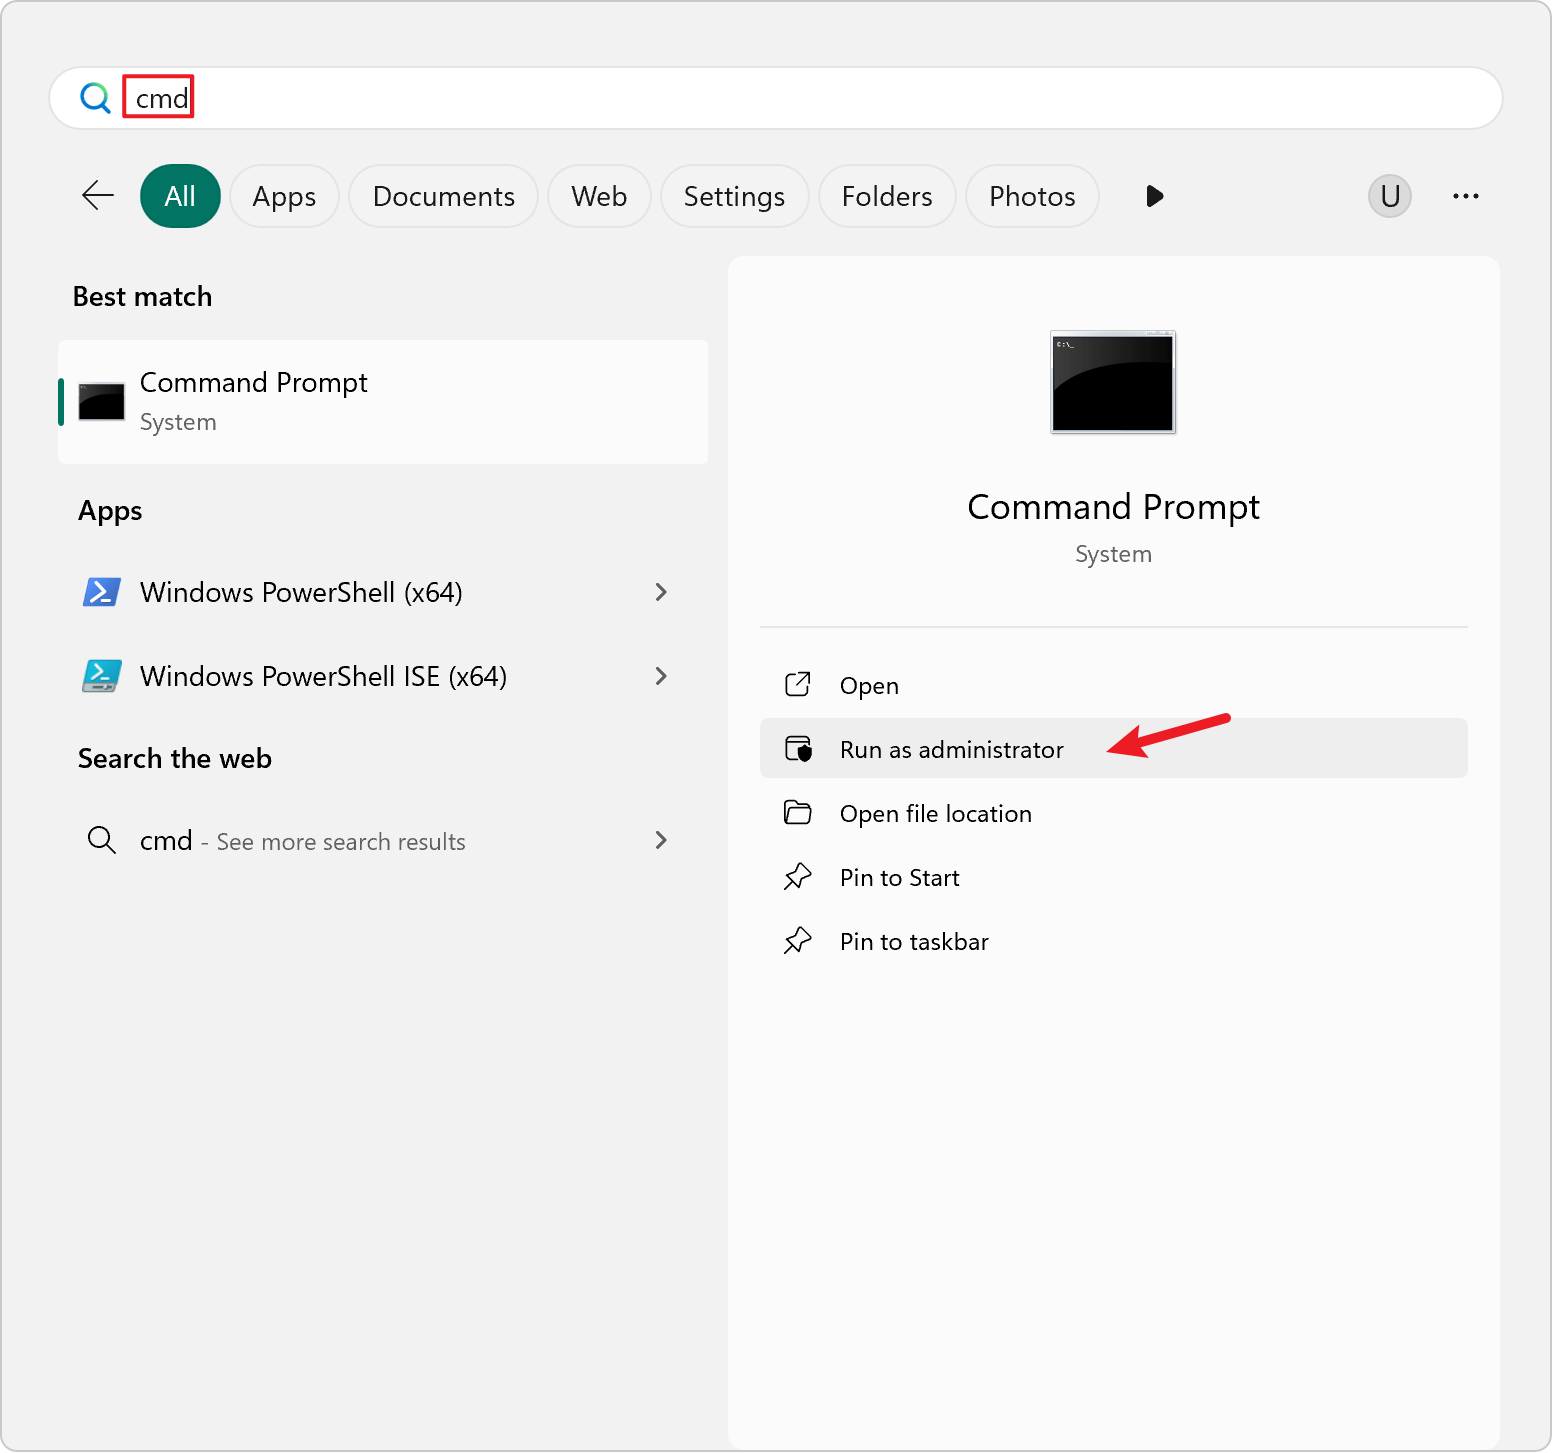
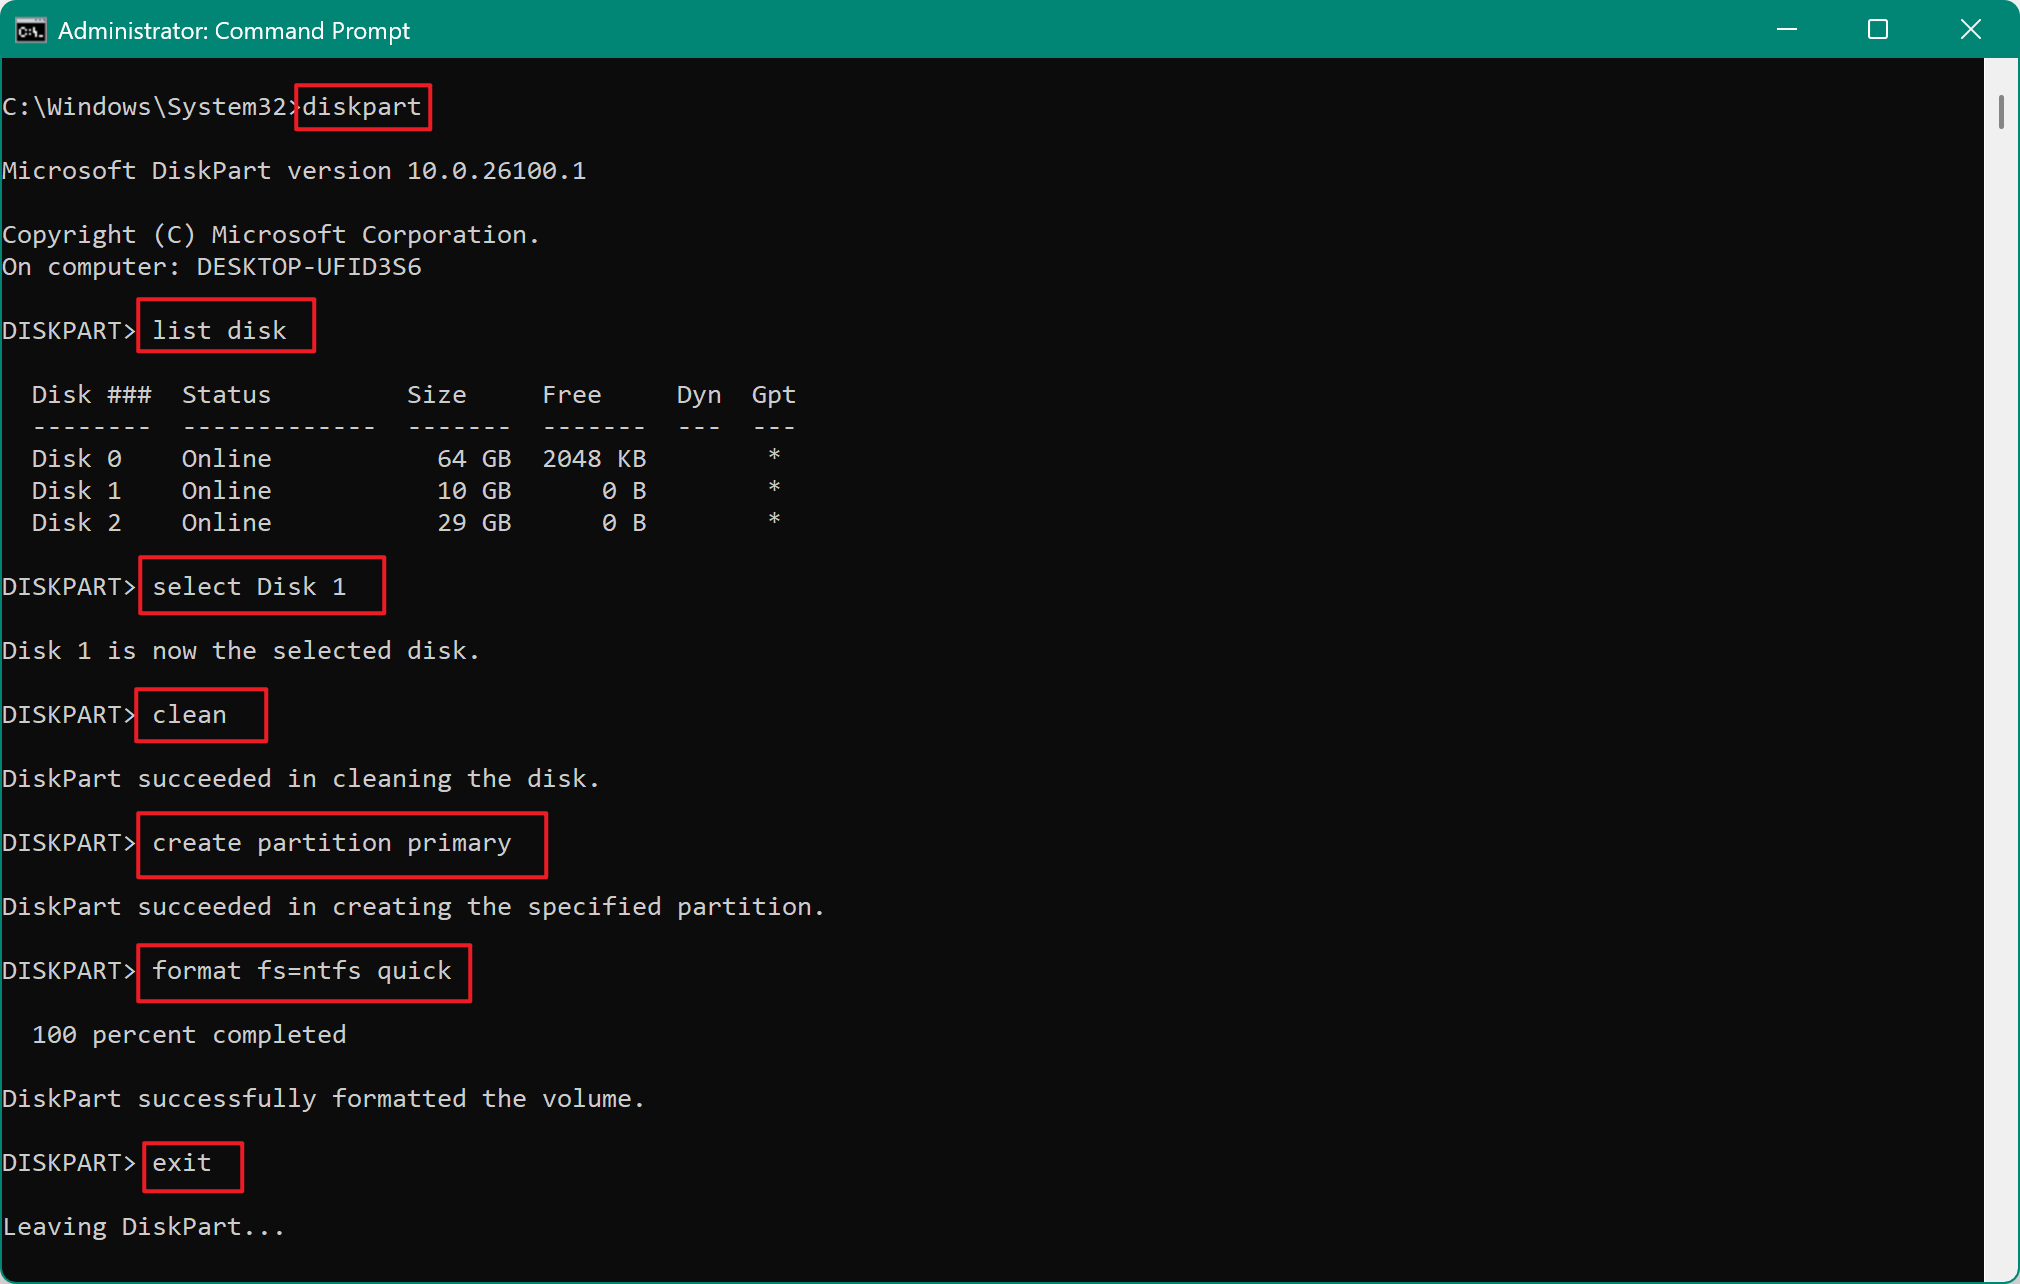
- Press Win + S, type cmd, right-click Command Prompt, and select Run as administrator.
![Press Win + S and type cmd]()
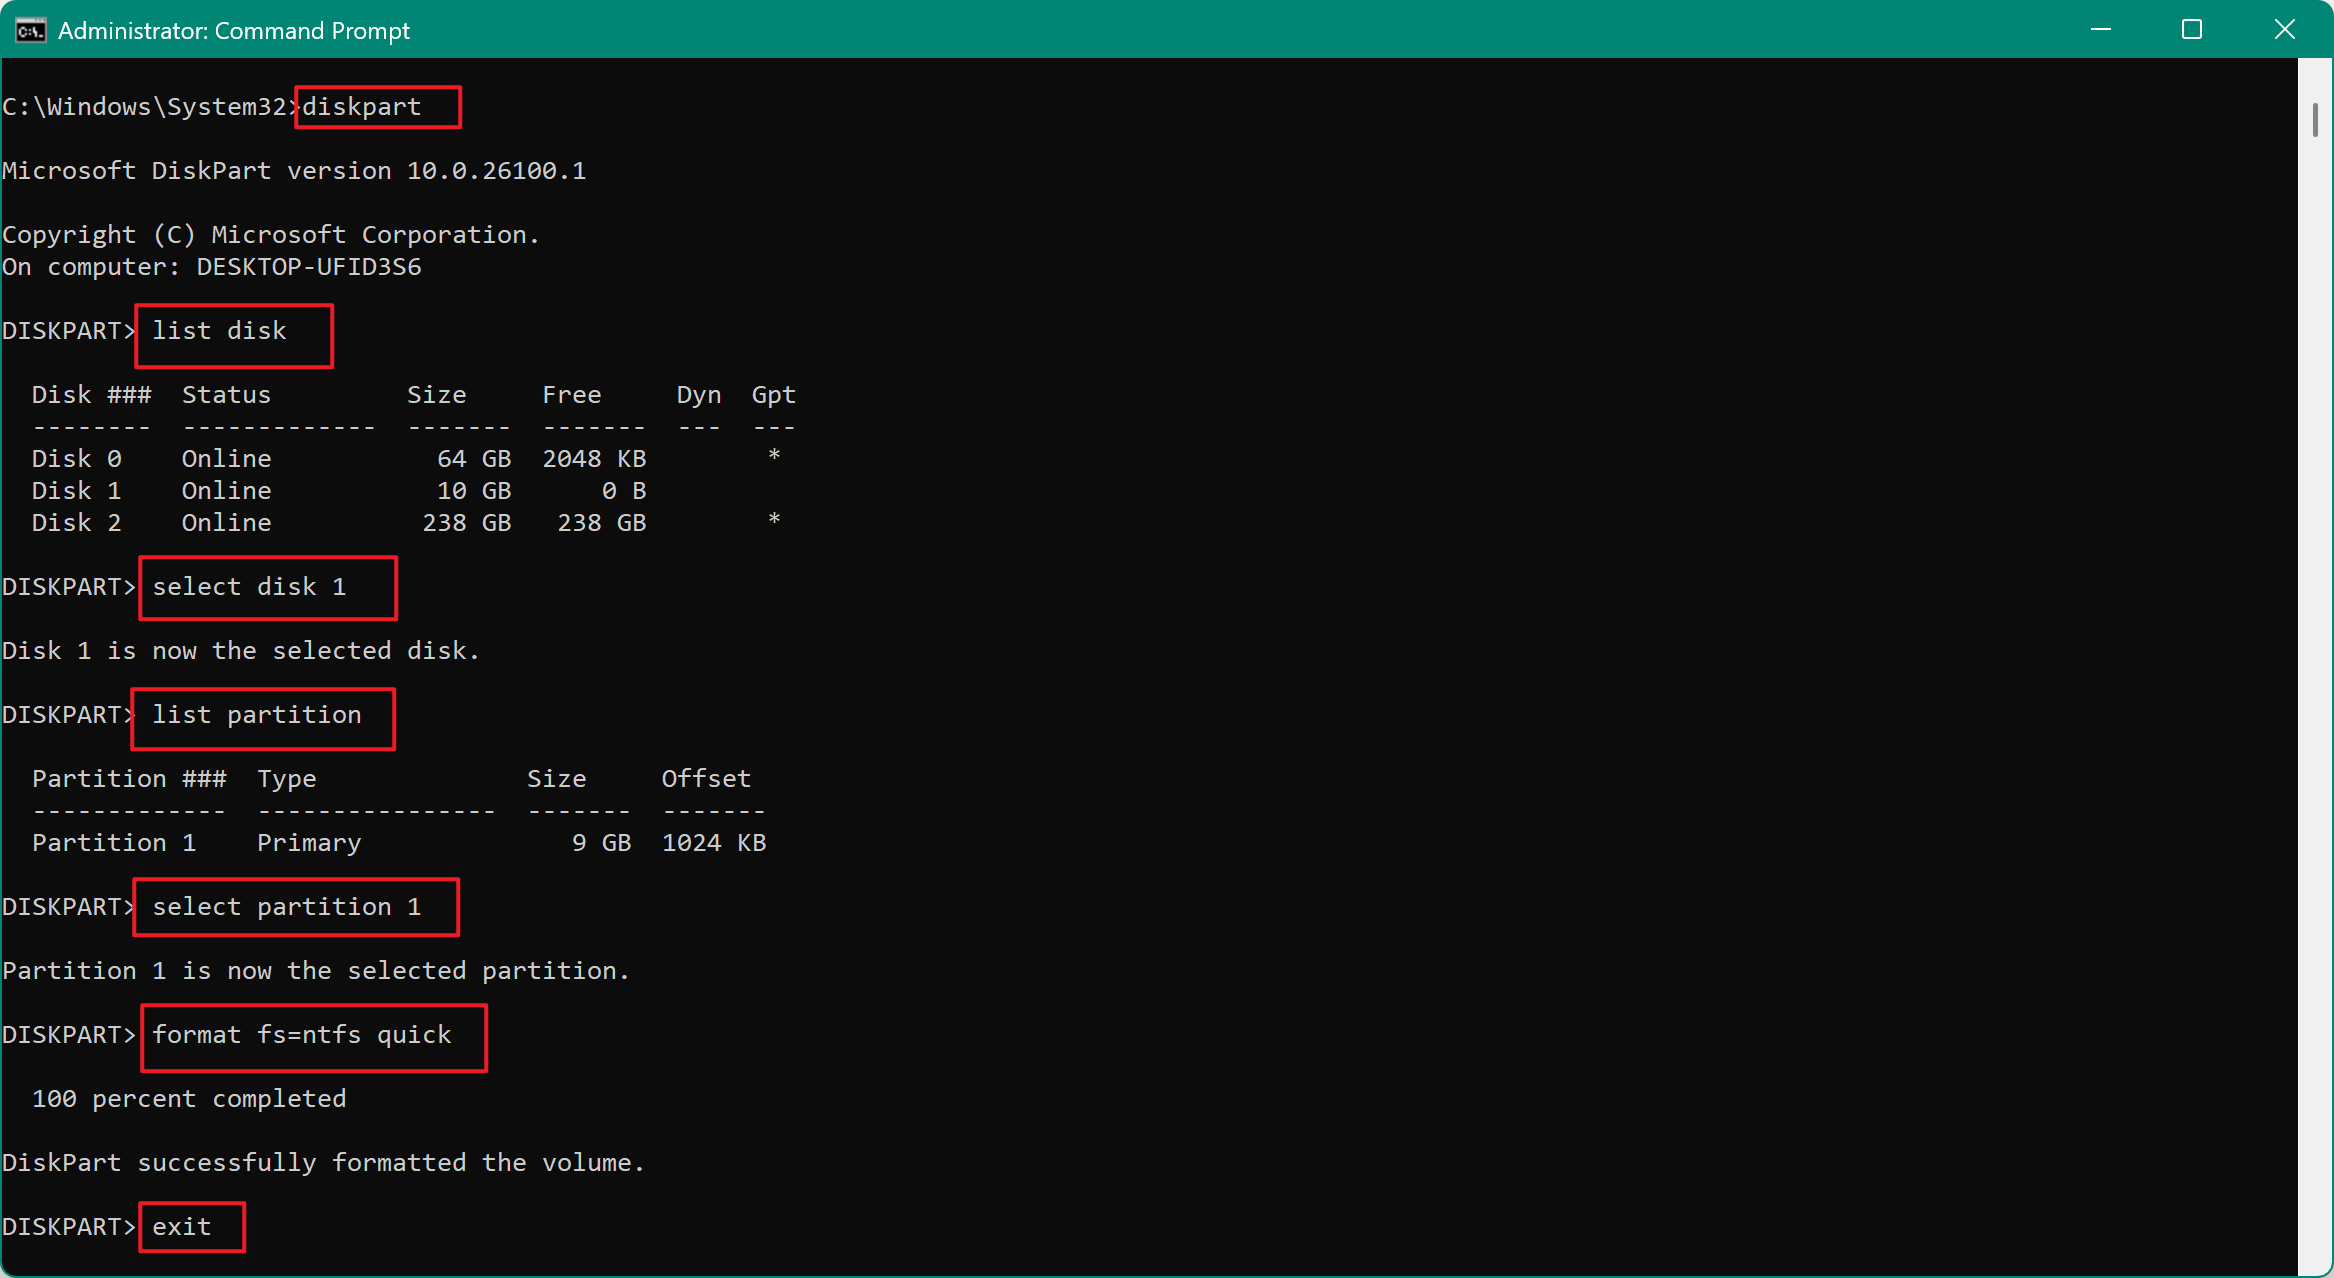
- Type the following commands:
diskpart
list disk
select disk 1
list partition
select partition 1
format fs=ntfs quick
exit![Type the following commands]()
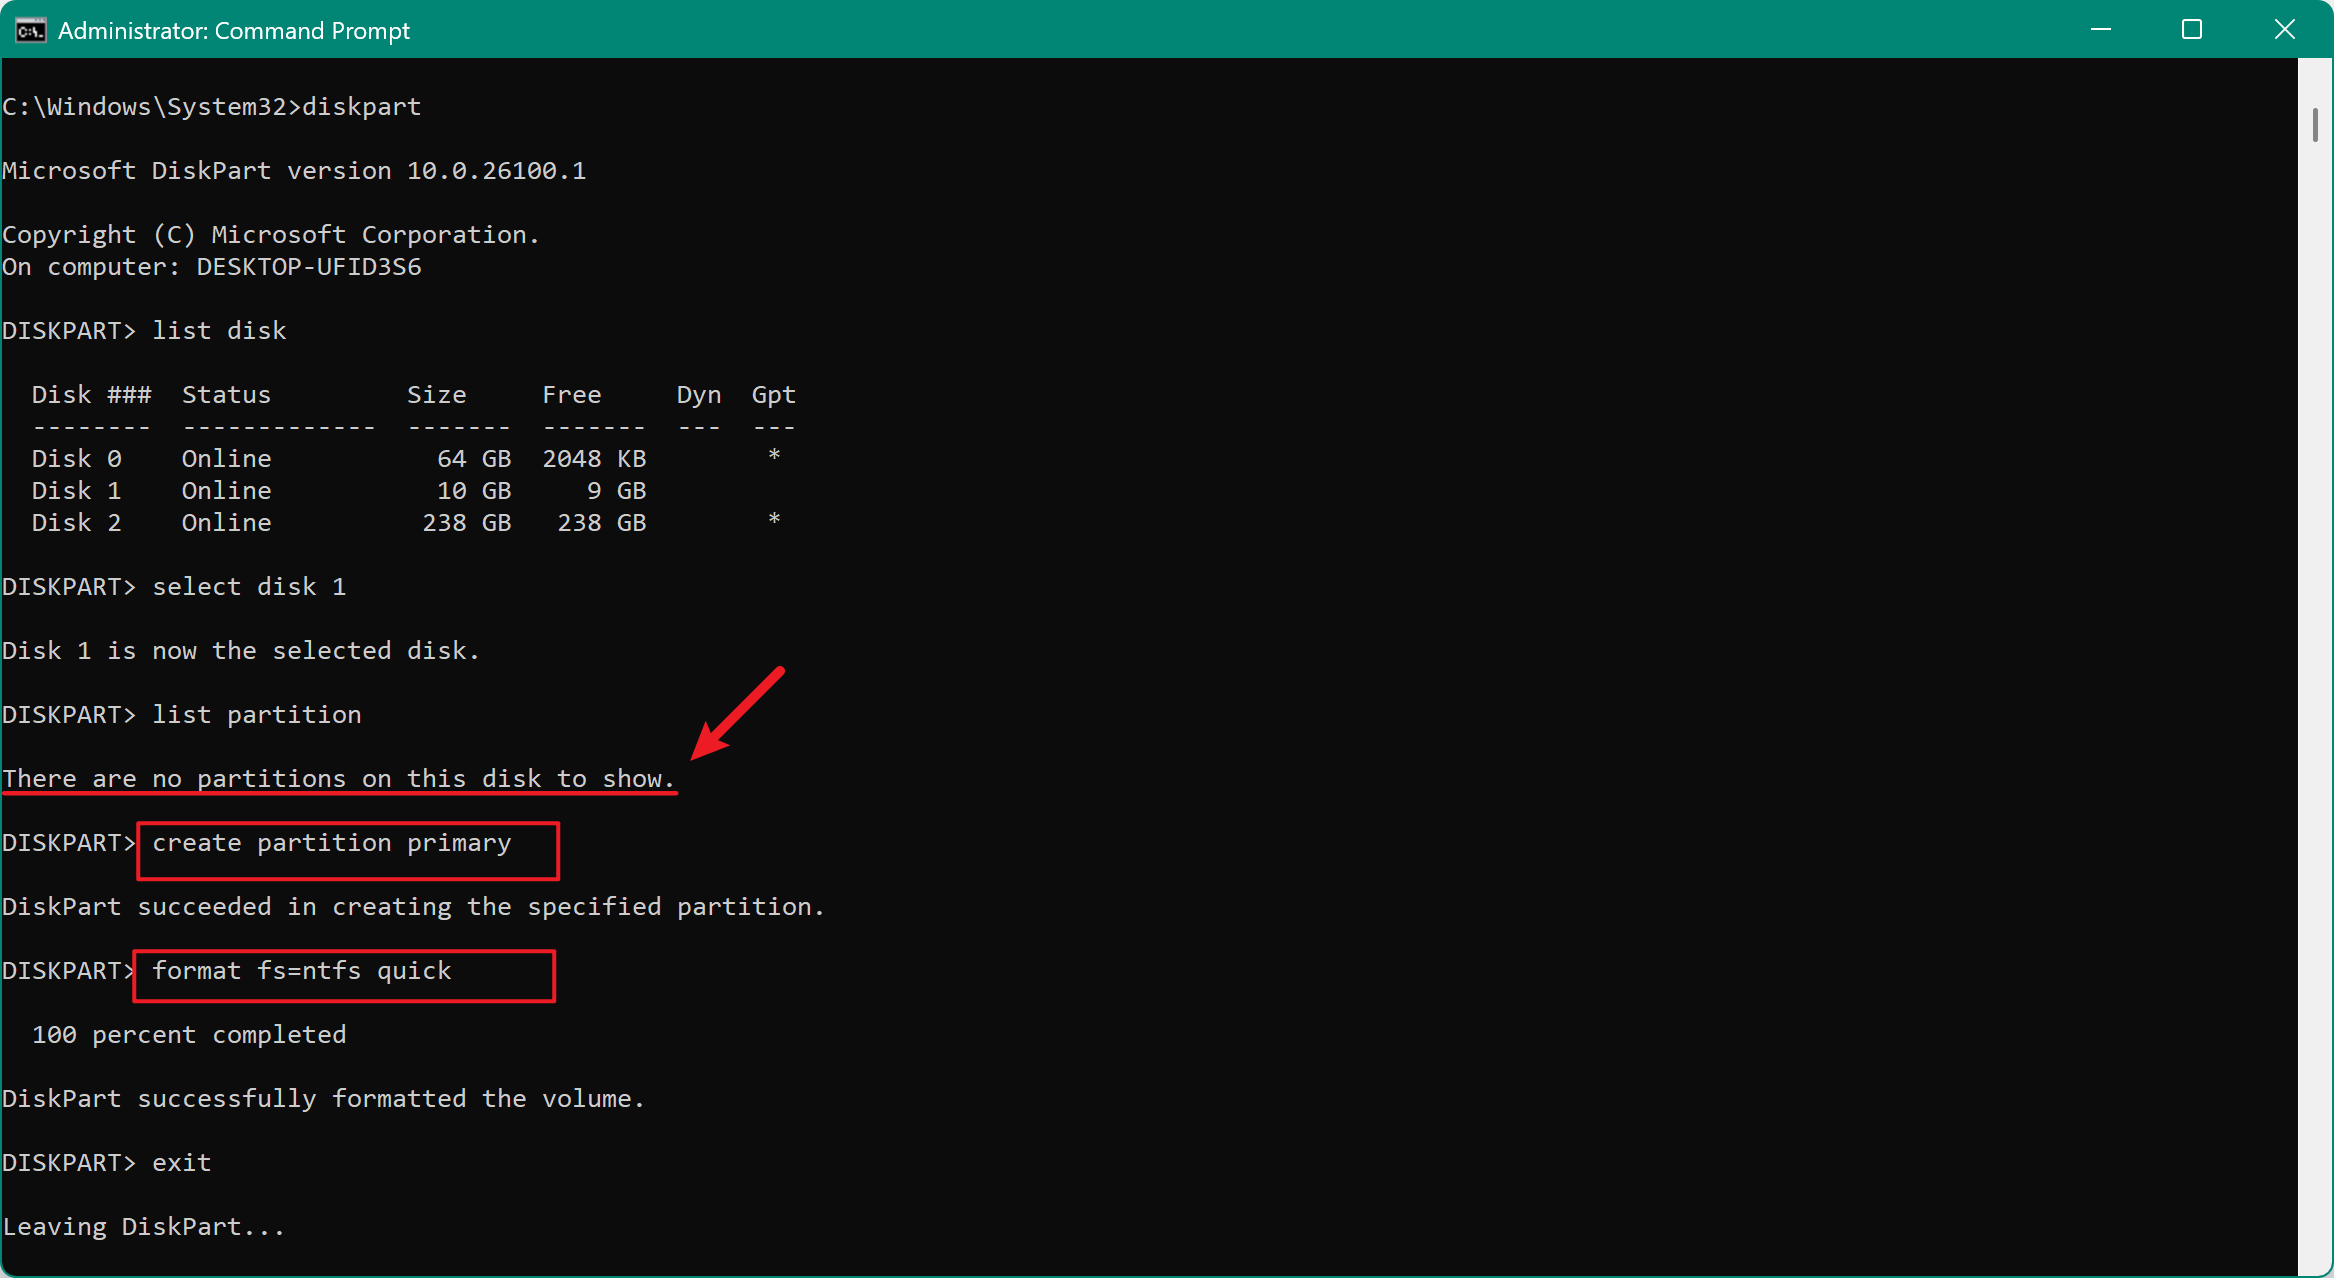
If the drive has no partition, use:
create partition primary
format fs=ntfs quick
Works On: All Windows versions
Best For: Power users or when GUI tools fail
Method 4: Format USB to NTFS Using PowerShell
Windows PowerShell offers another command-line alternative.
Steps:
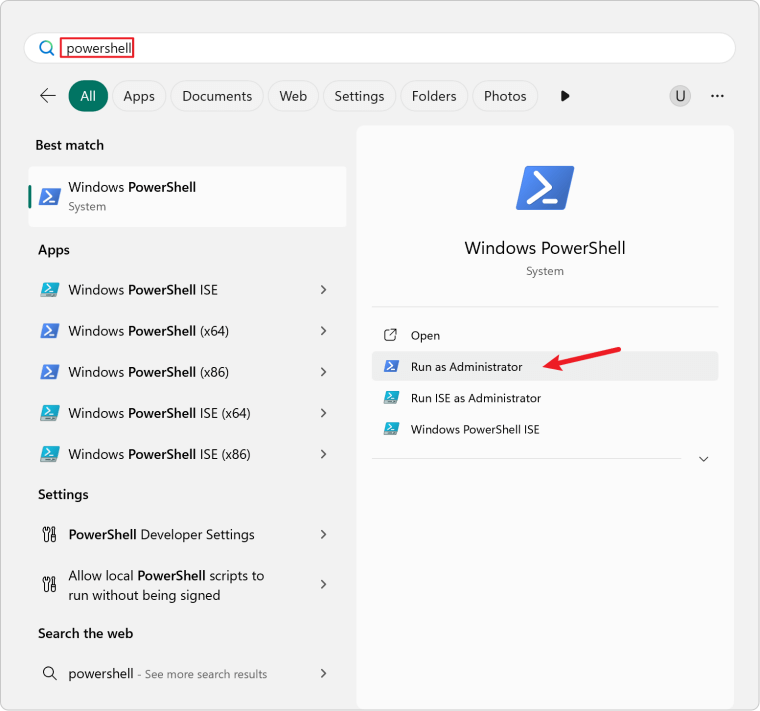
- Select Windows PowerShell (Admin) by pressing Win + X.
![Select Windows PowerShell (Admin) by pressing Win + X]()
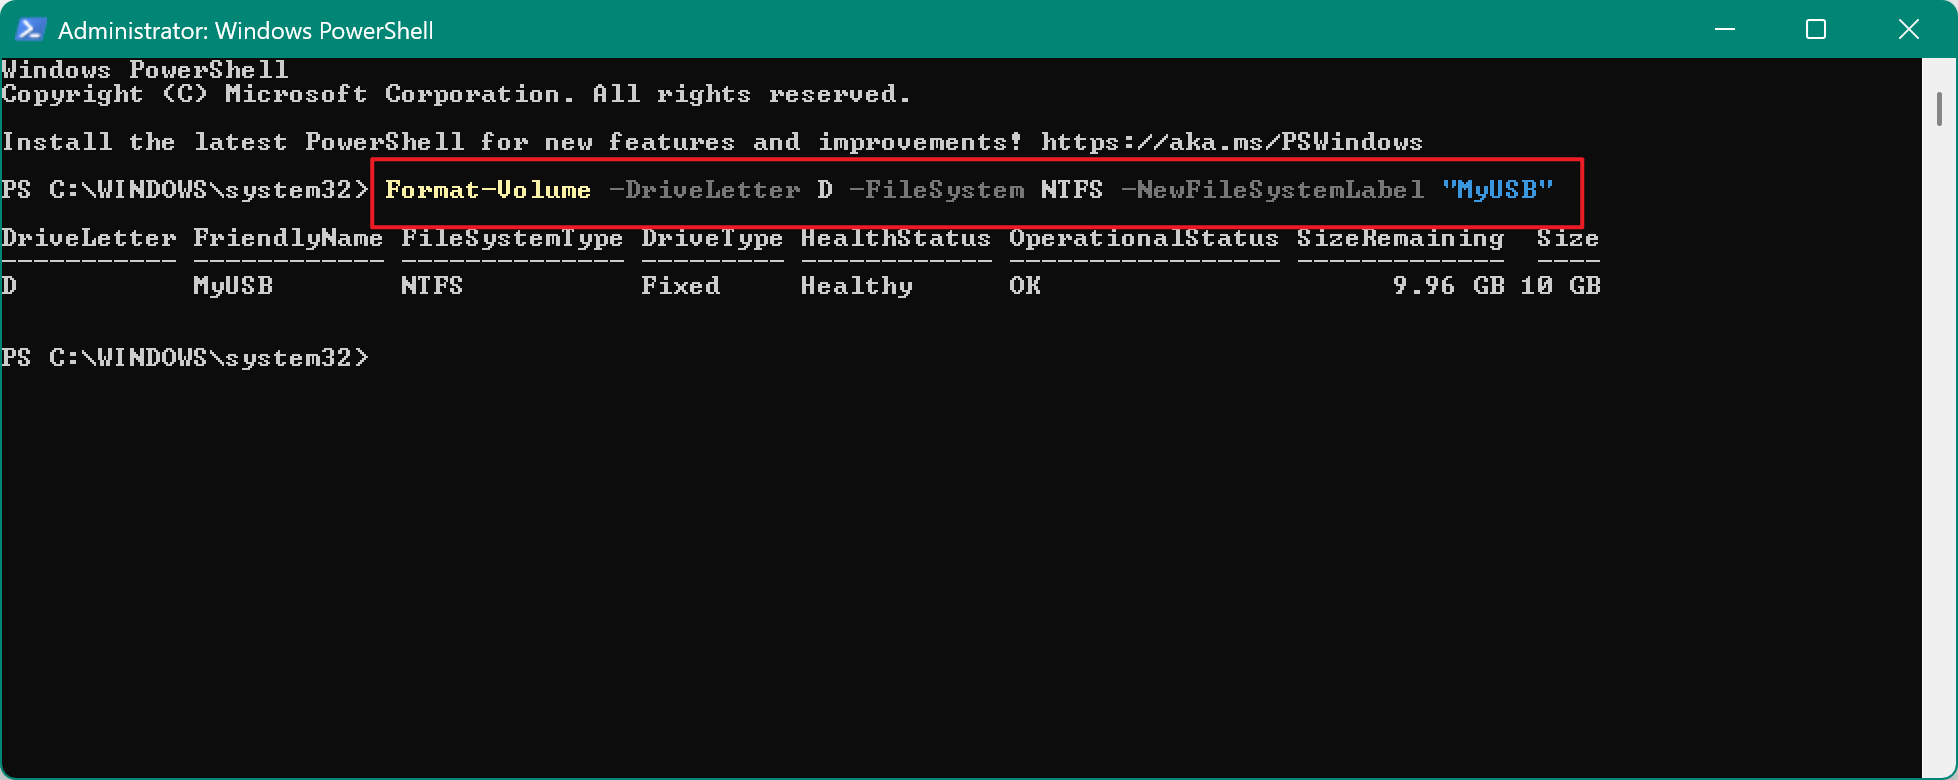
- Type the following command (Replace X with the actual drive letter):
Format-Volume -DriveLetter X -FileSystem NTFS -NewFileSystemLabel "MyUSB"
![Format USB to NTFS Using PowerShell]()
Works On: Windows 11, 10
Best For: Scripting and automation
What to Do If You Can't Format USB to NTFS
Sometimes, despite using the correct methods, Windows fails to format a USB drive to NTFS. This can happen due to various reasons such as file system corruption, hardware issues, write protection, or system restrictions. Here's a breakdown of common problems and how to resolve each one effectively.
1. USB Drive Is Write-Protected
A write-protected USB cannot be formatted until the protection is removed. Some USB drives have a physical switch on the side that locks the drive—check and toggle this if present.
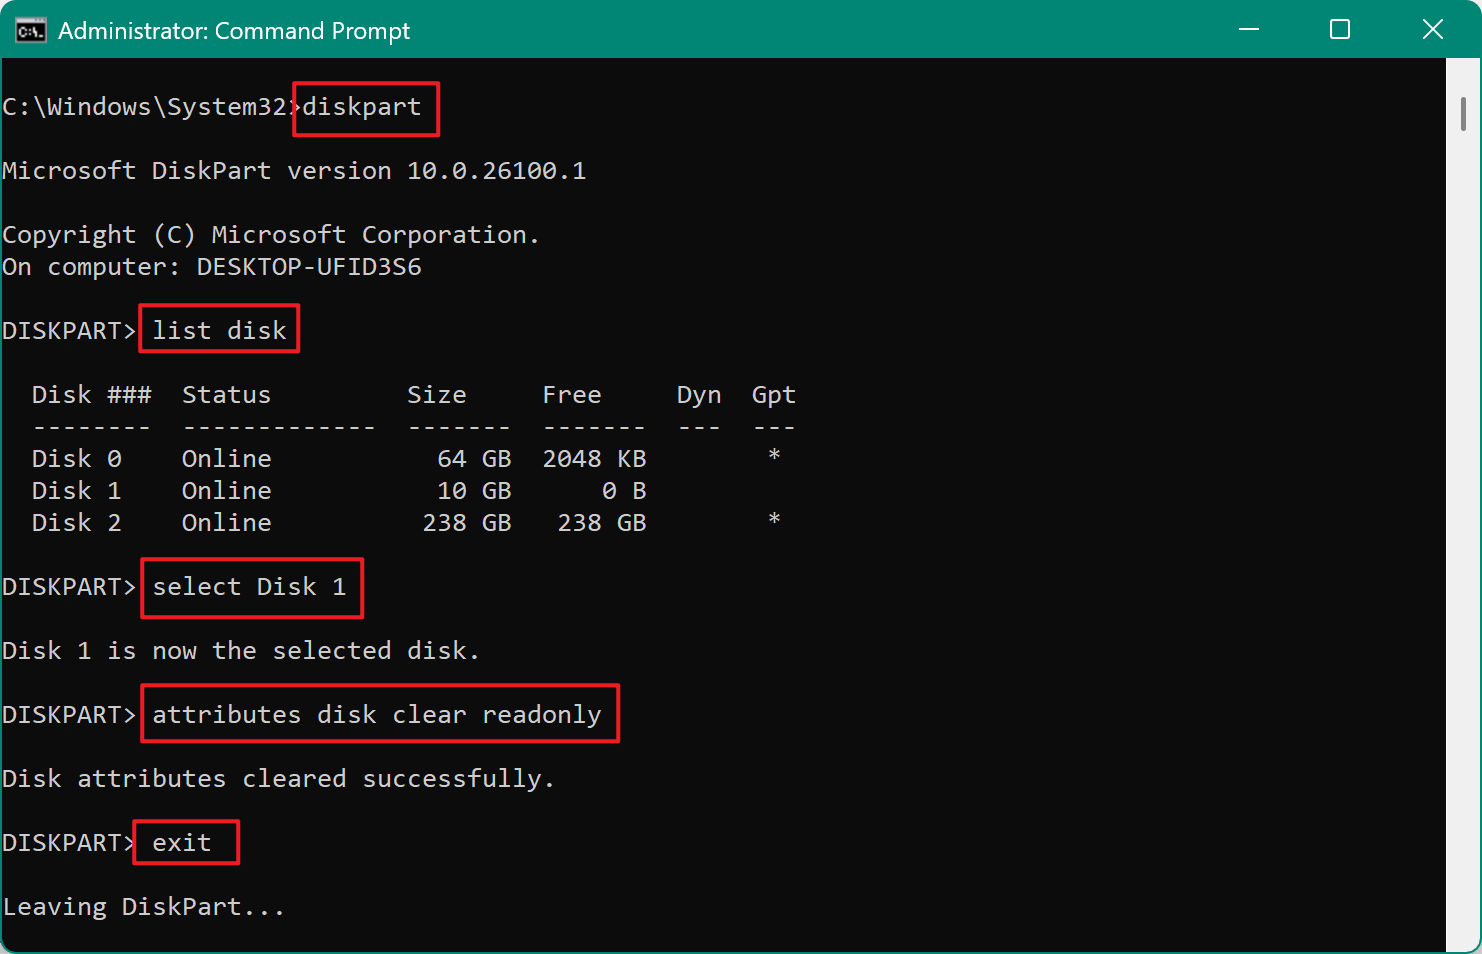
Remove Write Protection via Command Prompt:
- As an administrator, launch the Command Prompt.
- Execute the subsequent DiskPart commands:
diskpart
list disk
select disk X
attributes disk clear readonly
exit![Remove Write Protection via Command Prompt]()
- Try formatting again using File Explorer or Disk Management.
If the drive is still write-protected, the controller firmware may be damaged, and the drive could be permanently locked.
2. "Windows Was Unable to Complete the Format" Error
This error often appears when the file system is corrupted or the drive has bad sectors.
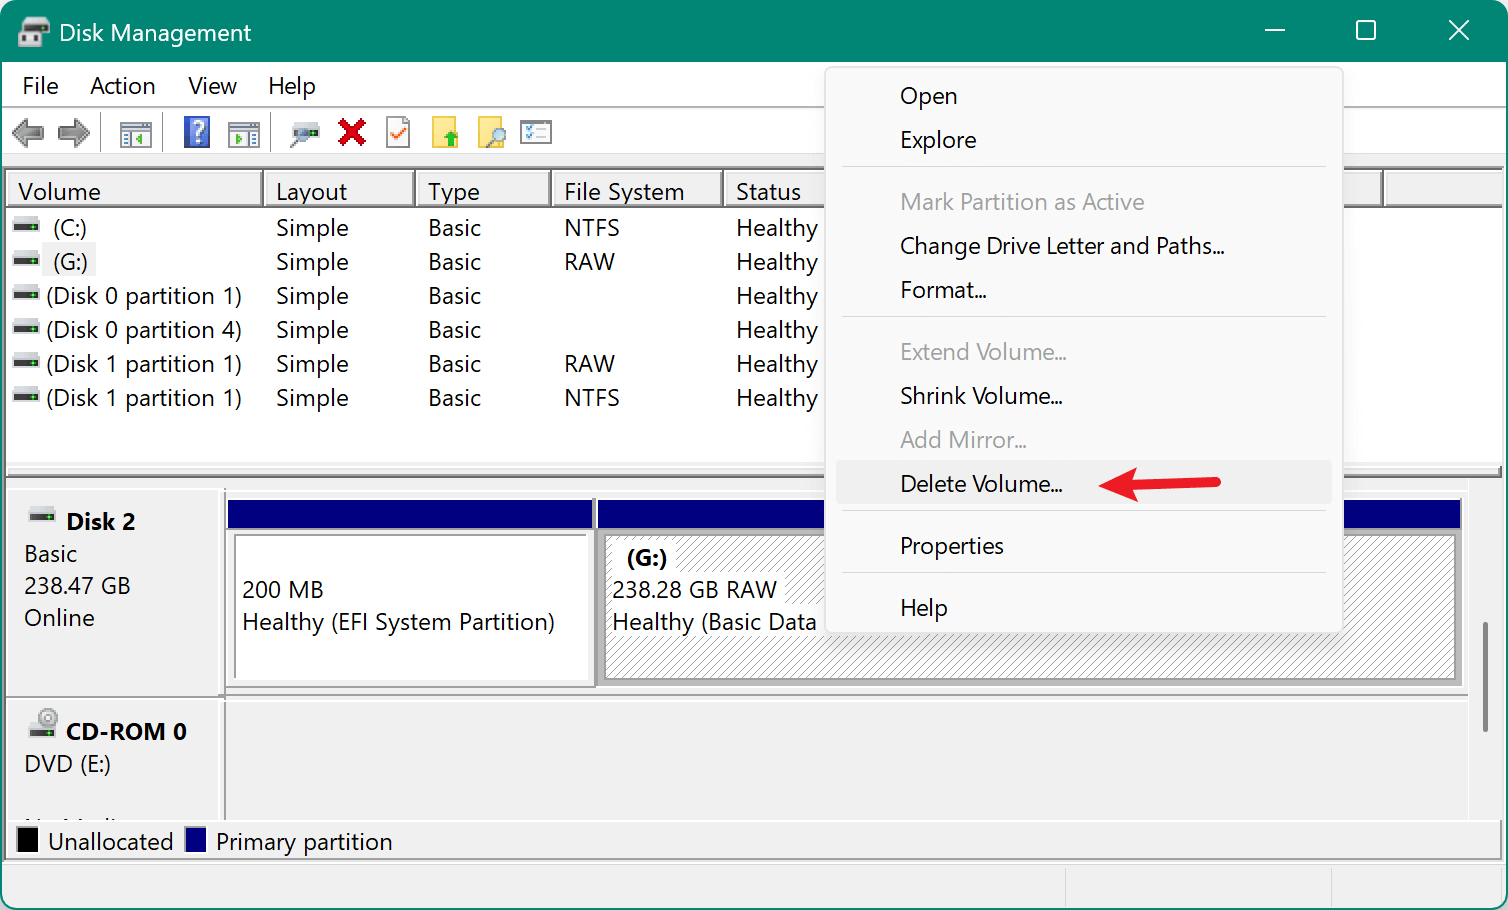
Fix It Using Disk Management:
- Disk Management (diskmgmt.msc) should be open.
- Choose Delete Volume from the menu when you right-click the USB partition.
![Choose Delete Volume from the menu]()
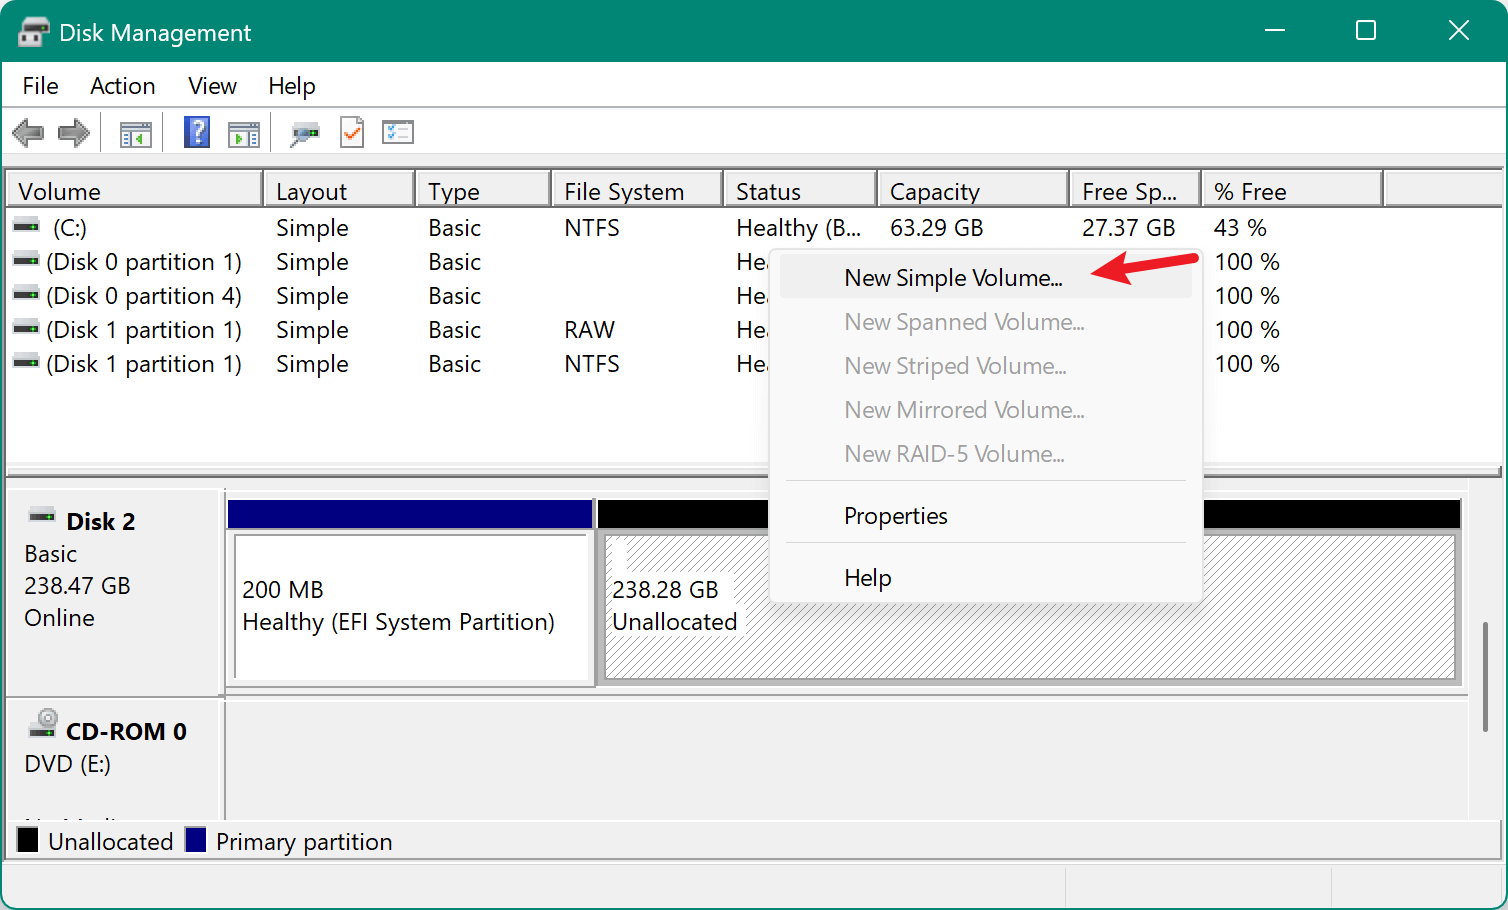
- Pick New Simple Volume from the menu when you right-click the unallocated space.
![Pick New Simple Volume from the menu]()
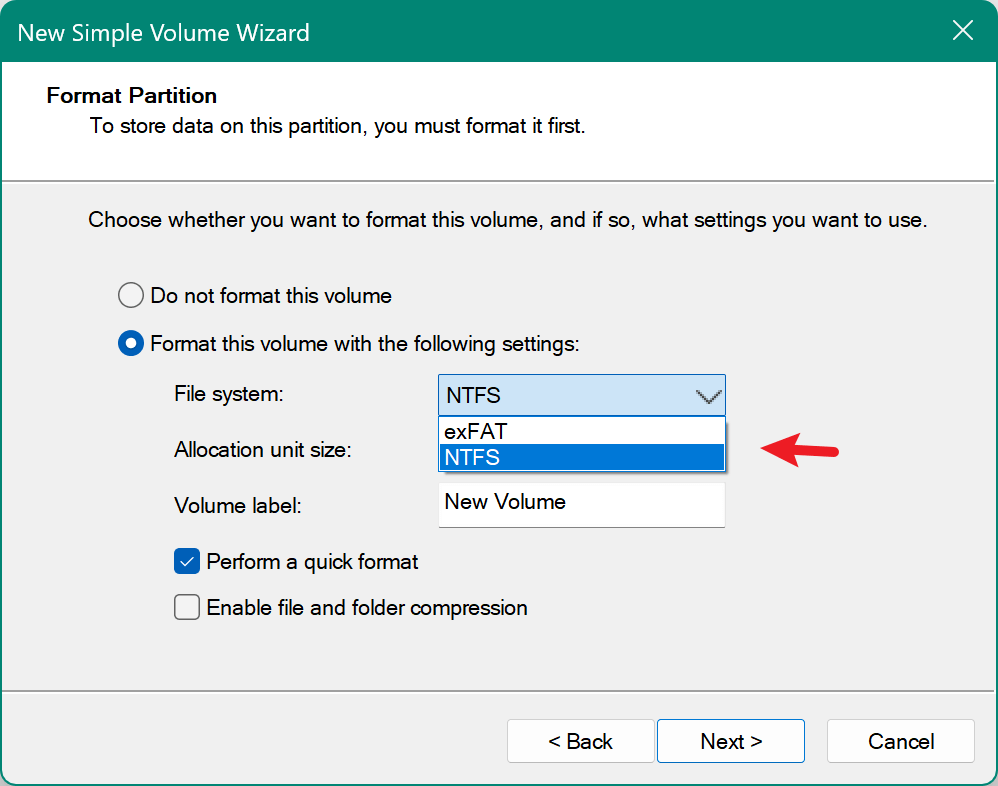
- Follow the wizard to create and format the drive as NTFS.
![Follow the wizard to create and format the drive as NTFS]()
Fix It Using DiskPart:
If Disk Management fails:
- Launch Command Prompt as administrator.
- Use DiskPart to clean the drive:
diskpart
list disk
select disk X
clean
create partition primary
format fs=ntfs quick
exit![Use DiskPart to clean the drive]()
The clean command removes all partitions and file system traces, allowing a fresh NTFS format.
3. USB Drive Shows 0 Bytes or Unallocated
This usually indicates the USB is in RAW state or its partition table is corrupted.
Steps to Fix:
- Open Disk Management.
- If it shows Unallocated, right-click and choose New Simple Volume.
- Format it as NTFS.
If it shows 0 bytes or RAW:
- Try DiskPart's clean and create partition steps.
- To rebuild the partition table, use a third-party partition manager.
4. USB Drive Has Bad Sectors or Is Physically Damaged
Bad sectors on a USB drive can prevent formatting. You can run a surface test or repair bad sectors using built-in or third-party tools.
Run CHKDSK to Fix File System Errors:
- As an administrator, launch the Command Prompt.
- Type the below command:
chkdsk X: /f /r /x
- /f fixes errors
- /r locates bad sectors and recovers readable data
- /x forces the volume to dismount first
![Run CHKDSK to Fix File System Errors]()
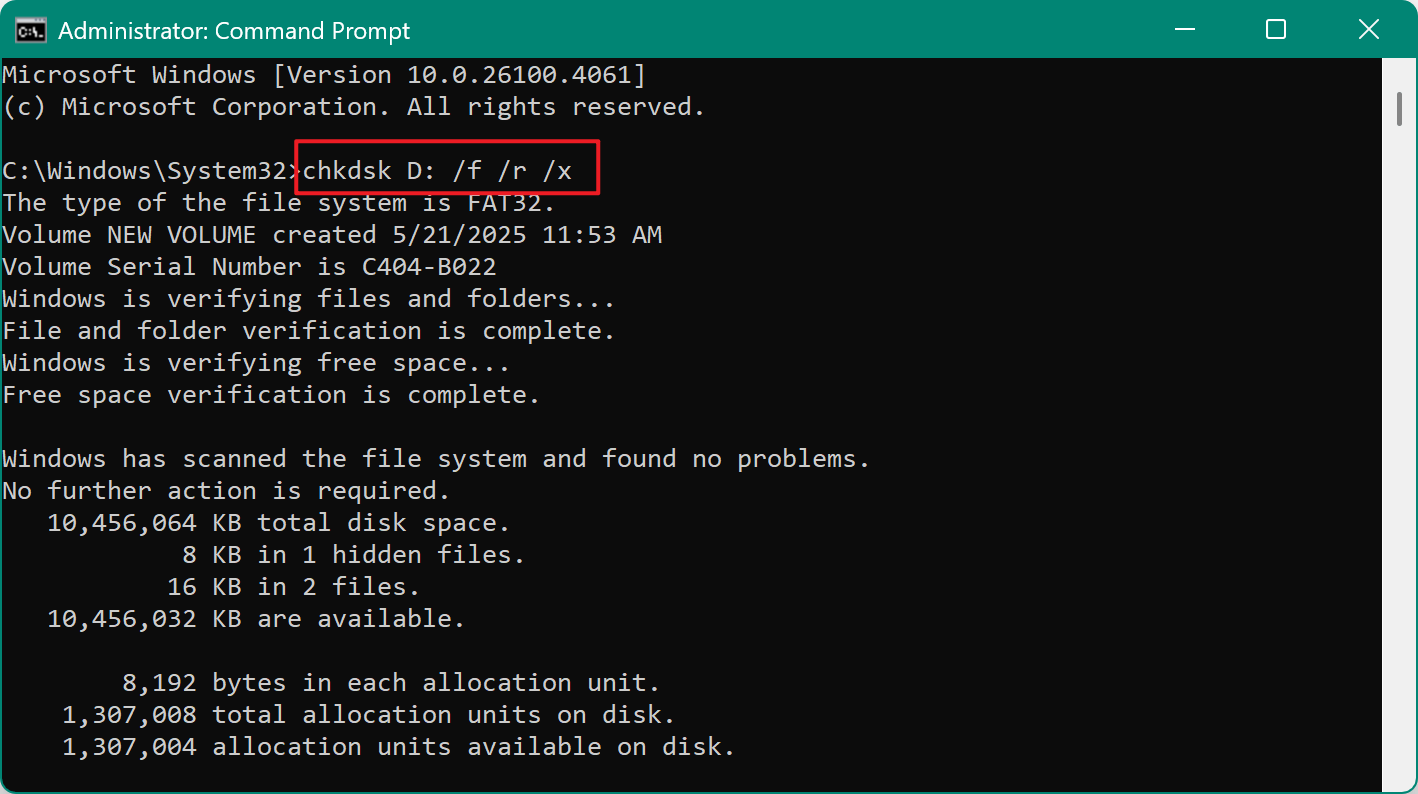
If CHKDSK can't repair the drive, consider using tools like HDD Low Level Format Tool or check if the USB is under warranty for replacement.
5. Use Professional USB Repair Tools
If none of the above methods work, these tools can help:
- HP USB Disk Storage Format Tool: Known to fix problematic drives others can't format.
- AOMEI Partition Assistant: Allows formatting, partition repair, and recovery.
- MiniTool Partition Wizard: Provides surface tests, format options, and bootable recovery media.
6. Try a Different Computer or USB Port
Sometimes, the issue lies with the USB port or drivers. Try the USB drive on:
- Another USB port (preferably USB 2.0 if using older hardware).
- A different computer to rule out OS or driver conflicts.
Format and Wipe NTFS Dive with Data Erasure Tool (Optional)
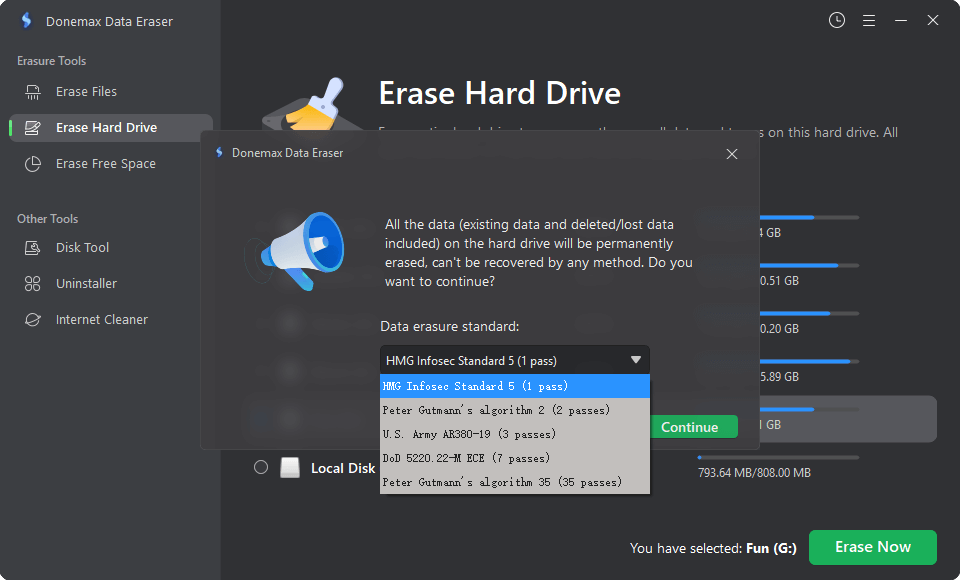
If Windows' built-in tools fail or you want a more user-friendly interface and advanced features, third-party software can help. For example, if you want to format the USB drive and ensure the data on the drive is gone forever, you can try the data erasure tool Donemax Data Eraser.
Donemax Data Eraser
- Advanced data erasure tool with disk formatting and other tools.
- Permanently wipe data from USB drive, SD card, SSD, hard disk, etc.
- Securely erase data to avoid data recovery.
The software can not only format the USB drive, but also ensure the data is gone for good and no recovery method can get back the wiped data. It's useful when you need to sell or donate an old USB drive.
Here are the steps to wipe the USB drive data permanently with Donemax Data Eraser:
Step 1. Connect the USB drive to the computer. Download and install the data wiping tool. Launch the software and choose Erase Hard Drive. Select the USB drive and click Erase Now button.

Step 2. To wipe the data from the drive permanently, you need to select a data wiping algorithm from the drop-down list.
Step 3. At last, start to wipe the data from the USB drive and format it. It will take a while and just wait patiently.
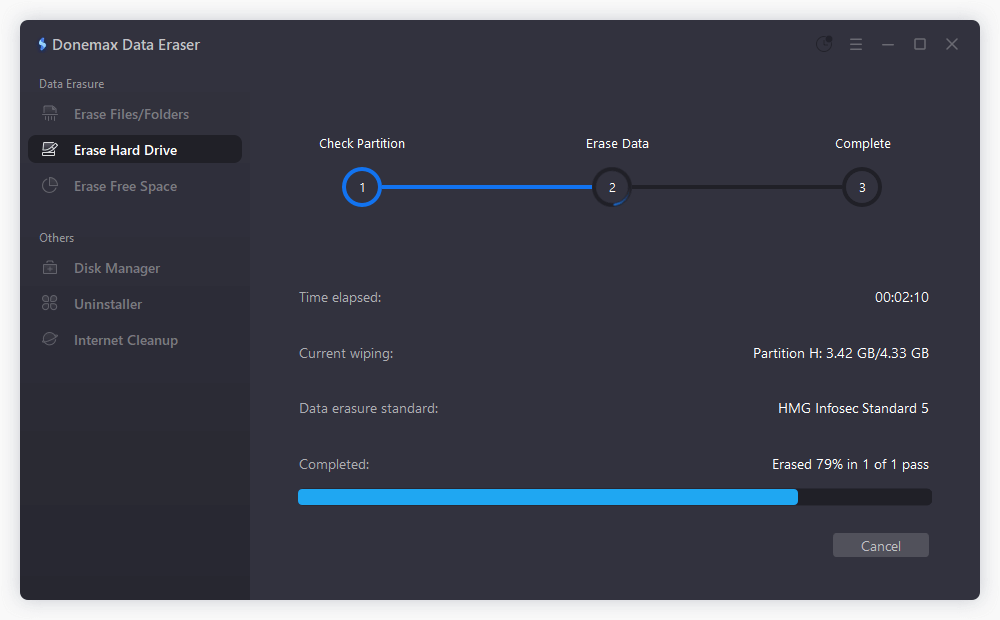
Once the wiping process is finished, the drive is formatted and also the data is wiped permanently. You can feel free to give it away or resell it.
Conclusion
Formatting a USB drive to NTFS on Windows 11, 10, 8, or 7 is straightforward if you follow the right steps and choose the method best suited to your experience level. From File Explorer to DiskPart, each method serves different purposes—from quick formatting to advanced repair.
If your drive is healthy and intended for Windows use, NTFS is the optimal file system offering robustness, security, and support for large files. Just remember to back up your data and check compatibility before formatting.
By understanding the options available and how to troubleshoot common issues, you can ensure your USB drive performs reliably and efficiently for years to come. If the USB drive will be given to another hand, ensure to wipe data from the USB drive and keep your privacy safe.
Donemax Data Eraser
One of the best data erasure programs for permanently erase data from PC, Mac, HDD, SSD, USB drive, digital camera and other devices. Once the data is erased, it is lost for good, cannot be recovered by any method.
Related Articles
- Mar 09, 2026How to Wipe External Hard Drive on Windows 11 PC?
- Mar 12, 2024Quick Format vs Full Format, What Are the Differences?
- May 17, 2024Best Bit Eraser Software: Erase Data Byte by Byte
- Jul 15, 2025How to Wipe exFAT Drive on Windows or macOS?
- Apr 25, 2025Factory Reset Windows 7: A Complete Step-by-Step Guide
- May 10, 2025How to Wipe Sabrent Rocket External SSD?

Contributing Writer
Christina
Christina is the senior editor of Donemax software who has worked in the company for 4+ years. She mainly writes the guides and solutions about data erasure, data transferring, data recovery and disk cloning to help users get the most out of their Windows and Mac. She likes to travel, enjoy country music and play games in her spare time.

Editor in chief
Gerhard Chou
In order to effectively solve the problems for our customers, every article and troubleshooting solution published on our website has been strictly tested and practiced. Our editors love researching and using computers and testing software, and are willing to help computer users with their problems