
Written byStevenUpdated on May 22, 2025
Format a USB Drive to FAT32 on Windows 11 / 10 / 8 / 7
Approved byGerhard Chou
Summary: The guide shows the methods to format a USB drive to FAT32 on Windows 11/10/8/7, including using system built-in tool and third-party disk formatter. If you want to wipe the data permanently while formatting it, download and try with Donemax Data Eraser.
PAGE CONTENT:
- What is FAT32 and Why Use It?
- Method 1: Format to FAT32 Using File Explorer (Windows GUI)
- Method 2: Format to FAT32 Using Disk Management
- Method 3: Format to FAT32 Using Command Prompt (DiskPart)
- Method 4: Format USB to FAT32 Using PowerShell
- Method 5: Format USB to FAT32 Using Third-Party Tools
- Troubleshooting Common Issues
- Conclusion
Formatting a USB drive is a necessary step for ensuring compatibility across multiple platforms and devices. Among the most commonly used file systems is FAT32, known for its universal support across Windows, macOS, Linux, game consoles, and other digital devices. In this article, we'll explain what FAT32 is, why and when to use it, and how to format a USB drive to FAT32 on Windows 11, 10, 8, or 7 using both native and third-party disk formatting tools.
What is FAT32 and Why Use It?
FAT32 (File Allocation Table 32) is an older but still widely supported file system introduced by Microsoft with Windows 95 OSR2. It has become a standard for removable storage devices due to its broad compatibility with various devices and operating systems.
Advantages of FAT32:
- Universal Compatibility: Works with Windows, macOS, Linux, Android, smart TVs, printers, and gaming consoles like Xbox and PlayStation.
- Lightweight Structure: Simple and efficient for small and medium storage devices.
- Faster Read/Write Speeds on older systems compared to more complex file systems.
Limitations of FAT32:
- File Size Limit: Maximum individual file size is 4GB.
- Partition Size Limit: Officially, Windows restricts FAT32 formatting to drives 32GB or smaller, although the actual limit is up to 2TB in theory.
- No File Permissions or Journaling: Lacks the advanced features of NTFS or exFAT, such as encryption, permissions, or recovery logs.
Use Cases of FAT32:
- USB sticks used in car media players or TVs.
- Drives shared between Windows and macOS systems.
- Firmware updates for routers, drones, and other hardware.
- Bootable drives for BIOS updates or installations.
Things to Know Before Formatting to FAT32
Before formatting any USB drive, keep these important tips in mind:
- Back Up Your Data: Formatting erases all data on the USB drive.
- Drive Capacity: Native FAT32 formatting in Windows does not support USB drives larger than 32GB. For larger drives, third-party disk formatting tools are required.
- Administrator Privileges: Some formatting methods require administrator access.
- Check for Errors: It's a good idea to scan your USB for bad sectors before formatting using tools like chkdsk.
Method 1: Format to FAT32 Using File Explorer (Windows GUI)
The easiest way to format a USB to FAT32 is through File Explorer, but only if the drive is 32GB or smaller. Here is how:
- Insert the USB drive into your computer.
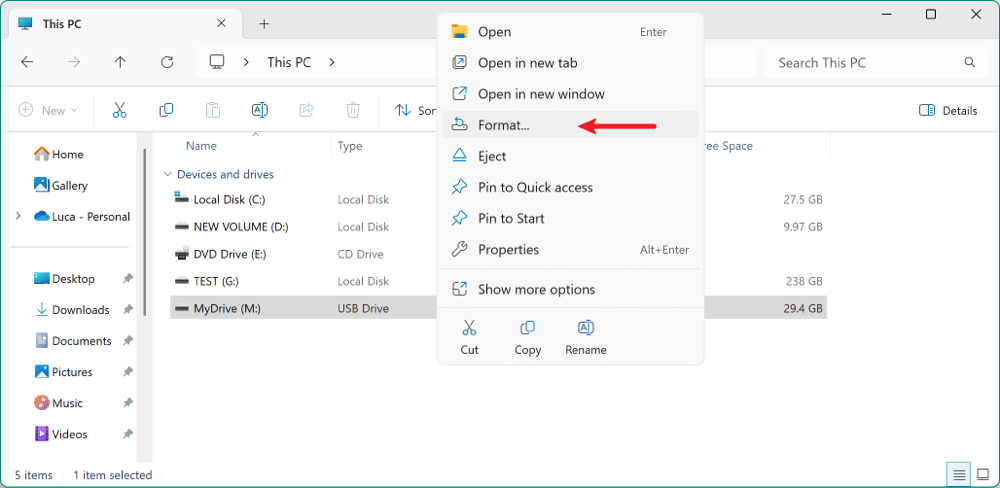
- Open File Explorer and locate the USB under This PC.
- Right-click the USB drive and select Format.
![format USB drive to FAT32 on Windows]()
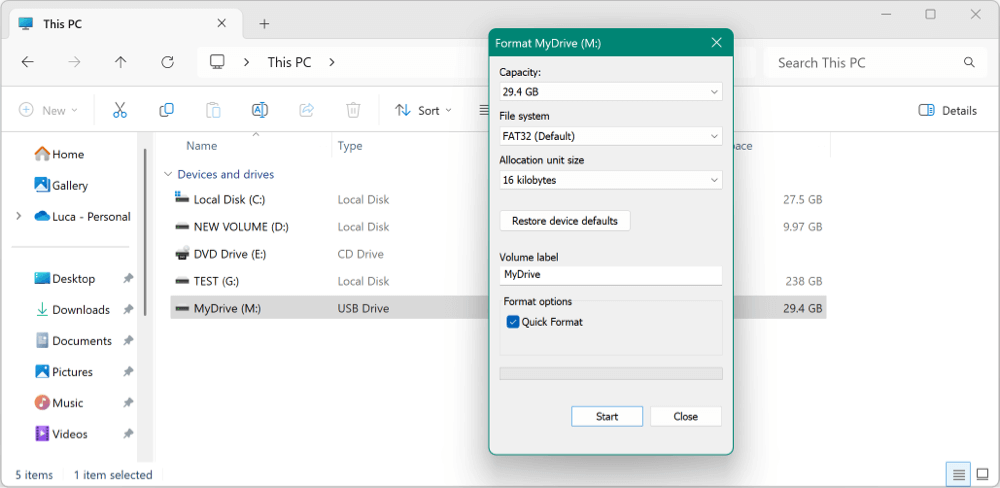
- In the File system drop-down list, select FAT32.
- You can leave Allocation unit size as default.
- Enter a Volume label if desired (this will be the drive name).
- Check or uncheck Quick Format as needed.
- Click Start, then confirm the warning about data loss.
![format USB drive to FAT32 on Windows]()
💡 Notes:
- This method is quick and built into all modern versions of Windows.
- If the drive is larger than 32GB, FAT32 will not be available as an option.
Method 2: Format to FAT32 Using Disk Management
Windows Disk Management offers more control than File Explorer, but it has the same 32GB FAT32 limit. Follow the steps to do the job:
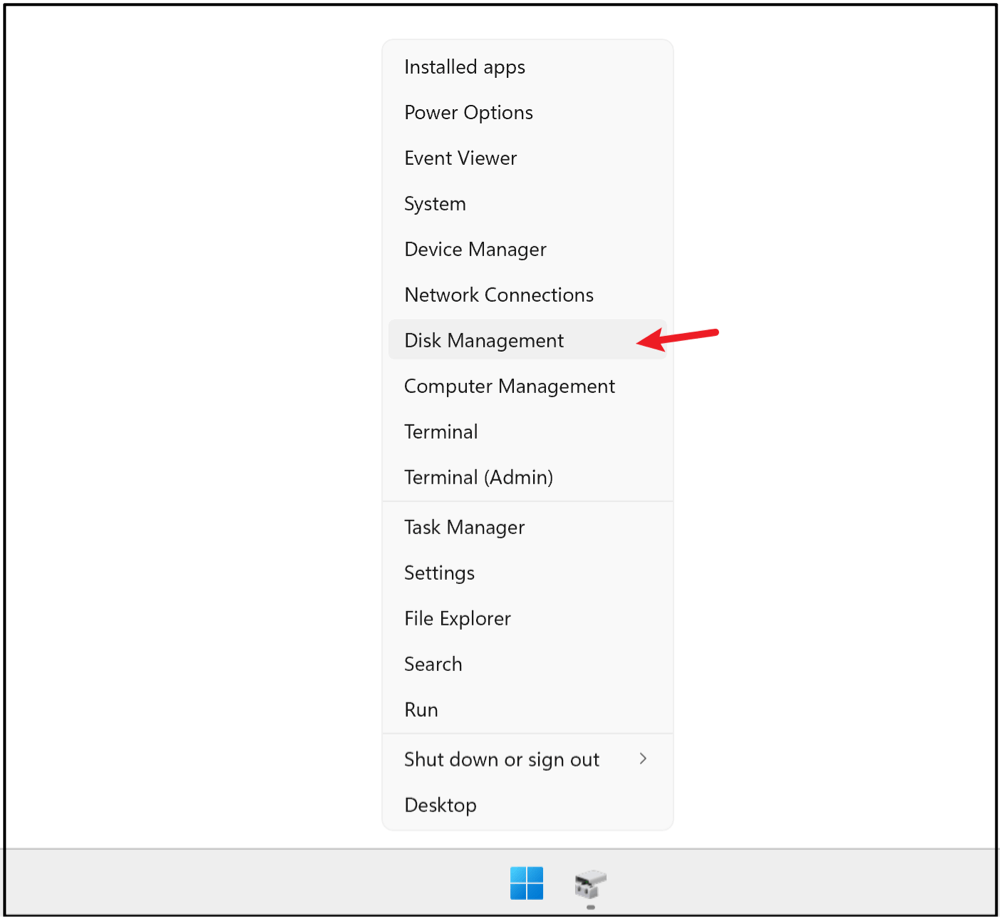
- Press Windows + X and select Disk Management.
![format USB drive to FAT32 on Windows]()
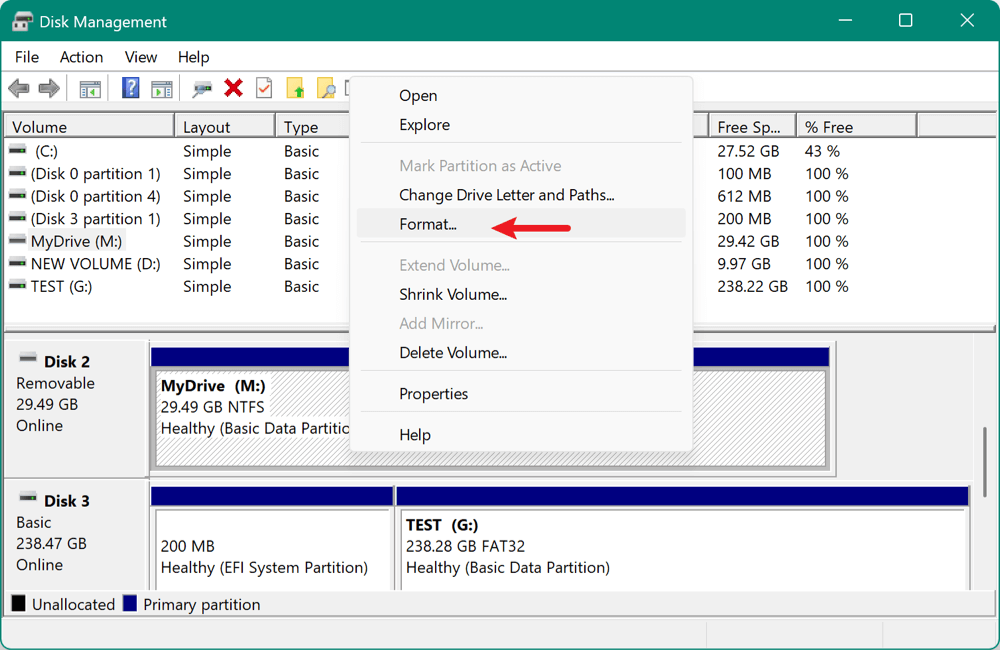
- Locate your USB drive from the list of volumes. Right-click the USB partition and choose Format.
![format USB drive to FAT32 on Windows]()
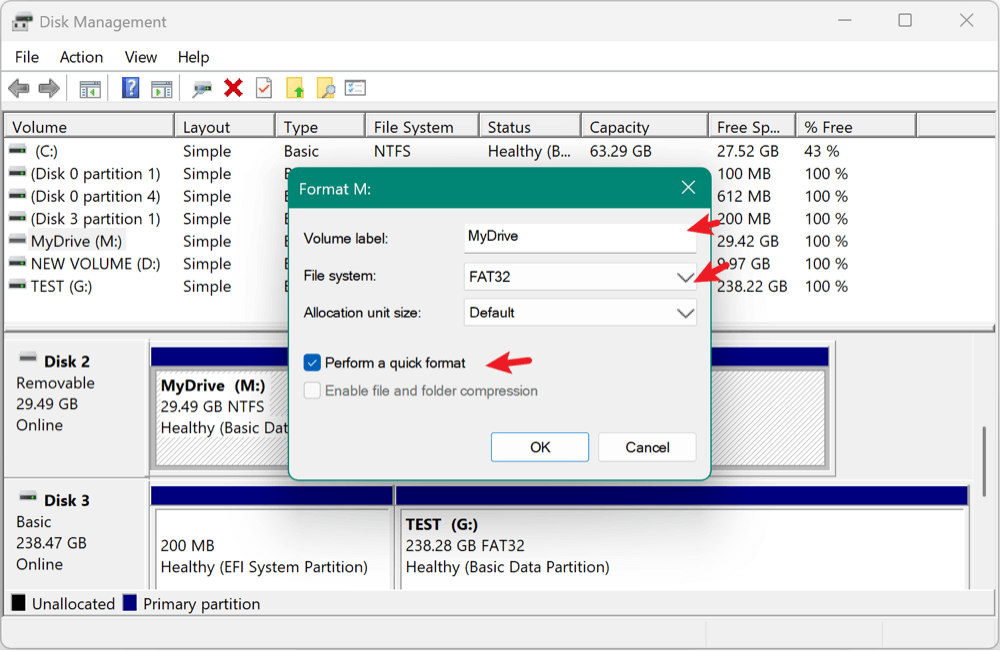
- Select FAT32 from the file system drop-down-list. Choose a volume label and allocation unit size. Tick Perform a quick format option. Click OK to proceed and confirm the formatting warning.
![format USB drive to FAT32 on Windows]()
💡 Notes:
- Disk Management is ideal for creating or deleting partitions before formatting.
- The 32GB FAT32 limitation still applies.
Method 3: Format to FAT32 Using Command Prompt (DiskPart)
If you prefer a more manual and scriptable method, you can use Command Prompt with DiskPart.
Warning: DiskPart can permanently erase drives if used incorrectly. Double-check the disk number!s
Here are the steps to run DiskPart and format the USB drive to FAT32 in Command Prompt:
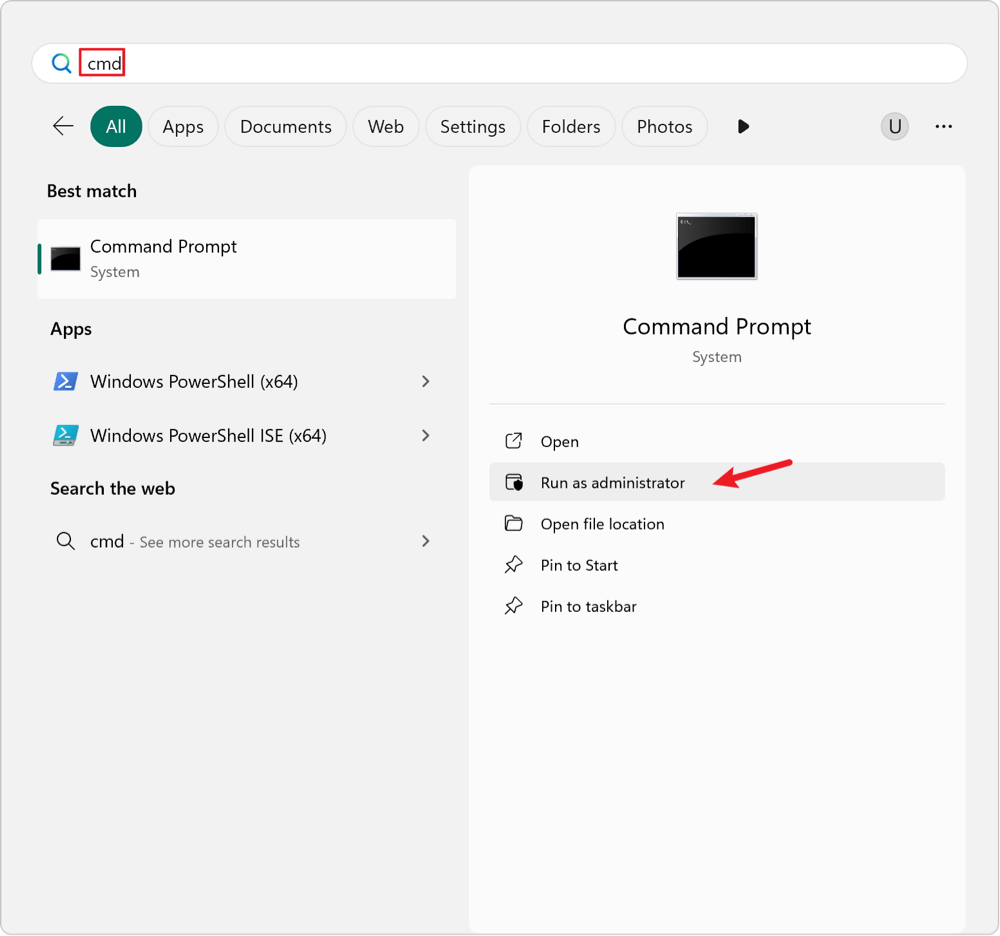
- Open Command Prompt as Administrator (search cmd, right-click → Run as administrator).
![format USB drive to FAT32 on Windows]()
- Type the following commands, pressing Enter after each:
diskpart
list disk
select disk X (replace X with your USB disk number)
list partition
select partition Y (or create one if needed)
format fs=fat32 quick
exit

💡 Notes:
- DiskPart is useful for cleaning and re-partitioning drives.
- You may not be able to format drives larger than 32GB with this method unless you create a smaller partition first.
Method 4: Format USB to FAT32 Using PowerShell
PowerShell offers another command-line method that supports automation and scripting. Format the USB drive to FAT32 with the following steps:
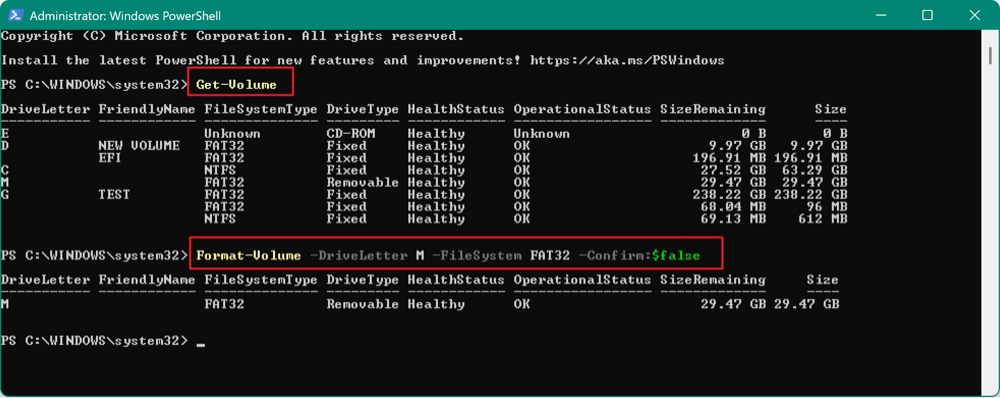
- Open PowerShell as Administrator.
![format USB drive to FAT32 on Windows]()
- Use the Format-Volume command:
Get-Volume
Format-Volume -DriveLetter X -FileSystem FAT32 -Confirm:$false

Replace X with your actual USB drive letter.
💡 Notes:
- This command also works only for drives 32GB or smaller.
- Ideal for system admins and advanced users scripting deployments.
Method 5: Format USB to FAT32 Using Third-Party Tools
When you're trying to format a USB drive larger than 32GB to FAT32, you'll quickly find that Windows won't let you. Both File Explorer and Disk Management restrict FAT32 formatting to drives of 32GB or less, even though the FAT32 file system can technically support volumes up to 2TB. This artificial limitation can be bypassed using third-party utilities designed for greater flexibility.
Below are some of the most effective and reliable tools for formatting USB drives (even large-capacity ones) to FAT32:
1. FAT32 Format by Ridgecrop (GUI Tool)
FAT32 Format, often referred to as "guiformat," is a lightweight and portable tool specifically built to format large drives to FAT32.
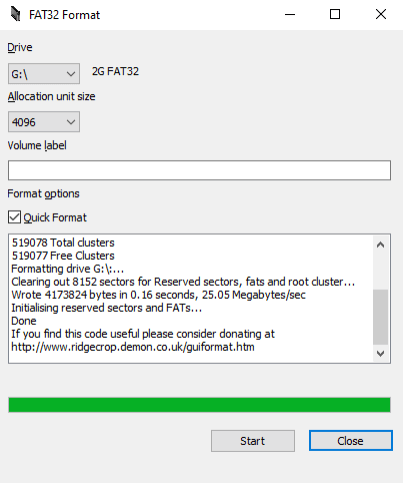
Key Features:
- Free and portable (no installation needed).
- Supports USB drives much larger than 32GB (tested with up to 2TB).
- Simple and clean user interface.
How to Use:
- Download the tool from the official Ridgecrop website.
- Run the .exe file directly (no installation required).
- Select your USB drive under the Drive drop-down list.
- Choose an Allocation unit size (Default is usually fine).
- (Optional) Enter a volume label (drive name).
- Check Quick Format for faster operation.
- Click Start, then confirm the warning prompt.
Pros
- Extremely fast and lightweight.
- Trusted by tech professionals.
- Successfully formats USB drives that Windows refuses to.
Cons
- Lacks advanced options (e.g., file system tweaks).
- Interface looks dated.
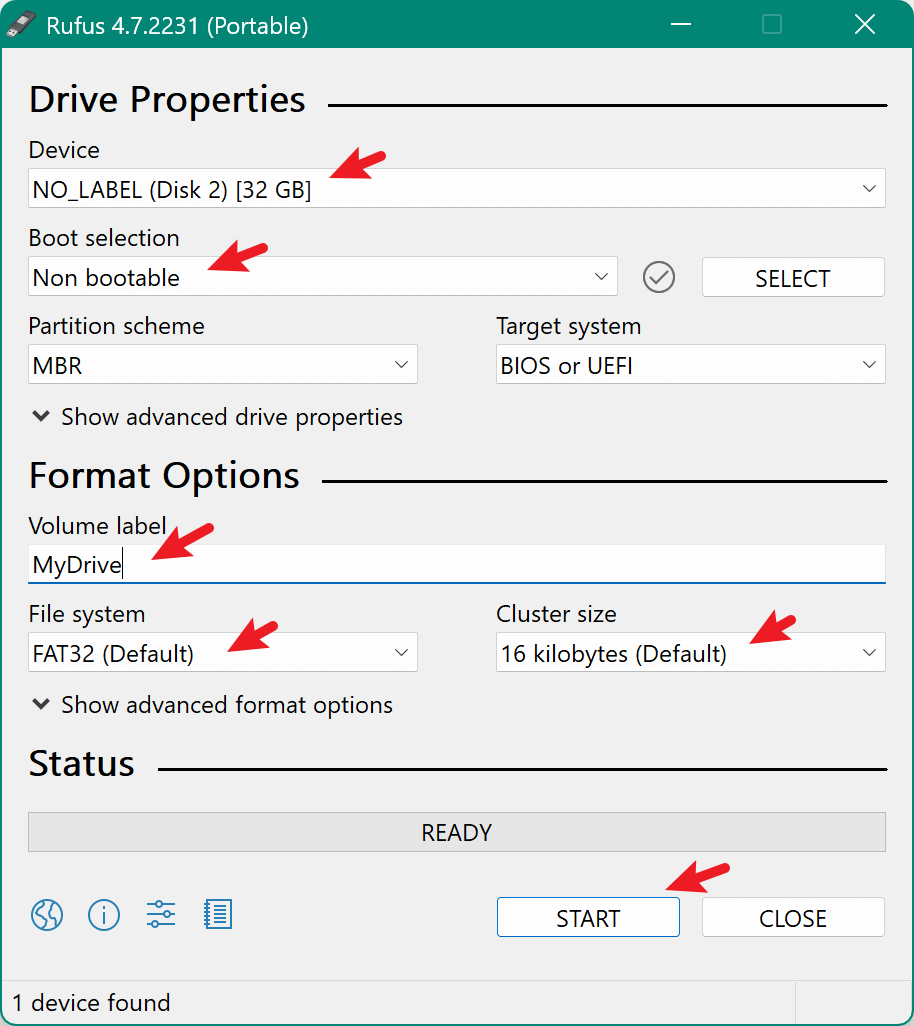
2. Rufus
Rufus is widely known as a bootable USB creation tool, but it also offers powerful and flexible formatting options, including FAT32 support for large drives.
Key Features:
- Supports FAT32, NTFS, exFAT, and UDF.
- Can create bootable drives for Windows, Linux, or BIOS updates.
- Allows formatting USBs larger than 32GB to FAT32.
How to Use:
- Download from the official site
- Open the application (no installation required).
- Under Device, select your USB drive.
- Under Boot selection, choose Non-bootable (unless you're making a bootable USB).
- Add a Volume label, if desired.
- Under File system, select FAT32.
- Click Start, then confirm the formatting process.
![format USB drive to FAT32 on Windows]()
Pros
- Offers detailed formatting and partition options.
- Regularly updated and widely trusted.
- Suitable for advanced users and system admins.
Cons
- Interface may be intimidating for beginners.
- Some antivirus programs may flag the .exe file (false positives).
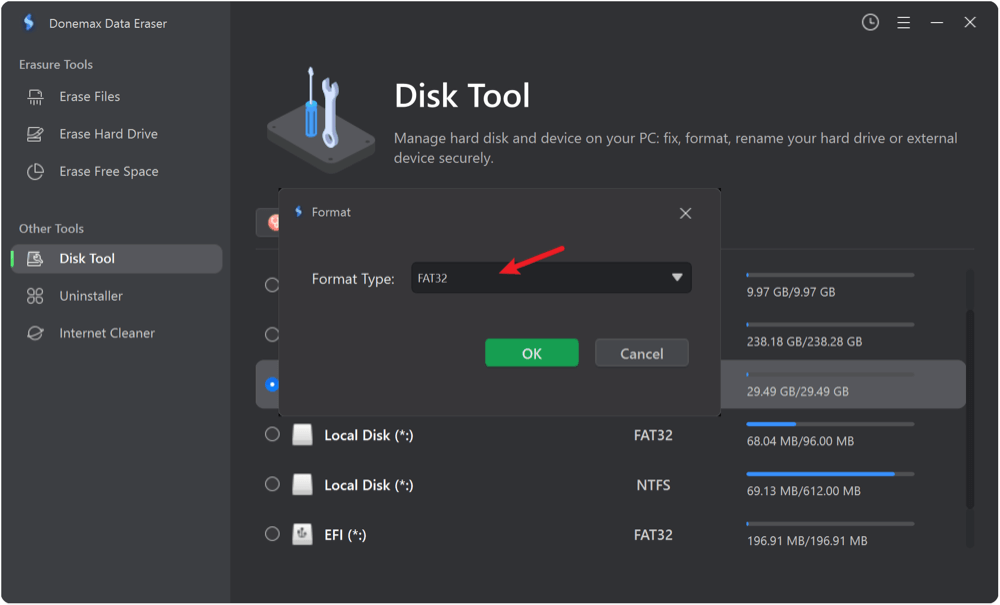
3. Donemax Data Eraser
Donemax Data Eraser is a full-featured data erasure tool that offers advanced disk management functions, including disk formatting. This tool cannot support FAT32 formatting for drives larger than 32GB.
Donemax Data Eraser
- Disk formatter for FAT32, NTFS, exFAT and more.
- Wipe data permanently to avoid data recovery.
- Full of data wiping and disk management functions.
Key Features:
- Shred files or wipe drives to ensure the data is gone forever.
- Format to FAT32, NTFS, exFAT, and more.
- Visual interface makes data wiping and disk management easier for non-technical users.
How to Use:
- Download and install the software on your computer. Launch the program. Select the Disk Tool feature.
- Right-click your USB drive from the disk list and choose Format.
![format USB drive to FAT32 on Windows]()
- Select FAT32 as the file system (Format Type). Confirm the operation and click OK.
![format USB drive to FAT32 on Windows]()

If you formatted a USB drive to FAT32 with all the above methods, the data on the drive is not gone exactly. With professional data recovery software, it's easy to recover the data from the formatted USB drive.
How to Unformat USB Drive and Get Lost Data Back?
Download the best USB drive unformat software - Donemax Data Recovery to help you quickly recover the lost data from the formatted USB drive.
Then how to ensure the data is wiped permanently after formatting it? With the feature Erase Hard Drive in the software Donemax Data Eraser, you can make it. The feature will not only format the USB drive, but also wipe the data from the drive and ensure the data will no longer be recoverable in any way. Just select the USB drive and click Erase Now and follow the wizard to erase the disk data permanently.

Pros
- Intuitive drag-and-drop interface.
- Supports large drives and complex disk setups.
- Great for managing partitions on SSDs, HDDs, and flash drives.
Cons
- Free version has limitations (e.g., cannot resize system partitions).
- Larger download and installation required compared to portable tools.
Troubleshooting Common Issues
1. Windows Was Unable to Complete the Format
Causes: Corrupted USB, write-protection, or bad sectors.
Fixes:
- Use chkdsk X: /f to repair errors.
- Disable write protection using registry edits.
- Try formatting with third-party tools.
2. Format Option Greyed Out
Causes: Could be due to missing partition or unsupported file system.
Fixes:
- Use Disk Management to delete and recreate partitions.
- Use DiskPart to clean the drive: diskpart → list disk → select disk → clean.
3. USB Not Showing Up
Causes: May be due to driver issues or port problems.
Fixes:
- Try different ports or another PC.
- Check Device Manager for unrecognized devices.
- Use diskmgmt.msc to assign a drive letter.
Conclusion
Formatting a USB drive to FAT32 ensures maximum compatibility with a wide array of devices and systems. While Windows natively supports FAT32 formatting only for drives 32GB or smaller, there are effective workarounds using third-party utilities for larger drives. Whether you're preparing a bootable USB, updating firmware, or sharing files across platforms, FAT32 remains a reliable choice.
Choose the formatting method that best fits your needs:
- File Explorer or Disk Management for quick tasks on smaller drives.
- Command Line or PowerShell for more control and automation.
- Third-party tools to handle larger USB drives with ease.
And always remember—back up your data before you format!
Donemax Data Eraser
One of the best data erasure programs for permanently erase data from PC, Mac, HDD, SSD, USB drive, digital camera and other devices. Once the data is erased, it is lost for good, cannot be recovered by any method.
Related Articles
- Feb 17, 2025How to Dispose of a Dying Hard Drive?
- May 10, 2024How to Wipe An USB Flash Drive on Windows 11?
- May 14, 2025Top 3 File Shredder for Windows 11: Delete Files Permanently
- Mar 11, 2026Keep Your Secrets Safe: How to Permanently Erase Data from a USB Flash Drive
- May 10, 2025How to Force Delete a Stubborn File or Folder on Windows Computer? [6 Methods]
- Jun 09, 2025About 'Reset This PC': How to Use 'Reset This PC' to Factory Reset a Computer

Contributing Writer
Steven
Steven has been a senior writer & editor of Donemax software since 2020. He's a super nerd and can't imagine the life without a computer. Over 6 years of experience of writing technical solutions and software tesing, he is passionate about providing solutions and tips for Windows and Mac users.

Editor in chief
Gerhard Chou
In order to effectively solve the problems for our customers, every article and troubleshooting solution published on our website has been strictly tested and practiced. Our editors love researching and using computers and testing software, and are willing to help computer users with their problems