
Written byStevenUpdated on Mar 26, 2026
Securely Erase Data from SSD: Protect Your Privacy
Approved byGerhard Chou
Before we start: When you need to sell, donate or abandon an SSD, there is an important thing to check: Wiping the privacy or confidential data from the drive. Which can protect your private information from data leakages. Donemax Data Eraser is a professional choice in such cases.
PAGE CONTENT:
Sometimes, you may need to say goodbye to your old SSD. Whether you're selling your laptop, returning a leased workstation, or just passing a drive along to a family member, you probably have one big question: "How do I make sure my private data is actually gone?"
If you've spent any time looking into this, you've likely heard that SSDs (Solid State Drives) are a bit "different" than the old-school spinning hard drives (HDDs) we grew up with. You're right—they are. And if you use the old methods to wipe them, you might be leaving your data vulnerable or, worse, wearing out your drive for no reason.
In this guide, we'll walk you through everything you need to know to securely erase data from SSD storage so that it stays gone forever.
Why SSD Data Erasure is Different (And Why It Matters)
To understand how to clear an SSD, we first have to look at how they store information. Unlike an HDD, which writes data to a specific physical spot on a magnetic platter, an SSD uses NAND flash memory.
The "Wear Leveling" Factor
SSDs use something called "Wear Leveling." To prevent one part of the drive from wearing out faster than the others, the drive's controller constantly moves data around. This means that when you "overwrite" a file, the new data might be written to a completely different physical location, leaving the old data sitting in a hidden corner of the chip.
The Role of TRIM
Modern SSDs use a command called TRIM. When you delete a file, TRIM tells the SSD that those data blocks are no longer needed. However, TRIM doesn't always happen instantly, and it doesn't guarantee that the data is unrecoverable by advanced forensic tools.
To truly securely erase data from SSD, you need a method that speaks the SSD's language.
The Risks of Not Securely Erasing Your SSD
Before we get into the "how-to," let's talk about the "why." Simply dragging files to the Recycle Bin or Trash is like taking a sensitive document and putting it in a wastebasket. Anyone can just reach in and grab it.
- Identity Theft: Your browser history, saved passwords, and "auto-fill" forms are goldmines for hackers.
- Financial Records: Tax returns, bank statements, and spreadsheets contain everything needed to compromise your accounts.
- Company Data: If you use your personal SSD for "Work from Home" tasks, a data leak could violate your employment contract.
How to Securely Erase Data from SSD: 3 Proven Methods
Depending on your comfort level with technology, there are a few ways to achieve a professional-grade SSD data erasure.
Method 1: Using Professional Data Erasure Software (Recommended)
For most home users, a dedicated tool like Donemax Data Eraser is the safest and easiest route. These tools are designed to trigger the internal "Secure Erase" commands of the SSD or use algorithms that bypass wear-leveling issues.
Donemax Data Eraser
- Most reliable data erasure software for SSD.
- Wipe data and ensure the wiped data unrecoverable.
- Shred files or wipe drive data in 3 different modes.
Why choose this?
- Simplicity: No need to learn complex code or command lines.
- Safety: It won't "brick" your drive or reduce its lifespan unnecessarily.
- Verification: You get a report confirming the data is 100% destroyed.
Method 2: Manufacturer Utilities
Most major SSD brands (like Samsung, Crucial, Western Digital, and SanDisk) offer their own "SSD Toolbox" software. These often include a "Secure Erase" feature.
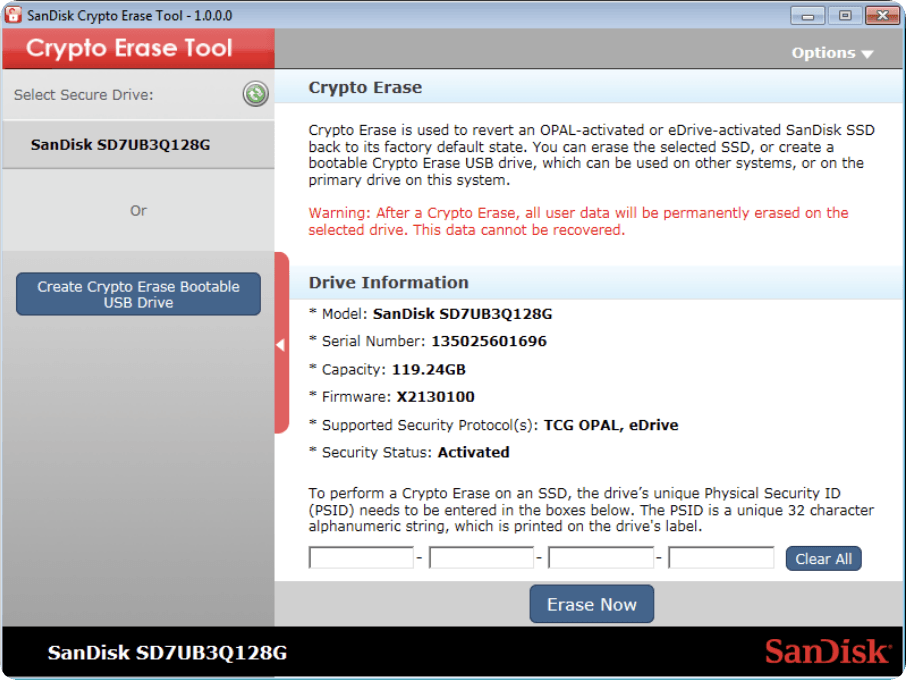
📌 Note: This only works if the software supports your specific brand and model.
Method 3: BIOS/UEFI Secure Erase
Many modern motherboards have a built-in "Secure Erase" utility located in the BIOS settings.
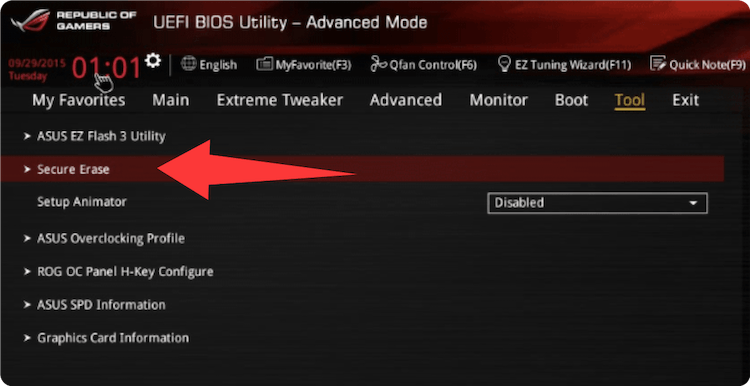
📌 Note: This is a "heavy-duty" option and is usually reserved for the drive that holds your Operating System (C: drive).
Step-by-Step Guide: Securely Erasing Your SSD with Ease
Ready to wipe the slate clean? Follow these steps for a stress-free erasure process.
Step 1: Backup Your Essentials
We can't stress this enough: Data erasure is permanent. Once you start this process, your data is gone—even the most expensive recovery services won't be able to get it back. Copy your photos, documents, and game saves to a cloud drive or a different physical disk first.
Step 2: Connect the SSD
If you're wiping an external SSD, plug it in via USB. If it's an internal drive you've pulled from another computer, you can use a SATA-to-USB adapter or an M.2 NVMe enclosure.
Step 3: Select the Target SSD
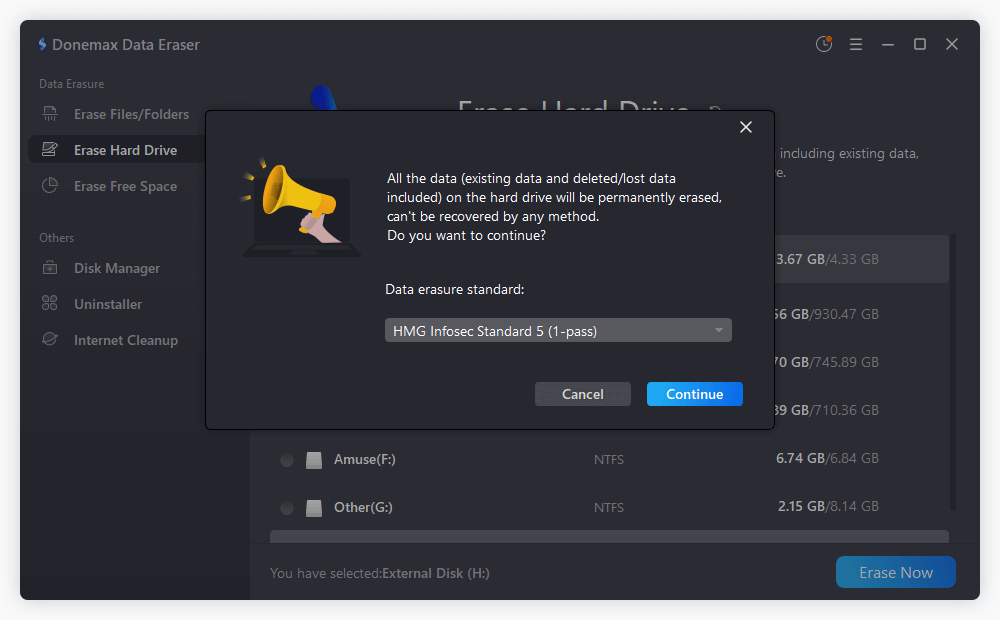
Launch Donemax Data Eraser (or your preferred software). You'll usually see a few different modes. To clear the whole drive for resale, select "Erase Hard Drive." Look closely at the list of drives. Ensure you are selecting the SSD you want to wipe.
📌 Tip: Look at the capacity (e.g., 500GB) to help identify the correct drive.

Step 4: Choose the Erasure Standard
For SSDs, you don't need 35 passes like an old HDD. A specialized SSD erasure algorithm or a standard 1-to-3 pass overwrite is perfect. This ensures the data is destroyed without putting excessive "wear" on the flash memory.
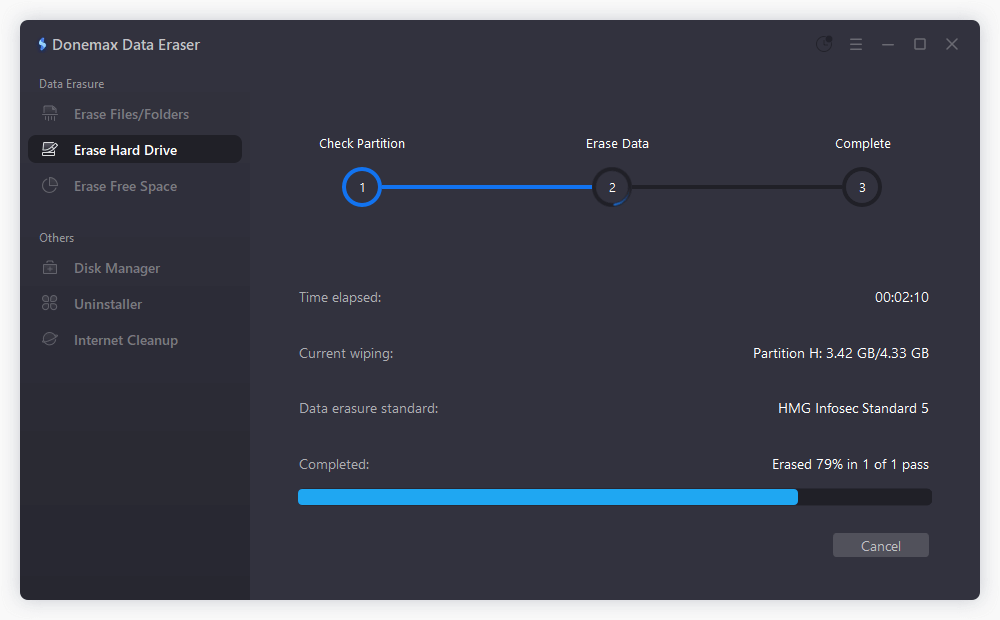
Step 5: Start the Data Erasure Process
Confirm the prompt and let the software work. Because SSDs are much faster than HDDs, the process is usually surprisingly quick!
📌 Pro-Tip: The "Physical Destruction" Alternative: If your SSD is physically broken and you can't run software to wipe it, but you're still worried about the data chips, the only way to securely erase data from SSD hardware is physical destruction. For an SSD, this means the flash memory chips themselves must be crushed or pierced. (Don't try this at home without eye protection!).
Common Myths About SSD Wiping
Myth 1: "You should use the Gutmann method (35 passes) on an SSD."
✘ False. This was designed for 1990s-era hard drives. Doing this to an SSD is unnecessary and will actually shorten the lifespan of the drive by writing to the flash cells thousands of times more than needed.
Myth 2: "Formatting is enough."
✘ False. A "Quick Format" just creates a new file table. The old data is still there. Even a "Full Format" in Windows doesn't always reach the hidden blocks managed by the SSD controller.
Myth 3: "A magnet will wipe my SSD."
✘ Big False. Unlike HDDs, SSDs do not use magnetism. You could stick a powerful magnet to your SSD all day, and your data would remain perfectly intact.
FAQs about Securely Erasing SSD
Yes, but you can't do it while Windows is running. You will need to either connect that SSD to another computer as a secondary drive or use a "Bootable" erasure tool (like a USB stick) to wipe it before the OS starts.
Actually, it can make it faster! Over time, SSDs can get "clogged" with old data that the controller hasn't cleared yet. A proper secure erase resets the blocks to an "empty" state, often restoring the drive to its original out-of-the-box performance.
In the software world, "Shredding" usually refers to deleting specific files or folders. "Wiping" refers to clearing an entire drive or partition. Both achieve the goal of SSD data erasure, just at different scales.
Conclusion: Protect Your Digital Footprint
Your SSD has been a loyal companion, storing your life's work and memories. But when it's time to move on, don't leave the door open for identity thieves. Securely erase data from SSD drives using a certified tool to ensure your privacy remains your own.
Whether you're a student selling a laptop or a professional clearing out old hardware, the peace of mind that comes with permanent data erasure is worth the few minutes it takes.
Donemax Data Eraser
One of the best data erasure programs can permanently delete data. It works on PCs, Macs, HDDs, SSDs, USB drives, digital cameras, and other devices. Once the tool erases the data, no one cannot recover it by any method.
Related Articles
- Jul 27, 2025Stellar BitRaser Review and Better Alternative (2025)
- Jan 15, 2025How to Permanently Delete Files So That The Files Can't Be Recovered?
- Jan 12, 2024How to Wipe NVMe SSD?
- May 26, 2024Wipe Old Hard Drive After Cloning It to SSD
- Oct 18, 2023How to Wipe Samsung Laptop Before Selling or Donating It?
- Oct 16, 2023How to Make Data Recovery Be Impossible?

Contributing Writer
Steven
Steven has been a senior writer & editor of Donemax software since 2020. He's a super nerd and can't imagine the life without a computer. Over 6 years of experience of writing technical solutions and software tesing, he is passionate about providing solutions and tips for Windows and Mac users.

Editor in chief
Gerhard Chou
In order to effectively solve the problems for our customers, every article and troubleshooting solution published on our website has been strictly tested and practiced. Our editors love researching and using computers and testing software, and are willing to help computer users with their problems