
Written byChristinaUpdated on May 20, 2026
Stuck on "Starting Internet Recovery: This May Take a While"? Here's the Fix!
Approved byGerhard Chou
PAGE CONTENT:
If you've ever tried to reinstall macOS, wipe your hard drive, or restore your Mac from a backup, you might have run into a bit of a roadblock. You press the recovery keys, your Mac boots up, and suddenly you're staring at a spinning globe with a message that reads: "Starting Internet Recovery, this may take a while."
And boy, do they mean it. Sometimes it feels like it takes forever.

If you are staring at your screen wondering if your Mac is permanently frozen or if it's actually doing something, don't panic. While this message can look a bit alarming, it is usually completely normal. However, if it has been stuck for hours or the progress bar hasn't budged, there are a few simple tweaks you can do to speed things up or bypass the screen entirely.
Why Is My Internet Recovery Stuck or Taking Hours?
If you've been waiting for an unreasonable amount of time, a few different factors might be bottle-necking your recovery process:
- Slow or Unstable Wi-Fi: Internet Recovery is highly sensitive. If your Wi-Fi dips or drops for even a second, your Mac may panic and restart the download from 0%.
- Network Restrictions and Firewalls: If you are trying this on a corporate network, school Wi-Fi, or behind a strict router firewall, the network might be blocking your Mac from talking to Apple's authentication servers.
- Apple Server Traffic: When Apple drops a major new macOS update, millions of people jump onto their servers at once. High server load can cause download speeds to drop to a crawl.
- Older Mac Hardware: If your Mac uses an older mechanical Hard Disk Drive (HDD) rather than a modern Solid State Drive (SSD), processing and initializing the recovery files will take significantly longer.
Step-by-Step Fixes for Internet Recovery Delays
If your Mac is stuck on the spinning globe, or if you want to speed up the process, walk through these troubleshooting steps.
Step 1: Ditch Wi-Fi and Plug In an Ethernet Cable
Wi-Fi is convenient, but it's prone to interference and drops. For a process as sensitive as Internet Recovery, a hardwired connection is always best.
- Plug an Ethernet cable directly from your router into your Mac (you may need a USB-C to Ethernet adapter).
- Your Mac will automatically detect the wired connection and use it, which usually cuts down the download time by more than half.
Step 2: Reset Your Mac's NVRAM / PRAM
Sometimes, temporary system settings or corrupt boot paths get stuck in your Mac's non-volatile random-access memory (NVRAM). Resetting this can clear out network caches and help the recovery environment initialize properly.
Here is how to do it on Intel-based Macs:
- Turn your Mac completely off.
- Press the Power button, and immediately hold down these four keys together: Option + Command + P + R.
- Keep holding them for about 20 seconds. You might hear the startup chime a second time or see the Apple logo appear and disappear.
- Release the keys and let your Mac start up again while attempting to enter Recovery Mode.
💡 Note: If you have a modern Apple Silicon Mac, there is no manual NVRAM reset key combo. Simply shutting the Mac down completely and turning it back on handles these checks automatically.
Step 3: Check Your Boot Key Combination
Did you know that there are actually different key combinations to trigger Internet Recovery? Depending on what keys you hold down at startup, you tell your Mac to download a completely different file size.
When turning on your Intel Mac, check which one you are using:
- Command (⌘) + Option (⌥) + R: This tells your Mac to download and upgrade to the latest macOS version that is compatible with your computer.
- Shift (⇧) + Option (⌥) + Command (⌘) + R: This tells your Mac to install the exact macOS version that came with your Mac when you bought it out of the box (or the closest version still available).
If the latest version of macOS is massive (like a 12 GB installer), switching to the original version that came with your Mac might give you a much smaller download size, getting you through the recovery screen much faster!
Step 4: Change to a Different Network (Avoid VPNs and Public Wi-Fi)
If you are trying to run Internet Recovery on a public Wi-Fi network (like at a coffee shop or hotel) or a highly secure office network, it will likely fail or stall midway. These networks often require a browser login step ("captive portals") or have strict firewalls that block background downloads.
- Move your Mac to a reliable home network.
- Ensure that any network-wide VPNs or custom DNS configurations on your router are temporarily disabled.
What to Do If Internet Recovery Fails Completely
If you see an error code (like -1008F or -2003F) or the spinning globe just freezes completely, you don't have to give up. You can bypass the internet download entirely using an alternative option.
The Best Alternative: Create a Bootable USB Installer
If your Mac can't pull the installation files from the internet, you can download them on another computer and feed them to your Mac via a USB flash drive. This completely bypasses the dreaded "this may take a while" screen.
What you need:
- A working second Mac.
- A USB flash drive that is at least 16 GB or larger.
How to do it:
- Download macOS: On the working Mac, go to the App Store and download the macOS installer you want to use.
- Format the USB: Open Disk Utility, select your USB drive, and format it as Mac OS Extended (Journaled). Name the drive "USB".
- Use Terminal: Open your Terminal app (found in Applications > Utilities) and paste the following command (replace [Version] with your specific macOS version name, like Tahoe or Sequoia):
sudo /Applications/Install\ macOS\
[Version].app/Contents/Resources/createinstallmedia --volume /Volumes/USBPress Enter, type your Mac password, and let it build the drive.
- Boot your broken Mac: Unplug the finished USB, plug it into the stuck Mac, hold down the Power (or Option) key while turning the Mac on, and select the USB installer from the boot screen.
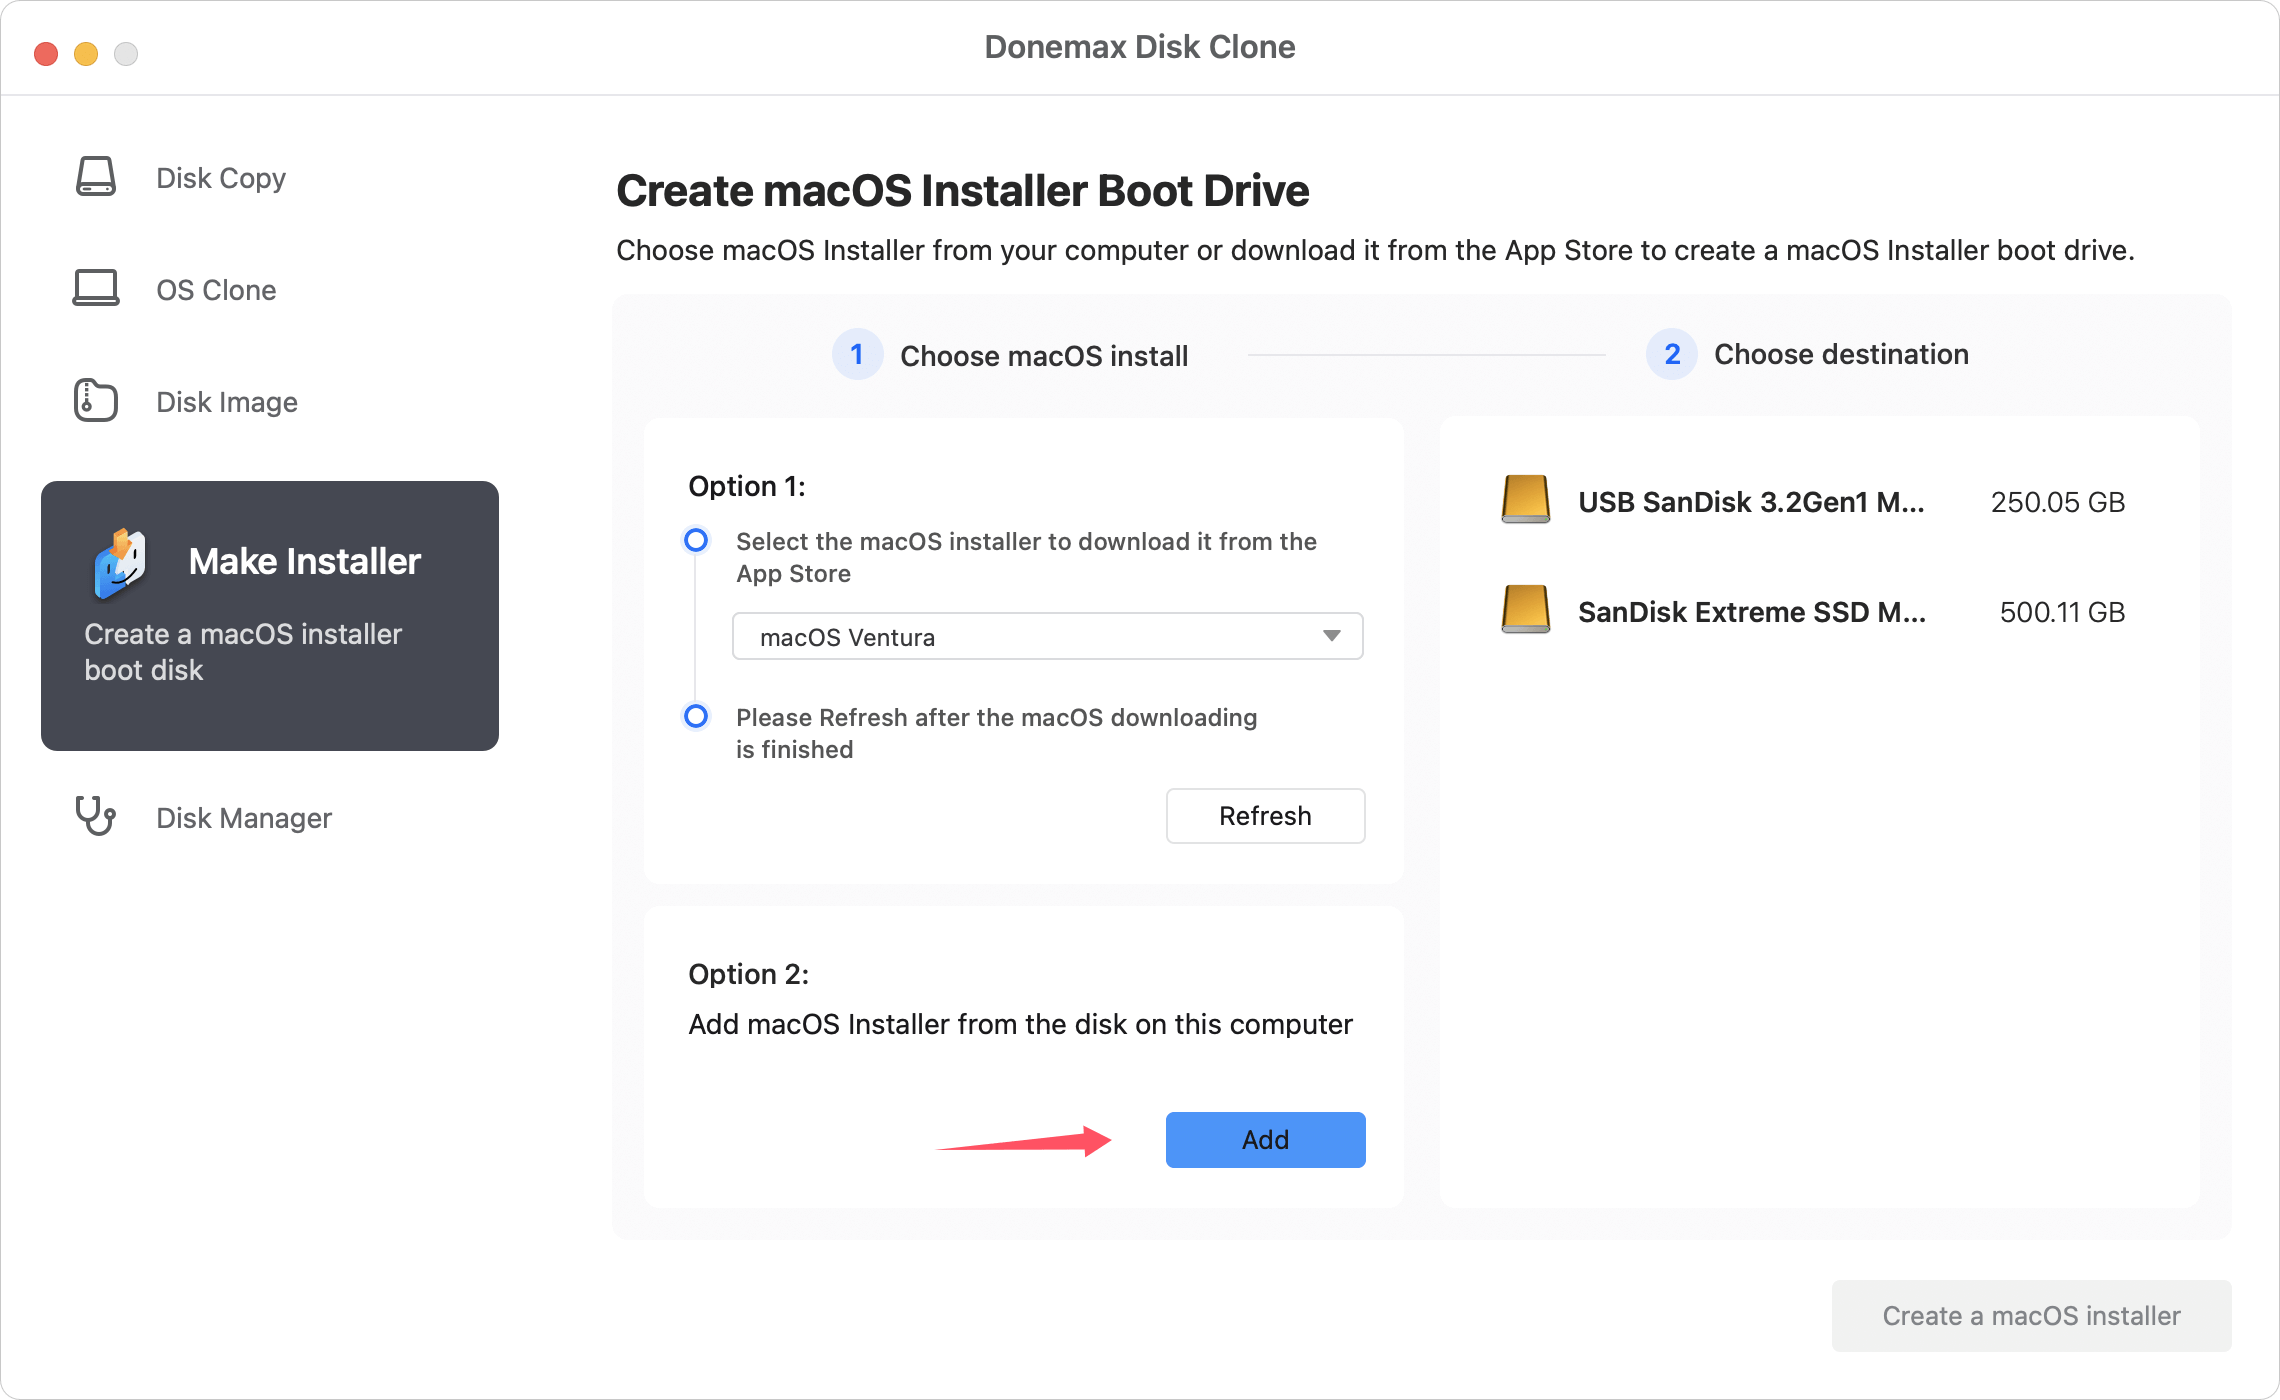
If you don't want to create the installer with Terminal, there is another easy way - using Donemax Disk Clone for Mac. The software offers a feature to create a bootable USB installer easily:
Run the software and choose Make Installer. You can select a version of macOS to download or manually select a downloaded installer file. Choose the USB drive and click Create a macOS installer button.
This method loads instantly because all the installation data is already physically saved onto the USB drive, saving you from downloading gigabytes over unstable Wi-Fi.
Pro-Tips for a Painless macOS Recovery
To make sure your system restoration goes off without a hitch next time, keep these quick tips in mind:
- Keep Powered Up: Always keep your MacBook plugged into its MagSafe or USB-C wall charger during this process. If your Mac dies halfway through writing firmware updates, it can cause severe system issues.
- Unplug Accessories: Disconnect external hard drives, docks, monitors, or keyboards before starting recovery. Sometimes external hardware conflicts with the system check-up phase.
- Back Up Your Data Regularly: Recovery environments are designed to repair or reinstall macOS systems, but things can go wrong. Ensure you have a routine Time Machine backup running so you can easily restore your data if you need to completely wipe your internal drive.
FAQs about Starting Internet Recovery Issue
It varies wildly based on your home internet package. On an average high-speed connection, it should take anywhere from 30 to 45 minutes. If it has been more than 3 hours and the progress bar hasn't moved, it's safe to say it's stuck and you should try restarting or switching to an Ethernet cable.
No, launching Internet Recovery alone does not erase your data. It simply loads the system utilities menu. If you choose to overwrite or format your drive using Disk Utility, that will wipe your files. If you just select "Reinstall macOS", it will usually just refresh the system files while keeping your user data intact.
If your Mac gets stuck in a boot loop during Internet Recovery, it usually points to either a serious hardware problem (like a failing SSD or bad RAM module) or a strict network firewall blocking the download. Try booting from a completely different network or resort to a Bootable USB Installer instead.
Final Thoughts
Seeing "Starting Internet Recovery, this may take a while" shouldn't cause panic. In most situations, your Mac is simply doing some heavy lifting over your network connection to ensure a clean, safe, and compatible restore environment. Give it some patience, optimize your network by swapping to an Ethernet cord, and if all else fails, rely on a trusty bootable USB drive to get the job done manually!
Related Articles
- Jul 02, 2024Cannot Format Samsung SSD? Fix It Now
- Apr 18, 2025Best 4 Methods to Fix Memory Card Not Formatted Error
- Mar 11, 2025Fix Seagate Ultra Compact SSD Not Showing Up on Windows or Mac Computer
- Apr 18, 2025Fix Can't Solve RAW Drive Problem: Here's How to Really Fix It
- Feb 11, 2025How to Fix SD Card Not Showing Up in File Explorer?
- Feb 24, 2025How to Repair a Corrupted Android SD Card: A Complete Guide

Contributing Writer
Christina
Christina is the senior editor of Donemax software who has worked in the company for 4+ years. She mainly writes the guides and solutions about data erasure, data transferring, data recovery and disk cloning to help users get the most out of their Windows and Mac. She likes to travel, enjoy country music and play games in her spare time.

Editor in chief
Gerhard Chou
In order to effectively solve the problems for our customers, every article and troubleshooting solution published on our website has been strictly tested and practiced. Our editors love researching and using computers and testing software, and are willing to help computer users with their problems
Hot Donemax Products

Clone hard drive with advanced clone technology or create bootable clone for Windows/Mac OS.

Completely and easily recover deleted, formatted, hidden or lost files from hard drive and external storage device.

Certified data erasure software - permanently erase data before selling or donating your disk or any digital device.